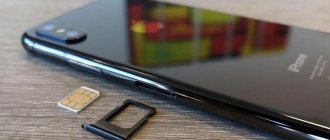
Dual SIM cards support iPhone, XS Max, iPhone 11 and iPhone 12. This allows you to use two mobile networks at the same time and separate work and personal phones to avoid unwanted contacts or use a more favorable tariff from another operator.
But, if other smartphones that support two SIM cards have special traditional slots for SIM cards, then Apple smartphones can use 2 different types of SIM cards: nano-SIM and eSIM.
If you have any problems with network communication or the operation of the SIM card, you can contact the iLab service center to troubleshoot the problem.
How to switch to another SIM card to make a call to a specific number
Before making a call, you can determine which SIM card the call will be made from. If the contact is already known and is on the favorites list, then you need to do the following:
1. Open Favorites and tap the “i” icon next to the contact.
2. Select your current phone number.
3. Select the second number from which the call will be made.
If you dial a number via the keyboard, you will have to do the following:
1. Enter the desired phone number on the keypad.
2. At the top of the screen, tap the number label assigned to the call.
3. Select a new number to dial from.
What is eSIM and how is it better than a regular SIM?
First, let's figure out the differences between eSIM and the regular SIM card that we are used to using. So, we know the second option very well: a small card that is inserted into a special slot, has a chip and gives us access to the mobile network of a certain operator.
What about eSIM?
eSIM technology is a non-removable chip built into new iPhone models (in fact, a regular SIM card in the new iPhone). When this chip is activated, it works exactly the same as a physical SIM card. An added bonus is that you can create multiple eSIMs, although you can only use one at a time.
For Android devices such as the Google Pixel 2 and Nuu Mobile X5, this is not a new technology at all, and Apple has used it in some devices such as the Apple Watch 3 and the iPad Pro. But the whole catch of the iPhone is this: on the device, in addition to the eSIM, there is also a standard SIM slot, which automatically made the iPhone a two-card smartphone.
Features of connecting an eSIM card
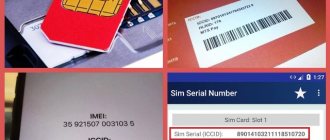
Once the eSIM card is connected to the device, all operator data will be stored digitally. To activate the functionality, you will need to install the operator’s proprietary utility and then scan a specific QR code.
QR code scanning sequence:
Did you like the article? Subscribe to our telegram channel. News comes out faster there!
- You need to go to “Camera” and point your device at the code.
- The user will instantly receive a notification about the possibility of activating the tariff.
- At the bottom of the screen, you must select the “Continue” function, and then “Add a cellular plan”.
Additionally, you may need to specify a digital password that will be sent in an SMS message. The connection will be made after specifying the correct digital code.
Instructions for activation using the utility:
- Launch the App Store, enter the name of the operator in the search, and install the application.
- Using the utility, pay for the tariff with the possibility of instant activation directly in the program.
New versions of iOS provide for manual assignment of a tariff plan by the user's operator. It is recommended to first consult with an employee of the company providing the service.
The operator's assignment of a tariff plan requires the following actions:
- A notification will appear indicating that the tariff is ready for installation, after which you must select it.
- Go to “Settings”, and then select the displayed function “Cellular plan ready to install”.
- Select the “Continue” action, which will be located below.
The developer implements the function of manual data entry when the operator is not authorized to make the settings automatically. Instructions for manual data entry:
- Go to device settings.
- Select the section with cellular communications.
- Select “Add new tariff”.
- At the bottom of the options, you must select the “Enter data manually” function.
Working with messages in iMessage, sending SMS and MMS
FaceTime and iMessage work from only one phone number. But you can change it if you wish. To do this you need to do the following:
1. Go to Settings → Messages.
2. Select iMessage & FaceTime Line.
3. Activate the desired number.
But SMS and MMS can be sent from any number, but the amount of payment for these services is set by each operator separately.
To switch the phone number for sending messages:
1. Log in to the Messages application.
2. In the upper right corner of the screen, select New.
3. Enter the contact's name.
4. Tap the phone number you are using.
5. Select the number from which the message will be sent.
How to set up an eSIM line using your operator's app
- Download your operator app from the app store.
- Follow the instructions to purchase a new cellular plan .
- Open Settings on your iPhone if you need to enter your plan details manually.
- Click Cellular .
- Click Add Cellular Plan .
- Click Enter details manually at the bottom of the screen.
- Follow the instructions to enter all the required details for your new cell phone plan.
We install the first SIM card in the tray
The simplest and most logical solution. My inner cap is happy.
On the one hand, a physical SIM card is easiest to remove and install, but on the other hand, you need to look for a paperclip to do this. And lovers of cases will not be delighted with the need to frequently change the SIM card.
Hence the conclusion - you need to install the most used SIM card in the tray, which you will rarely change.
Which SIM card to install: it is most logical to install a number for calls or the Internet as the main physical SIM card.
Of course, there will be no restrictions for this card.
How to Install Dual SIM Cards in iPhone
To remove the tray from the body of the device, use the supplied paperclip or similar tool - insert it into the small hole on the side of the phone and press.
The SIM card tray will slide out.
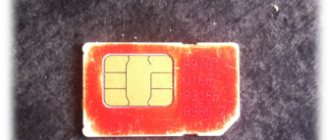
There is a bevel on the corner of each SIM card, which allows you to install it with the correct side.
The tray is designed to be used on both sides simultaneously. One card is inserted into the upper pad, and the second into the lower pad.
After this, carefully insert the tray with two nano-SIMs installed into the device in the same position as it was originally. You can only insert it on one side, so it will be very difficult to make a mistake.
It is important to take into account the fact that the SIM card is protected with a personal PIN code. If this ID number is used, note the location of each card in the tray. When prompted, enter the top and bottom card PINs respectively.
What you will need
- iPhone XS, iPhone XS Max, iPhone XR or later with iOS 12.1 or later.
- Mobile operator that supports eSIM cards
To use dual carrier services, your iPhone must not be locked to a carrier. Otherwise, both tariff plans must be from the same operator. If your first SIM card is provided by a CDMA network operator, the second SIM card will not support that network. For more information, contact your operator.
If you have a corporate cellular plan, check with your company administrator to see if this feature is supported.
Multiple eSIM support
By default, you can only use two cellular plans at a time. But when making calls, using the mobile Internet or sending messages, you can only activate one mobile network, just like with eSIM.
But the advantage of electronic SIM cards is that you can have more than one plan in eSIM, that is, use several numbers, but only one can be included. This means that other plans won't be used at all until you manually switch between your current eSIM plan and another eSIM plan on your iPhone.
How to use two electronic SIM cards on iPhone
Chances are, you probably already have a basic cellular plan on your iPhone 11 with a nano-SIM, for example. So to add an additional plan, such as: a work account, a local plan in another country (while traveling), a standalone plan, etc., you need to scan your carrier's QR code, use the provider's app, or enter the information manually.
However, before going any further, we recommend that you contact your carrier to transfer your current nano-SIM account to an eSIM to make it easier to connect your nano-SIM while traveling. If this doesn't matter to you, then you can simply activate the second or third line on the eSIM.
There are several options to choose from : Primary, Secondary, Personal, Business, Travel or Cellular Data
, but you can also enter your own label. After that, click "Done" to complete the setup. And there is always the option to change this later.
Once you've marked your new iPhone dual SIM line, you'll need to choose how the two plans will work together. To do this, by selecting “Default Line” you can configure one with these parameters:
- Use "[First Plan Name]" in the default line.
“[Supporting Name]” will be available for phone and SMS. This means that your first plan, being the primary one, will be configured by default for voice, SMS, data, iMessage and FaceTime calls. The second plan will be for voice and SMS only. - Use "[Supporting Name]" as the default string.
"[First name]" will be available for phone and SMS. This means that your secondary plan, being your primary one, will be set up by default for voice, SMS, data, iMessage and FaceTime calls. The first plan is for voice and SMS only. - Use "[Secondary Name]" for cellular data only.
"[First Plan Name]" will become your default string. This means your second plan will be set up exclusively for data (which is a good option when you're traveling), and your first plan will default to voice, SMS, data, iMessage, and FaceTime.
Now that your Dual SIM iPhone 12, XS, XS Max or XR is set up.
In the Contacts app, you can assign your SIM account to specific contacts, so it will always use that account for each person. When making calls, you can change the default line used for iMessages and texts, or you can switch when composing a new message. And this is just the beginning. iPhone chips iPhone chips
How to assign a name to each SIM card in iPhone
For ease of use of connected SIM cards, it is recommended to mark them. For example, one of them can be called “Personal”, and the second – “Work”. Such designations are useful when choosing a phone number to make a call or send a message, activate data transfer or for contacts.
Thanks to the designation of the SIM card (tariff), you can always understand which one is being used.
To change the designation, go to iPhone via Settings → Cellular, select the number to edit and click on the “Cellular Rate Label” button. Here you can choose a different name or set your own.