Hi all! In general, mobile Internet settings from Rostelecom are installed automatically the first time you turn on the phone with a new SIM card. If this does not happen and nothing works, then check that there is no SIM card icon in the upper corner of the screen - which may indicate physical connection problems. You can try removing and reinserting the SIM card. You can get Internet and MMS settings using the command:
*104#
After entering the USSD command, press the call button. If after this nothing works and the phone refuses to connect to the network, then you can try entering the configuration data manually. Let's look at how to connect and configure everything yourself.
NOTE! I checked everything described in the article myself, but if something does not work or difficulties arise, then write in the comments and I will definitely help you.
Setting methods
Today, Rostelecom distributes the Internet in GPRS, UMTS (or) and LTE (or 4G) networks. Configuring parameters for working in these networks largely depends on the characteristics of the mobile device and on the platform on which it is based, but in general, the procedure for all is approximately the same.
- As soon as you insert the Rostelecom SIM into your smartphone, you will receive an SMS message with network configuration parameters - you must accept them. In this case, you don't need to do anything else. The Internet will appear on your phone.
- If you did not have time to accept the parameters or accidentally refused, you can call the number: 88001000800. A company employee will tell you what to do and send a second message with the parameters.
- If the connection problem could not be resolved remotely, you can visit the nearest telecom store or operator’s office. In this case, Rostelecom employees themselves will set the necessary parameters and activate everything necessary. In some cases, a fee may be charged for this service.
- If the nearest office is far away or there is no desire/opportunity to leave the house, then below are instructions that you can follow to easily set up the Internet on your smartphone yourself.
What to do if you can’t set up your phone?
Even if you know how to set up Rostelecom Internet on your phone, the work does not always go smoothly. During the adding process, there may be failures or other problems due to which the user cannot log into the global network. Let's look at common causes of difficulties and actions that will help solve the problem:
- There is no money in the account. If there is no connection, check your balance. If the allotted traffic has run out, you can purchase additional minutes. When the package expires, top up your balance with the required amount.
- The settings are entered incorrectly, they are reset or they don’t exist at all. In this case, you need to repeat the steps discussed above and enter the information again. If all else fails, contact Rostelecom technical support and ask the operator for help.
- Mobile Internet is disabled. There are situations when the Rostelecom provider disconnects the user from the service. In this case, you need to check the connection status via the Internet or dial the technical support number for advice. The reason for the difficulties encountered may be restrictions that apply to a particular region. Perhaps there is simply no signal at the connection point. In this case, nothing can be done and you will have to wait until the connection appears. To clarify the situation, you can dial the technical support number, where specialists will tell you the reason for the shutdown.
In any current situation, there is no need to panic. If you were unable to set up Rostelecom mobile Internet the first time, call the operator, visit one of the sales points, or chat with a specialist via mailbox. As a last resort, you can call a technician who will provide personal assistance and enter the necessary settings. In practice, such a need rarely arises, because in 90% of cases the settings are installed automatically.
Automated setup
As soon as the user has installed a new SIM in the mobile device, a system message will pop up on the screen containing mobile Internet parameters. Do not rush to close this window: always carefully read what comes to you. You must accept the settings to automatically configure your phone. If there is no message, then you can request it using a special USSD command: dial *104# and press dial, after a while you will receive a message. You can also request the parameters again from the technical support operator, or you can request the parameters on the website: //rt.ru/ .
As soon as the user has accepted the parameters, a connection called “Rostelecom” is automatically created on the smartphone. The name of the access point can always be changed; it does not affect anything.
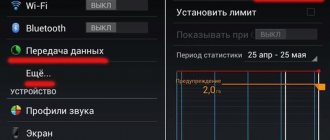
Users complained about Rostelecom's failure
There was a failure in the work of the Russian telecommunications. Problems were reported by users of the Downdetector portal, which records problems and outages of popular Internet resources.
Complaints about problems with Rostelecom began to arrive at around 17:30 Moscow time. In total, more than 200 people reported the outage. It is noted that 74 percent of users encountered problems with the fixed Internet. Another 16 percent reported no signal. Others noted that they experienced a complete shutdown.
Most of the requests came from large cities in Russia: Moscow, St. Petersburg, Nizhny Novgorod, Yekaterinburg, Krasnodar and Rostov-on-Don.
The previous major failure of Rostelecom occurred in March. Then users complained about problems with the Internet, failures of all company services and problems with television.
Manual setting
If Rostelecom's Internet does not work, then this is a configuration problem in the device, because the service is connected by default and does not need to be activated. If for some reason you turned it off (maybe you went on a business trip abroad), then you can activate it in your personal account or by calling the provider’s technical support. Once you have made sure that the data service is activated, you can begin setting up the settings.
In your smartphone you need to find the section for creating/setting up an access point. This section specifies the data that is necessary for the operation of the Internet from Rostelecom.
- While in the access point settings section, create a new point.
- Specify the name of the new access point (or connection profile). You can set any name.
- You don’t have to write anything in the “Home Page” line; during automatic setup, rt.ru is written there.
- In the “Select standard” line, select automatic.
- In the apn line we enter internet.rtk.ru.
- In the “Identification” line, select “Normal”.
- In the “Registration method” line, select “Auto”.
- In the “Session” line, select “Temporary”.
In some cases, you may need to disable network/communication protection and specify the country and cellular network code (250 and 39, respectively). All other lines with unclear IP or DNS, as well as lines with login and password, are left empty or with the values that were there.
Let us remind you that these are general steps when setting up the Internet; below we will analyze the procedure for specific mobile platforms that are the most common.
Why the Internet from Rostelecom may not work
Rostelecom does not have the Internet.
What to do if the user finds himself in such a situation? There is no limit to surprise - after all, everything just worked! However, the Internet access icon has disappeared, and we have to look through the possible reasons. You can quickly fix some problems yourself and continue working. Therefore, you should not call your provider in a panic. In fact, it is quite rare to call technical support. In most cases, the user can solve the problem on his own. Here are the three most common reasons why network access may be lost:
- Forgot to pay. Fortunately, the provider provides several ways to pay the subscription fee: through your personal account, application or payment terminal. You can pay for services remotely; you don’t have to be at home.
- The router is not working. If after a reboot nothing has changed, you need to contact technical support. However, in most cases the network icon appears and the person returns to work.
- Problems on the service provider line. This can happen, but Rostelecom has a reputation as a reliable provider, and disconnections are extremely rare. Therefore, this possibility is tested last.
Most often, the reason for the lack of Internet is simple. If we consider communication with technical support as a normal routine procedure, then everything will be resolved quickly and the user will be able to continue working.
iOS
Setting up the Internet configuration on Apple devices of older versions of the OS differs from that on the latest versions. In any case, you need to go to the Network settings, which are often combined with the MMS settings.
- In the iPhone settings, in the cellular section, you need to activate data transfer.
- In the APN line you need to enter internet.rtk.ru.
- We leave the “Login” (“Username”) and “Password” lines blank.
- In the standard selection line, select automatic (sometimes indicated as mixed).
- To enable support for the 4G standard, activate the LTE module with a switch.
Initial connection
The initial connection process is similar for all types of wired routers. Manufacturers try to indicate clear and similar symbols on different models and be sure to indicate detailed instructions in the documentation.
Connection diagram
To set up a Wi-Fi router, first follow the preliminary steps:
- Connect the router's power cable to the electrical outlet and insert it into the “Power” connector on the back panel of the device. In Figure 1, the connector is labeled 2. Make sure that the device operation indicator lights up. As a rule, it is indicated by a classic icon - a line partially or completely inscribed in a circle. For an example of designation, see Figure 2 under number 1.
Figure 2 – Router indicator panel
- Insert the Internet cable into the appropriate connector. It is usually located first, separated from the rest by color, distance and/or frame. Below it is the designation “WAN”, “INTERNET”, “NET”, a drawing of our planet or any other commonly used designation. If everything is done correctly, another indicator will light up on the front panel. It is marked in the same way as the connector. See example designation in Figure 2 under number 4.
If you are connecting an ADSL modem, you will not be able to physically insert the Internet cable into the wrong connector - it differs from the others in size and number of contacts.
- The next step is to connect your computer. You will need a regular network cable. The short version is always supplied with the router. If you don't have enough length to connect, measure and buy, it's inexpensive. Insert one end of the crimped cable into the LAN connector of the computer, and the other into a free connector of the router. Suitable connectors are numbered and highlighted with the word “LAN”. See an example of the designation in Figure 1 under number 4.
- If the router has preset wireless connection settings, the Wi-Fi indicators will also blink. They are indicated by three brackets of different sizes, which are nested within each other. Brackets can be positioned either vertically or horizontally. See example number 2 in Figure 2.
After connecting, proceed to setup. It has its own characteristics for each model and manufacturer, but the general algorithm remains unchanged and is divided into 2 types:
- Automatic setup.
- Manual setting.
There is a third configuration option - using a program installed on your computer. It is usually supplied on disks. But this setup process is a thing of the past.
Android
Android smartphones support the operation of two SIM cards simultaneously; this must be taken into account initially, before installing the SIM card into the device. Typically, only one slot in a smartphone supports 3G and higher standards. The slot supporting these networks will be marked, and the SIM card must be inserted there.
To set up the Internet on your smartphone you need:
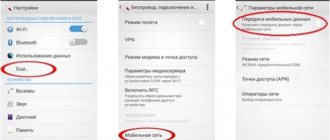
- Go to settings, go to “Mobile networks”.
- There select “Access points”.
- In this section, we create a new point, give it a name (any name is possible), and enter internet.rtk.ru in the APN line.
We leave the rest as is. For 4G to work on your phone, just select “Automatic” in the “Select standard” line. The phone will switch to a higher standard if you are in coverage area.
Automatic
After installing the SIM card, an SMS with settings from Rostelecom arrives on your smartphone. A person needs to read and accept the data. If the information did not arrive or other parameters were previously received on the SIM card, you can go in the following ways:
- Call customer support. Rostelecom's hotline number operates 24 hours a day - . The specialist answers any questions and sends an SMS with settings, if required.
- Visit to the company office. Rostelecom employees help with troubleshooting connection difficulties and tell you about the rules for using the Network.
If you were unable to install automatic Rostelecom Internet settings on your phone, you can enter the data manually.
Windows Phone
If you still have a smartphone on the Windows Phone platform (support for the operating system has been discontinued by Microsoft), then setting up the Internet proceeds according to the following scheme:
- In the settings section, go to the “Data transfer” item.
- Add a new access point (set any name).
- In the apn line we write internet.rt.ru.
- We leave all other lines as they are.
- Click on the checkbox below to save the settings.
If the correct data was entered (without errors), then when you launch the browser this will be visible immediately, you will be taken to the start page, various services will be displayed. If something was entered incorrectly, a warning will appear in the browser that there is no Internet connection. In this case, you need to double-check the entered data. In principle, only the apn address is important there; enter it carefully, without making mistakes.
Installing drivers
Modern routers are devices that solve problems independently. Manufacturers have already taught them to communicate with most modern operating systems. Therefore, when connecting a router, you do not need to install any additional drivers on your computer.
The only driver that should be is the driver for the network card. In most cases it is already installed.
Routers have their own software that needs to be updated regularly. This is what is most often meant by the word “driver” in such situations.
Updating the router firmware is simple, but in its own way for each firmware version. Go to the router configuration system; we will describe how to do this after the next subheading. Next, find the section called “Settings” or “Administration”, in it look for the section with the word “Update”. For example, in the screenshot below (Figure 3) the section is called “Firmware Update”. In it, click on the “Check” button, and the system will determine whether a new firmware version has been released. Depending on the result, the page will display a message that no update is required or display a Download button.
Figure 3 – Router configuration system
Updating the router is required for several reasons:
- no program is perfect. During operation, errors and problems encountered by users are identified. The developers are fixing them and including them in the next update;
- Technologies are developing not only in routers, but also in user devices. In smart homes, even bedside lamps, not to mention TVs, work via Wi-Fi. In order for the router to communicate with new devices, programmers write new instructions for it, and you install them.
We recommend that you do not neglect updates and check them at least occasionally.