Any modern home is literally crammed with modern technology, which can be controlled by both push-button systems and electronic applications. Not so long ago it became popular to use even mobile applications for starting a vacuum cleaner, stove, turning on the TV, which are controlled via a wi-fi signal; it is also used for surfing the Internet, watching programs, playing games, etc.
But sometimes the use of such a communication channel is limited by a number of factors, which is why many try to figure out how to strengthen the signal of a wi-fi router. To do this, you can use one of several methods.
Minimizing exposure to other devices
Features of signal transmission require the need for its distribution in space. Alas, in open areas the coverage radius will actually be quite large with excellent signal quality. But in a room with reinforced concrete walls, a large amount of furniture and, most importantly, sources of electromagnetic radiation, the propagation of waves encounters a huge number of various obstacles. Of course, not all factors have the same degree of impact.
The most active are:
- microwaves and other high frequency devices;
- industrial frequency electrical appliances powered from a household network;
- amateur radio equipment for broadcasting.
Make a directional wave Wi-Fi
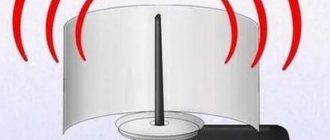
This method is aimed at narrowing the direction vector of the signal from the router. That is, the modem should distribute Wi-Fi not over 360°, but in a narrow direction. When implementing this technology, the rest of the signal will be reflected and redirected in the required direction, so that you get the maximum effect from the router.
In practice, this method looks somewhat primitive: you need to cover the back of the antenna with a metal screen. The simplest option is to cut an aluminum cola can, bend it into a semi-arch, and install the structure directly behind the antenna.
Read also: Stuffed pancakes with meat
WIFI signal reflector
To understand: the area behind the screen made of aluminum or tin will be non-working. The signal will be reflected from the foil and redirected in the form of a beam from a concave directional parabola to the PC.
Strengthening the signal in the router settings
If the installation location of the router is already chosen optimally, you can try to change the efficiency through the router settings. Not all software sets maximum or even optimal data transfer parameters. Therefore, one of the ways to strengthen the Wi-Fi signal is to manually configure the wireless network. Let's look at the most popular and accessible methods.
Increasing transmitter power
The vast majority of users are firmly convinced that their router operates at maximum power, but this is not always the case. In the technical parameters for your home network, you can specifically check the power level and, if desired, set a different one. To do this, on the control panel, for example, you need to select the “Wireless Network” menu, then click “Professional” and in the window that opens find the “Power Management” item. This control is typical for ASUS routers and the like; here the change is made by moving the flag, which is accompanied by the display of power as a percentage.
Other router models may have different power control options. For example, for Tp-Link routers you will need to go to the “Wireless” menu, then select “Wireless Advanced” after which you will need Transmit Power, where you can install:
- High is the closest to 100% transmitter power;
- Medium – average, corresponds to half of the adjustable limit;
- Low - the minimum power that the wi-fi adapter can provide.
And for a D-Link router, you need to go to the “Wi-Fi” menu, then to “Advanced” and then in TX power select in % select the signal strength value (see Figure 1).
Power increase
Change channel
The thing is that to broadcast Wi-Fi routers use different transmission channels. Due to the presence of adjacent devices or apartments in which other routers are also running, the same channel can be overloaded with a large number of signals, which significantly narrows the maximum range of your device.
To select a Wi-Fi channel (using D-Link as an example) on which the broadcast will take place, you will need the “Wi-Fi” menu, which contains the “Basic Settings” item, where the corresponding channel is set. As a rule, the default is automatic selection, but note that when choosing any of the proposed ones, you cannot guarantee that it is not already busy, so you can use a special program, for example, inSSIDer, to search for free channels.
Change channel
Transition to the 5 GHz band
Another method is to transmit the router's Wi-Fi signal at too low a frequency. Quite often the 2.4 GHz range is typical for older devices with one weak antenna. But even with the development of technology, many manufacturers left this indicator in the same area, but not higher than 3 GHz, so that old-style wi-fi receiving devices could work normally.
If your router provides a much larger frequency range to choose from, it is much more profitable to install 5 GHz - this will significantly increase the intensity and coverage area of wi-fi.
Changing the wireless network mode
This option is designed for those routers that operate in the standard universal mode b/g/n (11bgn mixed). It can be perceived by literally all devices that use wireless Internet.
But if all of your wireless receivers are new, you can change the legacy mode to the new 802.11N standard, which will lead to a significant improvement in signal strength. To do this, in the “Wi-Fi” menu and then “Basic Settings” you need to select the “Wireless Mode” tab and select the “802.11 N” item there (see Figure 3).
Rice. 3. Mode change
Installing alternative firmware (DD-WRT)
This method not only helps to increase the signal strength, but also restores its stability, so you no longer have to reboot your Wi-Fi router frequently. To do this, you just need to download the utility from: https://dd-wrt.com/support/router-database/ and install it through the file system:
- select the “System” menu;
- A window called “Software Update” will open on the screen;
- in the “Select file” field, specify the path to the downloaded firmware, as shown in Figure 4:
Rice. 4. Installing DD-WRT firmware
- give the command to update the firmware by clicking “Update Software”.
Please note that this method is only suitable for experienced users, since the program is selected for a specific model of Wi-Fi router and in case of an error, the router can be damaged.
What affects the Wi-Fi signal and coverage area
Neighborhood Wi-Fi networks. The first and most critical factor affecting the quality of a router’s wireless network is not a microwave, as many people think - no. This is most influenced by the same routers that neighbors have. And if this is not yet evident in the currently new 5 GHz range, then in the usual 2.4 GHz range a critical situation has now developed. The more neighbors you have with Wi-Fi, the worse the signal from your router covers your apartment. Due to interference from neighboring devices, your wireless access point will lose almost half of its power even at a distance of three meters. That is, previously one router worked without problems throughout the entire area of the apartment, but now only on half.
Read also: Prohibit test word
Obstacles in the signal path. This is not only the walls and ceilings of the room, but also furniture, household appliances, interior and metal doors and everything else that is located between the Wi-Fi router and the client device: phone, tablet or laptop. In my practice, there was a case when the access point was in a shielded room and as soon as the door was closed, the network disappeared. I’ll say right away that what the Wi-Fi signal dislikes most is fittings and expanded clay, sheet metal, steel frames and shelving, water supply pipes, large wall-mounted aquariums and mirrors.
Appliances. Here, in addition to the same long-suffering microwave, you can add a bunch of other equipment - large LCD TVs and plasma panels, cordless phones, Bluetooth speakers, baby monitors. Even a long USB 3.0 cable lying along the wall can also negatively affect the quality of the wireless network.
Strengthening with additional devices
In addition to programmatically changing the operating parameters of a wi-fi router, special devices can be used to improve its signal and increase the coverage area. This approach would be appropriate if none of the software methods gave the desired result and the wi-fi router did not improve the signal due to operating at its maximum parameters. It may also be of interest to anyone who likes to make things with their own hands, or somehow improve wireless adapters.
Replacing a standard antenna with a more powerful one
Each wi-fi router has a different design - some have only one antenna, others have two or three. The number of antennas determines the signal density; the more there are, the stronger the signal the router has. But not only the number of antennas determines the quality and speed of the Internet; it is also important to consider the power of the antenna.
Antennas for the router
Therefore, if the router has a free connector for installing another one or you can replace one of the weak ones, purchase a more powerful antenna. Preferably at least 5 dB, if possible, then 7 dB. Please note that to replace the antenna, you can take a model with a cord; it can also be installed at a distance from the router, which can significantly improve the Wi-Fi signal or move the access point.
Repeater installation
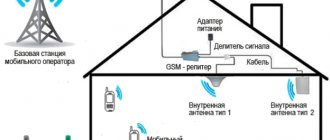
Due to the fact that the router’s wi-fi signal gradually decreases over a distance, after 30–50 meters it will become so weak that not a single device will be able to connect to the Internet. Therefore, to strengthen the signal, you can install a special device - a repeater that repeats the broadcast over a given distance. Setting up the repeater is quite simple - it is connected to the network and it starts working together with the main router.
Repeater Application
In addition, in repeater mode, instead of a repeater, you can install another router. It is also installed in the location where you want to strengthen the signal. In practice, it is justified to use one, maximum two routers in repeater mode.
Installing a wi-fi amplifier (booster)
This method allows you to strengthen the signal by increasing the gain. This is not a stand-alone device, unlike a repeater, but an integral part of the same wi-fi router. The amplifier does not work on its own, but it can significantly improve the signal and transmission speed due to its own antennas.
To connect it, use the antenna connector on the router. Due to models with directional antennas, it is possible to improve reception and search for a network in a specific area or direction.
wifi booster
Place the router closer to the center of the room
Another reason for the occurrence of dead zones is the poor location of the access point. The antenna emits radio waves in all directions. In this case, the radiation intensity is maximum near the router and decreases as it approaches the edge of the coverage area. If you install an access point in the center of the house, the signal will be distributed throughout the rooms more efficiently.
A router installed in a corner transmits some of the power outside the house, and distant rooms are at the edge of the coverage area.
Installation in the center of the house allows you to achieve even distribution of the signal in all rooms and minimize dead zones.
In practice: Installing an access point in the “center” of the house is not always feasible due to the complex layout, lack of sockets in the right place, or the need to lay a cable.
Useful tips
The above methods are a powerful tool for improving broadcasting by a router, but they are not enough. Therefore, we will further add to the above methods a few more practical tips that will also help strengthen the wi-fi signal.
Setting up the receiver on a laptop or computer
Both stationary and portable types of equipment have built-in Wi-Fi signal receivers. And if they work incorrectly or the adapter’s parameters are weak, no actions in the router interface or with its antennas will give you any positive results.
In such a situation, setting up a wi-fi signal receiver through the Control Panel will help. Or installing an additional antenna for the adapter.
Replacing the router with a modern one
It’s also worth noting that you won’t be able to endlessly upgrade all routers to strengthen the signal. In some cases, you simply need a new router, so if you decide to purchase one, make sure that the model is equipped with two to three antennas and broadcasts within 5 dB.
Choosing a router location
In addition to devices that emit strong electromagnetic radiation into the surrounding space, pieces of furniture with thick walls made of pressed sawdust, foil insulation, iron structures and other interior details also play an important role. Therefore, when choosing the location of the router, it is important to ensure that the Wi-Fi signal propagation path is minimally blocked by such obstacles.
It is also important to take into account at least approximate receiving points so that the router has as equal distance from them as possible. The ideal option is to install it in the middle of the home or distribution area, but in practice this is not always possible.
Selecting a location
Reboot your router
This method is associated with temporary difficulties in broadcasting the signal, when you cannot connect to the network, the gadget shows a weak signal level or its absence. In most cases, rebooting the router to resume normal signal transmission is done using a special button, but this action is not always enough.
Router reset button
If rebooting the router with the button was not enough, you can do this by disconnecting the power from the network. Such drastic measures require 15 minutes to reboot the device, after which the power supply is plugged back into the outlet.
Changing the installation location of the Wi-Fi router
When purchasing equipment, the first thing consultants pay attention to is the layout features and area of the room. If the house has plasterboard or reinforced concrete partitions, then the location where the router will be installed should be chosen more carefully. The router is installed in the central part of the house so as to distribute the signal evenly throughout the network. An obstacle to the full operation of the router can also be the close proximity of DECT phones, microwave ovens, etc. If it is not possible to buy a dual-band router, then the best way to strengthen the signal is to place these devices as far from each other as possible.
Read also: 11 ways to MAKE ONION FLOWERS
Replacing a WiFi adapter on a laptop
Changing the Wi-Fi module on a laptop is not difficult, especially there are models that have a cover on the bottom. When you open it you will see this module. You can buy another adapter that will connect via USB. Often, such adapters have an external antenna that enhances wifi on laptops, which you can replace in the future with a more powerful one.
Replace standard antenna
If you are an experienced Internet user, then you probably have several old routers lying around in your closet. Try matching an antenna from another modem to your router. The length of the antenna has nothing to do with it - what matters is its design, which determines the power. Therefore, if the antenna fits the mount (standardly it is a regular threaded socket or a smooth pin connector), try it. If the antenna on your router is mounted monolithically with the case, this method will not work unless you are a jack of all trades.
If your modem has an additional connector for a free antenna (there may be two or even three), supplement your antenna with a more powerful one or the same one. Recommended antenna power is 5-7 dB. In addition, the antenna can not only be mounted on the router body, but also installed in another place by connecting it to the modem with a cord. This method will significantly expand the free access area and improve the performance of your router.
Recommended antenna power is 5-7 dB.
Using programs we strengthen the Wi-Fi signal
Usually, after purchasing any equipment, people don’t really like to look at the instructions that come with the device. It’s no exception with a router; few people pay due attention to setting it up. Usually, the entire setup ends after entering the Wi-Fi network password and SSID; all other settings are left at default. Therefore, in the process of using wireless Internet, all sorts of problems arise, such as: weak signal, low speed. Let's figure out why this happens and how you can strengthen the WiFi signal
Selecting a WiFi radio channel
Having installed a router in an apartment, many did not think about the fact that the neighbors below, above, and on the side also installed a router. Why is this bad, you ask? And because there is a high probability that the channels in which the routers will operate may intersect. On many routers, channel 6 is set by default. Just imagine, all your neighbors, like you, are broadcasting on Channel 6, the result of such work is a decrease in signal level and a drop in throughput.
InSSIDer utility
Therefore, during the setup process, do not be lazy and download a utility that will help you decide on the choice of channel for broadcasting. For example, let's take a program that is easy to use and popular - InSSIDer . This utility can scan the radio broadcast well and produce a large amount of useful data, thanks to which you can decide which channel is most suitable for you.
Acrylic Wi-Fi app
Also no less popular is Acrylic Wi-Fi . There is a free version and a paid version, which adds advanced features. The application can scan channels in all modes in the 2.4 and 5 GHz range, and competently analyzes the distribution of channels.
How to remove power restrictions in a router
In most countries, routers have power limits of up to 100 mW. There are only a few countries in which there are no restrictions, one of them is Bolivia, thanks to this there is a loophole with which you can increase the transmitter power.
- Install Kali Linux or just Linux.
- In the terminal, enter the commands: ifconfig wlan0 down macchanger -r wlan0 iw reg set BO iwconfig wlan0 txpower 400mW ifconfig wlan0 up
The value 400 mW means power, you can start with 200 mW so as not to burn the transmitter.
You can also try the second method to increase power. To do this, you need to enter the command wl -i wlan0 txpower 100, where 100 is the power you set, and wlan0 is your adapter.
Minimize router usage on 2.4 GHz frequency
The main reason for the weakening of the router signal is nearby household radio electronics and devices. This can be any equipment - subwoofers, radio telephones and intercoms, microwave ovens and any household appliances on the remote control, wireless security, surveillance and security systems, etc.
Try to calculate the direct (shortest) route for the Wi-Fi signal to propagate from the router to the PC or laptop, and remove all electronics from this area. Or at least replace it with equipment without radio emissions. Checking the emission of interference and signal suppression of the router is very simple: just turn off nearby devices one by one and monitor the level of the Wi-Fi signal. This method, although approximate, often works.
Wi-Fi interference emission test
Use modern technologies
One of the best ways to make your wireless network as fast, stable, and secure as possible is to use modern equipment.
Communication standards are constantly evolving and improving. New implementations of this protocol provide faster connection speeds, reduce errors and susceptibility to interference.
However, to use them you need the appropriate equipment. Therefore, the most radical and expensive method of improving the quality of your home network is to purchase a modern dual-band router from a reputable manufacturer.
Install alternative firmware
Alternative firmware is written by enthusiasts to eliminate the shortcomings of proprietary software. The most famous project of this kind is DD-WRT. This firmware supports a wide range of equipment and is distributed completely free of charge.
Installing third-party firmware allows you not only to improve network performance, but also, in some cases, to activate previously unavailable device functions. However, it is worth considering that the process of flashing and subsequent configuration of the equipment will require time and special knowledge from you.
Changing the router location
Method No. 10
In many cases, to enhance Wi-Fi signal reception, it is enough to move it to another location. Owners of connection points make the same mistake - they install a router at the entrance to the premises or in the most remote room. Thus, half of the signal is wasted. The router distributes communications around itself. Thus, it needs to be installed as close to the center of the room as possible. This may cause some difficulties, since all the wires will have to be pulled to the center of the room. And this is not always convenient. However, moving your router even slightly can improve Wi-Fi reception away from your router.
When reinstalling your device, remember that walls are the main enemy of a wireless network. The connection will be stronger if you place the device in the center of a large room. Place the device higher. Do not place it on the floor.
Read also: Beard grows in different directions
Method number 2. Experimenting with frequency channels of wireless networks
Once you look at the “Remote Access” tab on your computer (bottom right), you will see a list of private networks deployed on the same frequency as your router. “Why do I need to know about the existence of other networks?” - you ask. The thing is that each of them takes up part of the channel, reducing the range of your router. To avoid such unwanted interference, you need to switch to another channel. This problem is solved using a special program, for example, inSSIDer. It is installed on the PC and launched. The program will provide you with data about the available wireless networks in your county, and what channel each one occupies. Having selected a free one, configure the device: go to the “Wireless Network” tab and select the “Channel” line. After selecting a free port, confirm the actions by successively clicking on “Change/Save”.


