Equipment and gadgets
26.06.20191491
If you urgently need to create a wireless network, you should try distributing Wi-Fi from your phone or computer, but this option is only suitable as a temporary measure - sooner or later the user will have to get a full-fledged router. One of the best manufacturers of wireless routers and related equipment is TP-Link; It would be right to choose her. Let's try to figure out how to connect and configure a TP-Link router.
Before turning on
The main function of the router is to create a local wireless network that connects computers, laptops and mobile gadgets within the home/office. The second, no less important task is connecting this network to the Internet. Therefore, before turning on the router for the first time, it is advisable to have the connection settings with the provider at hand. They are usually specified in the contract or in separate instructions from the provider. If there are no settings, then when connecting you need to call technical support and ask for this information.
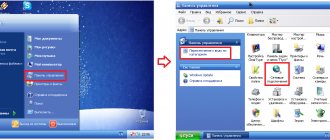
Before turning it on, you need to look at the bottom of the case: in TP-Link models, the following information is needed to configure the router:
IP address: usually 192.168.1.1
· Login: admin
· Password: admin
If the values in your model are different, it is better to rewrite or remember them in advance.
Possible errors and problems
Most often, when setting up a router from TP-Link, users encounter errors that say “No Internet access” or “Restricted”.
Do not be afraid of this problem; most often the problem lies in three aspects: incorrect router connection settings, faulty connection ports or incorrectly connected cables. If you have a problem like this, you should check these three points first. Just try different LAN connectors, use a different cable and carefully check the connection again according to our instructions. You can try resetting the settings. If this does not help, then seek help from a specialist or provider, who will be as accessible as possible and simply explain the essence of the problem and its solution.
Connecting to a router
If everything is in order, then after 20-60 seconds the router is completely ready for use. This time is needed to download the firmware. Indicators - LEDs on the front panel will help you find out about its performance. By the way, on TP Link routers these “lights” glow with a soft, pleasant light, without irritating even in the dark. Indicators are equipped with icons or inscriptions. From left to right:
· Power indicator: When the device is turned on, it should always be on.
· Internet: shows the functionality of the Internet connection. Doesn't work when first turned on; in online mode it flickers or lights up constantly.
· ADSL or LAN; 3G, 4G for Beeline and other mobile operators: depending on the type of provider, shows the presence of a signal from it. When you turn it on for the first time, it may blink, or it may be off.
· WLAN (WiFi/Wireless): access point indicator. Flickers or lights up when first connected.
· WDS: not present on all models, it is responsible for expanding wireless network coverage.
· Other “light bulbs” may be present - USB port, QSS fast connection, 2-6 local network ports, etc. It is normal if these indicators are not lit yet. If the device is used as a repeater, the light signaling may be different.
Do you need a backup?
If you don’t want to be periodically upset because your router settings have been lost, I advise you to read all further text very carefully. Here is an algorithm for creating a backup copy of your router settings:
- Go to your router settings.
- Go to the “System Tools” item, “Backup and Restore” sub-item.
- In order to save your settings to your computer, you should click the “Backup” button, after which it will be saved in your “Downloads” with the bin extension.
That's all: now you have a file with your settings, and you no longer have to wonder what to do if your router settings are lost. You just need to click on the “Select file” button opposite the “Settings file” inscription, then on the “Restore” button, and your device will be adjusted to the data saved in the downloaded file.
Sometimes users wonder how to remove router settings from a computer? It is necessary to clarify what is meant: if the file contains data, then you can simply move it to the trash; If we are talking about completely deleting network settings, you need to look in the control panel for the network to which you are connected and click on the “Forget this network” item.
Connecting a PC to a Wireless Network
A smartphone/tablet is also suitable for setting up a TP-Link modem, but we will consider the good old connection from a PC or laptop. If the router is working, then it is already “distributing” the wireless network (or expanding its coverage area using WDS technology). It is called standard and boring - like TP-Link_15616, and is visible from any device. It works without a password and this needs to be changed as soon as possible.
We connect the computer to the new Wi-Fi network. The wireless connection icon in the Windows tray will be crossed out with a cross (or another icon of missing Internet).
You can configure your TP-Link router through a browser. We enter 192.168.1.1 (without www) into its address bar: this is the router’s control panel. Remember - the IP address, plus the login and password are printed on the bottom of the case? So, instant authorization - and we are in the depths of the access point. If it is possible to change the language, then in the case of TP-Link you can do this with confidence: the company is famous for its decent translation of its firmware.
How to connect a device to a network, PC or laptop
The procedure for setting up a router does not cause much difficulty. This is done for 5-10 minutes. Follow the steps in the following instructions one by one:
- Find the optimal location for the device. The network and power cable should not be under tension or create problems for the user when pressing buttons (WPS/Reset).
- If you have a Wi-Fi router with removable antennas, screw them into the correct places.
- Plug the power supply into the outlet and insert the end of the wire into the appropriate socket. Make sure the power indicator light turns on.
How to connect a device to a network, PC or laptop - The Internet cable is inserted into a port called WAN or Internet. It is often visually distinguished by a different color.
- Connect the LAN inputs of the router and the network card of the computer/laptop with a network cable.
How to connect a device to a network, PC or laptop
Models with Wi-Fi i can be configured over the air. This is relevant if you are not able to connect the router to your computer via LAN. This completes the manipulation of the wires. The process then continues in the web interface.
Everything about wireless router settings
Step-by-step instructions - connecting to the Internet, setting a network password, advanced parameters: WDS, MAC addresses, connection encryption algorithms.
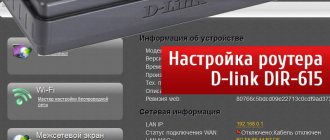
TP-Link control panel home page
You cannot change anything on the main page (Device Info) - this is a purely informational section. At the top there is information about the firmware and model version, below are the current indicators of the access point and connection with the provider, as well as the date and time.
Attention! When the router is fully configured, all values in the Device Info table should have non-zero values. If there are zeros anywhere (or values like 0.0.0.0), there is something wrong with the connection. True, the repeater mode allows zero values.
Changing the password on TP-Link routers
Changing your router password is a quick and simple procedure:
- You need to log into the web interface and open the “System Tools” tab.
- Next, click on “Password”.
- Now new data is entered, the information is saved, and the router reboots.
It is worth remembering that when changing the password you will have to enter the old data again.
Some router models feature an updated web interface design. You can change the password in them in the “Additional tools” - “Administration” tab.
How to connect a router to the Internet
Connecting and setting up the Internet occurs in the Quick Setup section of the side menu on the left. In other models, this section may be called WAN Settings / WAN Configurations.
How to connect a TP-Link router to the Internet: WAN and ADSL settings
In this section, it all comes down to entering 2-5 connection parameters that are provided by the provider. In our example it is:
· connection method (WAN Link Type): PPPoE mode;
· VPI/VCI values set to 0 and 33;
· login (PPP Username) and password (PPP Password) for authorization with the provider (not to be confused with the login-password of your personal wireless network!).
Each provider has its own settings: for Beeline they are one, for MTS they are different. Although they differ slightly, you should check with your Internet operator. In any case, to connect the router to the Internet you will need to enter no more than a few values. When the router is working as a repeater, it should not be configured to connect to the Internet. These parameters are needed only for the access point.
Instructions for setting up a router
Setting up a router is a whole set of measures that will be very difficult for an untrained user to understand. We have prepared step-by-step instructions for you, in which the information is laid out clearly, constructively and consistently.
How to connect equipment
Before setting up the router, you need to connect it to a computer or laptop. In order to quickly connect a TP-Link router, you first need to make sure that you have a LAN cable and a WAN cable.
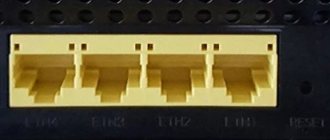
On each laptop, on the left side of the case there is a LAN connector designed to directly connect the router to a device that will use the Internet signal within the same room. On TP-Link routers, LAN connectors are located on the back of the router and are marked yellow.
Router setup diagram
The WAN cable is designed to connect the Internet to the router, which will allow you to use the Internet not only for the computer connected by the LAN cable, but also for other devices within the signal radius. Almost every home has a network cable. First make sure that the provider has carried out the setup and that the required cable has been installed in the apartment. If so, then simply connect it to your TP-Link router using the WAN port on the back of the TP-Link router. Typically, this connector is located on the same row as the LAN connectors on the left/right side.
Having found out why the ports on the back of the TP-Link router are needed and what they are responsible for, we perform the following steps:
- Plug the router into a power outlet;
- Insert the wire from the power supply into the corresponding “Power” connector on the back wall of the router;
- Using a LAN cable, connect your computer/laptop to the router, inserting the cable into the required connectors;
- Find the WAN cable from your ISP in your home and connect it to the router by plugging it into the blue WAN port.
The connection is complete. After this, the router functions are directly configured.
A video interpretation of the text instructions for installing a TP-Link router is available at the link:
How to enter router settings
To successfully set up a Wi-Fi router from TP-Link, you must have Internet access from the connected WAN cable from the provider. After connecting the router to the network, an access point is automatically created, the name of which corresponds to the router model. Such a network does not have a degree of protection, which means that access to it is not limited to anyone. To fix this, the user must go into the router settings.
There are two ways to configure a TP-Link router: software and using the web interface. The first method has become obsolete for a simple reason: no one uses disks, and proprietary software from TP-Link is supplied on disk media. The second method is better because it is always available and easier to navigate.
How to enter the settings of a TP-Link router:
- Open any internet browser (Chrome, Mozilla Firefox, Microsoft Edge, Opera, etc.).
- Enter the address “192.168.0.1” or “192.168.1.1” into the address bar. These addresses are universal for most routers of all manufacturers. If you can’t access one at a time, then try using another, one of them will definitely lead the user to where he needs to go.
A window will pop up asking you for login information. It requires a login (username) and password. There are two options: use universal data (login - admin, password - admin) or use individual login details. If you turn the router 180 degrees, you will see a sticker with technical information and two columns - “Username” and “Password”. Use this information to login.
You have entered the TP-Link router settings interface. On the left is a navigation panel that contains sections and subsections of all possible router settings. In the middle there is a work area.
How to set up a modem
Automatically
If you want to set up a TP-Link router quickly and without unnecessary discussions about the modem’s characteristics, then “Quick Setup” was invented for this.
This function is located in the web interface on the left navigation panel, second position. It only requires filling out a few fields. Depending on the connection type, four connection options are presented:
- Auto-detect – Let your router automatically detect the type of connection provided by the Internet service provider you use;
- PPPoE – when setting up using this type of scheme, the Quick Setup function will only ask you to come up with a name and password;
- Dynamic IP - this scheme involves connecting using DHCP (we will consider further), and it will require you to come up with an SSID, select the type of network encryption and come up with a password if the network is protected;
- Static IP - here you will need the most detailed information not only about future network data, but also about the numeric codes of the IP address, subnet masks, main channel, DNS servers (main and alternative).
Manually
The most important thing when setting up a router is to provide the computer and connected devices with access to the Internet. Doing this automatically or manually does not matter. Automatically is more convenient, but setting it up manually will allow you to learn more about your wireless network and how to configure it more finely.
The TP-Link router is configured in the “Network” section, the “WAN” subsection in the context menu on the left.
In the “WAN Connection Type” column, select the connection type that your provider uses from those offered. It can be of Dynamic IP, Static IP, L2TP, PPPoE or PPTP type. After this, depending on the selected type, a window with settings will open. It is necessary to fill in the columns “User Name”, “Password” in the case of Dynamic IP, “Server IP Adress/Name” and subsequent columns in accordance with the requirements of other connection types.
Via phone
The above methods also work when setting up a router from a mobile phone. You must be connected to the router’s Wi-Fi network in order to access the interface of the TP-Link router when you go to the router control panel addresses. The procedure is absolutely the same.
Internet connection settings
This paragraph describes the correct procedure for setting up the Internet for routers with different connection types. Depending on the characteristics of the connection protocols, there are three main ones: PPTP (Point-to-Point Tunneling Protocol), PPPoE (Point-To-Point Protocol over Ethernet) and L2TP (Laying 2 Tunneling Protocol). Each of them has its own connection specifics, which is detailed below:
NAT connections when using DHCP
The DHCP function is designed to automatically distribute unique IP addresses to devices connected to the TP-Link router. After connecting, all devices will be on the Internet under a common IP address, when on the local network they are represented by different addresses. The usefulness of the function lies in the ability to exchange multimedia information between various devices connected to a wireless Wi-Fi network.
To enable DHCP, do the following:
- Log in to your Wi-Fi router control panel account;
- In the navigation panel on the left, click on “DHCP”. Then go to the “DHCP Settings” section;
- Please note: the system of addresses from start to end works here. First, addresses are not generated outside the specified range, second, the initial IP must be set taking into account the real IP of the router. Between them there must be a step of one address, i.e. if the router’s IP is 192.168.1.1, then the initial one must be at least 192.168.1.2;
- In the list of connected clients, enable the status “Obtain an IP address automatically” for all connected devices.
After connecting DHCP, in the “WAN connection type” field, select “Dynamic IP”
PPPOE
To configure this type of connection, do the following:
- Log in to the router management interface;
- Then to “Network” and to “WAN”;
- In the “WAN connection type” section, select PPPoE, specify the login and password issued by the provider;
- “Secondary connection” should be disabled, in the “WAN connection mode” field specify automatic connection;
- Go to the “MAC Address Cloning” menu, and in the “MAC address on the WAN” field, enter the address of a computer previously connected to the Internet;
- In the “Wireless Settings” menu, give the name of your wireless network, indicate the Ukrainian region and save the changes;
- In Wireless Security, select WAP/WPA2-Personal and select automatic encryption. Here you come up with a password (minimum 8 Latin characters/digits). Save changes;
- Go to the “IPv6” menu item, then to “IPv6 Settings”. Briefly about the necessary actions: specify the login and password once, twice, in the “PPPoE Session” section, select “Shared with PPPoEv4”. The addressing type must be SLAAC mode. Enable “Get IPv6 DNS Server Automatically” and set the connection mode to “Always on”. Save your changes.
After this, reboot the router. In the "WAN" section of the "Status" page, check which address the Wi-Fi Router is receiving. If it starts with 172., then the setup is completed successfully.
PPTP
With this type of connection everything is much simpler. You just need to go to the “Network” section, then to “WAN”, select the WAN PPTP connection type and indicate the login, password and IP address provided by the provider. After that, save the changes and use the Internet.
L2TP
To configure L2TP, observe the following settings:
WAN connection type: select L2TP/Russia L2TP;
Username: your login issued by the provider;
Password and password confirmation: your password is from the same provider;
Select the Dynamic IP option;
IP address/Server name – server address or name (specified by the provider);
MTU size – no higher than 1450;
WAN connection mode – automatic connection;
Click Save.
How to change your password
In order to change the password on a TP-Link router, you need to follow these steps:
- Open any browser from your computer, laptop or mobile device;
- Go to the addresses “192.168.0.1” or “192.168.1.1” and log into your account;
- On the left side of the menu there is a “Wireless Network” section. Let's go there.
- Click on the “Wireless Network Security” subsection;
- In the “PSK password” column, enter a new password instead of the existing one.
If you have forgotten your password, you can use the reset method via a button or using the wifi router web interface.
How to update firmware
Updating the firmware is necessary in order to keep up with the developments of the router manufacturer, which are aimed at optimizing and improving the operation of the router. In addition, newer versions of the router firmware take into account and correct the shortcomings of older versions, and also add innovations aimed at improving the Internet connection and the operation of the router as a whole.
Before updating, you should make sure that you have more current versions of firmware for your router than it currently has. If there are any, feel free to install a newer version. Here are instructions for readers on how to flash the router:
- Go to the official website of the manufacturer (https: //www. tp-link. com/ru/);
- In the search box on the right side of the screen, enter the detailed model name of your router;
- And select “Support” from the proposed product categories, then “Firmware”;
- Read the recommendations and notes provided by the manufacturer to avoid connection problems;
- In the router’s web interface, go to the “System Tools” section;
- Then go to Firmware Update. There will be a “Select file” button - use it to upload the firmware file downloaded from the manufacturer’s official website;
- Unzip the file, upload it to the interface and click the “Update” button.
Wait for the firmware to install and pay attention: under no circumstances turn off the router or yank any cables. After this, the router will automatically reboot and you will need to configure the router again.
How to reset your router
Resetting your router settings can be useful if you have forgotten your password, want to reset settings left over from your old provider, or solve problems with an incorrect connection.
There are two ways to reconfigure the router:
- Restore settings to factory settings via the button;
- Do this through the web interface.
The first method involves using a special button called “WPS/RESET” or simply “RESET”. The outer part of this button is recessed into the plastic case of the router, and this does not allow it to be touched and accidentally pressed to reset the settings.
To reset settings using a button, you need something narrow and thin: a needle, a paper clip, a thin writing part of a pen, a special device that comes with the phone to open the slot for micro-SD and SIM cards. The idea is simple: just press the narrow and thin end of something onto the button, which is recessed into the body. Wait 10 seconds. When all the lights turn off and then blink at the same time, the router has been reset to factory settings.
There is a possibility that resetting the settings will not work the first time. To finally do it, turn off the router, hold down the reset button and at the same time turn on the router, holding the button down for 30 seconds after turning it on.
The second method is much more practical and universal, since it can be applied to any router from TP-Link. To reset settings through the router control panel, you need to do the following:
- Go to the control panel via an Internet browser at the addresses “192.168.0.1” or “192.168.1.1”;
- Enter the login and password “admin” and “admin”. If there is unique data located on the bottom of the router, use it, but there is no need, because there are standardized input username and password;
- Once in the management interface, go to the “System Tools” tab, then to “Restore Defaults”;
- After reading the contents of the page, click “Restore”;
- Review the warning in the pop-up window and click OK.
The settings have been reset, and now you need to reconfigure the way your TP-Link router works. Depending on the firmware version and router model, the interface may be in Russian or English. There are enough Russian equivalents to follow the same steps and achieve the same effect.
How to set up a wireless network
In the left side menu there is a Wireless section (“Wireless network”, Wi-Fi and other names). Let's go there.
Basic wireless settings section
Basic wireless parameters of a TP-Link router
Basic wireless parameters of the TP-Link router:
· Enable Wireless: Enable the wireless network. There should be a check mark.
· Hide SSID Broadcast: hide the network name from the air. The unofficial name of the option is “paranoid mode”. With a correct password like 463sltjHe&# it is impossible to hack the network, regardless of whether the repeater transmits its name or not.
· Wireless network name: name of the wireless network. It is better to use something personal to immediately distinguish your own network from your neighbors: The-Best-Wi-Fi, Aleksey's Network, etc. English letters, numbers, spaces are acceptable, but no Cyrillic.
· Country: optional. The TP-Link router does not require country setting to operate. You can choose your region, or you can forget.
The Apply/Save button is standard for all sections - it must be clicked after setting, before moving to the next section. Attention! Before changing the network name, encryption type, password, WDS mode, etc., keep in mind: the computer’s connection to Wi-Fi will be interrupted. You just need to re-click on the connection icon in Windows and select the newly created network (enter a new password) for each device on the network. They do not connect on their own.
How to set up Wi-Fi on a Rostelecom router
The following instructions will allow you to set your own settings for the wireless network in your apartment or house. Perform the following steps in sequence:
- Log in to the router's network interface.
- Open the Network category in the side navigation menu and select one of the Wi-Fi frequencies you want to configure: 2.4 or 5 GHz.
- Here you can set the following parameters:
- network name (SSID Settings);
- set, change a password or make the network open (“Security Settings”);
- device-specific rights management. For example, you can block your neighbor’s smartphone (“Access Control List”);
- tracking of connected devices.
Instructions for other models:
- D-Link;
- TP-Link;
- Asus.
Security section – Wi-Fi security and password
Perhaps the most important section of the settings. The QSS parameter (more often called WPS on other routers) is responsible for quickly connecting new devices to your network at the touch of a button, without entering passwords. If we are setting up a network outside the home (in the office), then it is better to turn it off (disable).
TP-Link modem security settings section
· Network Authentication: security type. Remember the word WEP - and never use it at all. Exclusively WPA, or WPA2 - no other values are suitable for a secure connection. WPA type variations (Home or Enterprise) are also acceptable. However, there is an ancient belief: a person who does not encrypt his wireless network goes to heaven.
· Configuring Open in network encryption means that your Internet can be used by random strangers, and they can have access to computers on the network. Use it only when you know exactly what you are doing. Even public Wi-Fi networks with free access for cafes/gyms are now commonly protected with a password.
· Wireless Network Key: Enter your own network password. Do not confuse it with the password for connecting to your provider. It is this password that will allow other devices to connect to the network. If the device is used as a repeater, then you do not need to set a password. Passwords like 111111, qwerty, Andrey, etc. sooner or later they will definitely be picked up by their neighbors. Choose a complex password, with letters, numbers and special characters, at least 10-15 characters.
An old joke: a computer geek's best password is the name of his pet. After all, a professional IT specialist’s dog’s name is always something like [email protected] !kw.
· Encryption algorithm (WPA Encryption). Both AES and AES-TKIP are equally good, there is no fundamental difference.
Firmware update
If we talk about TP-Link routers, they take care of increasing stability by releasing free firmware updates, which you can find on the website. There, having found your device in the list, you must go to the “Firmware” tab, as shown in the picture, and download the latest firmware version by clicking on it.
After the firmware has been downloaded, you will need to perform the following steps:
- Connect via an Ethernet cable from the router to the computer. Go to the device settings (instructions on how to do this are above).
- Go to “System Tools”, from there – to the sub-item “Firmware Update”.
- On this tab you can see the software version and hardware version, but we are interested in the “Select file” button. You need to click on it and specify the path to the previously downloaded file from the official TP-Link website. After this, the process will proceed without your direct intervention.
Advanced settings section
Advanced Wi-Fi settings. Useful advancements.
As a rule, TP Link modems do not require advanced settings. Everything should work with default values.
1. Channel: Auto is recommended. If there are many other networks in the neighborhood and the connection speed is weak, then you can experiment by manually selecting the optimal channel (from 1 to 11).
2. Mode: b / g / n / ac or their variations - bgn, bg, etc. In fact, generations of the Wi-Fi standard. You should select the most recent connection mode in the settings, bgn setting, or, if present, bgn+ac. The rest are needed only for rare cases of device incompatibility.
· The ancient and slow a and b modes were hardly seen even by seasoned specialists. These are retained for compatibility purposes and should not be used.
· Old “g” mode: can be used if older devices categorically refuse to work with other modes.
· Modern standard “n”: the most common for most devices.
· Latest “ac” standard: not supported by all devices.
3. Bandwidth (“width” of the Wi-Fi channel). Recommended values are 20/40 MHz, or Auto. The acceptable value is 40 MHz. Using 20 MHz significantly reduces network throughput, but sometimes helps to slightly increase its range.
Possible malfunctions and ways to eliminate them
If the router does not respond to connection to the power supply, the indicators do not light up, you should check the power button. The router may have burned out.
If the router does not distribute the Internet, there are options:
- Due to problems on the part of the provider. In this case, you should either just wait a while or call technical support. If experts say that everything is fine on their end, then the problem is related to the router. It's worth trying to reboot the router itself. In the vast majority of cases this will be the solution.
- There were some problems with the settings. The easiest way is to reset to factory settings using the Reset button.
Rarely used settings
Other wireless sections of the TP-Link control panel are required only in special cases - for example, to connect to a VPN, so let’s go over them briefly.
Filtering by MAC address
MAC Filter – filtering by MAC address. Allows only manually configured devices to connect to the network, and only after entering a password. No strangers. It is not recommended for home use or for a small office where everyone has their own.
Setting up a VPN on a router: not possible on all models. This is a more advanced feature.
Wireless Bridge (WDS): the ability to use a Wi-Fi router as a “repeater” - a repeater of an existing Wi-Fi signal. Used to “extend” the range of another working and configured router. In other cases, you need to use the already configured AP mode (Access Point mode).
Reset
When actively using home Internet services, Rostelecom customers prefer to buy a router. The company offers to rent a device and pay a monthly fee for the operation of the gadget along with the tariff subscription fee. Buying a router, in this case, will be a profitable decision and will save money. Having received the device for personal use, the client configures it in accordance with the operator’s parameters.
When the contract is terminated, the user goes to another provider. The question arises about the availability of a router from the current operator, since experts say that it may be difficult to connect a device with a router from another company. In most cases, if you reset the parameters correctly, the device will work properly.
First of all, you will need to reset the previous settings, regardless of the router model. The user needs to follow the algorithm of actions described below:
- The subscriber should connect the router to the network and make sure that the device is working properly. This will be noticeable by the blinking indicators;
- There is a “Reset” button on the router case. It is located at the back of the device. Sometimes for greater security, the button is inward. Then the user will need to find a long oblong object; a paperclip or a rod from any pen will do;
- The “Reset” button must be pressed with an object or finger and held for 10 seconds.
This will reset all existing settings to factory settings. After completing the operations, you should reboot the router. Now you can set new parameters using data from the new operator.
Checking the connection to the computer
Before setting up the router, you need to check its connection. It comes with a network cable - patch cord . Using it, the router connects to the computer.
patch cord with RJ45 connector
If you did it correctly, but the problem does not go away, then reboot the devices. It also doesn’t hurt to check all the cables again; they may not be plugged into the ports enough. This completes the installation of the device.
If the Wi-Fi transmitter is connected to the PC correctly, the LAN lights on it will light up.
We are looking for a problem in IP and DNS
This is one of the most popular reasons why you cannot access the web interface on TP link routers. You need to check whether IP and DNS are automatically obtained. This is especially true for those who have previously used connections with static addresses.