Adding a mailbox registered with Google (Gmail), AOL or Yahoo to your Apple gadget is not a difficult task. However, when the need arises to add an account for a Russian-language mail service - for example, Rambler – the user of a mobile device has to rack his brain. The difficulty is that when setting up mail on an iPhone, it is not enough to enter your username and password - the Mail application requires you to provide information that is usually unknown to the average user. You will learn where to get such information and how to set up mail on iPhone successfully from this article.
General algorithm
Any interaction with third-party services in the “Mail” tool built into iOS begins from the “Settings” menu, or more precisely, from the “Accounts and Passwords” section, where, firstly, information about logins and passwords saved in the system for authorization, and secondly, a special platform is available for interaction with iCloud and “electronic boxes”.
Immediately after going to the section, you need to click on the “Add account” menu item, and then you will only have to act according to the specified algorithm, depending on the service being added (mail, yandex, gmail).
Sometimes setting up a new work or corporate email takes no more than ten seconds, sometimes you will have to enter a dozen additional values, select servers and nodes, and configure protocols. Even with a strong desire, it is impossible to get lost during setup - even beginners working with the Mail tool for the first time will immediately understand all the nuances and receive a truly multifunctional, and most importantly, completely customizable platform for personal and corporate communication on the network.
Method 3: Spark
Spark from Readdle is one of the most popular email clients for iOS and iPadOS. Adding a new mailbox to it is carried out according to the following algorithm.
- Install the application and open it. Read a brief description of the main features on the main screen, finally tapping “Got it”, or immediately “Skip” them.
- Enter the email address you want to connect to Spark. Check the box “I accept the Terms of Use and Privacy Policy...”, then click “Next”.
Settings for Yandex.ru
- The algorithm for setting up Yandex on iPhone actions is similar to what is described above. In the same way, you will have to look in the “Accounts and Passwords” section, select “New Account”, click on the “Other” menu item;
- Again, you will have to fill out all the necessary information about your profile in the yandex.ru service - e-mail, password, name, short description (if there are too many mailboxes, sometimes it is better to add a couple of lines for additional clarity - where exactly the letters are coming from);
- Starting from iOS 10, Yandex settings are automatically linked - you don’t have to enter data about servers and ports.
- If the letters do not arrive or are sent, then you will have to look again at the account settings, in the SMTP section.
- Where it is important to check the box next to “Use SSL”, enter smtp.yandex.com in the “Host name”, and set the port to 587;
- The final step is to save the entered information.
How to set up Mail.ru mail in iOS
The principle is almost the same, but if you believe the official instructions from the Mail.ru website, you will have to enter a little more data manually.
To set up Mail.ru mail on iPhone and iPad:
- Open system settings.
- We look for mail settings among them (the tab called “Mail”).
- Go to this settings item and open the “Accounts” section.
- Then click on “Add a new account”.
- Among the available providers, we select “Other”, because Mail.ru is not there.
- In the fields that appear, enter the name of the mailbox, mailing address, password for the mailbox and a brief description.
- Click on the “Next” button.
- Save the changes made.
- In the advanced settings, find the “Outgoing mail server” item and go to it.
- After that, select the active server, move the “Use SSL” toggle switch to the active position and enter server port 465.
- Click “Finish” and go back one level of settings.
- Select the “Advanced” item.
- We turn on the “Use SSL” toggle again, but this time we specify port 993.
- Save the changes and exit the settings.
Now the mail should work.
Settings options for GMail.ru
- Setting up Gmail on iPhone and iOS is the easiest way - no additional parameters or complex settings, everything is already prepared in advance, all that remains is to go through a short authorization in the already familiar “Accounts and Passwords” section;
- And then – save the data and start using it;
- If messages do not arrive, it means that the account information has been entered incorrectly.
How to access mail on iPhone
Based on the information presented above, there are several ways to log into a particular mail:
- Using specialized applications for a specific type of mail. Each mail has its own application, which can be downloaded from the App Store for free. Some software is installed by default on the iOS operating system.
- Using a browser. Through the browser installed on your iPhone, you can log into any email account by entering your login password. However, the user will not be able to receive notifications about incoming messages.
- Using the standard Mail application installed on the iPhone.
OutLook Mail
- You can interact with the famous service from Microsoft from a separate application, but if you really want to keep everything in one place, then you should follow the already familiar path;
- Go to the “Accounts and Passwords” section. Select the option to authorize a new account;
- In the list that appears, click on “Outlook.com”;
- Fill in the text fields with your email and password information. If two-factor authentication is enabled, then you cannot do without entering the numerical combination received on the mobile number;
- The service will work automatically if the data is entered correctly and without errors. Messages should arrive immediately, otherwise, if problems occur, you will have to go through authorization again.
Rambler mail
The procedure for setting up the rambler completely repeats the instructions described for mail.ru and yandex.ru:
- Go to the adding a new account section;
- In the list that opens, click “Other”;
- Correctly fill out the text fields that appear (don't forget about the short description!);
- The system will pick up the rest of the information automatically. If for technical reasons all important text fields are empty, then you will have to enter some information manually. For the incoming mail server, the “Node name” is pop.rambler.ru (you should definitely check all the values up to the last letter!), for outgoing mail – smtp.rambler.ru;
- You will have to enter your login and password twice. Again, all entered data should be double-checked several times - this will save time searching for some imaginary errors, when in fact inattention is to blame.
How to set up Yandex mail on Apple devices
Connecting Yandex.Mail to a third-party device is easy. Previously, this required only specifying personal data in the built-in email client, but now you need to allow the connection in the Yandex web interface, and only then proceed to configuration directly in the iPhone and iPad settings.
Changing connection parameters of third-party email clients
First you need to select the data transfer protocol (POP3 or IMAP) on the official Yandex website. To do this:
- We go to the official Yandex.Mail website and enter your username and password to open the mailbox.
- After that, click on the six icon in the upper right corner to go to the box parameters.
- In the pop-up window, click on the “Other” link.
- In the sidebar of the window that opens, look for the “Email programs” tab and go to it.
Place a checkmark next to the line “From the imap.yandex.ru server using the IMAP protocol” or “From the pop.yandex.ru server using the POP3 protocol” depending on the selected protocol. You can learn about the differences between IMAP and POP3 in this article.
Having finished changing the security settings in the Yandex.Mail web interface, you can proceed to connecting the mailbox to iOS.
If you do not follow the procedures described above, then when you try to enter your Yandex mailbox data, the system will endlessly report that you are entering the wrong password.
Connecting Yandex mailbox to iPhone and iPad
We will configure mail through the iOS system parameters in order to use the mailbox through the built-in mail client.
To set up Yandex.Mail in a standard email client for iPhone and iPad:
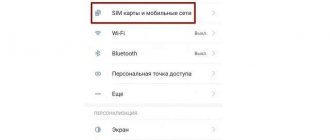
- Open the device settings.
- We scroll through the list of available items until we come across the “Mail” tab. Let's open it.
- Go to the “Accounts” menu.
- After that, click on the “Add account” button.
- In the list of available services that opens, select “Other”, since Yandex is not here by default, like most other (including popular) providers.
- Enter your login, Yandex email address and password. The description and name of the box are at your discretion.
- Then click on the “Next” button and wait. Usually, after a few seconds, mail is configured automatically, and there is no need to take additional measures for this.
In rare cases, you have to manually enter additional parameters, such as the data transfer protocol and the port for connecting to the mailbox. Let's take a closer look at these settings using Mail.ru mail as an example.
Mail settings for other services
Do you have an irresistible desire to add some exotic email account to your system, but you can’t find even the slightest details about the necessary setup on the Internet? Are the parameters not “clinging” in automatic mode? The situation is certainly complex, but solvable, there are at least two options:
- Contact your service provider. It is difficult to find an email service that does not provide parameters for authorization on different devices through third-party tools. You should look for login information somewhere in your profile settings, or rather in the section related to the network. Sometimes the service provider even posts detailed instructions on how to connect to different systems (including Mail on the iPhone), and even with screenshots. This is how things are, for example, on the website mail.ru;
- – Look at the Apple website. If you couldn’t find the much-needed information on official resources, then you’ll have to take third-party routes and contact Apple directly. A special platform is available on the support page, where in just five to ten seconds you can find a complete list of parameters that allow you to quickly put your Mail in order;
- Everything is described - the account type, ports, and important host and server names for receiving and sending emails. You can track almost all major mail services, but, however, there are exceptions. If the information is not found on the Apple website, then the best option is to return to the service provider and contact support there.
How to Set Up Google Mail, Yahoo and Outlook on iPhone and iPad
You won't have to bother with Google, Yahoo and other Western services. Already when you enter the settings, you will see the logos of popular email providers from the USA and can connect them to the built-in client in a couple of clicks.
For this:
- Open the device settings.
- We look for the “Mail” item and go to it.
- Then open the “Accounts” tab.
- Click on the “Add new account” button.
- We select the email service that we want to configure to work with our device.
- Immediately after clicking, iOS will launch the browser and open one of the sites for authentication. In the case of Google, this will be the Gmail website: here you just need to enter your mailbox details, and then allow authentication of a third-party application (you won’t have to do this manually on the website, as is the case with Yandex). That's all.
The scheme is the same with Yahoo, Outlook and AOL, only the interface for connecting to the Exchange server is different. There you will have to indicate your data just for working with a shared mailbox, and the main server parameters and other data should be indicated by the person who is responsible for Exhange in your organization.
Deleting emails from the server
Until recently (on iOS version 7+), Apple developers made it possible to transfer to an archive any messages appearing on Mail, both on a smartphone or tablet, and directly on the mail service’s servers. After iOS 10, the situation has changed - from now on, users can only choose where exactly to transfer old and unused messages - either to the trash bin or to the archive. This parameter is configured in the “Accounts and Passwords” section in the settings of the selected service.
Immediately after going to the “Additional” menu, in the “Destination for moving unnecessary messages” item, select “Deleted”. Then, within a few weeks (or a month), the trash can will be cleared of accumulated garbage.
How to find out your mail settings through the Apple website
In order to find out what your mail settings are, you can simply use the Apple website. To do this, do the following (or just follow the link):
1. Select "Support".
2. Click "iPhone".
3. Scroll down the page and select the “Programs” tab.
4. Click Mail.
5. Tap “Search for Mail program settings.”
6. Enter your mailbox address.
As a result, the user will receive settings for the Mail program. This is a convenient and quick way that allows you to easily find out which mailboxes have already been integrated, how filters are configured, etc.
Mail apps on iPhone
The App Store, Apple's official app and entertainment store, is bursting with feature-rich email clients that make it easier to work with any email account. But, if you really choose the best mail application, then you should focus on three options:
- myMail. Smart sorting of letters, and integration of third-party services (for example, developers allow phone numbers to be immediately saved to the address book, and dates to be transferred to the calendar), amazing optimization and support for the gesture system, as well as drafts, platforms for quick replies and history, where you can save an entire library. If the classic “Mail” has long been boring and changes are needed, then myMail is the best option;
- Gmail. And although there are no problems with authorizing a Google email account in iOS, the third-party application, Gmail, from a functional point of view, looks richer and more convenient than what the guys from Apple came up with. Everything here is of the highest standard - quickly, clearly, with gestures and integration. And you don’t have to worry about quick updates for new iPhones and iPads - Google always keeps an eye on new products;
- Mail.ru. Surprisingly, the domestic service copes with all its responsibilities perfectly - it has the same user-friendly interface as its competitors, the same ability to quickly transfer any data to third-party applications. There were even interesting additional technologies - like password-protected addresses and a schedule for sending letters throughout the day. The only thing that spoils the atmosphere is advertising that appears at a completely inconvenient time.
Additionally, it is worth noting the following clients - Yandex.Mail (interaction with other services of the famous search engine is perfectly configured - here you can search for hotels, call a taxi, and the ability to attach an account directly from your wallet), CloudMagic (simple, but tasteful), Boxer (very nice, but when working with several accounts you will have to pay at once).
When is it necessary to change your Apple ID email and what is needed for this?
First, let’s talk about what might motivate you to undergo this procedure:
- As I already wrote just above, in some cases the email is indicated anyhow - after all, the main thing is to register and start using the device as quickly as possible, and then access to it is lost.
- If you don’t use your mail for a long time, it simply becomes inactive, and another person may register it in the future. And your Apple ID is still on it!
- Stores often offer iPhone activation and setup services. At the same time, they register an Apple ID to their email address, and, of course, no one gives a password to it.
- And in general, I personally recommend creating a separate mailbox for your Apple ID account and not posting it anywhere.
To change your Apple ID email address you need to:
- Know your Apple ID password (what to do if you forgot it?).
- Know the answers to security questions (ideally, if you don’t know, you’ll have to call technical support at 8-800-555-67-34).
- Access to old mail is not needed.
That's it, it's time to get started!