Preparation
Connect the device to a 220 V network, connect it with one cable to the computer, the second to a telephone socket (provider line) or splitter. Press the power button on the back panel. When the ADSL LED lights up, you need to wait about 3 minutes for it to start flashing. Make sure the corresponding connection port LED is lit. After this, you can start setting up. Enter the IP address 192.168.1.1 into the search bar of any browser, and on the page that opens, log in by entering the username and password indicated on the label located on the bottom of the router. Usually these are admin and admin.
Connecting Intercross to the Internet
So, let's get down to business, the modem can be configured in two operating modes:
- “Bridge” mode - the Internet connection is configured on the computer; to access the Internet, you must start the connection manually each time.
Pros of this mode:
- The connection can be terminated at any time by simply pressing a button.
- You make the connection yourself when necessary.
- “Router” mode – automatically connects the router to the Internet.
Pros of this mode:
- You can distribute Wi-Fi.
- The connection is automatic.
- Ability to connect multiple devices to the Internet.
Configuring to “Router” mode
Intercross ICxDSL 5633 E (there are LAN, WAN tabs)
The appearance of the tabs on the bottom router looks like this:
Click the Wizard tab.
In the tab that opens, enter the parameters:
- VPI = 8; VCI= 35; — For Rostelecom subscribers.
- VPI = 0; VCI= 33; - For other providers.
Click the Next button.
Next, select the connection mode “PPP over Ethernet (PPPoE)” and click Next. Some providers may use a different type of connection, so if problems arise when connecting to the Internet, I recommend checking the connection type with those. provider support.
In the next step we enter the most important parameters:
- PPP Username - Your Internet login.
- PPP Password - Your login password.
If you do not have these details, then you need to check them in the contract or on the access card that was given to you upon connection. Be careful at this step; enter your username and password exactly as they were provided to you, respecting the case.
Click Next
Fill in the fields:
- "LAN IP" - 192.168.1.1;
- "LAN Netmask" - 255.255.255.0;
Click Next.
This completes the setup, check the parameters and click Finish.
Intercross ICxDSL 5633 E 2 (there is a Network tab)
If you couldn’t reset the router’s settings using the button, I recommend deleting them through the interface. The configuration of this firmware differs from the firmware above, because... There is a Network tab here, which stores the preliminary settings of the router.
First, let's go to this tab and delete all the preliminary settings. To do this, mark the existing row in the table and press the Delete button.
We repeat similarly for all records in the table.
Next, the “Channel Configuration” window will open with the parameters to be filled in:
- VPI = 8; (8-Rostelecom, for other providers 0).
- VCI = 35;
- Encapsulation - check LLC;
- Channel mode - select PPPoE;
- Enable NAPT - check the box;
- Login Name - your login;
- Password - your password;
Check and click the Add button, wait until the modem reboots.
After loading, a new line will appear in the Current ATM VC Table section, check it and click the Save button.
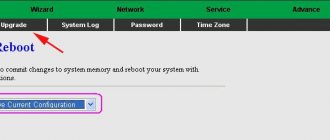
Select the “Admin” section, select “Save Current Configuration” from the drop-down list, click the Reboot button.
Setup in router mode is complete.
You can easily make similar adjustments to these parameters through the Wizard tab if something doesn’t work out for you. Setup via Wizard will be described below.
Setting to "Bridge" mode
Setting up in Bridge mode is the same for Intercross ICxDSL 5633 routers; first, delete the existing settings, as I recommended above.
We go to the Wizard tab, here you are prompted to enter a new password to log into the router, leave it blank or enter admin or your own option, click NEXT.
Skip the next step and click NEXT.
Next, you need to fill in the specified parameters according to the screenshots:
And click NEXT.
Click FINISH.
Next, select the “Admin” section, select “Save Current Configuration” in the drop-down list, click the Reboot button.
Setup in router mode is complete.
To set up a connection on a PC, use the instructions:
How to set up Internet connections on Windows 7
Setting up an Internet connection on Windows XP
General settings Intercross 5633 NE-10
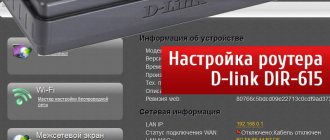
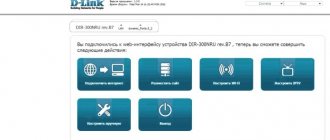
An interface will open, the first page of which provides basic information about the router. Further:
- On the left, click on Advanced Setup, under the inscription on Layer2 Interface and even lower click on ATM Interface. If the device is connecting for the first time, an empty ADSL table will appear in front of you. If something is written in it, it is better to delete it and then click on Add.
- You will be taken to the configuration page. Here you need to enter the VPI and VCI channels and the service category (data provided by the provider). Below there is an option “Quality service”. If you activate it, the priority will be the stability and reliability of your Internet connection. If you don't check the box, speed will come first. Click Next.
- Here you need to select a mode. The best option is Bridging. In this case, the router will be able to operate in transparent bridge mode.
- On the next tab, there should be a checkmark next to Enable Bridge Service. Click Next to view the settings you have made in general form.
- Check everything again and save the changes. Everything new will appear in the table, which was empty at the first stage. Now reboot the router.
For security purposes, it is recommended to change your username and password. If you decide to do this, open the main page of the interface and in the left column select Advanced Setup and then WAN Service. On the table in the far right column, click on Edit. In the window that opens, enter your desired username and password.
Device Features
The device has some characteristics that are worth knowing in advance:
- Perhaps after a while the USB indicator will stop working, but the connector will still work.
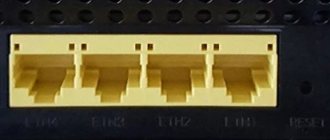
- All LAN ports are equal.
- The ADSL indicator blinks constantly.
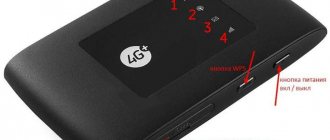
- The Wi-Fi power button is located next to the antenna connector and is easy to touch when rotating.
Thus, the modem from Intercross 5633 NE-10 from MGTS is easy to configure with your own hands, the main thing is to check with the provider all the necessary information in advance.
0-mgts
FON option
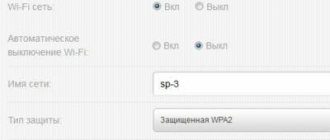
If you activate the function, you will get two networks: one only for you, the second for anyone. 1.5 Mbit of speed is reserved for this purpose. The usefulness of the function is that, while in Moscow or St. Petersburg (in other localities - alas, the technology is not taking root well), you can use the Internet for free if this option is also enabled on the “other side”. To activate:
- find Wireless on the left, then Basic;
- in the table below Guest/Virtual Access Points, check the Enable column (first line FON_FREE_ssid). Save.
- open the website fon.com and register on it;
- connect to the FON network by opening the “Wireless Connections” section on your computer at the bottom right;
- Once connected, return to the site and register your router. You need to enter the address of its installation and click on the “Submit” button. Within a day, your router should appear on the map shown here.
Advantages and disadvantages
The advantages of a multifunctional modem include:
- the ability to create a home wireless network;
- increased connection security thanks to the built-in firewall;
- extended cable connection - up to four external devices equipped with an Ethernet adapter;
- fast wireless connection in WPS mode;
- support for the international FON network: 65 free thousand access points in Moscow;
- convenient visual indication of port and line status;
- ability to use a network printer and external memory.
Some users consider the disadvantage of the model to be the significant heating of the case during operation and suggest placing the router in a vertical position as a solution to the problem. Negative reviews relate to the lack of a Russian-language setup interface, which somewhat complicates the procedure on your own.
The router provides a stable Wi-Fi connection within an ordinary apartment.
On the other hand, the model is a budget option, so you shouldn’t count on a long communication range. Especially in the case when the signal passes through reinforced concrete walls of the room. mgtsinfo
Router settings by static IP address
This option, although rare, does occur. For settings, go to connections after the configuration page and where (see above) you set Bridging, you need to check MAC Encapsulation Routing (MER). Click Next and on the page that opens, enter the modem address, subnet mask, gateway, and DNS servers given to you by your provider in the fields. If everything is distributed automatically (you can also check with your provider), just check the Obtain automatically box. Perform further actions by analogy with the connection discussed above.
If you need to reset the router settings to factory settings, including login and password, use the Reset button. It is located on the back of the case near the power switch.
Precautions when using a wireless device
To avoid unpleasant situations, you need to take care of your safety. To do this, you should adhere to the rules for operating the equipment. The antenna must be located at least 20 cm from the workplace or rest area. The device must be installed on a hard, durable surface.
Machine maintenance:
- Turn off the modem if you do not use it for a long time.
- Do not step on, pull or stretch the cable.
- Unplug the device from power and disconnect any cables connected to it before cleaning.
Contact an authorized service center if you notice smoke or smell an unpleasant odor from the router.
How to configure an intercross router icxdsl 5633 e
JSC "INTERCROSS"
Content
INTRODUCTION. 4 Possibilities. 4 Supported protocols. 4 System requirements. 5 Description of the status of the front panel LED indicators. 5 Description of the rear panel. 6 Safety instructions. 6 Information you need to obtain from your ADSL provider. 7 Essential information about the ICxDSL 5633 E/NE. 7 Necessary information about the computer. 7 CONNECTING THE MODEM. 8 MODEM SETUP. 9 Which connection mode to choose. 9 Setting up the modem in the WEB interface. 9 Main menu. 13 Quick Setup Wizard. 13 Modem settings in transparent bridge mode (Bridge). 17 Modem settings in router mode (PPPoE connection). 18 Service settings. 19 Setting up a DNS server. 20 Setting up Dynamic DNS. 20 Description of LAN settings. 21 DHCP setup. 21 QUESTIONS AND ANSWERS. 22 Technical support. 23
Introduction
This family of modems/routers with an Ethernet interface is designed primarily for high-speed Internet connections via ADSL2/2+ protocols with downstream speeds of up to 24Mbps and upstream speeds of up to 1024Kbps. This guide provides clear and easy-to-understand information on how to install and configure your router. This manual describes the settings of four types of modems:
· ICxDSL 5633E with one 10/100 Ethernet port · ICxDSL 5633UE with one 10/100 Ethernet port and one USB 1.1 port · ICxDSL 5633NE with four 10/100 Ethernet ports · ICxDSL 5633NE-02 with four 10/100 Ethernet ports and Wi-Fi Fi interface
Possibilities
Main characteristics
Supported protocols
Bridging/Routing · RFC 1483 bridge · IEEE 802.1D transparent bridging/Spanning Tree · Bridge Filtering (MAC filtering) · RFC 1483 Router · RIP v1 & v2 · DHCP (RFC1541) Server, Relay · Network Address Translation (NAT)/ Network Address Port Translation (NAPT) DNS relay IGMP v1 and v2
Encapsulation support
· RFC 1483 bridge/Router · PPP over ATM (RFC 2364) · PPP over Ethernet (RFC 2516) · MER
Ethernet
Wireless access
Network management
Safety
· Supports firewall function · Supports two classes of passwords · Supports DOS (Denial of service) to protect against certain types of attacks (such as SYN/FIN/RST Flood, Smurf, WinNuke, Echo can, Xmas Tree Scan) · Packet filtering by IP address and port number · Access control based on MAC addresses · Supports PAP, CHAP authentication methods
terms of Use
104 degrees F) – Operating Humidity: 10
85%, non-condensing (Operating) · Input voltage: AC100-240V, 50/60Hz. Output: 12V DC, 1000 mA(min) · Power dissipation: 10W (max) · Electromagnetic compatibility: FCC class B; CE Mark class B
System requirements
Description of the status of the front panel LED indicators
Description of the rear panel
Safety instructions
1• Place the router on a flat, horizontal surface in a room with adequate ventilation. 2• To prevent the equipment from overheating, do not block any ventilation openings on the equipment. 3• Connect your router to a voltage stabilizer to reduce the risk of damage from power surges and lightning.
page 6 4• Connect this equipment only to electrical outlets that match the ratings marked on the adapter. 5• Do not remove the protective cover from the equipment. Otherwise, all warranties for the equipment will be void.
• To clean the equipment from dirt and dust, first turn off the power to the equipment. Remove dust from equipment using a damp cloth. Do not use liquid/aerosol cleaners or magnetic/static cleaning devices.
Information you need to obtain from your ADSL provider
After you have entered into an agreement to provide you with ADSL service, the provider (service provider) must provide you with the initial connection data. (Attention! Without them it is impossible to connect to the ADSL network!).
This data must include the following parameters:
Be sure to fill out this table (optional parameters are highlighted in blue, but they can be very useful when setting up).
If your provider offers a non-standard connection method using a static IP address, check the setup procedure with them, since there are several installation options that directly depend on the settings of the provider’s equipment.
Necessary information about ICxDSL 5633 E/UE/NE(02)
Username
Password
LAN IP address ICxDSL 5333
LAN subnet mask ICxDSL 5333
Necessary computer information
Ethernet NIC
If your computer has an Ethernet NIC adapter installed, you can connect the ICxDSL 5633 router to this Ethernet port using an Ethernet cable. When using a four-port modem (ICxDSL 5633 NE/NE-02), you can also use the Ethernet ports to connect another computer or Ethernet devices.
USB port
Wireless access (Wi-Fi)
DHCP client status
Your ICxDSL 5633 ADSL router is configured as a DHCP server by default. This means that it can assign an IP address, subnet mask, and default gateway address to computers on your LAN. By default, the range of IP addresses that the ICxDSL 5633 can assign is from 192.168.1.2 to 192.168.1.254. Your computer(s) must be configured to obtain an IP address automatically (this is necessary to configure them as DHCP clients). After reading the above information, you can proceed to installing and configuring your router.
Please connect your ADSL2/2+ modem using the diagram below and following the steps listed below:
· Connect the modem (LINE connector) and the telephone via the splitter to the telephone socket.
· Using an Ethernet cable, connect the modem's Ethernet port (LAN) to the Ethernet port of your computer.
· Insert the power adapter cord into the power socket located on the back panel of the modem, and connect a nearby power source to the adapter.
If your computer does not have an Ethernet port, then use a USB connection.
Turn on the modem and your personal computer, check the Ethernet Link indicator to make sure the connection is established. The router will try to establish an ADSL connection, if the ADSL line is turned on and the router is configured properly, this indicator will light up after a few seconds. If you are setting up your router for the first time, you may need to make some adjustments before the router establishes a connection.
Attention:
Use only one interface - USB or Ethernet to connect the modem to one computer. If you use a USB interface to connect:
Connect the USB port of the modem to the USB port of the computer using a USB cable. Please note that different ends of the cable have different connectors. Select the appropriate cable ends for the modem side and the computer side. In order for your computer to be able to correctly determine what kind of device is connected via the USB interface, you need to install additional software (Driver) that comes with the modem.
Setting up the modem
Which connection mode should I choose?
Transparent Bridge Mode
resembles the mode of operation with a regular modem. You create a new connection and connect to the provider when you need it. But unlike a regular modem, you do not need to call your provider every time. The modem does this after the first setup and is constantly connected. Therefore, the connection procedure takes 1-3 seconds, which is required for authorization on the provider’s server.
In this mode, a connection icon also appears, as in the case of using a regular dial-up modem. You can easily break this connection and thus disconnect from the Internet, while maintaining access to the modem management. This is convenient when you are using an internal network and several computers are connected to the modem (for example, your friends or acquaintances). You do not need to worry that someone will connect to the network at your expense, because without knowing the password, it is impossible to connect to the provider in bridge mode. This mode is the most independent of the modem settings, because the latter organizes an end-to-end channel without restrictions.
Router Mode
differs from the transparent bridge mode in that the modem connects to the provider instead of you and opens access to the Internet to all connected computers. This is convenient when you do not want to create a connection every time (for example, after loading Windows).
Having a network connection with a modem means that you are already connected to the Internet. Even if you completely disconnect your computer from the modem, it will not break the connection.
If you are just getting acquainted with this technology, then think about which mode is best for you to use. The safest mode is bridge mode. It is easiest to work with for novice users. Then, once you get comfortable and understand the settings, you can switch to router mode.
Setting up a modem in the WEB interface
Connect your computer to the modem according to the diagram above.
To configure the router's WAN connection, you first need to configure the router using its HTML-based management interface, accessible through a Web browser. The easiest way to ensure that your computer has the correct IP settings is to configure the computer's network interface to use the DHCP protocol.
You can configure the IP configuration of a computer in the Windows operating system as a DHCP client as follows:
In the working window of the operating system, click on the “Start” button, select “Settings”, then “Network connections”.
Here is a list of the main sections for setting up your modem. There is also an information window in the Status section, which provides brief information about the device.
Quick Setup Wizard (Wizard)
Enter the values of the VPI and VCI parameters issued by your ISP (Internet Service Provider) Select the Encapsulation Mode for connecting to the Internet in accordance with the information received from your ISP. For each connection type there are different settings that are configured in the Wizard window. Below is an example for connection
Enter the Username and Password received from your provider. To continue, press (NEXT).
Disable Wireless LAN Interface:
Band:
The frequency range and mode that the gateway will use to establish connections with wireless devices.
2.4GHz (B): Only 802.11b wireless clients are allowed to connect.
2.4GHz (G): Only 802.11g wireless clients are allowed to connect.
2.4GHz (B+G): co-op mode. Allows 802.11b/g wireless clients to connect simultaneously.
When connecting 802.11b and 802.11g clients simultaneously, throughput may be reduced
SSID (Network Name Transfer):
None (no security methods are used)
WEP(Wired Equivalent Privacy)
– The simplest and, accordingly, least secure encryption protocol. When using this method, the router provides 64-bit or 128-bit encryption with four keys, which can be represented in hexadecimal or ASCII format. Each wireless client on the network must use an identical 64-bit or 128-bit key to decrypt data transmissions.
To continue, press (NEXT).
When you have completed all the steps to create a connection, the window will display all the settings you have made.
Check that they are correct and then click on the (Finish) button. Clicking (Finish) will save the settings and reboot the modem.
Configuring the modem in transparent bridge mode (RFC1483 Bridge)
If you need to change an existing connection, first select it by clicking the mouse cursor in the (Select) column and make the necessary changes in the upper part of the window. You can also create a new connection; to do this, you can immediately go to configure the parameters of the new connection at the top of the window.
1. Select VPI and VCI values; Your DSL service provider or ISP (Internet Service Provider) must communicate them; in this example, the DSL service provider uses 8 and 81.
2. Select the connection type 1483 Bridged as shown in the figure.
3. Select the encapsulation type (LLC or VC) according to your provider's requirements.
4. Click (Modify) if you have changed the parameters of an existing connection, or click (Add) if you are creating a new connection. Also, if necessary, you can set or change the ATM Settings and QoS of your ADSL router.
5. To save all settings, click (save) at the bottom of the window.
Note:
Configuring a modem in router mode with a PPPoE connection type (PPP over Ethernet RFC 2516)
PPPoE is also referred to as RFC 2516. It is a method of encapsulating PPP packets over Ethernet. PPP or Point-to-Point protocol is a method of establishing a network connection between end hosts. It is commonly used as an authentication mechanism for Internet users.
To configure the modem in PPPoE mode, select the section (WAN), as a result the Channel Configuration window will appear
If you need to change an existing connection, first select it by clicking the mouse cursor in the (Select) column and make the necessary changes in the upper part of the window. You can also create a new connection; to do this, you can immediately go to configure the parameters of the new connection at the top of the window.
1. Select VPI and VCI values; Your DSL service provider or ISP (Internet Service Provider) must communicate them; in this example the DSL service provider uses 0 and 35.
2. Select the PPPoE connection type as shown in the figure.
3. Select the encapsulation type (LLC or VC) according to your provider's requirements.
4. Enter the Login Name and Password received from your DSL service provider
5. Click (Modify) if you changed the parameters of an existing connection, or click (Add) if you are creating a new connection. Also, if necessary, you can set or change the ATM Settings and QoS of your ADSL router.
6. To save all settings, click (save) at the bottom of the window.
Note:
Setting up the service
Setting up a DNS server
The DNS service resolves Internet addresses, such as www.microsoft.com, into IP addresses.
On the DNS Configuration page you can choose one of two options for configuring the DNS service: Use automatic DNS assignment - “Attain DNS Automatically”, in this case the router will receive the IP address of the DNS server through one of the activated PVC channels using the PPPoA, PPPoE or MER protocol /DHCP.
Specify the primary and secondary DNS addresses manually – “Set DNS Manually”.
If you selected Set DNS Manually, three additional fields will appear - DNS1, DNS2, DNS3. Enter the required information and click on the button (Apply Changes) and at the bottom of the window click (save) to save the changes made.
Setting up Dynamic DNS
Dynamic DNS is a service that allows you to create a domain name match with dynamic IP addresses. This allows other Internet users to connect to you without having to track your IP address. In other words, DDNS allows you to assign an Internet name to your router, such as myICrouter.dynDNS.com, so that it can be accessed over the Internet. To do this, you do not need to know the router's IP address assigned by your Internet provider. Check the Enable box to activate the dynamic DNS service.
This window will allow you to add a dynamic DNS address using DynDNS.org or TZO services. First, in the DDNS provider field, select the D-DNS provider—DynDNS.org or TZO—with which you registered your domain name. Enter the hostname in the Hostname field and the Interface to use. Also enter the username and password issued by your DDNS provider. Click the (Add) button to add a new entry to the Dynamic DDNS Table. To delete an entry, mark it in the Select column and click the (Remove) button. To save all settings, click (save) at the bottom of the window.
Description of LAN settings
DHCP Settings
In the (LAN) section at the top of the window, click on the DHCP subsection, as a result a window with the corresponding settings will appear.
If you want computers on your local network to obtain IP addresses dynamically, enable the DHCP server and enter the range of IP addresses that can be assigned to your computer. Turn off the DHCP server if you want to manually (statically) assign IP addresses.
After making changes, click the (Apply Changes) button to apply the new settings. To save and click the (SAVE) button that appears after clicking the (Apply Changes) button,
Below is the DHCP server settings window.