In order for the YOTA device to function as expected, and to avoid any failures or annoying troubles, it will be necessary to carry out several simple measures. First, thank the Omnissiah for his gifts. Okay, just kidding, it's not necessary. But if you do this, it won't get any worse.
The SIM card is activated automatically when you turn on the new device for the first time. Well, or the old one with a new SIM card. It's not significant. Once you make sure that the device has connected to the Yota network, the APN settings will not cause any problems.
On all Yota APN , settings are made almost the same. The only difference in the algorithm of actions depends on the operating system installed on the tablet or smartphone.
Instructions for setting up the Internet Yota
Let's look in detail at how to connect the Internet in the Moscow region on Iota on different devices.
To achieve this, a number of rules have been developed that will reduce the risk of problems with connecting to the global network:
- You need to register a new SIM card in the region where you bought it.
- Before setting up, you need to check which protocols and communication standards your device supports.
- Before purchasing a tariff package, you should find out the coverage area of the 3rd and 4th generation network. This can be done on the official website of the company.
- When purchasing a separate tariff for a tablet computer, you should register on the company’s official portal, as well as fill out a personal subscriber profile.
- Before you start manually setting up the Iota Internet on any mobile device, you should wait 15-20 minutes after turning on the device. During this time, the device system can independently accept automatic settings.
Before activating the SIM and setting up the Internet, you need to change the Wi-Fi mode to Cellular data.
Preliminary stage
Before you connect ETA to your phone and computer, you need to get a SIM card. You have two options for designing a Yota card:
- Go to the company office or point of sale in your city;
- Apply for a SIM card through the official website. In some cities, home delivery is even possible.
When visiting the office in person, bring your passport with you. The employee will fill out an application and tell you when to come for a new card. Let's take a closer look at connecting through the site.
Obtaining automatic settings for the Yota access point
A subscriber of this provider needs to figure out how to connect to the Internet in Vladimir Yota using automatic settings. After activating the SIM card, the operator will send an SMS notification containing automatic parameters for accessing the network. It must be accepted and saved in the memory of the mobile device. These settings are installed automatically by the phone system, without requiring additional actions from the owner.
If such SMS is not available, you will need to manually configure your Internet connection.
You can get the information you need in several ways:
- by contacting the company's customer assistance center by calling the hotline;
- on the official Internet portal of the provider;
- via SMS message sent to the short number 0999.
Manual configuration of device operating parameters directly depends on the operating system.
Possible malfunctions and ways to eliminate them
The only problem when connecting to a computer is expressed in one symptom: it does not work. There may be two reasons for this.
- The device has a physical defect (manufacturing defect); it is not recommended to fix such a defect at home. Take the device to a service center, they will fix the problem or give you a new model of the device.
- No connection to the network. In this case, you need to check whether, in principle, there is coverage in your area by the Yota mobile operator. You can find out by following the link or by typing “Iota coverage map” into the search engine. If according to the map there is coverage over your place of use of the device, but the device cannot connect to the network, take it to the service center.
As general advice, the modem may not work correctly on Operating Systems Windows XP SP2 and lower. If you are trying to use the gadget in the basement, or there are a lot of reinforced concrete floors above you, try going outside.
Setting up the Internet on iPhone
Owners of iPad and iPhone must follow the following procedure:
- Go to the general settings of the device.
- Open the section with cellular communication parameters.
- Select the subsection with cellular data.
- Go to Settings and select Voice & Data.
- Specify the available city connection type. In urban environments, you can choose 3G, 4G.
- Create an Iota APN access point.
To complete the last point, the user needs:
- Open your device's general settings
- Select the section with mobile communication parameters.
- Go to the section with data transfer settings.
- For the access point, specify the value internet.yota.
After exiting the settings, you need to restart your iPhone. This will allow the new settings to take effect.
Switching on SIM for the first time
Turning on the YOTA SIM card for the first time is one of the most important moments. After you install the card into the device yourself, all settings come automatically. When purchasing, check whether the SIM format is correct, since ETA works with different sizes:
- Micro;
- Mini;
- Nano.
Information about the size of the SIM card slot is in the technical description of the device; if for some reason you have not determined the required format without outside help, bring the product with you to the sales salon and consult with the seller.
Setting up internet on Windows Phone
Let's look at how to set up the Internet in the Yota village on mobile devices running Windows. Settings can be accessed by scrolling down the screen starting from the gadget status bar. This allows you to activate the toolbar, in which you need to open the section with communication parameters. If mobile communication is deactivated, it must be turned on by moving the slider to the appropriate position.
To create a new access point, you must follow these step-by-step instructions:
- Go to the network settings section.
- Select a subsection for the SIM card.
- Open the access point settings item.
- Activate the creation of a new access point.
- For the name field, indicate Internet Yota, for the access point, enter the value internet.yota.
Other settings remain unchanged. The user needs to reboot the device for the new settings to take effect. This will allow the Internet from the Yota provider to work stably.
A similar algorithm is applicable for Symbian-based devices. But before purchasing a particular tariff for such phones, it is worth finding out whether it can connect to fourth generation networks.
No signal: why does this situation happen?
Sometimes users complain that the Internet does not work. Often, Android gadgets disconnect from the access point on their own, but don’t worry, as the problem can be easily fixed.
There may be no Internet when you leave the coverage area of the Iota provider. This problem can only be solved in one way - return to the access point. This is done like this:
- The device reboots.
- The “Only 2G networks” section turns on for a couple of seconds, and then immediately turns off.
After these steps, the Internet should work. Such problems most often occur among residents of regions that have a limited coverage area.
Internet activation on Android
The process of setting up mobile Internet on phones and tablets with Android OS (Asus, Samsung, Huawei, Xiaomi) is as follows:
- Go to main settings.
- Go to the network settings section and open additional settings.
- Go to the subsection with mobile network settings and select creating a new APN access point.
- For the name, set the value to yota, for the APN, set to internet.yota.
Save the new settings by pressing the button and reboot the Android system.
Step-by-step APN setup on Android
To set up access to the global network on an Android device, the user should follow these steps:
- Open advanced settings through the general settings of your smartphone.
- Go to the section with mobile network data.
- Select the APN access point settings item.
- Delete all existing access points and create a new connection.
- In the Name field, enter “yota”; for APN, enter the value “internet.yota”.
- Check the checkbox for enabling and disabling the ALP.
Next, you should save the changes made using the appropriate button. After this, you need to reboot the system and activate the created access point. Professionals recommend unchecking the automatic connection to the 2nd generation network. This will allow the device to connect to 4th generation networks. An exception to this rule will be the operation of the device in regions with unstable 4G network coverage. In such cases, it is worth setting priority for 2G or 3G networks, otherwise the device will periodically switch to a network with a more stable but slow signal.
Step-by-step instructions for connecting to a laptop and computer
The instructions for connecting to a laptop and a computer are almost identical, so they will be written in parallel (I will note the differences).
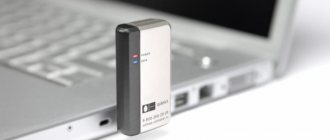
Installing/charging the modem into a USB port (we disassemble it for different types of modems - usb and wifi)
The installation of modems on the computer will be the same for both models, they are connected identically, the only difference is that in the model with Wi-Fi you will need to configure a wireless network.
- First, make sure that the computer is turned on and ready for use, the laptop is charged or connected to a charger.
- You will need to find a free and functional USB port.
- We open the protection (aka USB plug) and insert it according to the key into the prepared connector.
Installing drivers
There is no need to install drivers on your laptop or computer.
- After physical connection, the “Yota Access” program starts. It will automatically begin installing the device driver and special software.
- If for some reason the automatic installation does not start, go to “My Computer” and go to the modem folder, run the file “autorun.exe”
Registration and activation of the modem
The Iota modem is activated automatically after registration. The registration itself is nothing special: you will need to answer a number of simple questions. Among other things, be prepared to enter a working email and phone number, this is important because this data will be checked (phone number by SMS confirmation, mailbox by letter with an activation link). I also want to warn you, to avoid unnecessary problems, enter a valid last name and first name.
Upon completion of registration, you will be given 24 hours of free Internet to select the desired connection model and pay for it.
Settings on PC
- In the case of an LTE modem without WiFi module support, no settings are required; after installation is complete, a new active Iota network will appear, after which you can openly use the Internet.
- In a model that supports the distribution of wireless networks, after installation you will need to configure your access point. You will need to select the name of the network, its password and the type of encryption.
Login to the web interface
- Logging into the Yota web interface is quite simple; enter “status.yota.ru” in the address bar of any browser.
- If you can’t log in this way, you need to go to the modem’s IP address “10.0.0.1”.
- After this, the web interface shell menu will open.
General settings
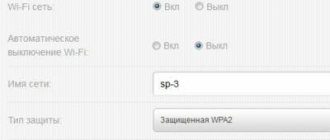
The general settings of the Yota modem contain only four points.
- Turn on/off Wi-Fi network. Switch modes in which the Internet will be available only to the user of a device with a physically connected modem and open the coverage of your Internet by area.
- Automatically turn off Wi-Fi. When the mode is turned on, after a certain time of inactivity, the modem will turn off the Internet. A useful feature when you have little traffic left.
- Network name. The name that will be displayed in the search for Wi-Fi networks.
- Type of protection.
Modem and Wi-Fi password
To set a password for the Internet, go to the settings, look for the “Protection type” item. If you select the “Open” tab, your network will be publicly accessible (without a password). In the remaining tabs you will need to enter the network security key (users will enter it to connect to the Internet).
- How to connect an MTS modem to a laptop - setting up equipment
Opening ports
To configure ports, you will need to go to additional settings.
- In the address bar you must enter “status.yota.ru/advanced” or “10.0.0.1/advanced”.
- Go to the “Ports” menu and configure the following parameters one by one. Public, enter the external port.
- Private, enter the internal port.
- Select the required protocol UDP/TCP/UDP,TCP.
- IP address of the device for which we are making a port.
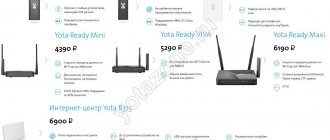
Yota APN: modem settings
Yota developers have created special applications for modems that allow you to access the global network on a personal computer or laptop. Universal device models are compatible with cards from this operator, and branded modems from other companies must first be unlocked.
Locked modems can only work with SIM cards from one provider. Yota offers modems and routers equipped with its official firmware. Such a modem does not require complex configuration to work in the Iota provider network, but without flashing it will not function in the networks of other providers even after full manual configuration.
After installing the SIM card in the appropriate slot and connecting to the PC, the control program and drivers will be automatically installed. Activation of the package and basic setup of APN Yota for the modem also takes place without the participation of the owner. You will have to manually configure the modem only if the automatic configuration fails. On the official Internet portal of the Yota company you will need to register a personal profile and indicate in it all the requested information. A confirmation code to activate a new account will be sent to your Yota SIM card number.
Instead of an introduction
An image that almost everyone already knows - before Iota, all whistle modems were of the same type. Remember all these Beelines-MTS-Megaphones. The same China, in the same packaging. Yota got carried away with the wrapper and did something strong. And under the hood it's about the same.
- Freely holds up to 8 devices on the line.
- Connects via USB to a computer or laptop. It worked for us simply through a power adapter from USB to distribute Wi-Fi.
- Keeps the 4G network full.
- A beautiful and simple interface, which I propose to configure now.
But remember that there are many types of modems and their versions - there are pure 4G LTE, there are versions with Wi-Fi, Many, Micro, etc. – Settings may vary slightly. Setting up the version with Wi-Fi differs precisely in the presence of settings for this wireless network, otherwise all the principles are identical.