The majority of users have long forgotten what a camera is. They take pictures with the camera of their own smartphone or a regular cell phone. Why not, because in terms of image quality, quite a few camera modules on smartphones give a head start to point-and-shoot cameras?
But now we are not talking about how this or that mobile phone takes pictures, but about how to transfer the resulting photos to a computer via a USB cable, also called a charging cord. And it’s not at all difficult to do this.
What will be needed?
Smartphone or regular phone . Smartphones differ from regular mobile phones in that they have a fairly developed operating system that is open for software development by third-party developers (the operating system of regular mobile phones is closed to third-party developers). Installing additional applications can significantly improve the functionality of smartphones compared to regular mobile phones.
Computer or laptop .
A computer is a device or system capable of performing a given, clearly defined, changeable sequence of operations. These are most often operations of numerical calculations and data manipulation, but they also include input-output operations.
A laptop is a portable personal computer that contains typical PC components, including a display, keyboard and pointing device, and batteries.
USB cable. The main feature of the micro USB to USB cable is its versatility.
It can be used with any portable equipment equipped with a microUSB connector. The exact same male interface is present at one end of the cable. The second end is equipped with a USB connector, which must be connected to a charger or to the computer system unit.
Instructions for dummies what to do
Take the USB cable in your hands, plug one side into the computer’s USB port, and the other into the microUSB port on your mobile phone.
Actually, what's next? Then go to “Computer” on the desktop or through the “Start” menu. You will see approximately this picture:
The mobile device is turned on and the computer detects it. Double-click the left mouse button on the portable player (it is indicated by an arrow above).
Once you log into your portable device, you will see various directories. If there is a memory card, you will see 2 sections: SD card and phone memory. If the memory card is not used, there will be only one partition. In our case, there are two sections, which means that we will select the one where the pictures are saved. In our case, in the device’s memory, but you may also have them on a memory card, depending on the parameters.
Here is a list of folders and files, if they are in the phone’s memory (they should be). If you shot with the default camera app on your mobile phone, all photos are located in the DCIM (Digital Camera IMages) directory. Go to it.
Next, as a rule, there are more directories; you need to go to the one called Camera.
Next you will be able to see your images. Select one or more photos with the mouse, you can use the Ctrl key to select the necessary files, then move them to the PC using the “cut” command and “paste” in the desired place using the right key, or copy and paste.
The time it takes to move or copy photos depends on the size of the images, as well as their number.
Another way to transfer photos from your phone to your computer
It is possible to use a different method. Connect your mobile device to your PC using a USB cable, then open “Computer”, right-click on the device and select “Import images and videos”.
An automatic search for image and video files will start.
After completing the search, you will need to click the “Import” button.
All found images will be transferred to the “Imported images and videos” directory, which will open automatically after the import is complete. Please note that in this case, the images are deleted from the device and transferred to the PC.
Another point is that if your smartphone is connected as a media device or as an external storage device, then all photos will be found. And if you connect the device as a camera, then photos and videos will be imported only from the DCIM folder.
Memory card
Another way to transfer photos from your phone to a laptop is to use a regular microSD memory card. However, here you will still need a card reader to insert the card into the laptop. Otherwise, everything is approximately the same as in the case of directly connecting the gadget to a laptop.
- Insert a memory card into your phone and copy photos from the DCIM folder to it;
- Remove the memory card from the mobile device and insert it into the card reader;
- Connect the card reader to your laptop, go through Explorer to the removable drive and copy photos from it.
If you have a USB adapter, you can try connecting a flash drive to your phone and copying data to it, but sometimes problems arise here due to recording restrictions.
How to transfer photos from your phone to your computer without a cord
Above we looked at two options for transferring photos from your phone to your computer using a USB cable. But some users have a question about how to do this wirelessly. And since we have detailed instructions, we will consider as many methods as possible.
We transmit photos via the Internet (social networks).
To carry out a transfer using this method, you need Internet on two devices: on your phone and on your computer. We register in one of the social networks, for example, VKontakte .
VKontakte (international name: VK) is a Russian social network with headquarters in St. Petersburg. The site is available in more than 90 languages; especially popular among Russian-speaking users. VKontakte allows users to send messages to each other, create their own pages and communities, exchange images, tags, audio and video recordings, and play browser games. The goal of VKontakte is to remain the most modern, fast and aesthetic way of communicating on the network at every single moment.
Go to your profile through a mobile browser and find out its id. Then copy the address vk.com/write12345678 and instead of numbers from 1 to 8, insert your id. By going to this address you will open a dialogue with yourself. Then you send yourself as many photos as you need from your phone and they will be saved in your conversation, which will not be available to other users. Then go to your dialogs from your computer and download the photos to your computer. You can also create a private album and upload pictures there, and when you need to download them to your PC.
We transmit photos via the Internet (mobile messengers).
To carry out a transfer using this method, you also need Internet on two devices: on your phone and on your computer. We install one of the mobile instant messengers on our device, for example, Telegram .
Telegram is a cross-platform messenger that allows you to exchange messages and media files of many formats. A proprietary closed-source server part is used, running on the facilities of several US and German companies, financed by Pavel Durov in the amount of about 13 million US dollars annually, and several open source clients, including those under the GNU GPL license.
Personally, we use Telegram to transfer photos so as not to constantly connect the device via USB cable. Well, it’s fast and convenient, despite the fact that this messenger is installed on both mobile and computer. Except that sometimes there were interruptions in communication, but at the time of publication of this entry everything was working fine. Here you need to send pictures to the “Favorites” contact - this is your folder with saved data.
Transferring photos via Bluetooth
This method may be relevant for those who do not have access to the Internet and do not have a cable for their phone. But you must have Bluetooth connection on both devices.
Bluetooth is a manufacturing specification for Wireless personal area networks (WPAN). Bluetooth ensures the exchange of information between devices such as personal computers (desktops, pockets, laptops), mobile phones, printers, digital cameras, mice, keyboards, joysticks, headphones, headsets on a reliable, free, universally available radio frequency for short-range communication. Bluetooth allows these devices to communicate when they are within a radius of up to 10 meters from each other (range varies greatly depending on obstacles and interference), even in different rooms.
This method is more suitable for owners of laptops than regular desktop computers, due to the fact that laptops, as a rule, have built-in Bluetooth, while desktop PCs do not. However, you can purchase a Bluetooth device for your PC that connects to a USB port. Depending on the specification, the connection speed differs.
Transferring photos via memory card
A memory card (sometimes incorrectly called a flash card) is a compact electronic storage device used for storing digital information. Modern memory cards are made on the basis of flash memory, although in principle other technologies can be used. Memory cards are widely used in electronic devices, including digital cameras, cell phones, laptops, and portable digital audio players.
In this case, you need a device that connects to a PC and will allow you to work with the memory of your memory card. Also, photos must first be moved to the memory card in your phone. This is done through Explorer (file manager).
So, if your computer or laptop has a card reader, then this device will help you, because it is designed for reading memory cards and other electronic cards for a wide variety of purposes.
You must also have a memory card adapter if you are using TransFlash.
The most widespread are:
- universal card readers for flash memory-based storage devices, often containing several different connectors and connected via a USB interface to a general-purpose computer. There are external (in the form of a separate device) and internal (in the form of a module installed in the 3.5″ bay of the system unit). USB card readers usually implement standard English class. USB Mass Storage Device[2], drivers for which are included in most operating systems.
- specialized smart card reading devices interfaced with equipment using the corresponding type of cards. For example, an ATM card reader (EMV), a card reader at automated checkpoints and metro checkpoints.
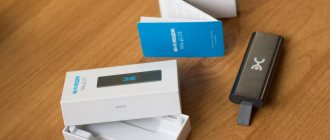
There are also USB card readers that support various memory cards, one of which is shown in the picture below.
We also have a USB modem from a megaphone, model E173u-1, which, after purchasing, was soon flashed for different operators. So, it has a built-in card reader, you can insert microSD (TransFlash) cards, without an adapter.
A wireless modem is a transceiver that uses mobile operator networks to transmit and receive information.
We've covered the basics and you shouldn't have any difficulties transferring images from your mobile device to your computer.
Additional materials
We also recommend that you read the additional materials, you may find them useful. Transferring photos may vary between versions of Windows, so we've provided this additional information.
Windows is a family of commercial operating systems (OC) from Microsoft Corporation, focused on the use of a graphical interface for management. Initially, Windows was just a graphical add-on program for the MS-DOS operating system of the 80s and 90s. As of August 2014, according to the Net Applications resource, about 89% of personal computers are running operating systems of the Windows family. Windows runs on x86, x86-64, IA-64 and ARM platforms. There were also versions for DEC Alpha, MIPS, PowerPC and SPARC.
How to transfer photos from your phone to your Windows 10 computer
To transfer photos and videos from your phone to your computer, follow the steps below.
- Connect your phone to your computer using a USB cable. Make sure your phone is turned on and unlocked. If it's an Android phone, you may need to change your USB settings to ensure that you can transfer media or photos in addition to charging your phone.
- Open the Photos app on your computer (click Start
and select
Photos
), select
Import
and
From USB Device
, and then follow the instructions. You can select the items to import and the folder to save them.
You can also take a wireless approach and use a Windows app on your computer to automatically send photos and videos from your phone as you take them.
Using Wi-Fi
Using the Wi-Fi interface will allow you to transfer photos from your smartphone to your computer using wireless technology. The technique is equally effective for all popular mobile platforms (Android, IOS).
The user needs to download a file manager from the official application store to the phone, for example Cloud File Manager. Next you need to start setting up your computer:
- Create or find a folder where the photos will be transferred. Right-click and select Properties.
- In the Access tab, click the Sharing button.
- In the drop-down list, select the All position, and next to the permissions, set Read and Write.
- Complete the setup by clicking the Share button.
To gain access to the folder, you will additionally need the computer's IP address. To find it out, you need to open the Command Line (you can via Start) and run the ipconfig command. In addition to general information about the PC, the IPv4 address will also be present.
To synchronize your computer with your smartphone, you need to open the Cloud File Manager application on your mobile device and go to the Local Network (LAN) section. Add a new network and opposite the Host (Address) line enter the previously obtained PC IP address. After saving all the changes, the user will be able to see the available folder on the smartphone and transfer all the necessary photos to it.
FAQ
When I go to the DCIM folder from a computer, there are no photos in it, but there are photos on the phone, that is, the computer does not see the photos on the phone.
This problem occurs on some models of Android smartphones, it has not been fully studied, there may be something with access rights, there may be several solutions, here is one of them:
- You will need a file manager. Or install the TotalCommander application directly from Google Play. We make a copy of the DCIM\Camera folder, for example DCIM\Camera2 directly in the phone itself. See if you have enough space for this. After that, connect the device to the computer and download photos from the DCIM\Camera2 folder.
- Another way, but it is risky and you can lose all the photos from your phone. It consists of renaming the DCIM folder to DCIM2 (or any other), then renaming it again as it was originally and connecting the device to the computer. This method helps some, but for others some of the photos are deleted. Therefore, the first method is more optimal, but requires free space for copying.
- The third method is similar to the first, but you do not copy the Camera folder, but move photos from this folder through the built-in file manager or the same TotalCommander to another folder. Then connect the device to your PC and download photos.
Transfer photos to laptop via Bluetooth
You can also transfer photos to a second device using a wireless communication specification such as Bluetooth. First you need to find the radio module on your laptop; usually the icon is located on the desktop quick access panel. If it is inactive, it will not be there.
To turn on the transmitter you need to:
- Go to Start, then Control Panel.
- Click on Network and Sharing Center.
- In the menu on the left, select the column Change adapter settings.
- Right-click on Bluetooth Network Connections. Enable option.
Not only the phone, but also the laptop must support Bluetooth. If it is not there, you should consider another option for copying materials or purchase an external adapter.
When Bluetooth is activated, you can transfer materials to the device:
- Click Accept file on computer.
- Open your smartphone's photo gallery. Mark pictures.
- Click on Bluetooth on your phone. Scanning of nearby electronic devices will begin.
- When the PC is displayed, click on the icon - the materials will be automatically transferred.
- Complete the procedure by clicking Finish.
Problems during import of pictures are often resolved by simply rebooting the devices