power unit
If the cable turns out to be working, but the charger still does not perform its function, check the operation of the power supply on another smartphone or, if possible, measure the voltage at the charging output connector using a voltmeter. If there is no voltage, the unit is faulty and must be replaced.
Read more about the charger in our article.
Reboot your phone
Often, smartphone problems such as this are caused by a simple mistake. To rule out that the cause is a temporary glitch, a reboot should be your first step.
Rebooting the phone will end all background services. It also updates the main components of your phone, in case one of them fell while performing a task. To quickly restart, simply hold the Power button and tap the Restart option.
If your phone's charging functions work properly again after a reboot, you should review all third-party apps and remove the ones you don't trust.
Contacts
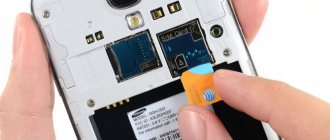
Another common cause of problems with charging a smartphone or tablet is clogged contacts. Dust and other small debris may get into the charger connector and the phone itself. The contacts can be cleaned with a soft brush, and you can also try to “lift” the fasteners inside the connector with a toothpick.
Attention! These actions are dangerous and must be performed carefully and competently. Remember that all responsibility for the gadget lies on your shoulders.
Step-by-step diagnostics with examples
Do not despair ahead of time if you think that your device cannot be saved. Let's look at a step-by-step diagnostic strategy.
First, check the cable, power supply and charging connector for serviceability. They should not be chipped, large scratches, dirt or deformed.
If you are unsure about the wire, try a different wire first or charge another phone with this wire. A typical wire malfunction is when the phone starts charging at the slightest movement of the wire from the connector. Do not overdo it when diagnosing, do not damage the charging connector.
The power supply is also quite easy to check. If your device is properly charged from a computer or other power supply, then the power supply being tested is 100% faulty. It can no longer be used, and it is unprofitable to repair.
And remember that some smartphone models, such as Samsung, may not charge with non-standard chargers.
Next in line is the charging connector. Try cleaning it with a brush.
A toothbrush is ideal as it can easily remove dirt and debris from the contacts.
Clean carefully so as not to damage the insides and contacts of the connector.
Do not use water when cleaning. This can cause the contacts to oxidize. And the water will not completely dry from the connector, and this will be another malfunction. Alcohol, isopropanol or Galosh gasoline are best. Use these products in small quantities, no need to pour them into the connector or onto the brush, a couple of drops are enough.
If, after cleaning the connector when connecting the wire, charging occurs, but is interrupted by the slightest movements and the connector does not hold the wire, then this is mechanical damage to the contacts. Such a malfunction can only be eliminated by soldering. And the connector may not necessarily be torn out of the board. Its contacts are also exposed on the board, and they are easy to tear out if you accidentally pull the wire while charging.
Do not try to fill the charging ports with superglue. Glue will not restore contact. He will even damage them.
Is it possible to solder the charging connector with your own hands?
Yes, this can be done if you are confident in your abilities and have a soldering iron and a minimum soldering kit. You can learn more about the intricacies of do-it-yourself soldering in this article.
How to change the battery
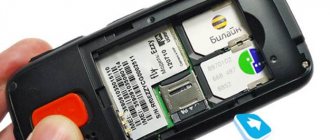
If the phone still charges, sees the charging connector and works, but the battery does not charge, then most likely it is the battery that is faulty.
For example, you pull the wire out of the connector and the phone immediately turns off. This means that the battery capacity is dry or short-circuited. In this case, you need to change the battery.
Typical battery malfunctions are swelling and leakage of electrolyte. This happens due to overheating, hypothermia, short circuit or interference in the power supply. Don't even try to charge it with a frog that's damaged like that. It's dangerous and useless.
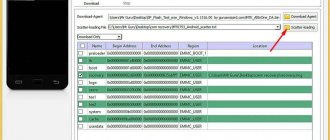
You can also check your phone and battery using a multimeter.
This method is accurate and more suitable for those who know how to disassemble phones and who have measuring instruments.
Set the multimeter to DC voltage measurement mode and connect the battery to the smartphone. Next, attach the multimeter probes to the contacts of the battery or board.
If, when you turn on the smartphone or disconnect the wire, the voltage on the battery drops sharply to several volts, then the battery capacity has a short circuit and needs to be replaced.
Modern smartphones are made in monolithic cases, and if you have the opportunity to peel off the back cover yourself, you can try replacing the faulty battery with a new one. Do not damage the old battery when removing the cover; do everything carefully. You can read more about the placement of modules, touchscreens, screens and back covers in this article.
If you have changed the battery and are sure that the connector, wire and power supply are in good working order, then most likely the problem is already on the board itself. It may have faulty chips such as: power controller, charging controller, processor and small SMD components.
Typical signs of a fault on the board are:
- The phone does not turn on and only the charging indicator lights up;
- The phone gets very hot when charging;
- Even a new battery drains quickly.
Even a small amount of moisture on your phone can damage it. By the way, many car owners charge their phones and navigators directly from the car’s converter. Not all smartphones and chargers are designed for this. When the car is turned on, there are large voltage surges and interference in the network, which can damage the phone's power controller.
You can warm up the board by first disassembling the smartphone and even clean it with alcohol, but the chances of a successful repair are extremely low. We need diagnostics with the power supply, freezer, circuits and soldering equipment. And each model of smartphone or tablet has different circuit boards, which makes diagnostics difficult.
Could there be a software glitch?
A purely software malfunction rarely manifests itself without an external cause. If water gets on your phone and while charging it starts to vibrate, blink or show your Android stash, then under no circumstances should you charge it. You risk killing your device.
Once exposed to moisture, you cannot charge your phone. It urgently needs to be cleaned of water and oxides. If you are not sure that you can clean it, it is best to contact a service center.
Software
If the smartphone firmware is unsuccessful or an update is installed, the system may malfunction, including during the charging process. There are several ways to fix this:
- Use applications to optimize the system and clean it of accumulated garbage (CCleaner, Clean Master, Smart Manager).
- Remove applications that were recently installed (they may conflict with the software).
- Reset the system via Recovery or phone settings (all data will be deleted).
Try charging your phone in safe mode
As the next step, try booting your phone into Safe Mode. Essentially, Safe Mode is a sandboxed environment that limits your phone to only the software it originally came with. This means that any third-party apps you download will not run in Safe Mode.
If you can charge your phone in Safe Mode, you know for sure that the culprit is a third-party service. Once you've confirmed this, review any apps you've recently downloaded. One of them may be the cause of your charging problems.
Try uninstalling recent apps and any apps you don't trust or haven't used in a while. Then restart your phone normally and see if it charges again. If you cannot fix the problem using this method, a factory reset is the most effective.
To enter Safe Mode on most new Android devices, press and hold the Power button. In the window that appears, press and hold the Power off button. After accepting the request, your phone will soon reboot into Safe Mode. To exit Safe Mode, repeat the procedure by selecting the Restart option.
Since not all Android skins work the same, the process may vary on your phone. If the steps here don't work, try visiting the support website for your device or searching for the Safe Mode button combination.
Battery calibration on Android
If your mobile device sees charging, but charges slowly or displays incorrect battery indicators, you can try calibrating the battery (article here, brief instructions below).
- Completely discharge the gadget until it turns off. When you try to turn it on, it should turn off immediately.
- If the battery is removable, remove it from the device and keep it separately for a few minutes.
- Reinsert the battery.
- Charge the device to 100% without turning it on.
- Remove the battery again and put it back after a while.
Unfortunately, calibration is not relevant for modern batteries.
How to prevent such a malfunction
It is enough to follow simple rules:
- Use original and high-quality chargers and cables;
- Do not use your phone or tablet while charging. Excessive movements may cause the connector to become loose. You can also try magnetic chargers and wires. They are easy to detach;
- Do not charge the phone from the car network immediately after starting;
- Do not discharge your smartphone to 0 and do not charge it to 100%. The ideal middle is from 10% to 90%. This is a proven fact. This way the battery will last much longer;
- Protect your phone and its connectors from dirt, dust and moisture;
- Try to prevent your phone from overheating or hypothermia outdoors and do not use it in such conditions. This negatively affects the condition of the battery and can reduce the service life of its serviceable operation and warranty.
Post Views: 598
How to enable Android battery percentage display
To record more accurate indicators of the charging process, people are looking for how to make charging percentages on Android so that they are displayed instead of the intuitive painting of the battery icon, which is activated by default. Displaying the battery charge percentage on Android is very convenient, and it is very simple to do:
- Go to the device settings.
- Find the item “Battery”.
- Select the “Charge level” parameter.
- Activate the charge percentage display.
Battery percentage on Android
In conclusion, we can say that following the competent advice and step-by-step instructions that were given in this material will preserve the “health” of the battery for a longer period. If the charging percentage on Android does not show correctly, you must first activate this function and then calibrate the battery.
Clean the charging port
Since it is always susceptible to contamination, the charging port is one of the most vulnerable parts of your phone. Dust particles can quickly accumulate and prevent your phone from connecting to a power source.
Check your phone's charging port and if you notice a build-up of dirt or other contaminants, clean it. You can do this easily by cleaning it with a dry cotton swab. Since it is a bit delicate, you should approach it with a gentle hand.
For a better look, use a flashlight to completely inspect the charging port area. If you notice any foreign objects stuck inside, you can do more heavy-duty cleaning with a SIM eject tool or a toothpick. After thoroughly cleaning your port, try charging your phone again.