You needed to delete your Google account from Android
phone or tablet? Then this article is for you! We have the answer!
Let's start with the Google account itself, what it does and what it is needed for (if you are not interested, scroll to the bottom of the article). This linked account allows you to use the Google Play
from which we download games, programs and the like, we cannot do this without it. The account also allows you to save contacts that you can always restore on another device, use Gmail from Google and other services including books, music, movies from Google. In general, without a Google account, your smartphone is just a regular phone for receiving calls and SMS.
But it happens that you still need to delete your account from the device.
The reasons can be very different, for example, you are selling or giving away your smartphone and do not want others to use your account and read your mail, look through contacts and the like, then the question arises of how to delete it. What you can't do when you delete your account:
- Linked contacts will not be displayed;
- You will not be able to download and buy Android applications on Google Play;
- You will not have Gmail mail, but all letters will remain if you log in from a PC, for example.
- Okay Google, Hangouts, Google+ and other services will not work;
- You will not be able to leave comments on YouTube or subscribe to channels.
It is worth noting that all previously downloaded applications from Google Play will remain on your device, contacts and SMS saved on the SIM card will remain untouched.
There are also advantages to deleting a Google account - various Google services will stop tracking you, and this will lead to saving traffic and battery. The number of unnecessary notifications will also be significantly reduced.
If suddenly one of you is afraid for your account in the future after deletion, then do not be afraid, all the data stored in it will remain on the Internet, and you can then add it again.
The message “Account deletion error” appeared - what should I do?
It happens that the methods described above do not work. As a result, after rebooting the device, the Google account remains in place or a deletion error occurs. In this case, the procedure will change slightly.
Stop syncing
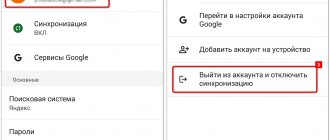
On Chinese smartphones, automatic synchronization of Google services is often activated by default. To delete your Google account without any problems, it must be disabled. For this:
- Open your mobile device settings.
- Find the "Synchronization" tab.
Useful Android features - we use all the capabilities of mobile devices
- Disable synchronization by moving the slider to the appropriate (inactive) position.
- Select the required Google account.
- Delete your account.
Changing your account in the Gmail app
- Launch the Gmail app on your mobile device.
- Tap on the profile icon located in the upper right corner of the screen.
- Click on the “Add account” button.
- Tap on “Google” and enter your new account information.
- In the application profile, change the information from the old account to the new one.
Clearing app data
- Open Settings.
- Go to the "Applications" section.
- Find “Google Accounts” in the list of installed programs that appears.
- Click on the “Erase data” button. If you simply clear the cache, the old Google account information will remain.
Adding a second account
You will need to go to your smartphone settings again. The further procedure will be as follows:
- Find the "Accounts" section.
- Click on the “Add account” button.
- Select Google.
- Enter the information from the second account. Agree to the terms of use.
- A second user will appear in the “Accounts” section.
- Try making the new account your primary account.
- If no errors occurred during the procedure, delete the old account in the same section.
How to open a password-protected archive - the three most effective ways
Removal using ROOT rights
ROOT is superuser rights. By default they are not available to the user. To obtain ROOT rights, you need to use specialized programs. The algorithm for activating them depends on the model of the mobile device. If you have ROOT rights, the process of deleting a Google account is as follows:
- Open standard Explorer or another file manager you use.
- Find the Android folder. In this folder, go to the Data section and open the System subfolder.
- Delete the ACCOUNTS.DB file. Restart your smartphone.
Ways to Bypass Google Account FRP After Reset for Advanced Users
These methods to bypass Google FRP account after reset are not recommended for users who have never used SP Flash Tool or custom recovery. These methods are only suitable for smartphones with an MTK chip!
Bypass FRP Lock using SP Flash Tool
- Install the drivers, SP Flash Tool and download the scatter file from your firmware (you can download the full firmware, unzip it and take the scatter from there)
Important! We need a scatter file from the current firmware! If you have Android 5.1 installed, then scatter from Android 6.0 may not work!
- In scatter-loading, specify your scatter
- Go to the Format tab – Manual Format Flash
- Now you need to indicate at what address Google FRP Lock is recorded, to do this, open your scatter.txt with any text editor (NotePad++ will be more convenient) and run a search (Ctrl+f) find frp, it should find something like this:
- Now we transfer the value “linear_start_addr” from scatter.txt to “Begin Adress [HEX]” in the SP Flash Tool, also “partition_size:” to “Format Length[HEX]”, this is where Google FRP Lock is located
- Click Start and connect the switched off phone to the PC, wait until the cleaning is completed
- Turn on the device, no more FRP Lock!
Did you manage to bypass Google FRP Lock? What method did you use? Share your experience in the comments.
Article in English
How to log out of your Google account without deleting your account?
Many users use accounts to register on social networks, online stores, and various websites. They do not need to completely delete the account. In this case, you can simply delete your account information from your mobile device.
On a smartphone
Typically, a smartphone provides several ways to delete account data: through Android settings, by changing the password, and by resetting to factory settings.
In Android settings
- Go to your mobile device settings.
- Open the "Accounts and Backup" section.
- Go to the Accounts tab.
- How to resize an image: 5 convenient ways
- Select the required Google account.
- Tap on the “Delete account” item.
- Enter password. Wait for the procedure to complete.
Reset to factory settings
Using this method will delete all data from your smartphone, so it is recommended to copy important files to cloud storage or to your PC. Your Google profile will remain the same. It can be connected to other mobile devices. Your Google account login and password will not change after this procedure.
Procedure:
- Open your mobile device settings.
- Go to the "Backup and Reset" section.
- Select "Reset settings". Depending on the model of the device, the option may be called “Data reset” or something slightly different.
- Confirm your actions.
After confirming the actions taken, the mobile device will automatically reboot, after which the data deletion procedure will begin. Contacts, programs, and files will be deleted. After completing this procedure, the smartphone will need to be configured again and the access data for your Google account must be entered again.
On PC
You can unlink your Google account from mobile devices via a computer connected to the Internet. To do this, you can use any convenient browser.
In Google Chrome browser
You can use this method if you were previously authorized through a browser in the Google mail service. If not, you will first need to go through the standard authorization procedure.
- Click on the “Details” button in the upper right corner of the browser window.
- Go to your Google account settings and open the "Security" section.
- Find the "My Devices" tab.
- Remove the required smartphone from your account.
In other browsers
- Open the link https://myaccount.google.com/?pli=1. If necessary, sign in to your Google account.
- Go to the "Security" section. Find the “My Devices” tab there.
- Click on "Device Management".
- Select the device you want to remove your Google account from and click the Sign Out button.
Please leave your opinions on the current topic of the material. We thank you very much for your comments, subscriptions, dislikes, likes, responses!
Kristina Gorbunovaauthor
Summarizing
The article describes effective and self-sufficient methods to bypass the Google FRP (Factory Reset Protection) account security lock, in the case when, after “resetting” the gadget to factory settings, the user encountered a problem due to a forgotten password or ignorance of it, when purchasing a device with hands
By using any of the methods and following the described instructions, the user will be able to restore the functionality of the smartphone or tablet and the ability to use it as intended. On the other hand, the presence of “unofficial” opportunities to bypass the blocking is promising and profitable for scammers, so you shouldn’t count 100% solely on FRP protection from smartphone developers against pickpockets; you need to be careful about your things and monitor their safety. As for logins and passwords, their safety is guaranteed not by “excellent” memory, but by storing passwords in written form in a secluded place.
Google Search
To remove the account confirmation request without using PC programs, you should, as the device owner already knows, go to the system settings. Below are two more ways to do this without extra effort. The first of them is at the stage of logging into a linked account. The user will need:
- Tap on the login input field.
- Find the system button with the @ symbol on the Google keyboard that appears and hold it.
- Until a window with a gear icon appears.
- Click on it and as soon as “Voice Search” opens.
- Use the physical phone button to go to the list of running processes and click on the Google search bar located at the top of the screen.
- Enter the word “Settings” in it and open the corresponding system menu.
- Great! Now all that remains is to select “Restore and reset”; the user already knows how to proceed.
Methods for resetting protection
For modern tablets and smartphones, after a reset, there are ways to bypass FRP for a Google account, but not all of them work on every gadget. Different phones have their own unique methods. All methods of bypassing a Google account are conditionally divided into 2 large groups:
- official;
- secret unofficial.
Google's security policy states that FRP is active for only 3 days. If you have time to wait, then the protection will stop blocking the activation and you won’t need to unlink from your Google account.
QuickShortcutMaker
Another way to reset the current Google Chrome settings on Android involves working in English:
- initiate login;
- at the stage when they ask for data to log in, change the interface language to English;
- Press Home three times quickly. This is a button located on the phone panel. It is central among the three most important buttons of the device. Confirmation that everything worked out will be a voice message about TalkBack activation;
- rotate the Russian version by sliding your finger across the screen diagonally or straight. If you don’t succeed the first time, you can repeat the movement again;
- A context menu will open. Find “TalkBack Settings” in it;
- when the menu pops up, press Home again 3 times as quickly as possible;
- click on “Privacy Policy”;
- specify any browser;
- start the Internet connection;
- in the search bar type QuickShortCutMaker;
- press "Search". It is necessary to find a resource where you can download the APK file of this software, but in such a way that there is no transition to Google Play. Make sure the source is safe;
- download the application and install it. The installation starts automatically;
- run the utility;
- go to the “Advanced Search” tab;
- type TouchWiz;
- the inscription will appear at the top. Tap on it;
- activate “View”;
- The Android desktop will appear. You should go to the settings menu;
- touch “About device”;
- go to “Software Details”;
- Scroll to “Build Number” and click on it 8-10 times;
- Developer mode will start. Now in the same section, select “Developer Options”;
- move the toggle switch to “Unlock...” and “Reset data” to the active position;
- confirm the command;
- wait for the algorithm to complete execution;
- create a new account or choose another one.
How to set up a search engine in Google Chrome
FRP protection: benefits and harms
FRP protection is automatically triggered after a hard reset. On the one hand, this is good: an attacker will not gain access to the data. He receives, in fact, a “brick” that is useless without access to the Android OS and the contents of the phone.
On the other hand, an access error may occur when you restore settings yourself. What if you can't remember the data or the device doesn't want to accept it?
The following will tell you how to bypass Google account verification.
Note : There may be differences in how to bypass FRP on different device models (Samsung, Pixel, HTR, Lenovo, etc.) and Android versions, but in general these instructions will be useful if you follow them step by step.
Method 4 – deleting system files (for devices with ROOT rights)
If you have superuser rights installed on your gadget, it will be much easier to delete all linked accounts.
You have the ability to edit and delete any system files and entries, and all account data is stored in one document.
You can erase the desired file from both your computer and your smartphone.
In the first case, connect the gadget to your PC and open the root folder; in the second, download Root Explorer to view hidden files.
Follow the instructions:
1. Open the phone’s file storage and go to the DATAàSYSETM or DATAàSYSETMàUsersà0 directory (depending on the installed firmware version);
2. In the list of files, find the ACCOUNTS.DB component and open its settings with a long touch ;
3. In the drop-down menu list, click on “Delete” and wait until the file disappears from Explorer.
Fig.13 - Removing ACCOUNTS.DB
This action allows you to erase all records of linked accounts from your smartphone. Reboot your phone.
After turning it back on, Android will automatically create a new “empty” ACCOUNTS.DB file.
Immediately after turning it on, you will be asked to add an account - create a new one or log into an existing page. Old accounts will not be displayed.
All files and contacts of the user that are stored on the device will not be deleted either.
Authorization during a call
Another way to remove the request to confirm your Google account is to link another account to your phone directly during an incoming call. This can be done in a couple of minutes - faster than going through the IMEI recovery procedure. To bypass the request, the user will need:
- Call a “locked” phone, accept the call and, without hanging up, go to the “Contacts” menu.
- Click on the “Add” button.
- Select create a new account.
- Specify its type - it’s easy to guess that it will be a Google profile.
- Enter the login and password for your work account in the appropriate fields - or create a new one, not forgetting to save the authorization data.
Important: at the stage of creating an account or logging into an existing call, you can end it by pressing “Reset” on the smartphone from which it was made.
Using Adb Run
You can bypass Google account verification using this wonderful PC program in all respects. After downloading (download - clouds.androidp1.ru) and installing it, the owner of a phone with FRP must:
- Connect the phone, wait for initialization and launch the program, then select Reboot Android from the list of available options by entering the number 2 in the text line and pressing Enter.
- Next, follow the same path to the Reboot Bootloader command and go to Fastboot menu.
- Select input mode Manual.
- And run Manual mode Fastboot.
- In the command line that appears, enter fastboot oem clean_frp and apply the command by pressing Enter again.
- Wait for the notification of successful completion and reboot the phone into normal mode using the “On/Off” button.
- If after entering the command nothing happened, apply a chain of additional ones: in the same field, enter fastboot erase persistent .
- Apply and wait for the request to be processed.
- Then - fastboot erase frp .
- And fastboot erase config .
- Once the process is completed, reboot Android.
In this way, the phone owner is almost guaranteed to be able to remove notifications about the need to confirm a Google account; if the method does not work, you need to move on to the next one, more complex, but also effective.
WiFi
The second option for entering “Settings” at the account confirmation stage involves the following user actions:
- Connect to your own wireless network, then select any other one displayed on the screen.
- And enter any combination of characters in the password field.
- Now the owner of an Android phone will have the opportunity to go back to the list of running processes - and proceed further exactly as written in the previous section.
Method 3 – Force stop of Google Accounts service
Google preinstalls a set of its web services and applications on all Android smartphones and tablets. This allows you to simplify the setup of your smartphone and speed up its operation.
The Google Accounts service is responsible for managing user accounts.
With this service, you can install the latest security updates and easily manage connected accounts.
In the system settings, you can forcefully stop Google Accounts and delete all utility data.
This way, all linked accounts will be automatically erased from the gadget.
Follow the instructions:
- Open settings;
- Select the "Applications" tab;
- Find the “Google Accounts” utility and select it;
- In the new window, alternately click on “Force stop” and “Erase data”.
Fig. 12 - Erasing Google service data
If your smartphone does not have a separate Accounts application, select the Google Services utility and erase all its data.
conclusions
There are a large number of options for resetting your Google account on Android.
If you figure everything out, it will be very simple to do. The main problem in bypassing a Google account is the problems with accessing the settings menu, which is why you have to do so many manipulations.
If one of the above methods does not help, then try waiting a few days before trying again.
Read on topic: What to do if your phone is hacked