If you have a laptop and a modem at home, it will not be difficult to create an internal network that other household members can use from different electronic devices. When performing this operation, it is recommended to use several proven methods, having first figured out how to distribute Wi-Fi from a modem.
Wi-Fi distribution
Methods for creating a local Wi-Fi network
The operation takes only a few minutes. To create your own network inside your home, you need to use only two components:
- A modem that provides access to the Internet.
- A network adapter with which it can receive a Wi-Fi network.
Important! If the device is able to “see” Wi-Fi, then it can be configured for distribution - this is the main postulate.
In the Windows operating system (versions 7 to 10), there is a special tool with which you can easily create a Wi-Fi network yourself. But if it is not suitable in a particular situation, then it is advisable to install third-party programs, with the help of which the setup process is simplified as much as possible.
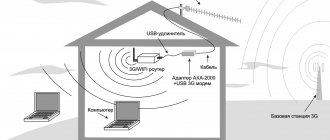
How to distribute MTS Connect Internet to several computers
If there is a small local network without the Internet and someone in this network has a 3G modem, one day the question arises of how to distribute this Internet to other users on the local network so that they can also take advantage of this benefit of civilization. The solution turns out to be not so obvious, since such a possibility is in its software.
One option is to buy a router with support for connecting a 3G modem, but practice shows that it is very rarely possible to set everything up right away and without problems. It often happens that a given model of router refuses to accept our modem and we need to wait for a firmware update, or change the modem (router) in the hope that they will still “make friends”. The second disadvantage of this method is the financial costs of purchasing a router.
The second option is to set up a proxy server on a computer with the Internet, but this option requires a good IT specialist who will understand the intricacies of setting up on the main computer and will carry out a large amount of work on setting up the Internet on all other computers.
After wandering through the modem settings, we assumed that there must be a third option and we were right. Its essence lies in manually creating a Remote Access Connection and connecting other network users to it.
1. Find out the connection parameters
Look in the modem settings:
We see that the username is “mobilie”, the password is hidden by asterisks, but we assumed that it was also “mobilie” (later it turned out that we were right); phone number: "#777"
Creating a remote access connection
For Windows XP
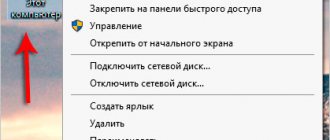
Go to the “Network Connections” folder (Start -> Control Panel -> Network and Internet Connections -> Network Connections) and click on “Create a new connection” (File -> New Connection):
Select “Connect to the Internet”
Select “Set up a connection manually”
Select the item “Via a regular modem”
Enter an arbitrary name, for example “MTS”
Enter the dial-up phone number (in our case “#777”)
Enter the Username, Password and its Confirmation (in our case it is “mobilie”)
Click “Finish”
We try to connect, check
“Sharing” the connection
So, everything worked for us, the only thing left to do is make this connection publicly available. Now let’s do what this connection was created for and what cannot be done using a standard program from MTS - we will distribute the Internet to other users of the local network:
Open the Properties of our connection
Go to the “Advanced” tab and check the “Allow sharing…” checkbox (1); two other checkboxes (2) - as desired, click “OK” (3)
In the information message, click OK
On our network card (which now distributes the Internet to the network), the IP address was automatically set to 192.168.0.1, the subnet mask was 255.255.255.0
After these manipulations, it is advisable to restart the computer.
Checking network settings on other computers
If difficulties arise with the automatic connection of other computers, you need to check their network settings and, if necessary, manually register on each of them: IP address - 192.168.0.X (X - a number from 2 to 255 (for each computer - UNIQUE ); Subnet mask: 255.255.255.0; Default gateway: 192.168.0.1; Preferred DNS server: 192.168.0.1:
1. Local network connection properties. 2. Select the line “Internet Protocol TCP/IP”. 3. “Properties” button. 4. Enter the specified values: IP address: 192.168.0.X (X is a number from 2 to 255); Subnet mask: 255.255.255.0; Default gateway: 192.168.0.1; Preferred DNS server: 192.168.0.1. 5. Close
Now access to the Internet will appear on other computers on the network.
USB modem without Wi-Fi
How to distribute Wi-Fi from a modem to a phone or computer - procedure:
- Create and then activate the network.
- Next, create access to the network that other users can use.
Important! Difficulties usually arise only if you have an ADSL modem, since this is outdated equipment that is inferior to modern models. Therefore, it is preferable to buy a new device. However, you can work with the old one.
USB modems from providers such as Yota, Beeline and similar are suitable for use.
Setting algorithm
To start the operation, you need to open the command line of your personal computer or laptop. Through the control panel, after creating a network, you can allow third-party users to access it to access the Internet.
First you need to make sure whether the modem can distribute Wi-Fi. Checking this is as simple as possible: open any search engine and enter a query. If there is Internet, then you can proceed to creating an access point.
The entire algorithm consists of the following actions:
- Make sure the modem is working.
- Create an access point with a new name and password.
- Allow sharing.
The whole operation will take a few minutes.
Create an access point
To create an access point that can be used by other family members, you must perform the following procedure (the network will begin to function only after completing the second item in the list):
1. If the Windows 7 operating system is installed, then all actions must be performed through the Start menu. For Windows 8 and 10, use the search bar (cmd command). As soon as the proposed option (command line) appears, it must be activated with the right mouse button and launched using administrator rights.
2. In the command line that opens, you must enter the following combination:
Command to configure
Instead of the letter “N”, enter any name of the network, you can invent your own. The letter “K” stands for a password, which you also need to come up with.
Important! The password must be 8 characters or more, otherwise the computer will not accept the command and you will have to start all over again.
3. Once the command is running, enter the following:
Command to configure
After this action, a window appears, where it is written about the correct completion of the process and the launch of the created network.
If an error occurs, you need to make sure that Wi-Fi mode is enabled on the device. On certain laptop models, a special button is installed that turns on Wi-Fi. If this needs to be done programmatically, then Wi-Fi can be activated through the general list of networks (use the Wi-Fi icon located at the bottom of the screen).
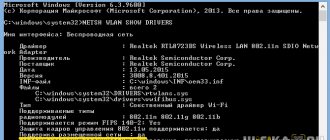
Important! If Wi-Fi is already turned on, but the command does not produce results, you will have to reload the network adapter drivers.
We allow Internet distribution
The next step is to allow other devices to use the created network. It is important to note that only a local network has been created, which does not allow access to the Internet, and there is also no possibility of data transfer. It is not yet possible to download certain files through it.
Procedure to activate network access:
- Go to the Control Panel.
- Find the tab and go to manage created networks. If the section does not appear on the first page, then it is advisable to use the search bar to activate the desired function.
- A line for changing adapter parameters will appear.
- Click on it to go to the next step.
- As soon as access opens, you must first find the one that was previously designated instead of the letter “N”. The second network of interest is the one with the name of the Internet operator that is used in a specific situation. The second network must be activated via the modem, turned on and working.
- Activate it with the right mouse button, go to the “Properties” panel to find the “Access” block. There you need to check a box that will prohibit other networks from borrowing from the Internet connection, and instead activate only the previously created Wi-Fi network.
- To save all changes, press the OK button.
Important! Sometimes the system may issue a warning indicating that all actions will be saved only after the next time you connect to the network.
In this case, you need to turn off the Internet and then start it again. If all steps are performed correctly, then the created Wi-Fi networks can be used by other family members from different laptops or personal computers.
Windows 10 has its own way
Method that works in Windows 10
If you have the Windows 10 operating system installed on your laptop or personal computer at home, you can use an easier way to connect to the network. To do this, you need to perform several steps:
- Using the search bar, find the device parameters. Next - “Network and Internet”.
- There you will find a mobile Hot Spot, which you need to activate and allow Internet distribution.
- At the same point, set a new password, and also come up with a network name that will be used in the future.
Having completed all these steps, you can begin to use the newly created network.
Problem solving
When transferring via USB, the address may be set incorrectly, then you will have to edit it yourself. Call up the context menu of the network through which you are connected to the Internet, click on the “Details” line. Opens the IPv4 Address option.
Go to “Properties” of the network that should send information to the phone. Click on IPv4, launch “Properties” again. We write the initial three numbers the same as they were in the computer connection. We set the remaining number so that it does not coincide with the PC address, but is no more than 254. If everything seems to be configured correctly, but the computer does not distribute the Internet via USB, then you can turn off the Internet connection and turn it on again.
There are almost no problems with distribution via Wi-Fi. The only problem is if the module cannot distribute it. Then all that remains is to either purchase an external module or use other methods.
USB modem with Wi-Fi
If a USB modem is installed in the house (from Megafon, MTS), which already has built-in Wi-Fi, then the operation will be as simple and fast as possible.
To create a network, you need to insert a special USB flash drive-modem into the laptop for the program to start. After this, a dialog box will open where the program will automatically suggest using certain applications for installation. After the initial boot, Wi-Fi will be distributed automatically.
Done, you can use the network and distribute Wi-Fi.
Access activation
After completing the previous steps, a local network will be created on the PC, but to gain access to it you need to do the following:
- Open Control Panel, then Network and Sharing Center.
- On the left side of the screen you need to click on “Change adapter settings”.
- The screen will display the connections available for connection. You need to select the one created in the previous step and select “Properties” from the drop-down context menu.
- The “Access” block will be displayed, where you need to check the box next to the line that implies the ability for other users to use the network. Finally, click “Ok”.
Note ! A notification may appear on your computer screen stating that the changes will not take effect until you reconnect; this is normal. Simply disconnect and then reconnect to the network.
to a wireless network on a PC running Windows OS If all of the above manipulations were performed correctly, you can connect to the network from home devices and use traffic.
ADSL modem
To distribute Wi-Fi with an ADSL modem, you will have to spend more time and effort, since it is a more complex operation due to outdated equipment. It is not enough to simply download the program to your computer, since precise configuration of the device is required.
Important! There are no universal instructions for distributing Wi-Fi via an ADSL modem, since you need to know exactly the settings of a specific device. But there is some general information that will help you understand this issue:
- First, you need to connect the router to the modem.
- After this, the router starts distributing the Internet.
- Each further process will be carried out using a network cable.
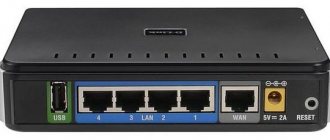
There is no way to connect the router to the telephone line in this situation. This requires a special ADSL port. Therefore, you will have to use a LAN connector, which will connect the Internet and the laptop using a network connection. Such actions, for example, can be performed with TP-Link modems. This is the best option that can be used in this situation with an old modem.
LAN connector
To connect the router and modem, you need to connect the device to the power supply using a network cable that goes into the blue WAN connector. The other end is connected to the WAN network connector.
Important! Before starting assembly, you need to set the router settings to default. In this case, modem will transmit the Internet specifically to the router used. It is not necessary to make any additional modem settings.
You must remember to activate dynamic IP. To do this, you will need to go to the modem settings, make sure that in the Wan Connection Type item, Dynamic IP is set. Other fields will be filled in automatically; there is no need to change them. In the same window you need to set a personal password.
Afterword
The idea is that in the same way, instead of a router, you can transfer the Internet to another computer by connecting them with a network cable. Only on another computer, in the properties of the local network connection, set it to automatically obtain IP and DNS. I haven't tested it, but it should work.
You need to understand that this method may not work with all modems and connections. Since there are a lot of different modems, operators, settings and other things, it is possible that some problems will arise during the setup process.
In my case everything worked. I hope you were able to set everything up just as well. You can ask questions and share tips in the comments.
Setting up a network using third-party programs
On the Internet you can find a huge number of programs through which you can distribute Wi-Fi. The four most suitable and simplest options will be considered.
Switch Virtual Router
After downloading the program, you need to launch it and perform a certain sequence of actions:
- There will be a gear icon at the bottom right of the screen that you need to click.
- In the menu that opens, find “Network Settings”. Here you need to come up with a name for the Wi-Fi network you are creating, and also set a strong password.
- All other settings can be set as you wish.
The saved changes will be activated with the OK key. Returning to the main screen, you need to click on “Start” and wait for the distribution to begin.
Switch Virtual Router Interface
VRP
This is a very convenient application with which you can distribute Wi-Fi without complex settings. To activate the application, you only need to enter your name and network password. As soon as the parameters are entered, a new distribution will be created.
Connectify
Another free program that simplifies Wi-Fi distribution. After downloading and launching, you must specify the network name and password. If necessary, you can make additional settings. As soon as the user presses the “Start” button, the new network can be used.
End of the giveaway
What are the differences between 3G and 4G networks: features, advantages and disadvantages
When you no longer need to use Wi-Fi, you can close it. This is done quite simply; you can enter the necessary command in the administrator command line - netsh wlan stop hostednetwork. You can reconnect the connection at any time; you can follow the steps already described. To change the password, you will need to enter the command netsh wlan set hostednetwork mode=allow ssid= N key=K keyUsage=persistent, where instead of “K” enter the new value.
How to distribute MTS Internet - description in detail
- Making a modem for Android
- We provide local network
There are two main ways to distribute MTS Internet. This can be done by using a USB cable or a WI-FI network. Each method has features and implementation rules.
Making a modem for Android
How to distribute MTS Internet for free? In order to provide Internet access to your computer, you need to configure it on your mobile device. You can use the automatic settings sent by the operator or try to do it manually.
If you can access the Internet from your phone, then you connect it via a USB cable to your laptop. In this case, for correct operation, you will need to install drivers and a special program (a disk with drivers is usually included with the device upon purchase; installation files may also be located on the phone itself).
Continuing the topic “How to distribute MTS Internet from a phone”, activate the USB modem device mode in the settings. The path to get to the section varies, depending on the phone model. When it starts working in modem mode, you will be able to access the Internet from a laptop/PC to which your mobile device is connected.
We provide local network
Now let's talk about how to distribute the Internet from an MTS modem. You have a modulator, then a thematic question was bound to arise. In practice everything is simple.
- Connect the modem to the main computer via a USB cable, look at the connection parameters (name, access password, phone number).
- Open the network connections folder, create a new one (the items you need to select are “Connect to the Internet”, “Set up a connection manually”, “Via a regular modem”, supplier name - MTS, phone number - #777).
- Finally, enter the name and password that were taken from the modem connection parameters, and click the Finish button.
Is it possible to distribute MTS Internet? The answer is yes, the main thing is to understand how this is done. To “share” a connection, you need to open its Properties, select the Advanced tab, check all three proposed boxes, confirm your actions and that’s it, distribution has begun. If you have problems connecting other laptops or PCs, it won’t hurt to check your network settings. You may need to manually register a new IP address, subnet mask, default gateway, and DNS server on them.
Now you know how to distribute MTS Internet to a laptop; this can be done in various ways. But there is one caveat: some tariff plans provide for an additional fee for distribution, so before doing this, you should consult with the operator. This way you won't encounter unexpected expenses.
Was this article helpful?00