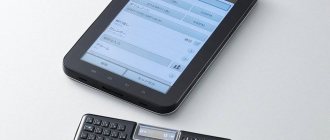
Tablet computers are available in abundance in the digital technology market. Samsung, Acer, Prestigio, Huawei, Asus, Chuwi, Irbis, Dexp, Texet, Iwork, iPad pro - and, quite possibly, a new one has already appeared in Asian countries and have firmly taken their place in the life of the modern generation. Reading books, games, the Internet, various programs and this is an incomplete list of the tablet’s capabilities. But let’s imagine a situation where you need to print large text, but you don’t have a laptop or PC at hand. Typing a voluminous document by clicking on the sensor is extremely inconvenient. Let's figure out how to connect a keyboard to a tablet and significantly increase its functionality by using it as a full-fledged monitor.
Methods
In order to connect a regular computer keyboard to a tablet, there are several ways.
- OTG adapter.
- Bluetooth.
- Branded docking station.
- Wi-Fi.
- IR port
The described methods are successfully suitable for such brands as: Wacom, Perfeo, Exeq Vido, Oysters, Prestigio Multipad, Huawei, Chuwi, Digma, Irbis, teXet, Vertex, Wexler, Mystery, Qumo, Ginzzu, Arnova, Explay, Colorfly, Ainol, Ramos, BQ, FNF, PiPO, Onda, Teclast, Cube, as well as more expensive models: Samsung Galaxy Tab, Lenovo, Sony, Microsoft, Asus, Apple (iPad).
Some of them are not very convenient. The option with an infrared port is hopelessly outdated and will not work on modern devices. Let's look at each in detail.
Connecting a keyboard via a USB cable: in what cases is an OTG adapter needed?
Connecting an accessory such as a keyboard to a tablet via USB is a simple matter. As a rule, drivers are installed automatically. If the gadget does not see the connected device, you will have to tinker a little:
- download the keyboard program from PlayMarket (there are many free ones out there);
- set this application as default in the input settings;
- in the application presets about and select the layout language;
- reboot the tablet.
Note : Settings may be named differently in different applications, but everything should be clear intuitively.
By purchasing a special peripheral device, the user receives a device with a microUSB cable. But to connect a regular keyboard to a tablet PC, you will need an OTG adapter, since almost all tablets support this type of connection.
Interesting : the 10-inch YOGA TABLET 3 Plus can be attached to a docking station, and the parameters allow it to replace an office laptop.
How to connect a keyboard to an Android tablet via OTG:
- Plug the adapter into the device using the micro USB connector;
- Connect keys equipped with classic USB to OTG.
Benefits of a physical connection
- reliability;
- drains less battery than wireless;
- The quality of the connection is not affected by the quality of the signal.
Topic: TOP 10 best USB keyboards
Bluetooth
Bluetooth technology has replaced the well-known IR port. Its main advantage is the absence of any wires. The only condition for a trouble-free connection is the presence of a Bluetooth module on your device. Today, this module is present almost everywhere. Thanks to this, a Bluetooth keyboard connection can be made with almost any mobile or computer device.
Pros:
- A Bluetooth keyboard can be purchased at a reasonable price here (depending on the manufacturer).
- Wireless connection.
- Compatible with other digital equipment.
But there is one significant drawback - high energy consumption. The Bluetooth keyboard itself is powered by several regular batteries. The low cost of such batteries will not hit your pocket hard. The same cannot be said about the energy consumption of the module. During long connection sessions, the tablet's battery will quickly discharge. Alternatively, you can work on constant recharging.
It is worth remembering the guaranteed data transmission range – up to 10 meters. This is quite enough to perform everyday tasks with documents, surf the net, and play games.
Types of keyboards
The design and location of the button may vary for different models. To use a Bluetooth keyboard on a tablet, you need to be able to turn it on. The procedure for synchronizing devices is as follows:
Let's look at solving the problem of not having the necessary driver using the example of connecting an external keyboard to an Android tablet . The sequence of actions is as follows.
Adapter for older Samsung models
To start editing, select the key with the value you need from the list, or click on the “Add new value” item.
In this case, your smartphone or tablet must support the USB host function. You can find out if your device has such support in our DevDB device catalog.
Most USB keyboards are supported in hardware and do not require any special settings. The connection itself is made using a USB OTG cable.
Branded docking station
ASUS ZenPad 10 Audio Dock A
very useful, but at the same time extremely expensive attachment for a tablet. A branded docking station can cost about half the cost of the device itself. It is produced, as the name implies, by the manufacturer, and significantly increases the functionality of the device. Equipped, as a rule, with all known ports.
A big plus is the ability to recharge the tablet from the docking station while working. There is also a touchpad, which laptop devotees are accustomed to. Unlike a keyboard case, the docking station cannot be connected to any gadget. A certain set-top box works with a specific brand of tablet, phone or smartphone.
The average user will not have to struggle with the settings of such a set-top box or installing drivers. This applies to both Android OS and Windows.
The Apple company also has similar stations for both iPhones and iPads, equipped with a Lightning connector. The cost starts from 3000 rub.
Keyboard Case
Another option widely presented by the Chinese manufacturer. Differs in versatility. You can connect with almost any Android gadget. But it doesn't differ in quality. Fails quickly.
Which tablets can be used for: how to determine
A universal connection method is using a USB connector. The algorithm of actions is as follows:
When purchasing, you can ask the seller to select a tablet to which you can connect a keyboard. But this is not necessary, because almost all models are equipped with USB connectors and Bluetooth. In the case of WiFi, everything is more complicated, because the device must work as an access point and be able to install a SIM card (this option is not necessary).
As you can see, connecting a keyboard to a Tablet PC is not a problem. This method is reliable, stable and consumes less energy.
To edit, select a suitable keyboard with the value suggested in this list. You can also use the “Add new value” option.
You can connect a wired or wireless keyboard and mouse to your Android gadget. There is nothing complicated in this process, just use the desired wire or Bluetooth wireless interface. You can solve possible problems with the operation of accessories using third-party software.
WiFi connection
This is one of the rarest ways to synchronize the data input device and the tablet. Of course, if voice typing doesn’t suit you for some reason, and you can’t turn on the on-screen keyboard, you can try setting up an external physical one via the Wi-Fi protocol. But it should be remembered that dancing with a tambourine cannot be done here.
Not every user will be able to perform a similar connection procedure. And choosing the appropriate mobile gadget that could connect to peripheral devices via Wi-Fi protocols will not be easy.
It should be noted that every year there are more peripherals with Wi-Fi.
Basic minimum
So, we have a tablet running Android 4, a keyboard, a mouse (optional) and the desire to turn it all into a workhorse.
I’ll make a reservation right away that a USB keyboard and mouse can only be plugged into a tablet that supports USB host (OTG) mode, so if the tablet doesn’t have this option, you’ll have to use more expensive Bluetooth accessories, and if there’s no Bluetooth support, then nothing. you can't help it - such a tablet is not suitable.
If the USB host mode is supported, the keyboard or mouse should be connected using an OTG cable, which usually comes with the tablet and is a miniUSB-male cable on one side and a full-size USB female cable on the other (if the tablet has full-size USB- ports, you can weave directly into them). If it is not included in the package, an OTG cable can be bought at any mobile equipment store or ordered in China for one dollar (it is no worse). I would like to warn you that usually not all ports support host mode, so you need to plug it into the correct one (usually it is signed Host or OTG).
When everything is in hand, we attach the mouse and keyboard to the tablet - and voila, everything works. One might say that this would be enough, but Android can offer much more advanced keyboard control capabilities. One of the main ones is a fairly developed and convenient system of keyboard shortcuts, which has existed since the first versions of the OS. So, to navigate around the desktop and various menus, you can use the “arrows”, and the key replaces the “Back” button, and the “Home” button. Besides these, there is a whole set of other control combinations, including shortcuts for launching applications:
Android keyboard shortcuts
- analogue of the "Back" button - analogue of the "Home" button - analogue of the "Menu" button - switching between applications - switching layouts - open settings - managing installed applications - changing wallpaper - write a letter - music player - calculator - write SMS - calendar - contacts - browser - Google maps - search - reboot 
A special place among them is occupied by the combination, which opens a search window, which in Android is similar to the search window in OS X or Ubuntu, that is, it allows you to search not only on the Internet, but also among installed applications, contacts and browser bookmarks. A very convenient keyboard control tool.
Keyboard shortcuts are also available in applications, but only a small part of developers implement such controls. Even among browsers where this functionality is a must, I could only find two that can be fully controlled using the keyboard. This is a standard browser and Google Chrome, which support the following set of combinations:
Browser combinations
- new tab - zoom in/out - download manager - reload page - search - bookmarks - history - add to bookmarks - share - page information - settings window - close tab - focus on address bar - scroll down/up screen - copy /insert - switch between tabs
Unfortunately, in Android there is no way to change key combinations or add your own, but the existing ones will be quite enough to work with the tablet without any mouse, only occasionally touching the screen to select some hard-to-reach interface element.
AIDE allows you to create full-fledged Java applications for Android within Android itself
Since we are talking about the browser, we need to take care of the Internet connection. Not all tablets are equipped with a 3G module, so you will most likely have to get the Internet in other ways. Two standard solutions are a 3G modem or Internet from a phone. The first option is more preferable, however, on tablets with one host port (like mine), it will not allow you to plug in a keyboard as well. The option of distributing the Internet from your phone via Wi-Fi is very convenient, but it drains the smart phone’s battery at an incredible speed, so it is much better to use the more economical Bluetooth for this purpose.
The blue tooth situation in Android is quite strange, and its support varies greatly from version to version. Nevertheless, Internet distribution via Bluetooth (PAN profile) has been supported for a long time, and, most likely, it is already present in the smartphone (you should look somewhere in the area “Wireless networks -> Advanced -> Modem mode”). To connect to such a “broadcaster,” Google recommends selecting the desired Bluetooth device from the list in the “Profiles” section and about. But in practice, such an item often simply does not exist, so to connect you will have to use an independent implementation of the PAN profile, for example, “Bluetooth PAN” from the market. It requires root, but using it is as easy as shelling pears: launch it, click on the huge round button in the middle of the screen.
To have access to all the necessary data on the road, you can transfer it to a flash drive in advance or use cloud drives like Dropbox or Google Drive. Both approaches are inconvenient because they do not allow synchronization to occur automatically. But the Dropsync application can do this and does it very well. In fact, Dropsync performs the same task as the desktop version of Dropbox: it allows you to store files on a flash drive, periodically synchronizing them with cloud storage. What’s important is that the directories for synchronization can be selected individually, sending and receiving from the cloud only what is really needed on the tablet, for example, books, music, source texts.
Using Dropsync is quite simple, you just need to select the directory to sync, the directory in Dropbox and choose the synchronization method: one way or both. After this, the software will hang in the background and periodically perform synchronization. I immediately recommend buying the Pro version, it supports Linux inotify technology for instant synchronization immediately after changing files, and also removes the 5 MB file size limit and the limit on one synchronized directory.
Infrared port
As we wrote above, this method is extremely outdated. You won't be able to play Tanks with it. Even typing a short message will be difficult for an unprepared user. Another disadvantage is the fact that most Android devices (except Xiaomi, Leagoo and other Chinese) have completely abandoned such an interface, just like Windows-based devices.
HDMI
Carrying a tablet with you, and even having a keyboard and mouse connected to it, you will probably want to hook it up to the HDMI port of your TV or AV receiver. In principle, everything here is simple and boringly convenient: plug in the cable and get a picture on the big screen. But there are several interesting points that I would like to talk about.
Tablet, HDMI and TV
Screen blanking. One of the most frustrating aspects of implementing HDMI support in Android is the need to keep the screen on. As soon as you press the tablet's power button, the HDMI is de-energized and the “big picture” disappears. You won’t be able to disable this behavior using Android itself, but you can use the excellent Screen Standby program, which forcibly turns off the backlight of the screen, so you can safely watch videos, play games or surf the Internet without being distracted by a copy of the image on the tablet.
Screen Standby has many very useful settings, for example, it turns off the backlight automatically when you plug in an HDMI cable. To do this, just enable the “Auto HDMI/MHL Detection” option in the “HDMI Detection” section (there are also settings to turn it off when launching an application or placing it in the dock). Another very interesting feature is switching the tablet into touchpad mode, when a cursor appears on the monitor screen and the tablet screen turns into a large touchpad. It is included in the menu “Settings -> Touchpad setting -> Use touchpad function”, but this function did not work for me, which is predictable, given the limited support for models.
Joystick and control panel. A tablet connected to a monitor or TV can be controlled not only using a keyboard and mouse, but also using a smartphone on the same Android. It is not necessary to log into the tablet via SSH or other means to do this. You can use the BT Controller virtual joystick from the market. This program allows you to turn your smartphone into a virtual blue-toothed joystick, control panel or even a keyboard - whatever you need.
BT Controller should be installed on both devices that are already connected via Bluetooth. Next, on one of the devices, press the “Connect” button, after which a message will appear on the screen asking you to select the device function: Controller or Host. Click Host on the tablet, after which an information plate appears in the upper right corner, symbolizing a successful connection and the functionality of the components. Tapping on the “KB Enabled” line on the sign will take us to the input method settings menu, in which we should select BTController, and tapping on “KB Active” will allow us to switch to BT Controller instead of the standard keyboard.
When all these operations are completed, you can use the joystick that appears on the screen. The free version of the application has only one interface option - a SNES joystick, which is quite convenient to play games with, but is not suitable for other purposes. The paid version of BT Controller allows you to choose between more than thirty different joysticks, remotes and keyboards and, more importantly, create a new remote control yourself using a special editor.
The case with the built-in keyboard turned out to be great...