Surely most of you actively use various social networks (for example, VKontakte, Twitter, Facebook, etc.), instant messengers and other services. You will be familiar with the process of registering your profile in the system, which is called an account (from English “account” - account).
In the modern world, a person gradually has more and more accounts. One is needed to communicate with friends and family on Skype, WhatsApp and other instant messengers, the second one he created to use email and receive various letters, for example, from work, and the third one he needs for entertainment and downloading games from Steam, Wargaming.Net and other resources.
Each site, if it involves constant and not one-time use (among these we can highlight, for example, various photo hosting sites, where it is often not necessary to create an account in order to upload an image to the public a couple of times) requires the user to register. This is necessary to store personal data and identify each person.
How to create a Google account
Creating a new account is necessary if there was none before, or if the user has forgotten the login and password for the old one, and he cannot restore it. The registration itself takes place in the phone settings or when you turn on the device for the first time.
If a person creates a page not with the first login to the device, then he needs to go to the settings, and through them to the “Accounts” section. After that, click on the “Add” button and follow the algorithm below:
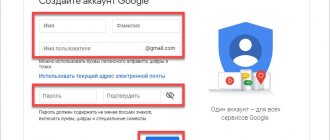
- In the adding window that appears, click on the “Create a new account” button, which is located lower than the field for entering an email address. Of course, the user can maintain his own email if he knows that he has a page. We are considering adding a new one;
- After that, enter the first and last name of the person for whom you would like to create an account. As a rule, this is the user himself and the owner of the phone. After the introduction, click on the “Next” button;
- Now you need to come up with a name for the user. This name will be included in the email, so it must be something new, something that has not been thought of or used by other users before. The name must contain only Latin letters and numbers, that is, the standard Russian alphabet is not applicable in this case. We come up with everything on the English layout.
- Next we need to come up with a password. It is worth coming up with a password that is not used on other accounts, if any. If you come up with a very easy password, then scammers will automatically be able to figure it out;
- After coming up with a password and repeating it, you can already link the phone number directly to the account itself. It is worth taking advantage of this opportunity, since after connecting the user will be able to restore his account through his phone number;
- It should receive an SMS with a confirmation code, which must be entered in a special field on the website;
- We accept all the terms of the agreement that the system offers;
- Afterwards, a window will appear with the created email and password, as well as additional information;
- Next, Google Services will be available. It is worth checking the box next to the option to create a backup copy, as it ensures reliability;
- The next and final step is to indicate payment information, if any.
Now all letters will be sent to the created account, the user can manage it, as well as use various services.
4.5/5 — (30 votes)
How to find out your account on your phone
Often, for some specific reason, the user may lose all data and cannot restore his previous account. In such situations, he simply loses all ways to access some Google services to which he previously had access, but without an account he cannot do this.
There are also situations when the user simply forgot that he has his own page. In any of them there are two exits:
- Use page recovery through the official Google website (possibly using the number or email address);
- Contact the company's support service so that they can help resuscitate all the data.
If possible data that identifies a person, including phone number and email, was not previously linked to the account, then he will not be able to restore it, no matter how hard he tries. Sometimes, if the user really remembers something, he can answer a series of questions that the system will suggest. With their help, it is determined whether a person was the owner of this account.
If the user does not know at all about what accounts he might have, then he can turn to the phone settings. In them, as a rule, you can actually find out the linked accounts, thereby giving yourself access to other recovery options:
- Open the phone settings. The application icon icon is located on the start screen and resembles a gear. Under the icon itself is labeled “Settings”;
- After going to them, we look for the section with accounts. It's called "Accounts";
- By going to this section, we look for mail from Google;
- Click on it and copy it.
Next, if the user wants to recover the password for it, he can watch in this video how to do it correctly
Finding out the ID on an iPad 3 with a block
To unlink an existing account, you will need to find out its password. To remove a block from a non-working device, you will also need this combination of symbols
So how do you find out the password on a tablet with a block? If you carelessly bought such a device and fell for the scammers, you can only sympathize. In such an unpleasant situation, you can choose one of two things:
- Try to find the previous owner of the device.
- Find ID by IMEI.
Of course, the first method has much less chance of success. Therefore, let's turn to the second.
How is IMEI found out and why is it needed in principle? But the fact is that having received certain information, the user can send a message to the previous owner of the device asking him to tell him the password for the account. Sometimes this method works.
In turn, to obtain data by IMEI, you will need to know the UDID number. It is reflected in the driver parameters when connecting the tablet to a PC or laptop. To do this, you need to go to the parameters. And then select the path to the device instance. There you will find the rather long list of symbols you are looking for.
Next, to get an ID, you will need to contact a specialized service. They provide information either by IMEI or UDID. But it would not be amiss to remind you that it is better not to purchase used gadgets at all. Or do this only as a last resort and with trusted people. Otherwise, all sorts of problems cannot be avoided. It makes more sense to wait a while and save up money for a new device.
If you can’t remember the ID on your tablet on which the unit is installed, write to support. But be prepared to provide scans of receipts and other documentation on your iPad. If everything turns out to be in order, the technical service will reset your previous number and password. You don't have to think about how to remove them; specialists will do everything for you. In the future, you will generate new qualifiers in the system.
But if you decide to get rid of your current ID on your own initiative, you can do it in no time. Don't know how to delete this number on iPad? To do this, log into the iTunes store. And then to your account. There you can easily find your current ID. Just change it and save your decision.
And don’t forget that all the work that is supposed to be done to return your identifier is most conveniently done using a midi element. A MIDI keyboard for iPad is simply irreplaceable in situations where you have to work with functionality similar to a PC on a tablet.
Synchronizing your account with your phone after changing your password
Having changed your email password, you will have to enter it in the future on all devices from which you will log into your account. And if access was restored to the mail that was linked to the phone, the owner of the gadget will again need to log in to the account from the phone.
In order not to lose authorization data in the future after setting a new password, the user should synchronize them with his smartphone.
Method 1: Restart the application
The easiest way is to act through official services from Google.
The procedure is carried out in 3 stages:
- Open any utility from Google.
- Enter the account password.
- We wait until the application opens the account. Once login is completed, the device will automatically sync with your account.
Access to the Play Market can be returned in 2 ways - by specifying personal data, or by returning control over the profile without them.
When you try to log into the Google application, you will be asked to log in again. The user will again be redirected to the Account Recovery page.
Return access to your Play Market account using personal data, namely:
- by phone number;
- using a second e-mail;
- answering the system's questions.
Regardless of the method you choose, you will need to enter a new password in the Play Market. By logging into your profile using the new data, your mail will be linked to the Play Market.
Sometimes the app doesn't prompt you for an updated password, so you'll need to open your phone's settings to sync.
A number of actions need to be taken:
- Open your device settings and go to Applications.
- Find the Gmail utility.
- Click on the “Force stop” button, then on “Clear cache”.
After erasing all data, you need to re-enter your mailbox using a new password, after which the profile will automatically synchronize with your smartphone.
You can also reset your account using the Play Market.
You must proceed as follows:
- Let's go to settings.
- Go to “Accounts and Synchronization”.
- Click on “Google account”, and then click on the button to delete it.
Having erased previous data from the smartphone’s memory, you can go to the Play Market again by entering your login and new email password.
Important! Before you begin, save a backup copy of your data so you don't lose important information about other accounts.
Method 2: Delete your account
You can first remove the Google profile from the phone’s memory, then restart the device and log in to your account again.
The procedure may vary depending on the smartphone model, but generally you need to follow this order:
- First you need to open the section with the gadget settings.
- Next, you need to open the “Accounts” subsection (“Accounts”).
- From the drop-down list, you need to select a Google profile and click on it.
- In the new window, all you have to do is click on the delete button.
- We confirm the operation.
The data will be erased from the phone’s memory, so to reuse mail and restore data, you will need to open the accounts section, where you need to select the “Add new” (“Login to account”) option.
But it’s better to restart the device and log in again using a new password.
For security reasons, Google does not allow you to log in to an account that was previously reset on your smartphone. You will have to wait the next 72 hours, or use another e-mail.
If there is no data left about other accounts in the device’s memory, you can reset your smartphone to factory settings. After this, all information, including logins and passwords, will be erased from memory, and applications installed on the smartphone will be deleted.
Then, at the first launch, you will need to provide data from Google Mail. The user must provide the login and password for the mailbox to which access was recently restored. Then, after starting the phone, all accounts can be viewed in the settings.
Method 3. Change gadget settings
When restoring access, the user will need to change the password by setting a new combination. After changing the password, you need to synchronize with the application.
If synchronization was not carried out automatically, you will have to act independently by opening the phone settings.
You need to do the following:
- Open the applications section.
- Go to Gmail.
- Click on “Force stop”.
- Clear application cache.
- Open the Google Mail application.
- Enter a new password.
Afterwards, the device will be synchronized with your account. All that remains is to restore application data by opening the Play Store.
How to find out if you have a Google account
A user who is not at all aware of the existence of such a personal Google page simply may not imagine that he has one. Knowing that you have your own account opens up the opportunity to use many resources from the company, so it is better for the user to know whether he has such an account or not.
To check its availability, simply go to the official website and then enter your email address. If the user does not have his own page, the site will display that “no account found with this email address.”
This is quite easy to fix: you can either register again, and if the user is sure that there was such an account, then he can restore it.
Restoration is possible in different ways, not only by phone number, so if you have an account, it is better not to create a new one, but simply restore the old one.
In what cases do you need to change your Samsung account?
If you get your hands on a new phone, then you just need to link it to your own account. First of all, this is a natural safety rule. If the profile of a relative, friend, or even a stranger is installed on your smartphone, then he has full access to all your data. Your own account ensures that only you have access to them.
Another advantage is synchronization. You can sign in to your account on other devices, change to a newer device - and still get access to your browser tabs, payment information and more. Samsung and Google accounts store the following data in the cloud:
- Your contacts from the phone book.
- Data you entered into the calendar.
- Google and Samsung app data.
- Samsung Pay and Google Pay.
- Browser bookmarks.
- Device location data.
Before you change your account on your Samsung phone, set up synchronization of this data on your old device. This way you can download them on any new device, or access them from your computer.
Now you can easily change your Samsung or Google account on your smartphone. If necessary, you can return to your old profile or change your phone, and then set up your account on a new device.
How to find out the ID of the previous owner of an iPad 3
Did you purchase the device on the secondary market? Well, this is sometimes beneficial, because such devices can be almost new. But the cost of products is an order of magnitude lower than new ones. Sometimes the difference reaches 30-50%. Given the high price of all Apple gadgets, such acquisitions definitely make sense.
If you want to find out the ID of the previous owner of your tablet, know that this is quite possible. For example, refer to the cloud settings or the AppStore. If the previous owner of the iPad did not erase the information from the device’s memory, you can easily find out everything.
In other cases, you can try to find the previous owner and ask him to disable the device search option and unlink the current account.