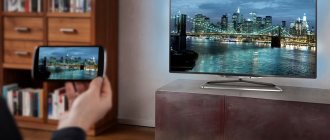
A modern smartphone is essentially a pocket computer with many useful functions. However, the display of even the largest phone cannot be compared to a TV screen. Therefore, many smartphone owners want to connect to a TV and use it to view full-size images. This can be done in different ways. Next, let's look at how to connect your phone to your TV via Wi-Fi.
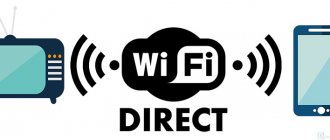
How to connect your phone to TV via Wi-Fi Direct
The Wi-Fi Direct option is present on almost all devices and it is certainly convenient.
Using this application, any gadgets can connect to each other without using a local network and a router.
To connect your phone to the TV via WiFi, you need to do some manipulations.
- Open the smartphone settings, go to where the Wi-Fi settings are located and activate the Wi-Fi Direct option.
- We do the same in the TV settings. Be sure to make sure that the option is in working order on all connected devices.
- After activating the program on TV, it finds all available devices for connection. Choose the one you need.
- A message appears on the mobile screen asking you to give permission to connect. We launch the desired file on the smartphone and watch how the image is transmitted to the TV screen.
Using a router
The router will also help you connect your phone to your TV. To use the router as a connection device, perform the following procedure:
- enter the TV menu;
- redirected to the “Network” section and go to the “Network Settings” subsection;
- select the “Wireless Network” type.
Select your wireless network by name, click on it and enter the Wi-Fi security code. After this, connect the smartphone to your home network.
You can download an application that allows you to access your phone data from your TV. Most often they use DLNA or UPnP.
Using Miracast technology
Broadcasting from your phone to your TV can also be done using the Wi-Fi Miracast function. It is based on Direct, but is more modern and has some advantages. For example, it supports the transfer of 3D files, and it also improves the process of transferring large files.
The connection process is exactly the same as described above in the case of Wi-Fi Direct. The option is enabled on both devices - permission to connect is given - the “picture” is transmitted to the TV.
It happens that an Android smartphone supports the function under discussion, but the TV does not. You can cope with this problem using an adapter, which is sold in specialized stores.
Just connect it to the HDMI input on your TV and enjoy watching a movie on the big screen.
Which connection method to choose
Among all the known ways to connect a TV to the Internet via a phone, the most relevant is considered to be connecting via an HDMI cable, or via wireless networks with AirPlay, Chromecast or Miracast applications. Each method is selected depending on the TV and smartphone models.
Connection options via USB, DLNA and Wi-Fi Direct are considered obsolete, so they are used when other methods have failed.
The most optimal if you have a Smart TV and a phone with Android OS is a connection via Miracast. This is the most convenient way to broadcast any content in real time.
Broadcast using YouTube
YouTube is considered one of the most popular sites when it comes to video content. And it’s not at all necessary to constantly watch videos on the small screen of your smartphone, because you can turn on the broadcast on your TV.
- Before you start connecting, be sure to have the YouTube app installed on your phone. If it is not there, then download and run it.
- Open its settings, activate the Watch on TV function. If everything is done correctly, then instructions should appear telling you what to do next, as well as a field for entering a password.
- Turn on the same application on your TV, open its settings and select the option to connect to your phone manually.
- Enter the code that appears on the screen into the field on your smartphone and click “Add”.
- In the list of added devices, select yours, agree to broadcast and watch the video on the TV screen.
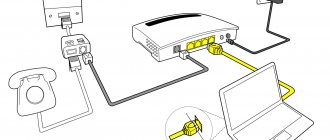
Via USB
This is the easiest way to connect your phone to a TV without Wi-Fi. Typically, this method is used if the receiver is not equipped with a wireless module, but the device has a socket for a USB cable.
To connect devices in this way, one end of the cable is inserted into the socket of the device, the other into the socket of the smartphone. After this, select the connection type on the TV. In this case it is USB. All phone folders will appear on the TV screen at once.
Using your phone as a media server
To connect your smartphone to your TV and use it as a media server, you need to make sure that both devices are connected to the same Wi-Fi network, and that they support Miracast or DLNA.
- We go to the “Market” on Android, find the DLNA Server application, download it and launch it.
- Open the menu, add a new DLNA Server, give it a name in the appropriate line, enter the name of your home Internet network.
- We go to the Root menu, mark the folder that can be viewed, and save the changes made.
- We return to the main menu of the program, there is now a created media server there, click on “Start” and turn it on.
- We go to the TV settings, open the “Video” section, find the name of the server there, select it. After this, the selected folders for viewing will appear. Launch the required file and look.
Checking screen casting support on Android and enabling casting
In order not to waste time, I recommend first making sure that your phone or tablet supports displaying images on wireless displays: the fact is that not every Android device is capable of this - many of them, belonging to the lower and partly to the middle price segment, are not support Miracast.
- On Android 9 (in case of a clean OS), go to Settings - Connected devices - Connection settings - Broadcast and make sure that the option to transfer images from your phone is enabled in the menu, as in the screenshot below.
- On Samsung Galaxy smartphones, open the notification area completely and see if there is a Smart View icon there (keep in mind that the icons in the notification area can be scrolled through and the one you need may not be on the first page).
- On earlier versions of the OS, go to Settings - Display and see if there is a “Broadcast” item (in Android 6 and 7) or “Wireless display (Miracast)” (Android 5 and some devices with proprietary shells). If the item is present, you can immediately switch it to the “Enabled” state using the menu (called by three dots) on pure Android or the On-Off switch in some shells.
- Another location where you may notice the presence or absence of a wireless image transfer function (“Share Screen” or “Cast”) is the Quick Settings area in the Android notification area (however, it may be that the function is supported, but there is no button to turn on the cast, or it is hidden and can be enabled in the settings, as shown in the video below).
If you can’t find wireless display options, Screen Mirroring, Smart View, broadcasting, Miracast or WiDi functions, try searching for settings by going to settings and using the search field. If nothing similar is detected, it is highly likely that your device does not support wireless image transmission to a TV or other compatible screen.
How to enable Miracast (WiDI) support on Samsung, LG, Sony and Philips TVs
Usually, in order to be able to transfer the image from the phone to the TV, it is enough that the TV is turned on and its Wi-Fi adapter is turned on, but sometimes the wireless display function is turned off on the TV and may need to be turned on in the settings first. Below are examples of such settings; the items on your TV may differ slightly, but the logic is usually the same and you can find the parameters you need.
- Samsung - On the TV remote control, press the Source button and select Screen Mirroring. Also, in the network settings of some Samsung TVs, there may be additional options for setting up screen mirroring.
- LG - go to settings (Settings button on the remote control) - Network - Miracast (Intel WiDi) and enable this function.
- Sony Bravia - press the source selection button on the TV remote control (usually at the top left) and select “Screen mirroring”. Also, if in the TV network settings (go to Home, open Settings - Network) you enable Built-in Wi-Fi and a separate Wi-Fi Direct item, the broadcast can be started without selecting a signal source (the TV will automatically switch to wireless broadcast), but the TV must already be turned on.
- Philips - the option is enabled in Settings - Network settings - Wi-Fi Miracast.
Theoretically, the items may change from model to model, but almost all today’s TVs with a Wi-Fi module support image reception via Wi-Fi and I’m sure you’ll be able to find the menu item you need.
Third-party applications for connection
There are also some mobile applications that are necessary when connecting to certain TV models or that work on the principle of mirroring. That is, on the TV screen you can see everything that is displayed on the phone.
- Samsung Smart View. This program is recommended for connecting a smartphone to Samsung Smart TV. It is something like a file manager. In addition, the application can be used as a remote control.
- MirrorOp or iMediaShare. Download one of the proposed programs to your device (you can find them in the Play Market), launch it and follow the instructions indicated on the screen.
Please note that before using applications, connect both devices to the Internet, and to the same network. If your TV does not support wireless technology, purchase an adapter and install it. Also make sure that the connection speed is fast enough to allow video and other files to be transferred normally, otherwise the image on the screen will freeze or not be displayed at all.
Connection via adapter
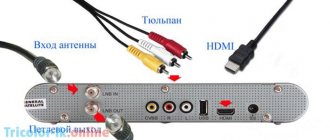
Connecting via an adapter is an option for older TVs that do not have USB or HDMI. Support for WiFi or Bluetooth, respectively, is also absent. You can use an adapter that converts the signal from HDMI to RCA. And connect the phone itself to it using a cable.
If you need to organize wireless data transfer, then the best option is to use the same converter from HDMI to RCA (or VGA, DVI, Scart), as well as a Chromecast set-top box. This will allow you to transfer images from Android and use the TV as an external wireless display.
You just need to take into account that the resolution and clarity of the picture will be lower than a direct connection without an adapter.
In total, you can connect your smartphone to a TV and display the image on the “big screen” in more than 5 ways. The best picture quality will be when using HDMI. If a wireless connection is used, then the clarity of the image directly depends on the throughput of the home WiFi, as well as ping indicators.
Chromecast streaming
A fairly functional and fashionable connection type that will be appreciated by more advanced gadget users. It differs in that, simultaneously with the connection, it makes it possible to upgrade your TV device.
Those. adds to the functionality of your TV the ability to work as a Smart TV. Google's development has found its admirers and, despite the high cost of this connection, has firmly occupied its niche. All you have to do is purchase a Chromecast streaming flash drive, and you're in the king.
SlimPort and MHL
Each of these 2 wired connection methods has its own characteristics.
MHL
Some models of budget phones running on MTK processors have the MHL standard, thanks to which you can receive a video signal directly via a MicroUSB-HDMI adapter.
However, this connection method has 2 main disadvantages:
- The smartphone must be constantly charged, because The battery level drains quickly;
- The technology works stably with FullHD resolution and lower, so you won’t be able to watch your favorite video in high quality.
SlimPort
This standard became the main analogue of MHL, but SlimPort was supported mainly by only a few smartphone models. Here the picture is of higher quality due to the fact that the signal is not decoded during broadcast, and this allows you to avoid lags. The technology also works with a resolution no higher than FullHD.
It's worth noting that to connect SlimPort you need a high-quality HDMI cable. If you have it from a second-rate company, then when watching a video, unnecessary noise may appear, the picture will be distorted, or the signal will be completely lost.