How to recover deleted Google contacts? It's actually very simple. Of course, if you have a Google account, you can not only restore your contacts, but also find your phone if you lost it, or block all the data on it, or delete it. There are a lot of options associated with a Google account.
So it’s worth creating an account if you don’t already have one. Moreover, for this you only need to create an e-mail on Gmail.
What does it mean to “restore” contacts?
- This means that you can get back contacts that were deleted in the past.
- This means that if any changes were made to the contacts, you can return them to the state that was before these changes.
You can “roll back” for any time, within 30 days . See, for example, it turned out that for some reason the changes made to one or more contacts were incorrect. What to do? If you don’t have a Google account, then that’s it, you don’t need to do anything. The data that was there before the changes has disappeared.
But when the data is stored in Google Contacts, everything happens simply. After any of your actions, any changes, the service makes a backup and stores both options in the database - “before” and “after”. He stores this information for you completely free of charge, for a calendar month. So all that remains is to find the record that contains the lost information.
Method 2: Backup
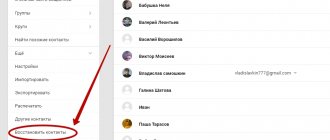
If the data backup function is enabled on your Android smartphone, then you can restore deleted contacts on your phone like this :
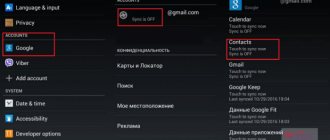
- Go to Google through the Settings app.
- Go to the “Install and reset” section and select the “Restore contacts” command.
How to save current contacts
It is quite possible that you are not sure for what period of time you need to return the data back. Then, it is better to first save what you have at the moment, and then try to “roll back” for different periods in search of the desired option for recording data. Go to Contacts.
- In Control Panel, click More.
- Select "Export" from the drop-down list.
- An export settings window will appear, indicate in it which contacts you want to save, click “Export”. It’s better to save everything. The result of the action will be the creation of a CSV file.
A copy of your current database is ready.
Backing up Google Contacts
Now, feel free to travel into the past, look, find the moment in the recording that you need!
Method 5: messengers
You can partially restore contacts on your phone after deletion from WhatsApp, Viber or Telegram . To do this, you need to install the messenger you used previously on your smartphone and log in using the number linked to your previous device. Some names in chats will remain unchanged, but the identity of the remaining numbers will have to be determined by photographs, correspondence, or alternative methods.
To save a number, for example, from WhatsApp:
- Click on it to go to a personal chat and click on the three dots in the upper right corner.
- Consistently use the “Add” and “Create new” commands.
The algorithm of actions in other messengers is similar. You'll have to add each person manually, but it's better than nothing.
How to return contacts to a specific date and time
Go to Contacts.
- In the control panel, click “More”.
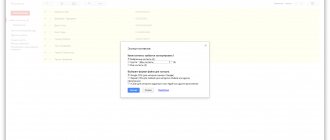
- In the list that opens, select “Cancel changes”. A settings pop-up window appears.
- Select the period, or a specific date and time, to which you want to “roll back” back.
- Click "Confirmation".
Attention! After you perform the action, it will no longer be possible to return the database to the current state (at the moment before clicking the “Confirm” button).
Setting Google Contacts Recovery Options
The “foolproof” system gives you a few seconds to cancel the action. A pop-up window appears at the bottom of the screen asking you to “RETURN”.
After you successfully find the lost information, you can safely restore the state of your contacts that was at the time you started the search. It is advisable to do this, for example, if during the period from the moment of loss of information (which you have now safely found) to the present time, some other changes were made to the contact database.
You'll have to do some manual work.
- First, write down the information you find in any file or piece of paper.
- Then restore the current contact database from the backup copy. To do this, you need to “Import” the same file that you got as a result of saving your current contacts.
- Manually enter information found in the past.
- Remove double contacts.
Method 4: VCF file
Practice shows that people intentionally or accidentally often export contacts to the internal memory of the device or to an SD card, where they are saved as a contacts.vcf file. To get them out of there and return them to the phone book, you should:
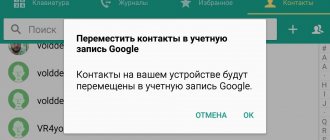
- Go to the standard “Contacts” application on your phone and through its menu (the icon in the form of three vertical dots) go to the “Import/Export” item.
- Select “Import from vcf file” and if such a file is available on the device, the application will find it. All that remains is to tap on the file and start the recovery.
How to Import contacts from a CSV file
Two important details to know.
- When importing data, all existing contacts are kept safe and sound. Even if some of the imported contacts are exactly the same as existing ones, no merging or substitution occurs. Identical contacts are “twinned”.
- All imported contacts, including duplicated ones, are placed in a separate group with a name that includes the import date “Imported DD.MM.” You can rename this group or completely delete it like any other.
Imported contacts are placed in a separate group
. So, to import contacts:
- In the control panel, click “More”.
- In the list that opens, select “Import”. The Import Contacts pop-up window appears.
- Select a CSV file.
- Click Import.
Import Google Contacts
Method 3: Import from SIM card
Some phone numbers can be stored in the phone's SIM card memory. They can be copied to the phone book.
But! The SIM card can only hold 200-250 numbers with names no longer than 15 characters, so they will have to be edited manually later. Plus, some numbers cannot be moved.
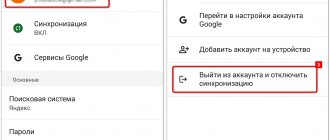
To copy numbers from a SIM card:
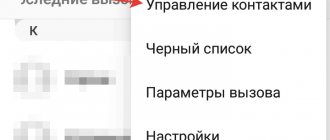
- Go to settings through the Google Contacts application menu and in the “Contact Management” section select “Import”.
- Mark the desired SIM card with a dot, click OK, check the numbers, and start copying with the “Import” command.
Last little tip
Do not save a CSV file with contacts on your computer drive, much less on a flash drive; it’s better to immediately save it to cloud storage when creating it, for example to Google Drive, it will be safer there.
The thing is that we are used to deleting files in the simplest way. We click on it with the mouse and press the delete button, or drag it to the trash, or right-click and select “Delete” from the list of actions. What's wrong? That this is not a complete removal. In this case, the file is not deleted at all, but remains on the disk. It simply becomes “invisible” for us, which is very easy to find with any data recovery program.
Anyone who has access to your computer or flash drive can easily get your contacts. So it’s better to either save important files directly to the cloud, or periodically do a complete deletion using special programs.
Use smart solutions!
Using data recovery programs
Many programs for recovering information from smartphones offered the function of returning deleted contacts. However, after devices switched to connecting to a computer via the MTP protocol, the capabilities of these applications were significantly limited. Using them, it is almost impossible to restore records erased from memory, since Android storage is encrypted.
As an example, let's look at the results of one of the popular programs - FonePaw Android Data Recovery. USB debugging must be enabled on your smartphone to scan. In addition, the program will require permission to access contacts, calls and SMS. After scanning, the application displays a list of those contacts that are in the smartphone’s phone book, which is logical, because we have granted access to it. However, if you switch to the “Show only deleted items” mode, the window will remain empty, although the test contacts were previously deleted. MiniTool Mobile Recovery for Android, EaseUS MobiSaver and Tenorshare Data Recovery showed similar results.
You can try other similar programs, but there is a high chance that the result will be the same. Therefore, do not buy a license before it shows results.
The main part of the data recovery application is distributed for a fee, but with a free trial version. If the trial version doesn't show anything or doesn't exist at all, don't waste your money. Restoring contacts using such programs obviously will not work.
Method 6: Backup & Recover contacts
Backup & Recover contacts application is designed to recover data deleted from an Android smartphone.
Download Backup & Recover contacts from Google Play
To restore data:
- Launch Backup & Recover contacts on your smartphone and agree to the license terms.
- Give the application the required permissions.
- Launch the Restore tool.
- Wait for the scan to finish, click on the found file and start recovery with the Recover All button.