For most modern users, quality Internet access is a key factor when choosing an operator. In this regard, the telecommunications company Yota has proven itself excellent, offering high-speed access to the global network throughout Russia. Despite the automatic settings of the Yota Internet access point, each subscriber may encounter the problem of lack of traffic due to incorrect connection of the device to the network. In such a situation, you need to act independently and make a few changes to the current settings of your smartphone, tablet or modem.
The online assistant Tarif-online.ru will tell you in detail about setting up the Yota Internet on a phone with Android, iOS or Windows Phone. We will also touch on important issues with activating web access on a wireless router so that you can comfortably distribute stable Wi-Fi to external devices (laptops, tablets, smartphones).
How to get Yota Internet settings
The process of installing a SIM card into a phone and then activating it is always accompanied by a response from the operator in the form of an incoming SMS with automatic settings for access to the global network and the ability to use the multimedia messaging service (MMS). In this case, user participation is limited only to receiving and saving the message. Further software and functional changes are performed by the operating system in strict accordance with the preset algorithm. In just a few seconds, the subscriber receives a smartphone or tablet with Internet 4G/3G or 2G and can begin selecting the most appropriate tariff plan.
But there are a number of exceptions to this rule, most of which are associated with the accidental deletion of a service message or its loss in SMS spam. In such a situation, the user must know how to order Internet settings on Yota or make the required changes manually. Let's take a closer look at the first option, which does not require the subscriber to have additional knowledge in organizing the phone interface.
To request Yota mobile Internet settings from your operator, you can use:
- call the customer support center toll-free number 88005500007;
- chat with an online consultant on the official Yota website;
- SMS service on number 0999 (write a verbal request in the body of the message).
You can contact the operator’s specialist through social networks. The most prompt assistance is provided by consultants on the Iota community page on VKontakte.
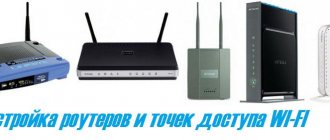
Connecting a modem to a router
To get started, you will need a router that supports Iota 4G modems.
- We connect the Iota LTE modem to the router via the USB interface.
- We go into the router’s web interface shell and find the USB menu.
- Select the “Modem” tab.
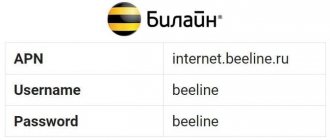
- We fill in: APN – “yota.ru”, number to dial – *99#, Username is not filled in, Password is left blank.
- Save the settings and reboot the router. The setup is complete.
The main motivator for creating this article was that in order to restore that small set of steps that will be given below, I spent many hours, talked with two representatives of Iota and searched through a million forums, blogs and similar resources (including quite useless post on Habré about my modem). I hope the text below will save someone time and effort. Straight to the point. Despite the fact that they write on the Internet that everything should work by itself and right away, in order for your SIM card from a modem (and not a tablet or smartphone, that’s a different story!) to work inside an arbitrary modem, you need to do the following :
- Unlock the modem if it is locked to an operator (no flashing required!).
- Insert a SIM card and ensure that it connects to the base station and registers in the Iota network.
- To do this, you need to make sure that there is LTE coverage from iota (3G is not suitable!), here is a coverage map, but the real coverage is greater, you need to check it on the ground;
- make sure that the modem operates on IOT LTE frequencies: band-7;
- and switch the modem to 4G mode.
- Establish a connection using the correct parameters.
Now, in order.
Unlock
The general advice is this: find your modem on 4pda.ru and follow the instructions there. For the mentioned Huawei E3272 (aka Megafon M100-4, MTS 824F, 824FT, Beeline E3272) there is a moderately useful text on this topic on the hub, and in general there is a lot of information on the network, especially in a special thread on 4pda.ru. I will give a short version of the instructions with my additions. I prefer to do all the following operations using AT commands. Under linux (and probably any other unix) this is done according to this instruction, and in windows according to this one.
- Find out the IMEI of the modem: it is written on it, but you can enter the ATI AT command and copy from there
- If you are paranoid, like me, then you put together a program to generate unlock codes from source codes (and even read them so that you don’t run any nasty stuff). If you need something simpler, here are the binaries and even a web service.
- Verbatim quote: “enter our 15-digit IMEI and click “Calc”, in the window the utility will generate our Flash/Unlock codes for us. Flash code is needed to reflash the modem, Unlock to unlock! In our Huawei E3272 modem, the unlock code is based on a new algorithm, i.e. v201 code
". - The instructions say: “Insert a SIM card from another operator, open the modem control program, and when prompted for an unlock code, enter the received code.” Since I’m on Linux and didn’t even understand what kind of “modem control program” this was, I simply entered the AT command AT^CARDLOCK="Your unlock code."
Switching to 4G mode
After this, the modem is ready, insert any SIM card and work. But, of course, except for Yota, which will not register your SIM card on the network until the modem is in “LTE only” mode. The thing is that, as they said in Iota:
We don’t have roaming in Russia at all and we have all our own LTE base stations. There are 3G stations that are used in conjunction with Megafon, but this has nothing to do with the modem.
To do this, we will again use the AT command (see the list of commands and their meaning, for example, on 4pda). Enter AT^SYSCFGEX=»03″,3fffffff,2,4,7fffffffffffffff,,
Correct settings
As Yota support suggested, to do this you need to enter the standard dial-up number *99# and enter the access point (APN): internet.yota (for some devices this can also be yota.ru, i.e. you need to check this option). Login and password can be left blank. Actually, that's all. Then you can use the modem, insert it into the router, and enjoy the Internet from Iota. Thank you for your attention.
In most cases, Yota SIM cards do not require additional activation: the SIM card is installed in the slot of the mobile device, and this is where the user’s participation in setting up the device ends.
However, situations are different, and sometimes after the manipulations done, the gadget does not connect to the network or refuses to access the Internet. In such cases, you will have to make the necessary settings yourself.
Manual Internet settings Yota
Connecting an Yota SIM card to the global network on your own also does not take much time and can be done even by an inexperienced user. To get a high-speed Internet connection, just follow three simple steps:
- enabling data transfer option;
- creating an APN (Access Point Name) access point;
- Activation of the changes made by rebooting the device.
It is important to consider the type of control program. To make it as easy as possible for you to understand the procedure, we organize the information into compact tables, separately for smartphones running iOS (IPhone, iPad), Windows Phone, Android. The parameters change similarly for tablets.
Setting up Yota Internet on iPhone
| Enabling data transfer | Sequential opening of menu items: “Settings”, “Cellular”, “Cellular data”, “Data settings”, “Voice and data”. Next, you need to select the most suitable network standard - LTE, 2G, 3G, 4G |
| Creating an access point | Sequential opening: Settings, Cellular, Cellular Data, Data Settings, Cellular Data Network. Next, indicate in the APN column the name of the access point – internet.yota. Leave the remaining fields blank |
After rebooting the OS, the device will be identified on the Internet and will be able to receive and send data.
Yota Internet settings on Windows
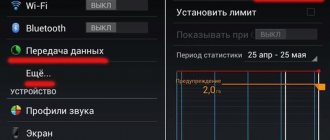
| Enabling data transfer | “Settings”, “Network and wireless communications”, “Cellular network and SIM card”. To enable data transfer, you will need to move the slider button to the far right position |
| Creating an access point | “Settings”, “Network and wireless communications”, “Cellular network and SIM card”, “SIM card settings”, “Internet access point”, “Add Internet access point”. In the “Profile name” column, enter – Internet Yota. In the access point column – internet.yota |
As in the previous case, to save the changes you have made, you must restart the operating system.
Setting up Yota Internet on Android
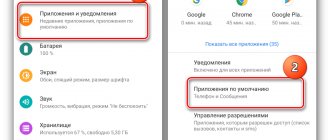
| Enabling data transfer | “Settings”, “More...”, “Mobile networks”, “Data transfer”. Next, you need to activate the checkbox (checkbox button) next to the “Mobile data” option |
| Creating an access point | “Settings”, “More...”, “Mobile networks”, “Access point”, “Create an access point”. In the “Name” column, enter – Internet Yota. In the APN column – internet.yota. All other fields must be left blank. Click the “Save” button |
To successfully set up Yota Internet on Android, it is also important to check the value of the APN type field, which should indicate supl or default, and reboot the device.
Please note that depending on the version of the operating system, there may be some differences in the spelling of the names of menu items, but their functional and semantic load is the same everywhere.
Setting up the MMS Yota service
Manually connecting a multimedia messaging system (pictures, music, video) has an algorithm very similar to that described above for VPN. To avoid confusion when filling out the data, we will again provide the information in the form of a consolidated table.
| Parameter name | iOS (iPhone, iPad) | Windows Phone | Android |
| Menu path | “Settings”, “Cellular”, “Cellular Data”, “Cellular Data Network”, “MMS”. | “Settings”, “Network and wireless”, “Cellular and SIM card”, “SIM card options”, “Add MMS hotspot” | “Settings”, “More...”, “Mobile networks”, “Access points”, “Create a new access point”. |
| Name | – | MMS Yota | MMS Yota |
| APN (Access Point) | mms.yota | mms.yota | mms.yota |
| WAP gateway | – | 10.10.10.10 | – |
| Proxy MMS | – | – | 10.10.10.10 |
| WAP gateway port | – | 8080 | 8080 |
| MMSC | https://mmsc:8002 | https://mmsc/ | https://mmsc:8002 |
| MMS center port | – | 8002 | – |
| MMS proxy address | 10.10.10.10:8080 | – | – |
| APN Type | – | – | mms |
Be sure to save the created APN MMS access point and restart your smartphone (phone) to update the SIM card online. Let us remind you once again: setting up Yota Internet on a tablet is done in exactly the same way and does not require the use of additional resources.
What does the android process media error mean?
At first glance, this system error is not related to the question: how to install Iota on an Android tablet, but this is not so. The message android process media may appear when installing the operator's mobile application.
With this error, the green robot reports that there are problems with the media data storage. The reason for its appearance is the incorrect operation of the file system: an unsupported format or incorrect deletion. The error is corrected by simply clearing the cache and then rebooting the device.
Yota Internet access point settings on a wireless router
Before activating the device, you must separately write down the MAC address, which is located on a special sticker under the back cover. Then you should connect the router to the computer (USB cable, Wi-Fi) and add the last five digits of the MAC address to the network name YOTARouter, for example YOTARouter83838. All Iota routers have a simple and easy-to-remember password by default: 12345678.
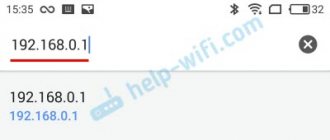
To make changes to the web interface, you will need to enter the address 10.0.0.1 in the search engine and specify the word admin twice, which is both a login and a password. Next, in the “Settings” tab, perform the following actions:
- activate the DHCP server to be able to assign IP addresses to external devices;
- change the network name ("Wi-Fi" subsection);
- change the router's IP address to protect the device from third-party searches and login attempts;
- close access to the router settings by assigning a new password.
Since the wireless router runs on battery power, it is advisable to set the shutdown time in the “Manage power modes” tab in a situation where no external device consumes Wi-Fi.
If the tablet does not have a SIM card
All previous recommendations are suitable if the tablet has a SIM card slot. What to do if it is not there? You can use a mobile router to distribute the Internet via Wi-Fi, or, if the tablet supports OTG, a mobile modem. To do this you need:
Mobile router
- Turn on the device and connect it to the computer using the cable supplied. The software will install automatically.
- Configure the access point settings.
- Connect to the Wi-Fi network created by the router.
- Launch the browser and follow all the instructions on the page that opens.
Mobile modem
- Connect the modem to the PC and wait for the software to install. Set up network configuration.
- Go to the user account https://my.yota.ru/ and activate the mobile modem in it.
- Using 3G modem Mode switcher) switch to “Modem only” mode.
- Using an adapter, plug the modem into the tablet connector.