Communication Life:), like many others, strives to keep up with the development trend of the World Wide Web around the world.
Almost every subscriber has a need to constantly use the World Wide Web.
Therefore, when buying a SIM card, many are interested in how to set up Life mobile Internet.
In this article we will look at all possible methods.
Life Internet settings - manually and automatically
All modern mobile operators offer customers a mobile Internet connection. Usually you can use it immediately after activating the SIM card, but sometimes additional configuration of the Lifecell Internet is required.
By selecting the correct settings and network parameters, users will receive a stable connection at the highest possible speed (Life is introducing a 4.5G network in Ukraine).
But it is worth remembering that even the correctly selected parameters do not guarantee an uninterrupted connection, since sometimes the quality of traffic is affected by third-party factors, for example, a smartphone malfunction or high network load during peak hours.
That is, it is worth changing or ordering settings only in cases where the subscriber has no doubt that this is the problem.
How to properly configure an access point
The abbreviation APN stands for Beeline access point. In most cases, you do not need to enable it; activation of settings for the Internet connection, receiving and sending MMS messages is configured automatically. In case of failure, access must be ordered in the form of an electronic document or connected to the point manually. Without this basic setting, the mobile device will not work correctly, even if the Beeline SIM card has an extended limit for traffic and SMS sending.
How to get Lifecell Internet settings
Typically, the necessary settings are installed automatically, so users do not have to think about where to get the correct settings. The operator recommends ordering them additionally only in 1 case: when traveling abroad.
In such cases, subscribers should:
- send a message to number 123;
- use the company's mobile application;
- or dial USSD command *123*6#.
In the case of the USSD command, nothing additional is required. When sending SMS, subscribers can select the appropriate message text:
- INTERNET to get Internet settings;
- MMS to be able to use MMS;
- ALL to get all parameters at once.
Sending a message or command is free, and automatically installing settings also does not require payment. The necessary parameters are sent to the smartphone instantly, so you can use the Internet almost immediately after sending the request.
On Android
The described procedure is fully suitable for Android phones, so users can order Life Internet settings using the specified command or sending a message. There is no need to do anything additional, since the rest will happen without the participation of the subscriber: Lifecell settings will arrive and be installed on the smartphone automatically.
For iPhone
The procedure is no different for iPhone owners. The operator sends the necessary parameters automatically as soon as the subscriber decides to activate the SIM card.
As a last resort, if users have difficulties connecting to the network, they can call the Lifecell contact center and ask the operator for help.
He will solve the problem manually, and the calling client will only have to follow his advice and wait until Internet access is established.
Internet version (via browser)
To enter your personal account, you need to go to the operator’s website - https://life.com.by/, click on the menu icon in the upper left corner and select the appropriate link.
In the “Login” block you will see two fields in which you need to enter:
If you are visiting for the first time, you need to register.
Registration in your life:) personal account via a browser.
Step 1. Generate a password by clicking on the “Get Password” button.
Step 2. Enter your mobile phone number and click the “Get password” button.
Authorization in the Internet assistant Life
Login to your personal account is carried out by entering your phone number and password (sent in an SMS message). Then click the “Login” button.
Home page
On the main page you will have access to the following information:
- detailing of expenses;
- telephone number and full name of the owner of the telephone number;
- current balance;
- the amount of remaining traffic in the current month;
- remaining minutes within the network and to other networks;
- number of SMS messages to other networks and within the network.
There are also possibilities:
- configure redirection;
- top up or share balance;
- add traffic for a day or a week;
- add SMS messages;
- contact a consultant.
For more detailed information, you can click on the corresponding block in your personal account.
Cost details
In order to get acquainted with the expenses, you need to follow the link “Details of expenses”.
Select the period you are interested in.
Click the “Get report” button and wait until a window appears prompting you to save the PDF file.
Order settings
In this section you can get and configure in automatic mode:
As a rule, modern smartphones do not require additional settings on the part of the user. However, outdated phone models require additional changes to the phone's functions.
To select the appropriate settings, click on the “Order settings” link.
Select the section that interests us.
After selecting, an SMS message with the settings will be sent to your mobile phone number.
Call forwarding
Incoming calls can be redirected to another number: landline, mobile or voicemail. Redirection is free.
The following options are available:
- forwarding to a number;
- forwarding, if the subscriber is busy, to a number;
- forwarding, if the subscriber does not answer, to a number;
- forwarding, if the subscriber is unavailable, to the number.
Select the appropriate item and indicate the number for forwarding.
Manual Internet settings Life Ukraine
It is usually not necessary to configure the network manually, but if you cannot do without it, you need to:
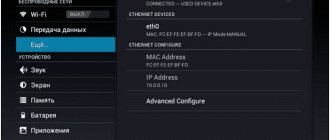
- find the “network settings” section in the smartphone menu (the exact location depends on the brand and model of the device);
- indicate Lifecell Internet in the “name” or “profile” field;
- enter the word Internet in the APN line;
- Leave other values unchanged.
After that, all you have to do is reboot your smartphone and check whether setting up Lifecell Internet manually brought the desired result.
Possibility of use without ordering settings
The Life operator claims that to use the Internet in Ukraine, no additional settings, super passwords or other data are needed. Users just need to connect to the network and select the appropriate connection mode, the system will do the rest automatically.
You only need to set up traffic and access to online services before traveling abroad.
Source
Connecting 3G connection
If you want to use 3G Internet connection technology, you need to configure it on your smartphone. However, first you need to choose a MTS 3g tariff or from other companies, which is focused on high traffic consumption. Otherwise, the fee for using the Internet may be several times higher than the cost of regular 2G.
See detailed description of tariffs of Ukrainian telecom operators
The first thing you need to do to connect 3g MTS or Life 3g is to get automatic settings or create an access point yourself.
Next, you need to go to the settings of your smartphone and in the mobile communication window, go to the 3G Mode tab:
- Click on the network mode selection panel;
- Check GSM/WCDMA$
- Close settings and restart your phone. Now a high-speed connection will appear on your smartphone that is connected to 3g MTS or 3g Life.
Some versions of Android have a different menu, to connect 3g MTS, you need to disable the “use only 2G” networks item in the settings, as shown in the figure below:
What is APN and how to change it on Android phone
Android provides users with a variety of customization options, some of which are useful for everyone, while others are only for advanced users. One of these settings is the Access Point Name, better known as APN.
APN is something that most users don't need to worry about. You insert a SIM card into your phone and it connects to your operator's network. You will be able to make calls, send messages and do other important things. But, if you're still tinkering with custom firmware or using an MVNO, you may find that things don't work automatically.
Set up 3g for Android
The list of actions will be approximately the same as in the previous version, but there will still be some peculiarities:
- go to the menu and the “settings” item;
- go to “Other networks”;
- visit the menu item “Mobile networks”;
- enable mobile data;
- go to the item called “Network mode" and turn on 3g;
- enjoy good internet.
What is an Access Point Name (APN)
APN is the information your phone uses to connect to your carrier's network. It lists the addresses your phone uses to connect to the network, the ports used to process Multimedia Messaging Service (MMS) messages, the types of data a particular APN uses, and other pieces of information to ensure your phone works properly.
Some of the settings, such as "APN Type", may be optional and your phone will still work if it is not 100% correct. Others, such as "MMSC" and "APN", are much more important and your phone will not work if they are entered incorrectly.
Luckily, most phones have a built-in APN for popular carriers, so all you have to do is insert your SIM card and let your phone do its magic. The phone already has an APN and it knows which one to load to connect to a given network.
APN access point of Kyivstar, Vodafone, lifecell operators
APN access points of 3G/4G operators in Ukraine. To set up Mobile Internet on your device, you must enter an access point (APN).
The operators Vodafone UA, Lifecell, and Kyivstar have a very simple access point: Internet
Kyivstar previously had a little more difficulty:
- www.ab.kyivstar.net — prepaid subscriber
- www.kyivstar.net — subscriber contract
But now for Kyivstar:
- Contract: internet
- Prepayment: internet
What is APN?
Access Point Name (or APN for short) is the name of the settings that allow your device (phone/modem/router) to establish a connection to the gateway between your operator's network and the public network.
Your operator reads these settings to allocate an IP address.
Depending on the network design of a particular operator, different settings may be required. In most cases, you only need to change a few settings, but you should still save the existing settings from your carrier. The majority of users will never need to manually change the APN, since each phone comes pre-loaded with several standard APN settings, so in most cases the device will be able to configure itself to make calls automatically. This is very convenient if you suddenly need help from your operator’s technical support, if some network settings in your device are not working correctly and you have to set the APN manually.
Dialing number for all operators: *99#
Source
