How to register a Yota modem? Insert your operator's SIM card into the router and connect the device to your PC/laptop. Wait for the new equipment to be recognized and the software installed, go to the website start.yota.ru and in the “Modem or Router” section, click on the “Register a new device” button. After this, fill in the required fields and confirm your registration in your personal account. Below we will consider in detail how to register Yota equipment, why it is necessary, and what difficulties may arise when performing the work.
Modem description
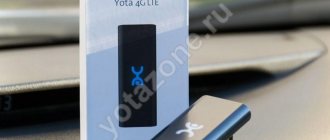
Yota is a wireless high-speed Internet network of the latest generation based on Mobile LTE technology. First of all, this is an extensive coverage area, free access to the World Wide Web, no time or traffic restrictions, uninterrupted connection even at travel speeds of over 100 km/h. The Yota 4G Lte modem is a universal device that fully meets the needs of modern users. This is a direct competitor to Huawei.
A modern USB modem is equipped with a Wi-Fi module, which allows you to organize wireless access points for a collective connection to the Internet. The compact device does not offer users wide functionality. It only requires distributing the Internet to several devices. And he copes with this task 100%.
Important! A Wi-Fi modem is unable to replace a full-fledged router. It has a limited range and does not have numerous settings and other subtleties.
Technical support "Iota" provides its clients with services for unlocking their own devices. First, you need to attach a screenshot through your personal account with imei by typing status.yota.ru/status in the address bar. Next you will have to click on the PrtScr combination. By pasting (Ctrl+V), you need to save the file. Without this document, it is impossible to unlock the device.
Important! Unblocking the modem through an official representative requires quite a lot of time - about 2 months.
Configuring apn yota parameters for the Android operating system
Let's look at how to set up access to the World Wide Web on Android:
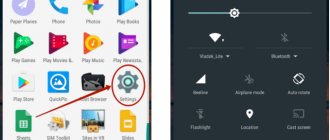
- Go to the “Settings” menu and select the “More” sub-item.
- Next we find “Mobile networks”.
- Select “Access point apn” (in a phone with two SIM cards, select iota);
- For the Internet to work correctly, delete existing apn access points and create a new one by clicking on “+”.
- Enter the parameters: name “yota”; apn "internet.yota";
- Make sure that the “Enable/disable apn” setting is checked.
- Save and begin activating the access point.
If network access does not appear, you need to restart your smartphone or tablet. You can also select the “Only 2G networks” item in the settings, check the box next to it and quickly remove it. Then the phone will automatically connect to LTE.
Devices running Android OS tend to disconnect from the apn access point on their own when there is no coverage. The chance of such an incident is negligible, since in 2021 the mobile network of the yota operator is available in almost any region of the Russian Federation. To connect to the Internet, you need to turn off and turn on the gadget again and repeat the procedure with checking and unchecking the box described above.
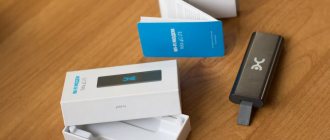
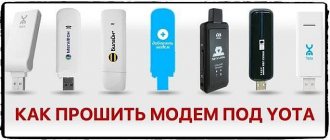
Types of modems from Yota
This article discusses the current offers of the Iota provider with their technical characteristics. Among them are the following types:
How to set up an Iota access point on an Android smartphone
This option is a black mobile device with a company logo in the middle. The USB connector is retracted inside the case, making the modem more compact and convenient to carry. But because of this same factor, one can judge the fragility of the structure. The equipment supports 4G signal. The modem includes a built-in multi-band antenna. The device operates at different frequencies and you can easily travel abroad with it. The modem weighs only 35 grams.
When turned on and operating, the device illuminates the company logo in light blue. After installing the device into a computer running Windows 7 or 10, it starts working automatically, without installing unnecessary programs. The consumer will no longer waste time on additional settings.
Note! You can log in in 15 seconds.
This Wi-Fi model is visually no different from its previous device, only slightly wider. It is black plastic with a retractable USB connector. There is also a slot for a SIM card next to the entrance. The main distinguishing feature is the ability to distribute traffic via Wi-Fi. Up to eight devices can be connected to it. In addition to the main connector, there is also a micro-usb. This means that the equipment is independent of the main computer and can be charged from anything. At its core, it can repeat the functions of a router. The weight of such a device is 50 g. The main protection in the case is the internal multi-band antenna. Therefore, the device operates at several frequencies.
This model looks completely different. This is a white wide monolithic case with the Iota logo. It is autonomous, that is, it does not depend on the main device. A micro-USB cable is also included with the modem. The device has a high-capacity battery.
Important! Experts call it one of the most stable devices from this company, as it works for up to 16 hours. And the process of full recharging takes only 2 hours.
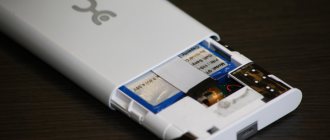
Since the design of all Iota devices is identical, here too the USB connector turned out to be retractable. There is a mode switch on the case. It makes it possible to access the device without a password. But by default, modem works with parameters that you can configure yourself, that is, by entering your login and password. There is a black and white screen on the body of the equipment. On it you can see how many devices are already connected to it, battery charge and operating mode.
This model is considered a router with forwarding of all ports. This particular assembly option is no longer on sale, but its alternative is the very first device. It works with set-top boxes, navigators, hard drives, etc. This is one of the first modems from this company in LTE mode.
All mobile devices support a maximum data transfer rate of 20 Mbit/s. The specific tariff will depend on how many days of use the budget is calculated for. If the balance on the contract is over, then Internet access still remains. But this way the speed drops to 64 kbit/s.
Yota Many – portable
Yota Many is already a portable modem, with a battery and the ability to be carried. Settings are approximately the same as above. In order not to write about the same thing, I simply suggest watching the video:
Save, reboot, work! As you can see, using the modem is very simple - then you just need to supply power to it. If you still have any questions, write them in the comments below to this article. We’ll figure it out, help you, and if necessary, add to this article. If you yourself can supplement it, be sure to write it in the comments. It will be useful for everyone!
Step-by-step instructions for connecting to a laptop and computer
How to increase Internet speed on a Yota 4G modem
The connections of all models are almost the same, but there are still differences.
Both modems are connected to a personal computer via a USB connector. For a modem with wifi function, you will need to additionally install a wireless network.
First you need to connect to the device. Next, connect the modem to the device.
The next step is to find a free USB port.
The Eta 4G modem must be inserted into the USB port on the device being configured.
Then driver installation is required. The installation starts automatically as soon as modem is inserted into the device.
Connect modem “Iota” to the laptop.
If you connect the modem to a device that does not have wifi, no additional settings are required. After automatic installation of the software, the active Yota network will appear. After this, you can freely use the Internet.
A wireless modem will require additional settings. Next, you will need to enter names and configure security in the form of a password for connection access.
Yota Internet provider for computer, tablet and mobile
The Iota operator, which recently appeared on the territory of the Russian Federation, provides a wide range of services both to people using classic Internet access from a personal computer, and to users of mobile devices of all options and types. Using the services of this provider is an excellent option for people who are accustomed to saving on Internet costs and clearly monitoring traffic usage.
You can find up-to-date information about the rules of use and the limits of use of the service on the official website.
Installing/charging the modem into a USB port
Devices from this company, depending on the modification, have different charging and power capabilities. The Yota 4G USB modem has the ability to supply electricity only when connected to a laptop or personal computer via a USB port.
Combined models have two options for USB charging and direct power supply from a stationary network through an adapter that is plugged into an outlet.
The Iota LTE wifi router can only be connected via an adapter in a stationary electrical network.
Note! It is recommended to use adapters with a power of at least 1.5 amperes for normal operation of the modem.
Installing drivers
There is no need to install drivers on your laptop or computer.
After physical connection, the Yota Acces program starts. It will automatically begin installing the device driver and special software. If for some reason the automatic installation does not start, you need to go to the “My Computer” section, open the modem folder, and run the autorun.exe file.
Login to settings
The Yota Wi-Fi modem is configured via the web interface. It is available at https://my.yota.ru/selfcare/login?goto= (or https://10.0.0.1/). There are no special settings here - you can do the following:
- turn off or turn on the wireless module;
- select the type of protection;
- set a password;
- set up port forwarding.
Service information is shown in a separate window:
- Data transfer rate.
- Current IP address.
- Firmware version.
- Amount of received/transmitted data.
- Yota signal strength.
New firmware is downloaded to the device independently.
Login to your Yota account
You can log in to your personal Yota account through the operator’s official website. Open any browser on your computer. In the address bar we write https://www.yota.ru. We go to this web page by pressing the Enter key.
Next, the system will prompt you to enter the data:
- E-mail address.
- Your account number.
- Login password.
Check that the information you entered is correct and confirm your actions. Now you have access to all the features of your Yota personal account. Check your balance, connected devices, change tariffs.
Registration and activation
The Iota modem is activated automatically after registration. The registration itself is nothing special: you will need to answer a number of simple questions. First you need to enter a working email and phone number. This is important to do because this data will be checked (phone with SMS confirmation, mailbox with a letter with an activation link). To avoid unnecessary problems, you must provide a valid first and last name.
Note! Upon completion of registration, the user will be provided with 24 hours of free Internet to select the desired connection model and pay for it.
Recovering and changing the client password
This procedure is easily performed directly in the authorization window within the service. If you have lost or forgotten your password, simply click the "Forgot Password" button and access a form that will allow you to recover it. In this case, a recovery link will be sent to the mailbox you specified during registration - without it, the password recovery procedure is simply not possible. Accordingly, the ideal solution would be to write down the password somewhere at the time of its creation, so as not to forget it under any circumstances.
Wifi setup
In the case of an LTE modem without WiFi module support, no settings are required. After the installation is complete, a new active Iota network will appear, after which you can openly use the constant Internet.
In a model that supports wireless network distribution, you will need to expand the access point after installation. You will need to select the name of the network, its password and the type of encryption.
How to remember your Yota number
When you change your telecom operator, it is difficult to remember the new number at first. Therefore, in order to avoid difficulties with your search in the future, you can use the following tips:
- After activating the SIM card, an SMS containing the phone number is sent to your phone. It is better not to delete the received SMS and save it in the gadget’s memory, and when the need arises to contact it;
- When purchasing a SIM card, the client receives an envelope with this information. All that remains is to transfer the data to your phone, to notes and save. And if you need to make a request, the required information will always be at hand. It will be very convenient to use the Evernote application to add notes.
The Yota company values each subscriber and tries to simplify the methods of obtaining the information of interest.
Advanced settings
The advanced settings of the Yota modem contain only four points:
- Turn on/off wi-fi network. Switch modes in which the Internet will be available only to the user of a device with a physically connected modem and opening Internet coverage by area.
- Automatically turn off Wi-Fi. When the mode is turned on, after a certain time of inactivity, the modem will turn off the Internet. This is a useful feature, especially when there is little traffic left.
- The name of the network, the name of which will be displayed in the search for Wi-Fi networks.
- Type of protection.
Download the Yota mobile application for Android and IOS (iPhone)
Using Yota applications, you can easily change the connection conditions as needed. For travel throughout Russia, there is a single price for all regions with unlimited calls.
Using it you will get the following functions:
- Online balance checks.
- Tariff changes.
- Change of phone number.
- Roaming configuration.
- Direct connection to technical support.
- Enable automatic payment mode..
- Daily and monthly payment mode
Speed setting
If the Internet speed has decreased, then you will have to take the following actions:
- First you need to check the signal strength. It must be no less than SINR 2 RSRP -110. To find out what kind of cellular signal is being supplied, you should go to the device category.
- If there is no signal, you need to visit the official portal https://yota-faq.ru/yota-zone-map/ and check. If necessary, by moving, you can increase the radio coverage of the Yota network.
- If the signal is excellent, but the speed is low, then you need to reboot the device. In addition, all downloads with their updates should be disabled.
- Then you should go to the page and read the article about YotaSpeed. It will indicate how to properly test all the Upload-Download capabilities of the device.
Tariffs of the mobile operator Yota
Communication tariffs are very interesting and are an extremely flexible tool for the person using them. An excellent option is the fact that any number of unused minutes can be replaced with gigabytes of Internet traffic or the reverse operation.
You can also find out about current tariffs on the website of the cellular operator.
Possible malfunctions and ways to eliminate them
Malfunctions may be different, but the symptom is the same; no matter what problem is detected, the user will not be able to access the Internet. Using an example, we can consider several reasons why problems occur:
Possible problems, manufacturing defects of the device, physical damage during use.
To avoid serious damage, it is better to use the services of a repair shop.
Does not catch the network or the modem is connected, but without Internet access. First, you need to check whether Yota Internet coverage is supported. You can find out about this by looking at the network coverage map. But it’s better to do everything in advance, since in the absence of an Internet connection, obtaining such information will be problematic. If there is a network, but there is no Internet, then you need to check the network settings through the modem control menu.
Important! If the settings are configured correctly, but there is no access to the Internet, you need to turn to professionals for help.
A common problem is lack of connection:
- The solution to this problem may lie in reinstalling the modem drivers.
- You need to go to the system and sharing control center.
- Next, you need to click on the item to change adapter parameters.
- Then you should click on local network connection.
- The system will require you to select network properties to configure them. Then you need to open the “Driver” section and click on the “Delete driver” button.
- Next, the personal computer or laptop will have to restart.
- After completing the action, you need to install the driver.
How to set up a Yota modem
Let's look at the step-by-step setup of the modem.
How to enter settings
After installing the software, the user will need to configure the device. To do this, the client needs to go to any web browser and enter status.yota.ru or 10.0.0.1 in the address bar.
An authorization window will appear, by default you need to enter admin/admin and confirm the operation by clicking “Login”.
If authorization is unsuccessful, then you need to find the necessary data on the device box. The main page of the modem will load, where the current status will be indicated. In the modem interface, you can monitor the necessary information about the operation of the modem, make settings and adjust the tariff plan.
When connecting for the first time, the user will be prompted to register an account to purchase access to their personal account. It is necessary to indicate real data in the “Last Name” and “First Name” lines. All other data is filled in using prompts.
How to configure network connection settings
After registration, you need to return to the current status page and click on the “Settings” command on it. If the user has purchased a wi-fi modem, the corresponding line will appear in the settings, where you need to check the “On” box. Next, you need to enter the network name (SSID) and come up with a password to create a new access point. In the “Security Type” line, select “WPA2 Protected”. Confirm changing settings.
How to update Yota 4G modem drivers
The modem software is firmware in such a way that all updates occur automatically without user intervention. The current device status menu indicates the update version; you need to copy it to a notepad or write it down in order to be able to track failures when changing.
Subscribers need to reinstall drivers when a software failure is detected, a virus is found on a PC when downloading and installing new software, etc. To update the driver manually you need:
- Open “Start” and find the “Control Panel” tab;
- In order not to bother searching for the desired section, you can move the mouse cursor over the search field, and type “Device Manager”, and then click on the magnifying glass icon;
- Click on the found section and select “Properties”. A list of installed programs will be displayed, among which you need to click on “Driver” or “Network adapters”;
- A list of drivers will open, with an exclamation mark next to the faulty one. You need to left-click on the driver and select “Properties”;
- Click on the automatic update line and wait for the driver to download and load. After this, you will need to restart your computer and check the operation of the device again.
How to set and change a password
To set up any other login and password you will need:
- Once in the modem interface, the user needs to go to the “Settings” section;
- In the new window, move the mouse cursor over the “Protection and Security” item and click on it;
- Here you can change the previously specified login and password. Before this, you will need to enter the old data, and then specify the new ones, duplicating them. After this, you will need to synchronize again; you may need to restart your computer and modem. The devices should ultimately work properly.
Other settings
In some cases, if the installation was carried out incorrectly or the device generates an error during operation, you will need to reset the current settings to default. The modem may not have a Reset button, so the reset is done as follows:
- The user needs to log into the modem interface. To do this, enter status.yota.ru/advanced into the address bar of the browser. Next you need to log in;
- You will need to go to the “Settings” tab. Then you need to click on the “Ports” command and scroll to the very bottom of the page;
- Roll the mouse wheel until the “Factory settings” section is displayed. You will need to click on the “Restore Factory Settings” button. After this, a reset will be performed and you can set everything up again.
Please note that the speed cannot be adjusted on the device; to do this, you need to go to your personal account and, by turning the slider, observe the change in speed and monthly subscription fee.
Choose the optimal tariff for yourself, register and agree, and then pay for it. This is a necessary operation for the Internet to function.
Connecting a modem to a router
In this manual, users can learn how to properly connect the Iota modem to the router. Before purchasing a 3G and 4G Lte modem and router "Eta", you must check their compatibility, since the presence of a USB port on the router does not mean that it will work 100%. You can find device compatibility information on the Internet.
The connection instructions look like this:
- You need to buy a modem and router from Yota.
- Then you should connect the modem to the router by inserting it into the router's USB port.
- The next stage is to determine the compatibility of the operating system with the Yota modem and the availability of Internet coverage.
- Next, you will have to set up an access point and personal account on your device.
- To do this, you need to log on to the official Yota website, register, check in your personal account that the drivers are up to date, if there are updates, then you need to update the software.
- Next you need to reboot the device.
In conclusion, it should be noted that for those who have not yet managed to buy a modem for Yota in 4G Lte mode and experience the high functionality of this irreplaceable device, the company offers a wide range of high-quality certified equipment necessary for quick and convenient connection to the network. The cost of the device can be found on the operator’s official website.
Podgornov Ilya Vladimirovich All articles on our site are audited by a technical consultant. If you have any questions, you can always ask them on his page.
Content
Cellular operator Yota is becoming increasingly popular among Russians. In almost all regions of the Russian Federation, subscribers use the services of this provider. Yota offers customers quite favorable tariff plans. The quality of mobile communications is constantly improving. In addition, the operator provided the opportunity to use reliable mobile Internet. You can study the tariffs and offers in detail on the official page of the provider. Every year the operator makes new, more profitable offers to its subscribers. Service is constantly improving.
A service was developed specifically for the company’s clients – a personal account. Here users can find out the balance, disable or activate options. To gain access to high-speed Internet, Yota clients buy modems. These are proprietary devices programmed to work only with one operator. To perform configuration settings, you need to log in to the Yota modem. Some subscribers have difficulty coping with this task. Today we will take a closer look at how to log into the Iota router. From this article you will learn how to check the address of the Iota modem. We’ll also talk about the advantages of the Yota personal account.