When may you need to transfer data to a SIM card?
Typically, smartphone owners use Google cloud services for backup data storage. You can copy information from the cloud to any gadget connected to the Internet. But there are a number of situations in which it makes more sense to transfer contacts from your phone to a SIM card:
- Before updating the gadget's firmware.
- If necessary, roll back the smartphone to factory settings.
If the device breaks down, before returning it to the service center.
- When using several smartphones at the same time.
- After purchasing a new gadget - to transfer information to it.
And of course, saving contacts from your phone to a SIM card will help in a situation where the gadget does not have access to the Internet, that is, there is no way to transfer the list of subscribers to the cloud for storage.
Mobile applications for transferring data from phone to card
Third-party applications have been created to transfer contacts and other information. Among them we can highlight AirDroid. The program is simple and understandable for any user. After installation and launch, registration is required. The menu is designed in the form of several windows with a list of possible options. There are icons on the left side; by switching through them, the user has access to numbers on the smartphone, SMS and other data.
The second simple application is MobiKin Transfer. The program works without restrictions, safely and reliably. All information is stored in full.
The utility can be used for any operating system, including Windows. For advanced users, the ADB protocol may be suitable. It must be used in situations where the smartphone is damaged and cannot make calls, but USB debugging is possible.
Activation of the function is carried out using the developers menu, and to go you will need to click on the build number of the device several times in its settings. In addition, you need to install the ADB driver on your PC for a specific model of mobile device. The next instruction is:
- On your computer, go to the command line through the start menu and type cmd.
- Accept all agreements to run cmd.exe.
- In the new menu you need to select the translation to the driver folder – cdd://ADB.
- Now write the command: adb pull /data/data/com.android.providers.contacts/databases/contact2.db /home/user/phone_backup/.
- The folder will contain a new file contact2.db, which can be opened using a standard notepad or a special editor.
- To search for contacts in the smartphone’s memory, you need to go to: /data/data/com.android.providers.contacts/databases/contacts.db. Since the folder is a system folder, access to it without administrator rights is impossible.
When unpacking an archive, you must remember its address, otherwise you won’t be able to do anything.
Features of transferring information to a SIM card
Before you transfer contacts from your phone to a SIM card, you need to take into account the main nuances of this process.
- A SIM card can accommodate a limited number of numbers. Old SIM cards contain no more than 100 entries. For new ones, issued no more than 3 years ago – up to 250 entries.
- When transferring the phone book to the SIM card, only the name and number of the subscriber are saved. It will not be possible to record: photos, notes, birthday data and other additional information.
- If several numbers are associated with one name in the gadget's phone book, when transferring data to a SIM card, separate entries will be created for each number.
- Only the first 6 characters of the subscriber's name, including spaces, can be saved to the SIM card.
Before transferring all the saved numbers from your phone to the SIM card, you should put things in order in the list of subscribers: delete irrelevant numbers, clear the phone book of duplicates, shorten usernames that are too long. If this is not done, the directory may not be copied completely, or using it after transfer will be a rather difficult process.
How to transfer files and applications from any smartphone to honor in a couple of clicks
We all face the problem of setting up a new smartphone, when we need to transfer as much of our data as easily and quickly as possible. And if everything is simple with contacts - they are stored in a Google account, then problems may arise with the transfer of old applications, call history, messages and files. And re-installing all your favorite programs is a rather tedious task. However, in Honor smartphones, the developers took care of solving this problem by transferring data in just a couple of clicks.
Immediately after turning on for the first time, Honor 9 will ask you to select a language, accept the user agreement, connect to the Wi-Fi network and enter your Google account. After these simple manipulations, the smartphone will offer to restore data or configure it as a new device.
You can restore information from a backup copy, from a Google account, or from an old device on Android or iOS.
We will transfer data from another Android smartphone (from a different manufacturer), so we choose the first option.
The device will offer to transfer data in one touch using NFC. It is worth noting that not all smartphones have this technology, so you can restore information by going to Google settings on your old device and selecting “Set up a nearby device.” This feature allows you to restore from a backup that you should have created in advance.
However, if you didn't make a backup, it's quicker and easier to skip Google's transfer and use . This can be done immediately when activating Honor 9, or later go to the advanced settings and select this function yourself.
With Phone Clone you can recover information from an iOS or Android device. You need to install the application of the same name on the old gadget from the Play Market or from the website - with its help you need to scan the QR code on the Honor 9 screen.
Phone Clone will immediately prompt you to choose what information you need to transfer - messages, call list, photos, audio, video, documents, system data and applications. In general, you can remove almost everything that was on the previous device.
The user can only click the “Transfer” button and wait for some time - it depends on the amount of information on the device. By the way, Phone Clone does not require the Internet; data is downloaded via Wi-Fi Direct. Note that this proprietary utility downloads apk files of applications and installs them on the Honor smartphone - thanks to this, the recovery process does not take much time.
But what if your old gadget is an ordinary push-button dialer that only has Bluetooth? And for this case, Honor developers have prepared a way to transfer data.
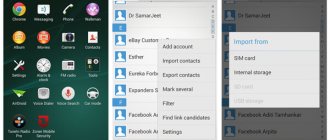
Go to contacts, click on the menu button, select “Import/export”. There are several options for transferring data, including from a memory card, but the most useful option is importing from another phone.
We go to import from another phone, select a device with Bluetooth and connect to our “dialer” - the contacts are immediately transferred.
In total, transferring data using the proprietary Phone Clone utility took us no more than 15 minutes. At the same time, all photos, videos and data weighing almost 3 GB were restored to Honor 9. The smartphone also downloaded all applications via Wi-Fi Direct and installed them immediately, without taking up unnecessary traffic.
Find out more about Honor smartphones
Source:
Instructions for transferring data from Android to SIM card
Let's look at how to transfer contacts from your phone to a SIM card (on Android version 9 and higher). On gadgets with earlier versions of the OS, the process may differ slightly in the names of menu items, but the general logic of actions will be the same as described.
- Open the contact list.
- Click on the icon with three dots located on the right in the upper corner of the screen (can be located in the center).
- In the submenu that appears, select “Manage contacts”.
- Go to the “Export/Import...” section.
- Click on the “Export” button.
- Mark the SIM card to which you want to copy with a dot.
- We select from the general list the records that need to be saved. If you need to transfer all contacts from your phone to a SIM card, mark the word “All” with a dot at the top of the list.
- Click the “Finish” button.
- On the new screen, click “Export”, then confirm the transfer by clicking on the “Yes” button.
- We wait until the copying process is completed, then return to the main menu of the device.
To check that the transfer went smoothly, you can open the phone book again. There should be a SIM card icon next to all entries marked earlier - this will mean that they were copied successfully.
Google account
Each of us in our lives bought ourselves a new smartphone to replace the old one.
But when you buy, you get a clean device on which only a small set of stock programs are installed by the manufacturer. How to fix the situation? “Inhabiting” a device and transferring most of the information to it in a short period of time is quite simple - this can be done in several ways. A Google account is the easiest way to transfer your data between phones running Android OS.
What to do:
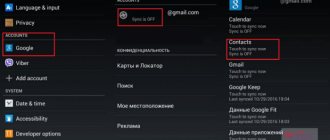
Open the “Settings” menu and find the “Backup and reset” item.
- Activate the “Data backup/copy” item;
- Go to the “Backup and reset” menu item and activate the “Auto recovery” item;