Chris Jennings
Blogger, producer, speaker.
The vast majority of users do not change the default settings on their smartphone. The problem is that built-in apps and endless notifications constantly demand your attention. In such an environment, it is difficult to remain productive and enjoy life.
A few years ago I reviewed gadgets and mobile applications. Then I realized how much of my free time my phones take away. The entire industry is built around your attention. And only you decide who to give it to.
This guide will help you take control back into your own hands. The settings on different devices may differ slightly, but the essence is the same. Go!
Test your new device
First of all, take a few minutes to inspect your smartphone and make sure there are no scratches, dents, or chips. Carefully inspect the box and check the specifications.
Most Android phones come with a clip to remove the SIM card tray. Don't throw it away as it may be useful in the future. Inside the box you will find a charger and possibly headphones, a case or a protective glass.
Get ready for active work
Immediately put your phone on charge. You'll probably be using your new smartphone a lot over the next few hours. It would be a shame if your smartphone suddenly dies in the middle of an important process.
Immediately connect to your home Wi-Fi network if available. Not all mobile operators provide unlimited Internet. And you're almost certainly going to download a lot on your first day, installing apps and games.
Clear your lock screen
One of the reasons Android is popular is the ability to customize your lock screen. Some people like to add widgets, notifications, and other information to their screen. But all these things distract your attention from the tasks for which you pick up your smartphone.
Remember: the lock screen is just a security measure. You don't need notifications on it - just unlock your phone and move on to more important things. Here's what you need to do to turn off all notifications.
- Open Settings → Security & Location.
- Go to the “Lock screen settings” tab.
- Select Don't show notifications.
Sign in to or create a Google account
When you turn it on for the first time, the smartphone will ask you to go through the initial setup. It's a little different for each smartphone, but they always ask you to sign in to your Google account.
You can skip this step if you want, but we don't recommend it. Logging into your Google account connects your device to many useful services. This is the first step to personalizing your phone.
Activating this account automatically syncs your email, calendar, and contacts list. Moreover, without an account, you will not be able to install applications from the Play Store.
If you previously had an Android smartphone, contacts and mail will automatically be downloaded to your new device as soon as you log in to Google.
How to set up Android on a new phone
Insert SIM card and turn it on
How to set up Android: first insert a SIM card.
Insert a SIM card into a newly purchased gadget if it supports mobile communications. If there is a removable battery, insert it and close the back panel.
We turn on the smartphone or tablet by pressing the power button, which is usually located either on the top or on the right side. You may need to charge your device before turning it on.
Choosing a language
Immediately after switching on, you will be asked to select a language. We choose the one we like. Please note that we compiled the article based on the Sony Xperia X Compact smartphone; Sony’s creation has its own style and interface, so our screenshots may differ slightly from what you see on the screen of your gadget. And yet, the first thing you are asked to choose after turning it on on many devices is the language.
Connecting to the network and the Internet
Next, we will need to decide how we will connect to the Internet: only via Wi-Fi or via a mobile network. The choice here depends on the availability of an Internet traffic package, which is usually included in the tariff plan. Those who want to go online when there is no Wi-Fi at hand will have to connect to the mobile network.
You will then be prompted to insert a SIM card, if this has not been done previously, and then select a wireless network. We select our home network from the list, enter the password (the up arrow button is responsible for changing the case of letters, and if there are no numbers on the on-screen keyboard, click on the button with the numbers “123”), then click on “Connect”.
You can use a new Android smartphone or tablet without an active Internet connection, but you won’t be able to log into your Google account and access services associated with it, such as contacts and calendar notes. Well, of course, you won’t be able to download apps either.
Setting up email and social networks
After setting up the network, log into your Google account by entering your email address and password. If it doesn’t exist, we create a new one.
On some devices you will also be asked to log in to other services such as Facebook, Twitter, VKontakte, Odnoklassniki and Dropbox. You can do this now or later through the appropriate applications.
Google services and Google Play settings
Do not miss:
- Google play services error: what are they and instructions on what to do
- The best tablet manufacturers. Which tablet company should you buy?
- Instructions on how to get root rights on Android
Next, several options related to Google services will pop up, namely the backup and restore option, and permission to transfer data about the device’s location. Check the box next to your preferred options and click “Next”.
Then you will be asked to decide on a payment method for purchases on Google Play (to purchase applications, songs and other content on Google services). You can choose a credit/debit card or PayPal, enter your details, or to skip this step, just click on “No, thanks” (during the first purchase, you will be asked to select a payment method again). Next, select “Continue”.
Restoring programs and settings from a previous device
If you previously logged into your Google account from your old device, the data recovery option will appear. Perhaps we will choose the “Do not restore” option, since the new gadget must start from scratch, but those who want to “remember the past” need to select the device from which the data will be transferred. Please note that everything can be restored - even a game installed a year ago, which was played once and forgotten. The data transfer process will take place in the background and may take some time, the main thing is that the Wi-Fi connection does not drop out.
Owners of Nexus or Google Pixel smartphones will be asked to enable Google Now (this service is available on all Android smartphones, just not all of them activate it during the installation process), which provides useful information, for example, news, weather forecasts, sports results, information about flights and much more.
As you remember, when writing this article we did not rely on the Nexus or the Google Pixel, but the screenshot shown in the article was taken from a Nexus screen running Android Lollipop. On new versions of the OS - Android Marshmallow and the latest Android Nougat, the window view may be slightly different, but in general, during the Google Now setup process, the same question is asked. In any case, you can either enable this service or refuse its services. After that, click “Next”. You don’t have to think long about what to choose – you can always change the parameters in the device settings.
Security Settings
Many current smartphones and tablets have a fingerprint scanner, and the next screen prompts you to use it to unlock (this feature is especially useful for those who plan to use the Android Pay payment system). You can set the unlock by fingerprint, PIN or password. If you choose fingerprint unlocking, you will need to select a backup unlocking method in case the scanner starts to malfunction.
We choose to unlock the device using a fingerprint, then set either a pattern key, a PIN code, or a password as a backup option. We have chosen a PIN code. Click “Next”.
In addition to all this, you will be asked to set a PIN code, which will need to be entered every time you turn on the gadget. It's up to you to decide whether to accept or reject this option, but we think that entering a PIN code every time you turn on is an activity that can get boring very quickly. So, select “Request a PIN code when you turn on the device” or “No, thank you,” then click on “Next.”
We set a PIN code (at least four digits) that we can remember. Also, do not forget that PIN codes like “1234” and “0000” are one of the most unreliable and easiest to select. To continue, click on the arrow button.
The next screen prompts you to enter your preset PIN again to eliminate the possibility of an error. Therefore, we repeat the code again and press the same arrow key.
Setting up notifications
The next setting concerns notifications on a locked device: you can either show them completely, hide personal information, or not show them at all. If you select the first option, anyone who looks at the locked screen while receiving a message will see the sender's name and will be able to read the beginning of the message.
For those who value their privacy, it is better to select “Do not show notifications” or “Hide personal information in notifications.” On the other hand, by hiding notifications, you can miss some important message yourself. We select “Show notification in full” and click “Next”.
Setting up the fingerprint scanner
Now it's time to set up the fingerprint scanner. It is usually built into the Home button (or power button in our case) or installed on the back panel below the camera. If you can’t find it, you can turn to the user manual, look at a review of your gadget, or simply study the image on the display, which usually shows its location.
We hold the device in our hand as casually as possible, since reading the fingerprint should happen quickly, clearly and without the need to twist the finger in any special way. Then click on the scanner. To calibrate, you will need to do this procedure several times, during which you can slightly change the position of your finger so that the scanner gets as complete a fingerprint as possible. The process will be accompanied by a progress bar; once it is full, the next stage of settings will open.
On many smartphones and tablets, you can add up to five fingerprints. A useful option if you have to transfer the device from one hand to another or, say, manipulate the display with your thumb rather than your index finger.
It is also possible that the device is being used by another person who will also need to unlock it. But you don’t need to add all five fingerprints right now; if the need arises, you can do this later.
Update default applications
That's it: this was the last step of the initial setup, but as mentioned above, the setup process may look and proceed differently on different devices. After all that has been done, you will most likely receive a greeting from your new gadget and may receive a brief tutorial on some points, for example, how to change the screensaver, widgets and settings. It wouldn't hurt to take a look, but, of course, you can skip the process and go straight to the main screen.
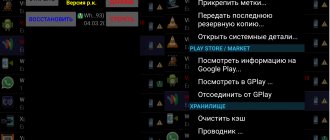
First of all, it is recommended to check available updates for the gadget or pre-installed applications. To do this, go to “Settings”, select “About smartphone” or “About tablet”, then select “System update”. To update applications, go to Google Play (its shortcut should be on the main screen), click on the icon in the form of three horizontal lines in the upper left corner, select “My applications and games” and click on the “Update all” option.
Remove unnecessary apps
Most likely, on your new phone you will find several applications that were pre-installed by the manufacturer, but you do not need them. These apps take up space and can slow down your smartphone. You can delete them.
After turning on your phone, go to "Applications" in Settings. There will be a list of pre-installed programs. You may not be able to remove all apps, but you can disable them. They will not work in the background, so the device will work faster and discharge slower.
System and application updates
Open system settings and look for the phone section and check for OS updates. If additional options are available, set the date and time to check for updates.
Then go to the Google Play app store. Open the menu and select Settings to set your preferred update method. It is better to disable forced application updates or enable Wi-Fi only to save mobile traffic.
Don't be afraid to install new apps
If the smartphone is not the first one, logging into the old account may automatically install old applications. But this does not mean that you are obliged to continue using them.
New smartphone - new applications. It is possible that the old smartphone did not support some services and it was necessary to use “light versions” of programs. Install the best and most modern applications - enjoy productivity.
There are many alternatives to some of the apps you use on the Play Store. You can also install a different launcher, download some new games, or choose a different music player. You can choose a different keyboard that will pay attention to your habits and make typing easier. All these applications, if you don’t like them, can be easily removed - not a trace will remain of them.
Once all the apps are installed, you can start customizing the device to your liking. You can change the ringtone, change the wallpaper on your home screen and customize widgets. Don't forget to put your favorite applications on the quick launch panel, adjust the brightness, enable gesture controls and other useful features that your new smartphone offers.
Protect your device
Your phone contains sensitive information, especially if you use it for banking, online shopping and home delivery. It is important to implement measures to protect your data.
Setting a PIN to unlock is a security option available on all Android phones. Many of them have fingerprint scanners, a faster and more secure option. There are already devices that offer face unlock, although in many devices this feature is not as secure as a PIN code or fingerprint scanner.
You can check if your device supports Smart Lock. This is a rather useful feature that allows the smartphone to bypass the lock in certain situations. For example, the phone will not be blocked if it is near a certain Bluetooth device, such as a smart bracelet.
Operating system management
If you have never used an Android smartphone before, you may not know what gestures are used here. Of course, the system itself will tell you about some of them at the end of the first stage of its setup. But you still only have to guess about most gestures. Or read about them below:
- Tap - simply click on the selected element. There is no need to hold your finger for a long time - the press should be once and quickly.
- Double tap - you are required to double tap on the selected element. We can say that this is analogous to double-clicking the left mouse button.
- Long tap - you need to hold your finger on the selected element for one or two seconds.
- Pinch - here you need to touch the display with two fingers and then spread them apart. Or bring them together, depending on the situation. This is a common way to zoom in and out on maps, web pages, and photos.
- Swipe - this gesture consists of sliding your finger across the screen in one direction or another. This is how most actions are performed in a mobile operating system.
As for the interface in Android, it depends on the proprietary shell used. For example, Xiaomi smartphones do not have a menu; shortcuts for all installed applications must be found on the desktop. In Samsung devices, the menu is still present, so some shortcuts from the desktop can still be removed.
Samsung Galaxy A5 desktop
The general principle of using the operating system is the same on all devices - you need to navigate the desktops or menus, tap on the application icon and use it. Quick transitions from one program to another are acceptable - for this, use the corresponding button at the bottom of the screen or even below it.
You yourself can change the interface of your smartphone. To do this, pay attention to the best launchers for Android. They partially or completely change the appearance of the operating system. But you will have to pay for this with RAM - a certain amount of it will be occupied by the launcher.
Check available updates
There is a possibility that system updates are available on the new phone. Sometimes these are minor changes that have little effect on performance. And sometimes updates can fix the operation of some programs or services, and also significantly speed up the operation of the smartphone. Sometimes this can be a whole new version of Android, especially if the smartphone has been on the market for a while.
Tweaking Android
To fully customize your smartphone, we suggest you configure the following parameters as you wish, after which you will be even more satisfied with your new product.
Setting up the launcher
Getting to the desktop after the first launch, the user sees only those utilities that the manufacturer decided to draw your attention to. But you shouldn’t leave the main screen like this, because you can change it to your taste and put programs that you consider necessary on the first page. In addition, Android allows you to add widgets that can reduce the number of steps you have to take to get to the desired function in any application.
Applications can be added to the desktop using the usual drag-and-drop method - hold down the required icon and drag it to the desired location. To add widgets, you will need to hold your finger on an empty area of the screen, click on the “Widgets” section and select the desired widget from the list.
Setting up the dock bar
As a rule, most shells have a so-called dock bar - a place on the desktop where frequently used applications are located for quick access, for example, a phone, instant messenger, browser, camera. It can also be customized by moving the icons of the most important programs here.
Usually this can be done both from the desktop and from the application menu (the latter may not be available in some shells and launchers): you need to hold down the required application and simply drag it to the bottom of the screen.
Changing wallpaper
The desktop of an Android smartphone should please its owner. Wallpaper is an integral part of it and this is what the eye catches first. To make your device delight you, you need to choose wallpaper to your liking, if the standard ones do not suit you (and this happens quite often).
To change the wallpaper of the home screen or lock screen, just hold your finger on an empty space on the desktop, click on “Wallpaper” in the menu that appears, then find and select the appropriate image, decide where to install it and then confirm the action.
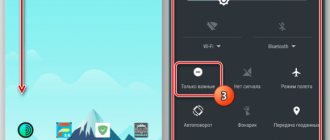
Setting up the Android notification shade
The status bar displays the clock, network signal strength, battery charge, and other indicators and notification icons. If you pull it down, you will see quick switches for frequently used smartphone functions, for example, Wi-Fi, Bluetooth, flashlight and others, but their number depends on the shell. By default, the switches are configured as the manufacturer sees it, but you have the right to choose their location yourself or completely disable unnecessary ones.
To customize quick settings, you need to pull out the curtain (once or twice - depending on the firmware) and click on the pencil icon and move the switches as you like. You can disable elements by simply clicking on them or dragging them to the area below.
Screen Settings
The default screen settings often suit only a certain number of users. And before you get disappointed in your phone because of the “wrong” colors or large font, check to see if the settings contain the same items that can be changed.
Most shells provide screen calibration options. To do this, find in the list of available screen settings something similar to “Screen calibration” or use the search and then select the mode that suits your liking.
To change the text size and image scale on the screen, find the items of the same name in the Settings application and set the value that will be most comfortable for you. If you have good eyesight and the device display is large enough, you can safely set the values to minimum or close to minimum.
In the same section, you can configure the inclusion of a special night mode, which prevents exposure to blue light, which is especially negative when using the phone before bed.
You should also set a waiting time that is comfortable for you, after which, if inactive, the smartphone screen will be locked.
In addition, most manufacturers add various “goodies”, the use of which should improve the user experience. You should go through all the points and activate the elements you need.
Sound settings
In addition to selecting the volume and sounds of an incoming call, alarm clock and various notifications, you should turn on vibration when calling (it is not clear why it is disabled by default), so as not to miss a call, message, or simply not to oversleep work/study. You can also choose which sound effects to leave or disable for various actions, for example, when dialing a number in the dialer, locking the screen, tapping the screen, and others.
Setting Do Not Disturb Mode
Do Not Disturb mode is a very convenient and highly customizable feature. It can be turned on either manually or automatically at a specified time or in a certain place. You can configure several different rules at once. When the mode is turned on, you are asked to choose which sounds to turn off, which notifications to leave or not show any, as well as messages and calls from which contacts to let through with sound. You just need to set it up once and no longer worry about whether a random call will wake you up in the middle of the night.
Setting up notifications
In new versions of Android, developers have done a good job on the notification system. Now they can be configured very finely, for example, moving down or completely disabling certain notifications from one application, while leaving others or even increasing their priority. Similar parameters can be useful in instant messengers: remove notifications from some channels completely, turn off the sound for others, and place personal messages at the top of the list and notify about this with sound.
Setting up accounts
If you have mailboxes in other services or more than one Google account, then you can easily add these accounts in the appropriate section in the settings. Now all your mail will always be at hand. Also, if necessary, you can disable synchronization for some accounts.
Battery settings
In the battery parameters, the first thing you need to do is set the lower charge threshold, when reached, the energy saving mode will turn on. In some shells you can set this value with an accuracy of one percent, but most often it is “5%”, “15%” or “20%”. You also need to decide whether to use the Battery Manager or Adaptive Battery feature. The first will identify programs that consume excessive power and offer to limit their operation. In the second case, the system itself will monitor which applications you use least often and limit such background processes to extend the life of the smartphone on a single charge.
Well, in addition, you can choose the style of the battery icon in the status bar and whether to show the remaining charge percentage, and if so, then next to the icon or inside it.
As you can see, Android has a lot of parameters that it is advisable to configure immediately after purchase. But, unfortunately, most users neglect this and then negative reviews about the smartphone appear on various forums, review sites and similar resources, such as “the screen turns yellow”, “no vibration for an incoming call, missed a very important call”, “inconvenient curtain ", etc. As a rule, this happened because the owner was too lazy to go into the settings and change the parameters to his taste, or gave this matter to a sales consultant who configured the device in a way that would be convenient for him.
In this article we have presented things that are quite obvious to an experienced user, but not all of them are and these people need help. Don’t be afraid of the abundance of settings and put this matter off until later, because if you take a closer look, it becomes clear that everything is intuitive and quite simple.
It is also worth remembering that some of the above parameters may be missing, moved to other sections, or new ones added, depending on the manufacturer and the installed shell. Share in the comments what settings you think need to be changed first after purchasing a smartphone.
Set up your mobile data limit
If your plan doesn't include unlimited data, you'll need to track how much data you've used per day or month. Going over your limit by watching cat videos on YouTube can hit your wallet hard.
Setting up mobile data control is very simple. Go to your device settings, click “Data Usage,” and then set a data limit for a certain period based on your tariff plan.
The next step is to enable a warning when the limit is approaching and turn off the mobile Internet when it is reached.
If you don't find data monitoring features, there are many third-party alternatives available on the Play Store, such as My Data Manager.
Explore your smartphone settings
Take the time to learn the functionality of your phone. This can save you a lot of time later and you may even discover some new options.
You leave a lot of personal information on your smartphone, and you'll likely use it for communication. You must know your phone number.
Setting up an Android device may seem like a complicated process, but once you get the hang of it, you'll enjoy your new gadget.
What's the first thing you do when you buy a new smartphone? Write about it in the comments!