To access the Internet, Yota offers favorable conditions and tariffs, and among modern access methods you can use modems from the company that can operate in the 4G/LTE network. It is possible to use the test mode for a week, after which you can return the device if you are not satisfied with any parameters.
Before purchasing and connecting equipment, it is recommended to go to the operator’s website and familiarize yourself in detail with the data on the coverage area.
Modem description
Yota is a wireless high-speed Internet network of the latest generation based on Mobile LTE technology. First of all, this is an extensive coverage area, free access to the World Wide Web, no time or traffic restrictions, uninterrupted connection even at travel speeds of over 100 km/h. The Yota 4G Lte modem is a universal device that fully meets the needs of modern users. This is a direct competitor to Huawei.
A modern USB modem is equipped with a Wi-Fi module, which allows you to organize wireless access points for a collective connection to the Internet. The compact device does not offer users wide functionality. It only requires distributing the Internet to several devices. And he copes with this task 100%.
Important! A Wi-Fi modem is unable to replace a full-fledged router. It has a limited range and does not have numerous settings and other subtleties.
Technical support "Iota" provides its clients with services for unlocking their own devices. First, you need to attach a screenshot through your personal account with imei by typing status.yota.ru/status in the address bar. Next you will have to click on the PrtScr combination. By pasting (Ctrl+V), you need to save the file. Without this document, it is impossible to unlock the device.
Important! Unblocking the modem through an official representative requires quite a lot of time - about 2 months.
Possible problems
After connecting and setting up, certain operational difficulties may arise.
In some cases, after the manipulations have been carried out, the modem does not show any signs, or it simply cannot connect to the network, the reason may be:
- Computer problems or disabled ports. In this case, the modem will not be visible in the device manager or a yellow exclamation mark will appear next to the modem name, indicating that the software was installed incorrectly. To solve the problem, you need to enable the ports or update the drivers or reinstall the operating system.
- Weak signal or lack of Iota coverage. To determine this, you can look at the modem's LED, which should be blue. You can also find out about the signal by the status on the computer. If the network in your home has poor reception, it is recommended to use special extension cords that allow you to place the modem in a place with a good signal.
- The old operating system, when the modern modem cannot be detected, does not support encryption. This combination can cause characteristic difficulties. If problems arise that you cannot solve on your own, then it is best to contact Iota technical support. Operators will help you connect and configure the modem remotely or point out possible problems and ways to resolve them.
Types of modems from Yota
This article discusses the current offers of the Iota provider with their technical characteristics. Among them are the following types:
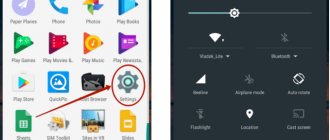
How to set up an Iota access point on an Android smartphone
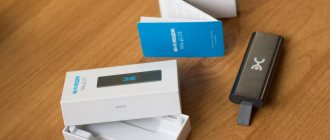
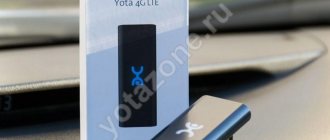
This option is a black mobile device with a company logo in the middle. The USB connector is retracted inside the case, making the modem more compact and convenient to carry. But because of this same factor, one can judge the fragility of the structure. The equipment supports 4G signal. The modem includes a built-in multi-band antenna. The device operates at different frequencies and you can easily travel abroad with it. The modem weighs only 35 grams.
When turned on and operating, the device illuminates the company logo in light blue. After installing the device into a computer running Windows 7 or 10, it starts working automatically, without installing unnecessary programs. The consumer will no longer waste time on additional settings.
Note! You can log in in 15 seconds.
This Wi-Fi model is visually no different from its previous device, only slightly wider. It is black plastic with a retractable USB connector. There is also a slot for a SIM card next to the entrance. The main distinguishing feature is the ability to distribute traffic via Wi-Fi. Up to eight devices can be connected to it. In addition to the main connector, there is also a micro-usb. This means that the equipment is independent of the main computer and can be charged from anything. At its core, it can repeat the functions of a router. The weight of such a device is 50 g. The main protection in the case is the internal multi-band antenna. Therefore, the device operates at several frequencies.
This model looks completely different. This is a white wide monolithic case with the Iota logo. It is autonomous, that is, it does not depend on the main device. A micro-USB cable is also included with the modem. The device has a high-capacity battery.
Important! Experts call it one of the most stable devices from this company, as it works for up to 16 hours. And the process of full recharging takes only 2 hours.
Since the design of all Iota devices is identical, here too the USB connector turned out to be retractable. There is a mode switch on the case. It makes it possible to access the device without a password. But by default, modem works with parameters that you can configure yourself, that is, by entering your login and password. There is a black and white screen on the body of the equipment. On it you can see how many devices are already connected to it, battery charge and operating mode.
This model is considered a router with forwarding of all ports. This particular assembly option is no longer on sale, but its alternative is the very first device. It works with set-top boxes, navigators, hard drives, etc. This is one of the first modems from this company in LTE mode.
All mobile devices support a maximum data transfer rate of 20 Mbit/s. The specific tariff will depend on how many days of use the budget is calculated for. If the balance on the contract is over, then Internet access still remains. But this way the speed drops to 64 kbit/s.
Activation of Yota SIM card on Android
Connecting a device to a PC is quite simple, but you will need to strictly follow certain rules. First of all, connect the modem via a special cord to the computer. All these components are present in the box from the router. After that, follow the algorithm:
- Connect the router to your computer.
- Run the installer.
- Follow the app's instructions.
You can also activate the modem using Wi-Fi. This is the most preferred method, since Internet access will be available throughout the apartment. To connect to this network, you just need to connect to it. You can recognize your own Yota Internet by the last 5 digits of the IP address.
In fact, everything is not as complicated as it might seem at first glance. After purchasing a card, you need to insert it into your device and restart it. Activation occurs automatically immediately after it is recognized by your device.
Next, you need to install the official application of the yota operator, in which you should log in, as I wrote earlier in the news - Yota personal account. After successfully logging into your registered profile, activation is completed.
Insert the SIM card of the Yota operator into your device (phone, modem or tablet) and wait until a message about successful activation appears, after which the network signal strength indicator should be activated.
- In the smartphone menu, go to the settings section.
- At the top, click on the more tab (about 3-4 lines), then go to the section - mobile network, look for the item - APN access points, then click - change / Create a new access point.
- The next step is to indicate in the column - Name - “Yota”, and in the column - APN address - “internet.yota”
After you have done everything, you should save all changes, then the SIM card should be activated. If everything is done correctly, the network signal reception level indicator should light up in the top menu of the display.
Activating a SIM card on devices running iOS is much simpler than on Android. You just need to do a few steps and you're done.
In the first point, everything is the same as its predecessor, insert the SIM card into your smartphone or any other device, after installation, turn it on. Activation should take place automatically; if this does not happen, follow the steps below.
- Go to the section - Settings, then click on the subsection - Cellular communications, and another click on the link - Cellular data.
- Next in the field you need to go to the APN folder. In the APN column, enter “internet.yota” (without quotes).
This completes the process, wait 1 minute, after which the network reception signal indicator and the network availability icon should be activated.
Yota is an Internet operator that allows you to enjoy high-speed Internet access. To connect the router, just follow the instructions carefully. First of all, you need to connect the device to the computer via the USB port. The automatic downloader will launch the installation wizard yourself, you just have to agree with all the requirements. But on more modern computers, installation occurs in hidden mode; you will know about its successful completion by a notification on the desktop.
After installing the software, the computer will show that there is an RNDIS device in the USB port. It does not require additional configuration, you can immediately start using the Internet. Many users believe that the lack of changeable parameters is a plus - they cannot be broken. The only thing you can configure is the Wi-Fi settings.
The operating principle of the Iota modem
How to connect to a Yota router and configure it
By analogy with previous Wi-Fi devices, the Iota 4G modem works only in routing mode (it can configure its own subnet and issues IP addresses like 10.0.0.*). The modem performs port forwarding; there is no option to transfer the IP address to the DMZ.
Step-by-step instructions for connecting to a laptop and computer
How to increase Internet speed on a Yota 4G modem
The connections of all models are almost the same, but there are still differences.
Both modems are connected to a personal computer via a USB connector. For a modem with wifi function, you will need to additionally install a wireless network.
First you need to connect to the device. Next, connect the modem to the device.
The next step is to find a free USB port.
The Eta 4G modem must be inserted into the USB port on the device being configured.
Then driver installation is required. The installation starts automatically as soon as modem is inserted into the device.
Connect modem “Iota” to the laptop.
If you connect the modem to a device that does not have wifi, no additional settings are required. After automatic installation of the software, the active Yota network will appear. After this, you can freely use the Internet.
A wireless modem will require additional settings. Next, you will need to enter names and configure security in the form of a password for connection access.
How to change wifi password on various Yota devices
The Yota Wi-Fi router can only work from the SIM card of its telecom operator; the device does not accept other SIM cards. But the client can make firmware so that the modem works on any connection. There are restrictions on connecting gadgets; no more than 8 devices can connect to the router at a time. This router can also work via a USB cable, like a simple modem.
The device has the following characteristics:
- It is fully compatible with operating systems such as Linux, MacOS 10.8, and Windows XP SP3 and higher.
- The battery has a capacity of 2000 mA.
- It is recommended to operate the router at temperatures from -10 to 60 degrees, air humidity can be 5-95%.
- The frequency range is 1800/2600 MHz.
- The modem can provide access to the network at speeds of up to 100 Mbit/s, but in reality the operator significantly limits the network connection so as not to overload the connection.
- The device can work offline for up to six hours, the duration of operation depends on workload.
- The manufacturer gives a guarantee for the modem for 12 months of use, the period is counted from the date of purchase.
- The weight of this device is only 85.6 grams.
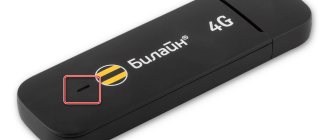
There are three indicators on the external panel of the Yota router. One of them indicates whether there is a 4G connection in the area. The second shows the connection to the Wi-Fi network. The third is designed to determine the battery charge. Also, on the case there is a SIM card slot and a USB port. You need to start the device using the on/off button. To reset the firmware, the subscriber can use the Reset button on the case.
As already mentioned, regardless of the manufacturer and model of the modem, the new password should be as complex as possible. It is best if it contains uppercase and lowercase letters at the same time, numbers (preferably those that are not related to each other, like birthdays) and various symbols.
As an example, let's look at the sequence of steps to change the password on a cellular operator's router. First, you need to make sure that the equipment is charged. If this is not the case, the router needs to be charged. After 30 seconds, open the list of wireless connections and look for the Yota network. At this stage, it is worth checking whether it is open or closed (that is, already password protected). Note that this depends on the modem manufacturer. Often the factory password is also indicated on the back of the device.
Installing/charging the modem into a USB port
Devices from this company, depending on the modification, have different charging and power capabilities. The Yota 4G USB modem has the ability to supply electricity only when connected to a laptop or personal computer via a USB port.
Combined models have two options for USB charging and direct power supply from a stationary network through an adapter that is plugged into an outlet.
The Iota LTE wifi router can only be connected via an adapter in a stationary electrical network.
Note! It is recommended to use adapters with a power of at least 1.5 amperes for normal operation of the modem.
Appearance of the device
The Iota 4G router does not have any special design features; it is simple and concise. The modem looks like a small rectangle that connects to a desktop computer. Although this modem was created in order to distribute a network signal, the router is not autonomous; in order for it to function, it requires a power source. The user should take this into account when purchasing a modem from Yota.
The device itself is small in size, its body is made of gray plastic. There is a company symbol on the front side of the device; when connected to the network, it begins to glow. On the back there is a USB, which is intended for connecting to a laptop.
The Yota Wi-Fi router is sold in a white cardboard package; it is required to protect the modem from external factors and damage. The name of the device is written on the front side of the package, as well as the company name. The box provides the user with instructions for setting up the device.
- note
- You will have to buy a USB extension cable separately; it may be needed to install a signal amplifier.
Installing drivers
There is no need to install drivers on your laptop or computer.
After physical connection, the Yota Acces program starts. It will automatically begin installing the device driver and special software. If for some reason the automatic installation does not start, you need to go to the “My Computer” section, open the modem folder, and run the autorun.exe file.
How to connect to PC
Connecting a Yota product to a desktop computer or laptop in most cases does not take much time and does not cause any problems.
In order for the router to start working, you need to connect the device via the UCB port to the computer. After this, the router will automatically download the necessary utilities and drivers to the PC, and then the network will automatically download and configure – transfer.
In some cases, the user is required to independently install the manufacturer's program Yota Access (a special program for installing equipment on operating systems of computers running on the Windows platform).
For simpler models of modems from the Yota operator, no additional installations or connection of applications and programs are required. In this case, installation occurs automatically and does not take more than 15 seconds.
Important! If problems arise with the router settings and connecting it to the network, a Yota subscriber can always go to the manufacturer’s official web resource and read detailed instructions there. Instructions for installing and configuring the device are publicly available in PDF format. An alternative way to solve problems that arise is to call the operator’s number (free when calling from a Yota operator mobile device).
Login to settings
The Yota Wi-Fi modem is configured via the web interface. It is available at https://my.yota.ru/selfcare/login?goto= (or https://10.0.0.1/). There are no special settings here - you can do the following:
- turn off or turn on the wireless module;
- select the type of protection;
- set a password;
- set up port forwarding.
Service information is shown in a separate window:
- Data transfer rate.
- Current IP address.
- Firmware version.
- Amount of received/transmitted data.
- Yota signal strength.
New firmware is downloaded to the device independently.
What problems arise with the router?
Often the device does not work in the “Tenth” version of Windows.
This happens mainly after installing some operating system updates that cause the device drivers to go wrong. After installing the update packages, you just need to reinstall the Yota drivers for the Windows 10 operating system. Problems often arise in older versions of Windows, for example, in XP with a second service pack. In this case, you need to install additional software or update Windows.
The company offers a relatively extensive selection of devices that provide wireless network connectivity. Some models are universal and can work without being connected to a power supply, while others allow work to be carried out exclusively using the power supply. Thus, the company has developed a range of models in which each client can choose the device he needs. At the same time, the company tried to minimize the costs of its customers and developed special SIM cards for the company’s Internet devices.
Important! Yota routers are divided into two types: routers with a modem and without a modem.
When connecting the router to the network and putting it into operation, the user may experience the following problems:
- The router is connected, authorization has passed, the necessary drivers have been installed, but the high-speed 4G network is not distributed to the router.
If a similar problem occurs, the user must configure the modem manually using the address 10.0.0.1 on the browser start page. The connection in this case will be made through the UCB connector, directly to a computer or laptop.
- The computer does not see the connected modem in network devices. This problem most often occurs due to outdated software both on the device itself and on the router. It is recommended to first update the router by going to the start page through the address bar to the home page of the browser 10.0.0.1. After installing the necessary updates, the router needs to be rebooted and reconnected.
Important! A Yota subscriber can always find out about the status of the router settings at the “Personal Account” address, which is located at 10.0.0.1. This combination must be entered in any browser installed on your computer.
Also, if any problems arise with setting the operating settings, the user can contact the Yota support service, where a specialist will advise the subscriber on all issues that arise and provide qualified advice on diagnostics and resolution of issues that arise.
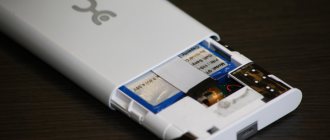
The Yota modem is very similar to a regular USB drive used for storing data. At the back there is a rotating USB connector and a slot for a SIM card. In order to connect the Yota modem to the computer, you need to carefully remove the connection mechanism and install the modem in the USB port.
Yota modems operate in LTE, 3G and 2G networks. However, they do not support Wi-Max networks that were once deployed by this operator. If you have an old Yota modem at your disposal, then you need to exchange it for a new model - otherwise, you will not be able to use the communication services of this new cellular operator.
As we have already said, Yota modems are available in several varieties - with or without a built-in Wi-Fi module. And the second type of modems has a module for organizing wireless networks. According to the technical specifications, up to 8 external devices can be connected to the modem - tablets, smartphones, laptops and much more. At the time of distribution, such a modem must be connected to the PC - the device takes power from it.
By the way, Yota modems are good because they can work under any operating system. And if everything is clear with Windows and Mac OS users, then in this case the developers did not ignore Linux users.
Previous modems are simple and lightweight. But the next variety is more impressive in size and weight. We will talk about the Yota Many modem. It is compatible with all operating systems and can work both via USB ports and autonomously, being a kind of wireless router. To ensure autonomous operation, a rechargeable battery is installed inside the modem. The Yota Many modem is small in size and easily fits even in a pocket.
The battery life of the device is 16 hours, the maximum number of connected devices is 8 pcs.
There is a Yota Share function that allows you to deploy open networks with the click of one button. The status of the Yota Many modem is monitored using a small LCD display.
In addition to a simple USB modem, Yota users also have access to the YotaMany router. The device works in the same way as any other router. An access point is created to which other devices can later connect via Wi-Fi. For example, in this way the Internet can be connected not only to a laptop, but also to a tablet, phone, TV, etc.
Let's consider the following situation: you have a laptop that needs to be connected to the router. This can be done in two ways - via USB or directly via Wi-Fi. It’s simple, we connect the router to the laptop via USB or connect to the turned on router from the laptop via Wi-Fi. After the connection is established, you should open the browser and perform the same steps that should be performed when connecting the Yota USB modem.
Registration and activation
The Iota modem is activated automatically after registration. The registration itself is nothing special: you will need to answer a number of simple questions. First you need to enter a working email and phone number. This is important to do because this data will be checked (phone with SMS confirmation, mailbox with a letter with an activation link). To avoid unnecessary problems, you must provide a valid first and last name.
Note! Upon completion of registration, the user will be provided with 24 hours of free Internet to select the desired connection model and pay for it.
Wifi setup
In the case of an LTE modem without WiFi module support, no settings are required. After the installation is complete, a new active Iota network will appear, after which you can openly use the constant Internet.
In a model that supports wireless network distribution, you will need to expand the access point after installation. You will need to select the name of the network, its password and the type of encryption.
USB connection
If you connect your Yota router wirelessly, you need to make Wi-Fi settings. The process is not complicated, just follow a few steps:
- In the device settings, among the tabs at the top of the screen, select Wi-Fi configuration. You will be able to enter the name of the network SSID so that it can be more easily recognized in the future.
- Here you can hide the network name if security is important. In this case, the SSID will need to be entered manually from other devices.
- In the same section, you can set or disable the Wi-Fi connection via a password.
- By default, the Sleep mode option is disabled here. It should not be activated, since periodically the device will go into standby mode and the network will turn off.
- If you click the “Save” button, all changes will be saved in the program. However, for them to take effect, you will need to restart the router.
How to connect a Yota modem to a computer? To do this, you need to find a free USB port, turn the USB mechanism and install the modem in the specified port. This applies to both a regular modem and a Wi-Fi modem. As for the Yota Many modem, it connects via a USB port or via Wi-Fi. As soon as we connect the modem to the USB port, the computer will begin automatically installing drivers. A control program for the Yota modem is not needed - all presented modems work without third-party drivers and software.
How to set up a Yota modem? There is no need to configure anything here - as soon as the modem completes the automatic installation of drivers, we will see a new network in the active state in the Network and Sharing Center.
More about Yota: How can I unlock a SIM card?
After this, we will need to launch the browser and open any site - a redirect will work, which will redirect us to the profile registration page. After registering, we can top up our account and start surfing by selecting the desired access speed.
The Yota modem can be connected to both a laptop and a desktop computer. In both cases, the installation process is the same and no difficulties should arise provided that all requirements set by the operator are met.
The procedure for connecting and setting up a Yota USB modem on a PC:
- The first step is to decide which USB port the modem will be connected to. There is one caveat - it is better to connect the modem via the USB 2.0 interface. Why? Because the modem may not work correctly with USB 3.0 ports, and when connected to USB 1.0 ports, the connection quality will be at a very low level due to the limitations of the outdated standard.
- Once the modem is connected to the port, the driver installation process will begin. This process is completely automated and does not require any manipulation from the user. Just wait for it to end. After automatic setup is completed, a new network will appear in the list of available networks.
- Launch your browser and open any website. You will be automatically redirected to the account registration page. Set up your tariff plan and top up your account (if necessary).
Important! If the modem cannot establish a connection to the network, it is most likely outside the coverage area of the Yota network. In order to find out the network coverage area, just study the coverage map, which can be found on the operator’s website.
To connect to the Internet, you should buy a Yota 4G WiFi router; this can be done at the company’s office or partner communication centers. After the purchase, the SIM card is activated; you can ask a consultant to carry out this procedure. A new SIM card is installed in the router, and then the device is connected to the computer. If the battery is low, connect the device to a charger.
We'll tell you step by step how to connect the device.
- Insert the SIM card into the router.
- Press the power button and hold for 3 seconds until the indicators light up and be sure to wait until 4G turns on.
Now about how to set a password on the Yota WiFi router.
Advanced settings
The advanced settings of the Yota modem contain only four points:
- Turn on/off wi-fi network. Switch modes in which the Internet will be available only to the user of a device with a physically connected modem and opening Internet coverage by area.
- Automatically turn off Wi-Fi. When the mode is turned on, after a certain time of inactivity, the modem will turn off the Internet. This is a useful feature, especially when there is little traffic left.
- The name of the network, the name of which will be displayed in the search for Wi-Fi networks.
- Type of protection.
How to set up a Yota 4G LTE modem on Windows 10?
Externally, this device is very similar to the model discussed above.
It differs from the previous device in the ability to connect, in addition to the computer itself, other gadgets via a Wi-Fi network.
The algorithm of action steps is similar to the previous one with the exception of minor differences:
- Insert the device into the USB port of the PC and open an Internet browser;
- Type your phone number and wait for the password to arrive;
- After entering the access code, you will need to enter the wireless network settings;
- In the appropriate fields of the modem interface, type the name and password for Wi-Fi, and also indicate the type of protection;
- Ready!
There are a number of ways to configure the router to suit the user’s parameters and solve some problems with the device in home mode. One of these methods is setting up a router using a web connection.
In order to independently configure the device at home, the user must have at least one browser installed on the computer in operating mode.
In order to go to the web connection settings, the user needs to enter a digital combination in the running browser on the start page in the address bar of the page. The combination entered by users is the IP address of the router, specified in the initial factory settings, it looks like this: 10.0.0.1.
When choosing a wired option to connect your computer to a 4G/LTE router for setup, the operating system will offer to install drivers, which you should not refuse. Once the installation is complete, the device will become recognized and support for network access will be available.
Now you need:
- Click on the device shortcut in the tray with the left mouse button;
- in the next window, enter all the data for the work. This applies to the network name and password, starting or turning off Wi-Fi. If necessary, you can specify automatic shutdown.
The direct menu is clearer for a beginner compared to the browser interface. Everything here will be intuitive. However, it is recommended to carry out detailed configuration through the browser, since all options are available in it. This applies to changing the physical address of the device, choosing a different channel, the method of protecting the network, and much more.
Setting up a 4G/LTE Yota router comes down to ease of connection. There is no need to perform complex operations, which is required in devices from other manufacturers. It is recommended to make the first connection directly via a USB cable. You can make all the desired settings.
Often there is a need to set a fixed IP address. To do this, just go online from another device, if the PC cannot connect to the mobile IP, and in the “Network” settings menu, select static IP instead of dynamic. All that remains is to specify the new value.
The initial setup of the YOTA router does not require specific knowledge from the user, since the necessary drivers are installed independently. You just need to connect the device to the USB connector and a cloud will appear on the screen with information that new equipment is connected to the PC and it is setting the appropriate settings. Installing the necessary drivers to work with the router takes no more than 2 minutes.
Installation problems only occur when connecting to older versions of the OS. For Windows, this is everything that was developed before XP. The main problem is that this OS does not natively accept WPA2. Accordingly, you will have to find and install the necessary drivers for compatibility yourself. However, it is much easier to reinstall Windows to a more modern version.
Speed setting
If the Internet speed has decreased, then you will have to take the following actions:
- First you need to check the signal strength. It must be no less than SINR 2 RSRP -110. To find out what kind of cellular signal is being supplied, you should go to the device category.
- If there is no signal, you need to visit the official portal https://yota-faq.ru/yota-zone-map/ and check. If necessary, by moving, you can increase the radio coverage of the Yota network.
- If the signal is excellent, but the speed is low, then you need to reboot the device. In addition, all downloads with their updates should be disabled.
- Then you should go to the page and read the article about YotaSpeed. It will indicate how to properly test all the Upload-Download capabilities of the device.
Improving the signal using an external antenna
To obtain maximum connection speed, connect an external antenna. She catches the signal and stabilizes it. The external antenna is connected to the modem itself via a pigtail.
There are two options for connecting the antenna:
- Indoors. This installation method is suitable for rented office spaces. The antenna is simply placed on the windowsill in a special stand.
- On the facade of the building. This is the most common method of installing an antenna and allows you to extremely improve the signal quality. For better results, it is placed on the mast.
A practical solution is the Bester model, which gives a signal amplification of 16 dB.
The pigtail must match the modem connector. Direct connection of an external antenna allows you to minimize signal transmission losses. In the absence of a suitable pigtail, you have to purchase a universal adapter. However, in this case, the reception will be reduced by 2 times or more.
How to determine the direction of the antenna? You can try this method.
Possible malfunctions and ways to eliminate them
Malfunctions may be different, but the symptom is the same; no matter what problem is detected, the user will not be able to access the Internet. Using an example, we can consider several reasons why problems occur:
Possible problems, manufacturing defects of the device, physical damage during use.
To avoid serious damage, it is better to use the services of a repair shop.
Does not catch the network or the modem is connected, but without Internet access. First, you need to check whether Yota Internet coverage is supported. You can find out about this by looking at the network coverage map. But it’s better to do everything in advance, since in the absence of an Internet connection, obtaining such information will be problematic. If there is a network, but there is no Internet, then you need to check the network settings through the modem control menu.
Important! If the settings are configured correctly, but there is no access to the Internet, you need to turn to professionals for help.
A common problem is lack of connection:
- The solution to this problem may lie in reinstalling the modem drivers.
- You need to go to the system and sharing control center.
- Next, you need to click on the item to change adapter parameters.
- Then you should click on local network connection.
- The system will require you to select network properties to configure them. Then you need to open the “Driver” section and click on the “Delete driver” button.
- Next, the personal computer or laptop will have to restart.
- After completing the action, you need to install the driver.
What to do if the modem does not work?
In 99 out of 100 cases, activation and first launch go without problems. However, sometimes subscribers encounter difficulties. The most common mistakes when connecting Iota devices:
- The router is not connected to the modem correctly. In such situations, the blue backlight on the latest gadget lights up. This indicates that the Wi-Fi network has not been created. Most often, the reason is hidden in the unavailability of a signal in a given location or an emergency interruption of communication.
- The Eta modem does not see the computer. Typically, such complexity arises due to an outdated version of Windows. To establish communication, you will need to update the system or download and install the latest drivers for your OS version from the mobile operator’s portal.
Yota Corporation offers different tariff plans for both calls and the Internet. This allows subscribers to choose a package that best suits their needs. Before installing the Yota modem yourself, we advise you to visit the official website and read the recommendations so that the procedure goes smoothly.