Install an alternative keyboard
Until now, you may have used a physical classic keyboard or a standard virtual keyboard. However, there are some easier ways to write.
To be honest, there is no such thing as a perfect keyboard, but Google Play offers a lot of interesting alternatives that you might like. Here are the most interesting of them:
- Perfect Keyboard
(multiple customization options) - Go Keyboard
(ideal for tablets) - Swype
(classic gestures) - SwiftKey
(good at predicting what you want to write)
Internet settings on Nokia Lumiya series
Lumiya series phones operate on the same operating system, but the menus may have certain differences. Because of this, there are some problems with selecting the correct settings.
For a phone with two SIM cards
The setup involves performing the following steps:
- Activating data transfer to Nokia. You need to go to settings, go to cellular network, and then SIM cards and data transfer. The slider should be moved to the on position. All that remains is to choose a SIM card that will be most convenient for working on the Internet at the moment. You can choose both the first and second options.
- Organizing an access point online. Again you need to open the settings, go to the item with SIM cards, then to the settings of the first or second SIM card. It is worth choosing the one where data transfer is definitely activated and adding an access point. Enter the required information in the fields provided. When everything is done, all that remains is to reboot the phone.
Important! This instruction is universal, so it is also suitable for the difficult-to-understand Nokia 3310. How to set up the Internet later is intuitively easy.
Setting up the Internet is much easier if the owner has a device with only one SIM card. It is enough to go through the following algorithm:
- Go to settings.
- Go to profile settings.
- Add new.
You need to fill out several fields and save the changes. Rebooting the smartphone is also a mandatory action in this case.
Thanks to these instructions, it is easier to organize Internet access for any device.
Note! You can watch various training videos if it’s difficult to figure it out the first time. They will also help if the Internet does not connect to the Nokia N2.
BlackBerry KEY2 – Autonomy meets performance
First of all, KEY2 is a working tool designed for conveniently sorting messages from different sources and printing using a physical keyboard (which you still need to get used to).
The 4.5-inch IPC LCD screen has a resolution of 1620 x 1080 pixels (3:2). Color rendition is decent, there is enough brightness even when used on a sunny day.
Auto brightness adjustment works well. Despite the unusual aspect ratio of 3:2, everything fits comfortably on the screen, including games. Due to image scaling, the edges are cut off, for example, when watching a video on YouTube.
The Snapdragon 660 chipset is responsible for the speed of the device. Many will say that this is a strange decision, because now the 845 chipset is being promoted with all its might. But according to manufacturers, the BlackBerry phone doesn't need this.
But we managed to achieve a compromise between performance and autonomy. In addition, KEY2 is not intended for games (despite this, the Snapdragon 660 can handle many modern games).
6 GB of RAM is enough to store different applications in memory and switch between them without losing data.
BlackBerry Hub is an application for which phones of this brand are loved. It allows you to connect all accounts from instant messengers, email, social networks, and messages will go to one place. The KEY2 keyboard itself is also not simple. If desired, it can be used as a sensor for scrolling pages.
Pros:
- well-thought-out case (the phone fits comfortably in the hand);
- keyboard with a size convenient for typing with two hands;
- current hardware;
- touchpad in the key pad;
- capacious battery.
Minuses:
- mediocre camera that requires normal conditions;
- unusual screen aspect ratio.
Various mobile devices are produced, at first they were completely push-button, now they are mostly touch-sensitive. And yet, there are even “old-school” samples on the market, and these are push-button phones that distribute WiFi and support LTE networks.
Install alternative stores
Google Play is ok, but there are some apps that you can't find there. Sometimes you can find an incredible promotion at an alternative store. So let's install programs like:
- Softonic Moba
, - Amazon Appstore
, - F-Droid
At the same time, keep an eye on the black market and all the files freely available on the Internet. They often contain pirated applications that can compromise the security of the system. If you don't want any viruses or other nasty problems, you should be very careful while installing the APK file.
Setting up the Internet on feature phones
There are several options available to set up a network on these phones:
- Go to settings, then turn on the display of LAN networks. If the network is found, the user will constantly notice an icon in the form of four squares. But you can use other methods to find out about the network parameters and look at the name.
- Another solution is to visit the connection manager menu. A push-button telephone also supports it. At this point you should find a section dedicated to WLAN, where you can view the network, find out its name, determine the signal strength and protection, speed.
- Sometimes the apps themselves ask which network to use when they see a suitable connection. Here, too, the option to search for WLAN networks appears. If you select this part of the menu, the user will see the available connections along with the current characteristics. The access point is always displayed.
If the network is used quite often, then there is no point in defining it manually. This is not necessary. You can add a WLAN as a regular access point. There are several fields that need to be filled in in this case:
- connection name;
- used data channel;
- network status;
- network mode;
- protection mode;
- protection parameters;
- Homepage;
- WPA mode;
- shared key;
- encryption. Each system has its own, Microsoft is no exception.
Note! You can change the selected channels on which the network operates. It all depends on the support of this or that functionality.
Instructions
In Beeline, for example, you can activate two different types of Internet connections. One of them is carried out via GPRS communication. In order to connect it, you will need to dial the USSD request number *110*181# and press the call button. The second type of connection can be made using the special command *110*111#.
To order automatic settings, subscribers (regardless of the brand of their mobile phone) will need to visit the main page of the operator’s official website. Next, you need to select the “Phones” tab and click on it. A column called “Internet, GPRS and WAP settings” will appear in front of you. After this, all you have to do is fill out a short request form.
Setting up an Internet connection is also available via SMS messages. In the text you must indicate the number 1. And the number to which such SMS should be sent is 5049. Using it, you can also get MMS and WAP settings at any time. Just instead of one, you will need to enter the number 2 or 3. Do not forget about the existence of such free numbers as 05190 and 05049.
Ordering automatic Internet settings is also available to all Megafon subscribers by calling the subscriber service number 0500 (intended for calls from a mobile phone) or by calling 502-5500 (for calls from landline phones). In addition, employees of the operator’s communication shops and company offices are always ready to help you.
Users of the MTS network need to dial the short number 0876 to connect to the Internet on their mobile phone (you can call it for free). You can also use another number - 1234, intended for sending SMS messages (do not indicate anything in the text, the SMS must be “empty”). Receiving automatic settings will also be available through the company’s official website. To do this, simply go to the appropriate section and fill out the special field.
Setting up Internet access is a problem that many users face. This is especially true for those who own Nokia smartphones running the Windows Phone operating system. The reason is the difference between the interface and the usual options. Understanding the settings is not as difficult as it seems at first glance. It is enough to follow simple tips on how to set up the Internet on Nokia.
Disabling the Internet on Nokia
There are several ways to disable the Internet option when it is no longer needed:
- through the settings in your mobile phone;
- via USSD code;
- disconnection by calling the operator;
- disabling via the Internet assistant.
Each operator will have its own instructions for those searching for suitable solutions:
- In the case of Beeline, most USSD commands begin with the symbol combination *11*#. After the hash mark there are certain numbers - 60, 70, 80, 90. The user chooses his option depending on which tariff he is currently connected to.
- For Tele2 subscribers, the most relevant thing is to use the Internet assistant. It is available at my.tele2.ru. Calling 611 is also one of the ways to disable any functions of interest, not just the Internet. You can also contact the company office directly.
- If you want to give up, the smartphone owner can simply disable the access point. To do this, just change one of the parameters in the field to be filled in, or you can simply delete the existing information.
Control your device
Your new Android phone is almost set up. However, it is also highly recommended to install tools that will allow you to monitor and monitor battery, CPU or memory consumption and data transfer. Here are some of the best deals:
- Onavo
allows you to control the transfer of data over the Internet. - 3G Watchdog
is even more detailed than Onavo, also available as a widget - AutoKiller
automatically closes inactive applications to save
CPU and battery resources - JuiceDefender
helps you save energy
Sign in to your Google account.
When you launch our new Android phone for the first time, you will be asked to fill in certain details. One of them is logging into your Google account. You can skip this step, but we don't recommend it.
Once you sign in to your Google account, your data will be automatically transferred from older Android devices. Of course, if your data has been synchronized with the Google cloud. With a Google account, you'll also have access to apps, games, and media from Google Play.
JOY'S S13 – Supports installation of third-party applications via APK
This is no longer just a push-button phone, but an updated version of it. The device runs on Mocor 5 OS, better known as Android 4.4, optimized for buttons. The same OS is now used by Xiaomi and Nobby.
The battery capacity of JOY'S S13 is , which is sure to last for several days. If necessary, the phone can be used as a battery. Fortunately, a full-fledged USB port is provided for these tasks.
The form factor of such devices does not allow it to “fit” a large screen, so the display size is only 1.7 inches, with a resolution of 128 x 160 pixels.
Thanks to Wi-Fi and LTE support, the phone is suitable for use as a router. There is a 2 megapixel camera, however, the shutter button is located in an unusual place - on the top edge of the body.
Pros:
- 4G LTE;
- battery;
- good speakers and microphone.
Minuses:
- small screen, even for a push-button operator;
- In some models, audio profiles are set randomly.
BlackBerry Passport – A corporate phone with a large screen
Passport is positioned for those who work a lot with mail and office documents. This device is convenient due to its wide screen, where more information can be placed.
Because of the large screen, the BlackBerry Passport looks more like a phablet than a traditional smartphone. It is more convenient to use it with two hands than with one, since the dimensions are 128 x 90.3 x 9.3 mm.
The assembly is above all praise - to increase the strength of the structure, the manufacturers used a stainless steel I-beam. All trays for memory cards and SIM cards are hidden under a plastic plug on the back of the case.
The first thing that catches your eye when you see this phone is the screen. Everyone is used to aspect ratios of 3:2, 16:9, 3:4, but here the geometry is 1:1. If the display of a 5-inch phone fits 40 characters, then here there are 60 - and this is convenient. Everything you need scales well.
Resolution – 1440 x 1440 pixels, technology – IPS. The screen geometry was still designed for work, and not for watching video content or playing games.
Like other BlackBerry models, there is a physical keyboard, albeit only three rows. But it supports gesture recognition. For example, to erase printed text, just swipe the keys from right to left.
Since 2014, phablets have been equipped with batteries with a capacity of 3000 mAh. The Passport has a 3,450 mAh battery, which is enough for two days of moderate use.
As for performance, everything is fine with it: 4-core Snapdragon 801 processor, 3 GB of RAM, 32 GB of internal memory (expandable up to 128 GB). The device operates smoothly, without slowdowns. The phone with Wi-Fi supports BlueTooth, LTE, NFC.
Since Passport runs on Blackberry OS, it has a useful Blend feature that allows you to connect the device to a computer or tablet. This is convenient for working with contacts and all kinds of data. You edit them on your computer, but everything is saved on your phone.
Pros:
- physical keyboard with touch;
- capacious battery;
- high-quality assembly;
- BlackBerry OS;
- decent sound.
Minuses:
- slow camera focusing;
- weight;
- little software.
How to set up Internet on a Nokia phone on Android
Most modern smartphones receive Internet settings automatically when they are turned on for the first time. But there are exceptions to any rule. An example is when the phone is brought from abroad.
Note! Going to the menu looks standard: “Settings” - “Wireless networks” - “Mobile communications”.
If the user accidentally turned off automatic detection of settings, he can enable them without any problems. To do this, follow a few simple steps:
- Go to the item “Communication Operators”.
- Selecting the “Select automatically” section. Or the operator is selected from a proposed list with several items. This rule may also apply to Nokia phones with 4G.
Another option is to call the cellular company's help desk with a request to send them automatic settings. The same result will occur when sending a certain combination of numbers to the operator’s short number. Information can be easily found on the provider's official website.
Note! If none of the above helps, you can try manually identifying access points.
In the corresponding menu item you need to find the “New access points” section and enter the network name, user and password. Each operator has their own; examples were presented above.
Setting up an access point on your Lumia phone
Wi-Fi Internet connection is supported on all Lumia series phones. But sometimes other devices that are near the phone need it. In this case, the gadget can be used as an access point. The main thing is to turn on Wi-Fi on the device and set the appropriate parameters. The procedure for users is as follows:
- Go to the “Internet Sharing” item.
- Enable Wi-Fi hotspot. You need to swipe left on the Sharing indicator. After this, the function will be enabled.
- Set certain settings. First go to the settings item. The name for the planned shared access point is entered in the “Connection name” field. Next, define a password with which other users and devices will gain access to the connection. The minimum number of characters is 8. At the last stage, all you have to do is click on the confirmation button.
- Try to connect to the network from another device. You also need to enable the Wi-Fi function on it. The user will see a list of connections that are currently available to him. You should select a new access point, which is currently played by the Nokia Lumia phone. To establish a connection, just follow the instructions displayed on the screen: enter a password, establish a connection.
- The last step is to click on the Exit button to return to the original screen. After this, you will be able to connect to the Internet on another gadget without any problems.
Possible errors and ways to eliminate them
When connecting your phone to the Internet, various errors sometimes occur. If you access the Internet through a cellular operator, signs of connection problems may include pages not loading in the browser and the absence of a mobile network sign in the status bar. Typically, the sources of problems are the following:
- poor operator coverage. The problem is solved by moving to an area with good coverage.
- minus on balance. It will be enough to check whether the operator’s page is loading, and then top up your account or connect the promised payment. After payment, the Internet should turn on automatically.
- traffic exhaustion. The Internet may disappear at the most inopportune moment, so it is better to pay for the connection in advance.
In all other cases, it is enough to reconnect the mobile data module and reboot the phone.
How to set up the Internet
First you need to figure out how to set up the connection step by step. There are not many steps to complete:
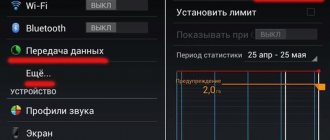
- Start by activating traffic transfer on your mobile phone. To do this, go to settings, select “Networks and wireless communications”, go to the “Cellular communications and SIM card” section. Set the switch to the active position.
- Setting up an APN access point. Open the menu again, and in it the settings item. Further everything follows the same principle as in the first step. Only in the “SIM card settings” section add an access point.
Finally, you will need to fill out four fields with certain information to configure your new access point. The first two are mandatory; you need to choose a servicing cellular operator. Then the data is entered into the remaining columns. Connection name is a field where you can enter the company name, but phone owners are allowed to choose any convenient options.
Related questions:
Check NOKIA 4.2 IMEI number
How to lock apps with a password on your phone?
How to boost the signal in NOKIA 4.2?
How to transfer contacts using Google account to NOKIA 4.2?
How to determine which apps are draining your battery in NOKIA 4.2?
How to make a WI-FI router from NOKIA 4.2?
Everything you need to know about rooting in NOKIA 4.2?
IP address in NOKIA 4.2
How to extend battery life in NOKIA 4.2?
How to clean and boost NOKIA 4.2?
How to enable NOKIA 4.2 to download applications from sources other than Google Play
How to install Adobe Flash Player on NOKIA 4.2?
Google Play errors in NOKIA 4.2
7 steps to set up your new NOKIA 4.2
Fix "Application has stopped" in NOKIA 4.2
How to restore contacts in NOKIA 4.2
How to download YouTube files using NOKIA 4.2?
How to format an SD card on NOKIA 4.2
How to save battery power on NOKIA 4.2?
How to enable applications in NOKIA 4.2?
How to manage auto updates in NOKIA 4.2?
Clear app data
Deleting Internet History
What to do if your phone is stolen
How to open Developer Options in NOKIA 4.2
Help! It didn't work
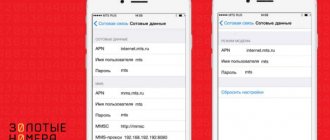
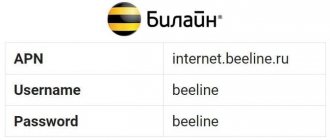
Access Point Specifications
Example with MTS operator:
- network password - MTS;
- username - MTS;
- access point name - internet. Mts. Ru.
Important! For all changes to take effect, it is recommended to restart the gadget. First they turn it off, then turn it on. After this everything should work.
Note! Each operator has its own actions, after which Internet settings are sent to phone owners automatically. Therefore, it is worth finding out in advance how to connect the Internet on a Nokia phone in one case or another.
- MTS. All you need to do is call 0876 or send an SMS to 1234 with an empty text field. Another available option is to visit the official page of the mobile operator on the Internet. You need to go to the tabs “Private clients” - “Help” - “Settings”. The last step is to order automatic setup for a particular phone, for example, Lumiya. The procedure does not require additional payment.
- Beeline. The best options are to call the technical support center at 0674 or request *111#. The operator provides an official program for Windows Phone with the appropriate name. It makes it easy to automatically configure the necessary functions. In this case, everyone will understand how to connect the Internet to Nokia.
- "Megaphone". Here you will have to call the number 0500. It is permissible to send a request to the number 5049 containing only the number 1.
- "Tele 2". The main contact number here is 679. Having dialed it, all you have to do is wait until the necessary parameters are sent to the owner of the equipment. In the case of Nokia 216, the Internet settings will remain the same. Typically, with this model, many users have problems setting up the Network.