Firmware is the software that allows the router to perform its functions properly. This firmware is flashed or stored in the microprocessor's memory. The firmware of the Dir 615 MTS router, just like any other, is compared with the Windows operating system. Windows is updated periodically: new parameters are introduced and the quality of the operating system is improved. It’s the same with the operation of the router. Firmware for router - updating, improving performance and troubleshooting. Even if there are no problems with the operation of the router itself, it is advisable to flash it from time to time to prevent breakdowns. Also one of the reasons for reflashing is that the native firmware is installed in an older version.
Characteristics of the Dir 615 MTS router
The Dir 615 MTS router model is often found among users for a number of reasons:
- wireless interface;
- wireless connection security;
- more wireless network options;
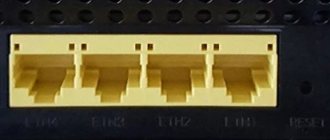
- 4 ports for connecting different devices to the network;
- security: security from network intrusion and limited access for children;
- easy to manage and configure.
The software part of most D-Link routers is a weak point. Some came straight away with semi-working software.
Why update firmware
The manufacturer installs the original firmware, but when using the router, instability is detected.
In addition, if the router is not the latest model, then the installed software is outdated. Because of this, security gaps appear: access to settings, wireless network, and blocking of sites is open.
The updated firmware revision is designed to eliminate vulnerabilities and improve device throughput.
How to reflash the Dir 615 MTS router?
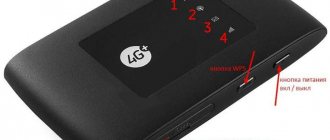
- Before you start flashing the firmware, turn the router over. On the back side, look at the model, in this case – model: Dir 615. Remember the revision – H/W Ver.: E4 and the software version installed on this router – F/W Ver.: 5 10RU;
Or enter 192.168.0.1 in the address bar on your computer and find the revision and router software on the screen. This data will be needed during the firmware process.
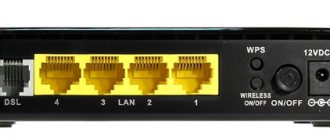
- We connect the router to power and network. We connect the router to the computer through one of the ports;
- On the website D-Link.ru - this is the official website, download the original firmware. On the main page of the site, select “FTP Downloads”.
FTP uploads are hardware from D-Link, which produces its equipment. There are folders with versions of all possible D-Link firmware.
We find our router model Dir 615. Please note that if you choose the wrong firmware for a specific router model, this can completely damage the router.
- Go in and click on the Firmware folder.
- Select revision E.
- Open the beta folder.
- Download the firmware to your computer.
- Disconnect the network cable from the router. We only leave the connection of the router to the computer and, accordingly, to the power supply.
- We go to the router interface. In the address bar enter 192.168.0.1. Enter the login admin and click “login”. There is no need to enter the default password.
- Click the “Tools” module in the header.
- Select "Firmware".
- In the “FIRMWARE UPGRADE” section, click review, select our firmware and download.
Next, we confirm that we really want to perform this firmware by clicking “OK”. - After this, the router reboots and begins to reflash.
- On the screen we see a sign that informs how much time is left until the firmware is completed.
- After the flashing is completed, a window appears in which the software version is already 5.11RU.
But when we go into the router interface, we see that no more changes have occurred. Flashing Dir 615 MTS completed successfully.
To check, connect the LAN cable and make sure the router is working perfectly.
Software Update
A couple of points to take into account:
- The software version must exactly match the version of your device.
- To update, you need to connect via a LAN cable.
- Under no circumstances should you turn off the router during the update.
Login to settings
Everything is very simple here. We enter the address in the browser - 192.168.0.1 or 192.168.1.1. In the window that opens, you need to enter your name and password. According to the standard, this is admin/admin.
Manual update
Here we do everything as in the screenshot. First, click on “advanced settings”, then you need to pay attention to the “System” block. Arrow to the right and select “Software Update”.
Then everything is elementary. Select the file that we downloaded and click “update”.
But there are other firmware versions that differ in interface. Here are instructions for the oldest of them. This is firmware version 1.0.0. In the main menu, select “Configure manually”. Then pay attention to the “System” button in the top menu. And in the submenu select “Software Update”. After that, it’s just as easy to select a file and update.
Now you need to wait until the firmware update is successful. You will be prompted to change the factory password.
We advise you to do this. Just before you change the factory password, you better write it down somewhere.
Automatic update
With automatic updating it is even easier if there is Internet on the router. We do everything exactly according to the instructions. In the settings, you may be immediately prompted to update the firmware (see screenshot). Just click "Update" and follow the instructions.
In other versions, you need to go to “System”, select the item from the “Software Update” list there. The first method is manual. The second is automatic updating, to do this, click check update and follow the instructions.
That's all, so we reflash the D-Link DIR-615 K2 router.
Video on the topic:
How to configure the firmware of the Dir 615 MTS router?
Sometimes it happens that during the firmware update the router settings are lost. But setting them up is very simple.
- We connect the router to the computer and the Internet.
- In the address bar we write the IP address of the router: 192.168.0.1.
- Enter the login admin and password admin.
- We go to settings and see the start page. Select "Net".
In the “Net” item, click WAN.
The connection type must be Dynamic IP.
If there is another type of connection, click on it, and this window will open:
In the specified line, select the type of connection we need: Dynamic IP. But usually it is already installed by default. This setting allows the Internet to work. But for now through the cable connecting the router and computer.
You can change the name of the wireless network if you wish. In the Wi-Fi section, select Basic Setting.
In the SSDI column, enter the desired network name and click APPLY.
After this, be sure to save it.
If the wireless network is not password-protected, you need to set a password for it. Click Security Settings and select the encryption type WPA2-PSK.
Enter any password, at least 8 characters, and click APPLY.
And be sure to save it.
Our network appeared among the available wireless networks.
Click “connect”, enter the password and that’s it, the computer is connected to the wireless network. The setup is complete, you can disconnect the cable connecting the router and computer.
Setting up PPTP
To set up communication using this protocol, you need to follow these instructions:
- On the main page of the web menu, open the Network section.
- Add a connection in the WAN settings.
- For the connection type, specify PPTP.
- Select automatic connection mode.
- Correctly enter the name, access key and server address.
The user will find the necessary information in the cooperation agreement concluded between the subscriber and the service provider company. Also, most Russian providers post instructions for setting up different models of routers on their official websites.
How to remove the firmware?
If suddenly the installed firmware did not give the desired result or did not eliminate the problem, you need to restore the firmware. What is needed for this:
- Reset the router settings: connect the router to power and press the button in the form of a RESET point with a sharp object, holding it until all the lights on the front light up at the same time.
- Disconnect the router from the local network. Connect to your computer.
- In the address bar, enter 192.168.0.15 and the subnet mask 255.255.255.0.
- Disconnect the router from power. After that, press and hold the RESET button again and connect to power. The router will boot within 30 seconds.
- In your browser, enter 162.198.0.1 in the address bar and you will be taken to the Emergency ROM page.
- Upload the firmware that you previously downloaded from the official D-Link server and click run.
- After this, a notification will appear that the router has started to reflash. Once complete, the router will reboot and be ready for use.
Flashing a popular router model is easy using the instructions provided.
L2TP setup
This type of connection is configured like this:
- From the start page of the administrative panel, go to the network settings section.
- On the WAN settings page you need to add a new connection.
- Select the desired protocol type (L2TP).
- Activate automatic connection by checking the box next to this mode.
- Specify the correct login, password, and server address.
The data required to fill out the fields can be clarified in the contract, on the provider’s official website and by calling its hotline.
Setting up a connection with a static IP: step-by-step instructions
Legal entities are required to have a static IP. Civilians can also order a static IP address as an additional feature of the tariff plan.
This parameter is configured as follows:
- From the start page of the admin panel, go to the network section.
- In the WAN settings, add a new connection.
- For the connection type, specify the current protocol using a static address.
- For IP, specify the server address and subnet mask.
- For the gateway IP address, select the default gateway.
- For the DNS server of the primary type, specify the DNS value.
- Select automatic connection mode.
- Enter your login, password, and server address.
All data is contained in an agreement concluded between the provider and the user. If it is not available, the subscriber can clarify the necessary data by calling the customer support operator. You can also contact the technical support department through the subscriber’s personal account.
Automatic installation
If the router is connected to the Internet and configured, then the process of flashing it looks even simpler.
True, for this you need to have an option to automatically update the device software in the router settings. Some versions of the web interface do not support this option. In this case, you need to return to the installation manually.
Once you find the automatic update section, you will find a button or link there that says “Update.” Click on it and the automatic installation process will start. This is a very convenient option. Generally speaking, it was with her that we needed to start our conversation because... automatic installation does not require any unnecessary movements from the user: there is no need to download anything from the Internet and slip it into the update program. Well, it's still useful to know.
What is it for?
Why does the router need a software update? The need to flash the device is usually caused by the following reasons:
- Disable Wi-Fi.
- Router freezes.
- The DHCP service does not work to automatically configure a network connection.
- The VPN connection is not established.
- Slow data transfer speed.
It should be noted that the process of updating the router firmware is almost identical on all devices, regardless of the manufacturer’s brand. Therefore, this article will discuss the general course of action that must be performed in order to update the router firmware.
Restoring previous operating parameters
After successfully updating the router, you need to restore the previously existing settings. The file that was created earlier is just useful for this.
You need to go to the “Backup and restore” section and simply load the file with the previous settings by clicking the “Restore” button.
Thus, the procedure for flashing the router is quite simple and does not require a lot of time, however, it must be done with a certain amount of care, since incorrect actions can lead to damage to the device. After correct flashing of the router, the device will work stably, quickly and without any failures, providing the signal quality declared by the manufacturer.
Firmware is the software that allows the router to perform its functions properly. This firmware is flashed or stored in the microprocessor's memory. The firmware of the Dir 615 MTS router, just like any other, is compared with the Windows operating system. Windows is updated periodically: new parameters are introduced and the quality of the operating system is improved. It’s the same with the operation of the router. Firmware for router - updating, improving performance and troubleshooting. Even if there are no problems with the operation of the router itself, it is advisable to flash it from time to time to prevent breakdowns. Also one of the reasons for reflashing is that the native firmware is installed in an older version.
Port forwarding
To properly open and transfer ports, you must proceed according to the following scheme:
- Having opened the “VLAN” section, add a new connection using the corresponding button.
- For the name, specify the value TV.
- For the connection type, select transparent.
- For VLAN ID, specify the individual code provided by the service provider.
- For the tagged port, select WAN or Internet.
- For an untagged port, indicate the connector used by the set-top box.
Be sure to save the new settings using the appropriate button.