Modern Android devices have many hidden functions unknown to the average user. Among such examples is the possibility of using a phone or tablet with Android OS as a flash drive. The process of editing files, transferring them from the device, and recording the necessary information becomes easier. To connect your Android as a USB flash drive, there are several methods given in our article.
How to connect Android as a flash drive with version up to 4.0:
- Using a USB cable, connect your device to the computer.
- It takes a little time to recognize the device; you should not perform any manipulations with the phone (tablet) during the process.
- A USB connection icon will appear on the gadget’s screen and may offer a choice of connecting as a media device. We have no use for these functions now.
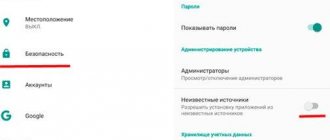
- If the PC stubbornly does not “see” the device, it is necessary to debug it manually. To do this, in the “Settings” menu you need to find the “Applications” item. In it we also find the “For Developer” section, after which we select the “USB debugging” button from the list. After this procedure, there are usually no more problems with connection.
More modern devices with Android version 4.0 and higher are connected using the previous algorithm. The only difference is that if connection is impossible, debugging is carried out in the “Settings” section, where the “Memory” item is selected. Here is the “Settings” category, in which the USB connection is debugged. In this case, you need to choose to operate the device as a media device.
Connecting a flash drive using USB
Read also:
SIM card and memory card - How to install in one slot?
Many modern devices running Android OS have a standard micro-USB connector. So connecting a flash drive to a smartphone is very simple.
The flash drive will work on the device if On-The-Go technology is loaded. Manufacturers have been introducing a similar function into the gadget since the latest version.
Typically, modern mobile devices have a micro USB connector, so the user cannot do without a USB cable and an adapter for a flash drive.
Most manufacturers include adapters for flash drives. If you don't have it, you'll have to purchase it from a digital store.
If you cannot find a microconnector on the device, then most likely you will need to purchase not only a cable, but also a special adapter.
Of course, this will be quite inconvenient, since to successfully connect an additional device you will have to use several cables. However, this is the only option for connecting a USB flash drive in this case.
It is also worth mentioning the opening of an additional device. You can cope with this task by downloading one of the file managers.
Often it is already installed by the manufacturer along with a certain set of programs. If there is no file manager, you will have to install it.
As for Android smartphones, the most common are Total Commander and FX File Explorer. The user can choose the application he likes.
Possible problems and their solutions
When connecting flash drives, other problems may arise that are not related to connectors and supported technologies. Let's look at the most common problems and methods for resolving them:
- The flash drive is not mounted automatically. When you are sure that OTG is present, but the USB drive still does not appear in the file manager, it means that the device lacks the necessary function. Most often, the problem occurs on devices of the Nexus line and those on which . The solution is to install the StickMount application (requires superuser rights to work).
- Invalid file system format. A flash drive in FAT format is connected to an Android smartphone via micro-USB. If the drive was formatted to the NTFS standard, then it will not be possible to recognize it using standard OS tools. As a solution, two options can be taken: Re-format the flash drive into FAT format. This can be done both on a computer and on a smartphone. Please note that this process will delete all data. Therefore, it is recommended to transfer them to another medium in advance.
- Installation . Using the program's tools, you can open a flash drive in NTFS format and manage its contents. There is other similar software, but in most cases it requires root access to function.
The presented material describes in detail how to connect a flash drive to an Android smartphone. You can accomplish your plans even in the absence of a Micro-USB input and OTG support, and special applications will help you recognize drives of incompatible formats.
Articles and Lifehacks
A regular memory card that is used in your mobile device can become a storage device, you just need to know how to enable USB storage on Android. The indicated task sounds somewhat frightening to an ignorant person. But in reality there is absolutely nothing to be afraid of. To complete it you will need:
- Mobile device running on the Android operating system;
- Computer with USB port;
- USB cable that comes with the gadget.
Now you can proceed to the process of turning on the USB storage.
What to do if the computer does not see the device
Alas, there is no single advice, but we will try to understand the situation and consider possible solutions to the problem.
The very first thing you should do is reboot your device. The author of these lines periodically has this problem and it is solved by rebooting the device. Most likely, there is some glitch in the system. If there is a more recent firmware for your device, be sure to update it, it may help.
The next step is to carefully inspect the USB cable. It is possible that it is damaged. If possible, try connecting the device with a different USB cable. If it works, then that's where the problem lies.
Connect the device to a different USB port. Some of them may not work or work incorrectly.
If you see its connection mode on the device, click on this item and try to select a different type of connection, for example, not a media device, as in our case, but a USB drive. This can help.
Without disconnecting the device from the computer, try disabling and enabling USB debugging several times in a row. If this works, you will hear a characteristic sound in the speakers, and an autorun window will appear on the computer screen. Try also simply disabling USB debugging.
You should pay special attention to drivers, since for some devices you will have to install them yourself. In some cases, you have to install drivers from completely different devices - you can find out more about drivers for a specific device on thematic forums
If all else fails, try connecting the device to another computer. If another computer sees it, then the problem is with your computer and possibly with the drivers. If the other computer does not see the device, then the problem is either the cable, the device itself, or the USB port. And be sure to update the firmware version, if possible.
If you have any questions, you can ask them using the comments.
Few consumers know that a mobile device running on the Android operating system, unlike other portable devices, can be used as a flash drive. Lenovo smartphones on Android were originally designed by manufacturers with functions that allow them to be used as a flash drive and used for their intended purpose. Thanks to this, the user can record the necessary information, delete files from the device that are not used, but at the same time take up a lot of space on it.
Using an Android phone as a flash drive, there is no need to connect it to a computer, constantly carry with you the cable needed to connect to a laptop, that is, to perform a lot of manipulations that waste a lot of time.
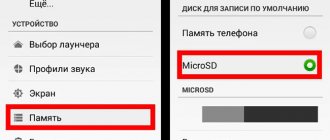
I can’t find the “Memory card (SD card)” item on my phone: what should I do?
Sometimes in a smartphone the user cannot find the item indicating a memory card (which we indicated in the very first instructions). Without it, you won't be able to use your phone as a flash drive. So download this ES Explorer app here.
After installation, you will see it in the application list as shown in the screenshot:
How to connect a smartphone to a computer instead of a flash card?
Launch the application, after which you can find the memory card in the menu that opens on the left. Next, proceed according to the first instruction above.
Other installation options
Since many people want to upgrade their device to MIUI now, there are manual installation options via Recovery and Fastboot, but this is a topic for another article. It is also worth considering that the approximate similarity of devices, say Redmi 3 and 3 S, does not promise us that they will be able to officially update at the same time, although everyone really hopes for this.
If for some reason you are unable to update your device, you should try slightly more difficult methods, but no less correct; more about this in the article about device firmware.
We talk about the technology for updating smartphones and tablets “over the air”.
As we know, all software products are subject to regular updates. Developers of operating systems and other software strive to improve, optimize and make them more functional. The Android operating system is no exception. Since its release (2008), it has received a huge number of updates. All of them related to bug fixes and functionality improvements.
Google has chosen to update its operating system exclusively via the Internet - it is called OTA or over-the-air update.
How to enable a USB drive on Android, turning a regular smartphone into a mobile data storage
It would seem that connecting an Android device to a computer is not difficult at all. I connected it with a USB to mini USB cable and everything should work. But this doesn't always happen. Sometimes additional steps are required. Let's talk about them further.
How to enable USB storage on Android
Let's start with the fact that different versions of Android have slightly different ways of connecting the device to a computer as storage. Don't know your version? Go to settings, look for the menu item “About phone”, “About tablet” or “About device”. The version of your gadget is listed there. Next, proceed according to the instructions prescribed for your version of Android.
Android 2.1 – 2.3.7
- Connect your device to your computer using a USB cable
- Wait until the computer detects the device. If the computer detected your phone or tablet, skip the next step. Otherwise, follow the next step of the instructions
- Disconnect your device from your PC. Go to Settings -> Applications -> Developer options -> USB Debugging. Press the button to enable USB debugging mode. Connect your device to your PC.
- Once the device has been recognized by the computer, a USB icon will appear in the status bar. Pull the status bar down with your finger, tap “USB Connection”
- If you are given a choice between the options “Connect as a media device (MTP)” and “Connect as a camera (PTP)”, select the first option
- Ready! The green Android icon turns orange, and on the PC your device is displayed as a data storage (removable disk with an assigned letter)
Android 4.0 – 4.2
As a rule, in these versions of Android, the device is recognized automatically after connection. If this does not happen, follow these steps:
- Connect your gadget to your PC via USB
- Select Settings -> Storage -> USB Connection Settings
- Of the two options offered (connect as a media device/as a camera), select the first one. Ready! Device connected as storage
Now you know how to enable a USB drive on Android of any version.
How to Clean Android Internal Storage
Clogged internal memory of a phone or tablet is a problem that any user faces sooner or later. Once you have connected to your PC via USB, you have a convenient way to solve it. Here is a short list of actions that you can take to clean the internal storage of your Android device by connecting to a PC.
- Transfer your photos and videos to your PC. Just drag them to the desired PC folder and delete them from your phone
- Check your Download folder. As a rule, a lot of unnecessary downloaded files accumulate there. Delete them and transfer the ones you need to your PC
- You can also save some data directly from applications to your PC. For example, you can archive all your SMS and save them on your computer
By connecting your Android device to your PC as storage, you can easily exchange information between devices, and also comfortably clear the internal memory of your gadget.
Connection procedure
The actions you have to take are absolutely simple, and even the most novice user can handle them. So, you will need:
- Connect a working Android device to the computer using a USB cable;
- When the PC “sees” the gadget, the message “Enable USB drive” will appear on its display; you will need to click on this inscription;
- Some models automatically turn on the USB drive when the device is connected to the computer. In this case, you don't need to press anything else;
- After these steps, the line “Open folder to view files” will appear on the PC monitor, and the new equipment connected via a USB cable will be recognized as a disk drive.
And then you can work with the SD card and the files that are on it, like with a regular flash drive.
Benefit from external storage thanks to USB 3.1
Fast USB 3.1 Gen 2 memory provides many external SSDs, such as the Freecom mSSD MAXX, with a significant boost in speed. The
high data transfer speeds of USB 3.1 Gen 2 benefit, of course, network storage with a RAID configuration and external drives, primarily flash. -memory - solid state drives and USB flash drives. But for the latter, the availability of USB 3.1 Gen 2 is currently reduced to zero. The offered flash drives from SanDisk, Kingston and Corsair, positioned as USB 3.1, transfer data at a speed of no more than 5 Gbit/s, that is, they belong to the first generation. However, for most flash drives this should be sufficient for now.
As for external solid-state drives, the manufacturers Freecom (mSSD MAXX, about 8,000 rubles) and Adata (SE730, about 9,500 rubles) offer drives with USB 3.1 of the second generation. The first practical tests show that the high-speed interface does indeed provide significantly higher data transfer rates. Terramaster offers a two-bay D2-310 network storage enclosure (about 10,000 rubles) with support for USB 3.1 Gen 2, which should also make a good impression on high-speed SATA drives in a RAID array.
Music via USB-C The headphone jack on your smartphone is open: a Type-C to TRS adapter will soon appear as standard
It should be separately noted that memory manufacturers do the best job of specifying versions and standards and are the least likely to leave their customers halfway. The remaining manufacturers must urgently supplement the documentation and properly implement the standards.
Transitioning from one generation of technology to the next has always been a long and often confusing process, but not since the days of VHS and Betamax has there been such confusion as now. Someday, the USB 3.1 / Type-C configuration will really make life easier for everyone - especially users, but for now there are many difficulties to be overcome.
PHOTO: CHIP Studios; Freecom; Stouch; Club 3D; Raidsonic; Acer; LG; Asus; Sabrina Raschpichler
Restricting access to USB ports
Let's look at 7 ways
, with which you can block USB ports:
- Disabling USB through BIOS settings
- Changing registry settings for USB devices
- Disabling USB ports in Device Manager
- Uninstalling USB controller drivers
- Using Microsoft Fix It 50061
- Using additional programs
- Physically disconnecting USB ports
Disabling USB ports through BIOS settings
- Enter BIOS settings.
- Disable all items related to the USB controller (for example, USB Controller or Legacy USB Support).
- After you have made these changes, you need to save the settings and exit the BIOS. This is usually done using the F10
. - Restart your computer and make sure the USB ports are disabled.
Enable and Disable USB Drives Using Registry Editor
If disabling via BIOS does not suit you, you can block access directly in the Windows OS itself using the registry.
- Open the Start menu -> Run, enter the command “ regedit
” and click OK to open the registry editor. - Continue to next section
- On the right side of the window, find the “ Start
” item and double-click on it to edit.
Enter the value " 4
" to block access to USB storage devices.
Accordingly, if you enter the value “ 3
” again, access will be opened again.
Click OK, close Registry Editor, and restart your computer.
The above method only works when the USB controller driver is installed. If a driver has not been installed for security reasons, the Start setting may be automatically reset to 3 when the user connects the USB drive and Windows installs the driver.
Disabling USB ports in Device Manager
- Right-click on the “ Computer
” icon and select “Properties” from the context menu.
A window will open on the left side of which you need to click on the “ Device Manager
” link. - In the Device Manager tree, find the “ USB Controllers
” item and open it. - Disable controllers by right-clicking and selecting the "Disable" menu item.
Removing USB controller drivers
Alternatively, to disable the ports, you can simply uninstall the USB controller driver. But the disadvantage of this method is that when the user connects a USB drive, Windows will check for drivers and, if they are missing, will offer to install the driver. This in turn will allow access to the USB device.
Another way to deny access to USB drives is to use Microsoft Fix It 50061
(https://support.microsoft.com/kb/823732/ru - the link may open near the mituta). The essence of this method is that 2 conditions for solving the problem are considered:
- The USB drive has not yet been installed on the computer
- The USB device is already connected to the computer
Within the scope of this article, we will not consider this method in detail, especially since you can study it in detail on the Microsoft website using the link given above.
It should also be noted that this method is not suitable for all versions of Windows OS.
There are many programs for setting a ban on access to USB ports. Let's look at one of them - the USB Drive Disabler
.
The program has a simple set of settings that allow you to deny/allow access to certain drives. USB Drive Disabler also allows you to configure alerts and access levels.
Disconnecting USB from the motherboard
While physically unplugging USB ports on a motherboard is nearly impossible, you can unplug ports on the front or top of your computer by unplugging the cable that goes to the motherboard. This method will not completely block access to USB ports, but will reduce the likelihood of using drives by inexperienced users and those who are simply too lazy to connect devices to the back of the system unit.
! Addition
Set up your computer
If you are using a Mac computer, then you do not need to install anything. However, on Windows computers there are some minor adjustments that need to be made.
Launch the Pocket app on your Android, then go to Settings. Click Help and under Windows, select the letter for the new drive. Click "Save Settings".
Now open Windows File Explorer on your computer (or just My Computer folder) and enter the ftp URL listed under Option 1 in the Pocket app.
Here you will find a Pocket folder, inside of which is a batch file. Copy the file to your computer, then double-click on it to run. The file will make some changes to the Windows registry, after which you need to click Yes.
Once you do this, the file can be deleted from the Pocket folder on your computer. Now restart your computer for the registry changes to take effect.
When your computer is turned on, you will find your local Pocket drive in Windows File Explorer. Ready! You can now transfer files between Android and computer.
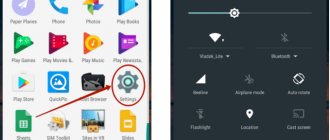
Android setup
So, if you connected your smartphone, but nothing happened:
- Open Android Settings
. - Go to the “About phone”
(may be called “About device”). - Find the build (model) number
and click on this item until a notification appears that you will soon become a developer.
Usually you need to press 7-10 times
.
After you become a developer, a new section will appear in Android settings - “Developer Options”
.
Inside it you will find a “USB Debugging”
, which needs to be turned to the
“On”
.
Now try connecting your phone to your computer again. When connecting, a mode selection window should appear on the smartphone screen. The default setting on older versions of Android is “Charge Only”. If the window does not appear, slide it out of the notification shade.
To transfer files, you need to select media device (MTP) or storage mode. Among the options there will also be a PTP mode, but it is only suitable for photos that can just as easily be moved to MTP.
After selecting the appropriate mode in “Computer” on Windows, a media device will appear, the contents of which you can work with. Depending on your phone model and Android version, the internal memory and SD card may appear together or as separate drives. But this does not matter, the main thing is that they are displayed at all.
There are no other options in the Android settings that are responsible for connecting via USB, except for debugging. However, there are some peculiarities. For example, on Nexus smartphones, you need to unlock the screen, which is protected by a password or pattern, in order for the computer to access the contents of the memory.
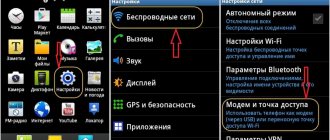
Also, USB connection cannot be established if tethering mode is enabled on Android. To check its status and disable it if necessary:
- Open Settings
. - Under Network & Connections,
click
Advanced Settings
or
More
. - Enter modem mode and disable the WLAN access point
. If it is disabled, you don't need to do anything else.
Some manufacturers offer users special programs to control smartphones on a computer, but you can establish a simple connection via USB without this software. Utilities from manufacturers are needed not for the banal transfer of photos, but for performing more complex tasks: updating phone software via a computer, flashing the device’s firmware, resetting settings.
The reason that the computer does not see Android via USB may be an incorrectly installed or simply crooked custom firmware. Also, sometimes a factory reset helps, but before doing it, be sure to back up your data as it will delete your data. The problem may disappear even after a normal reboot of the smartphone - keep this in mind.
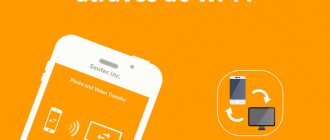
Transfer files between your Android and computer
Whenever you need to transfer a file to your Android smartphone, you can simply copy it to Pocket local drive on PC and it will be available in Android/data/.appcube.pocket/ folder on your mobile device.
If you want to transfer a file from Android to your computer, then select the file, click “Share” and select the “Pocket” application. The files will be added to the Pocket folder on your computer. Amazing! Now you don't need a USB cable to transfer files between Android and computer.
Warning:
Please note that the files you transfer using this method are not protected. This means any user on the same network can access your personal files. You should not transfer files on a public Wi-Fi network.
That's all! We think this is the perfect solution for transferring files between Android and computer in the 21st century. You can use your Android as a wireless flash drive without worrying about cables and other hassles.
Interesting articles:
- TOP 4 popular Android applications for transferring files over Wi-Fi
- How to unlock your computer using a fingerprint scanner on Android
- How to register for MIUI 9 beta testing?
- Xiaomi Redmi Note 4 how to reset settings
- How to delete an Android application via computer?
- How to find out your WiFi password on an Android phone without root rights
News related to this material
Smartphone News
Motorola Droid Turbo 2 review: an unbreakable smartphone
News of phones, tablets and Hi-Tech
How to enable GPS on Android: how to determine location
News of phones, tablets and Hi-Tech
Huawei is getting deeper: will restructuring begin?
News of phones, tablets and Hi-Tech
Tablet Modecom Free TAB 8010 IPS IB and IB IPS Free TAB 8025.
News of phones, tablets and Hi-Tech
How to choose a secure browser for your smartphone?
Problem solving
Windows setup
If ports are enabled in the BIOS, but devices connected via the USB interface are not detected by the system, then check the registry editor, device manager and group policy editor. It is possible that changes were made to the system through them, due to which the ports are no longer working. You should start with the Registry Editor.
If USB support is enabled in the Registry Editor, check the controller drivers in Device Manager.
If you see an exclamation mark icon next to the controller, and you are sure that the interface is supported in the registry editor, then this means that there are problems with the drivers. First try updating the software:
If updating the controller software does not help, update the motherboard driver. Download it from the manufacturer's website and install it manually. Another way to update the drivers of all controllers at once is to remove them from the system. Right-click on the controllers and select "Delete". After a reboot, the system will automatically install controller drivers, so you no longer have to worry about how to enable the USB ports - they will work just like that.
If only removable devices connected via USB do not work, check in the Group Policy Editor to see if a read ban is set.
Find the Removable Devices: Deny Read option and set it to Disable. The problem with identifying flash drives and external drives should disappear.
Ways to run msconfig
Second method (Windows XP, Vista, 7, 8, 10)
Go to the Start menu - All Programs - Accessories. Select “Command Prompt”. A black command line window will appear, type in it and press Enter.
Third method (Windows XP, Vista, 7, 8, 10)
In the same Start menu, click “Run”. A window will appear asking you to enter the required command. Here we enter , and press Enter as usual.
Fourth method (Windows XP, Vista, 7, 8, 10)
Go to Explorer at C:\Windows\System32. There are a lot of files in this huge folder. Scroll to the middle of the list and find msconfig.exe.
It makes no difference which of the proposed methods you use. The first one is the most optimal, as it is the fastest.
How to connect Android from MTP to USB storage mode as a flash drive
With version Android 4.4 KitKat, the USB storage mode has been removed and the smartphone or tablet can only be used as an MTP. You can still make Android work like a flash drive!
It is not clear what the Android OS developers were guided by, but absolutely all new smartphones and tablets cannot use the device in USB storage mode, but instead only MTP!
Thanks to a specially created application, you can still connect Android to MTP in USB storage mode in just a couple of clicks!
It is also worth noting that the application may not work on any specific device, you need to check it.
Be careful! This application may break the operation of the device. Only flashing Android will help!
The necessary conditions
To work in USB storage mode you will need:
- Launch the USB MASS STORAGE Enabler application (displayed in the menu as a USB activator)
- We grant Root rights, and a request to change the work of Selinux will appear, allow
- If the device is supported, the application will go to the main menu
- To activate the “flash drive” mode in Android, click the “Enable USB MASS STORAGE” button
After using Android as a USB storage device, disable this mode by clicking on the corresponding button in the USB MASS STORAGE Enabler application. To connect the device in a different mode (MTP or PTP), restart Android.
That's all! Stay with the Android +1 site, it will be even more interesting! Read more articles and instructions in the Articles and Android Hacks section.
iTunes and File manager for Apple
By downloading the File Manager app from the App Store, you can use it as a USB drive on your iPhone. To do this you will need:
- Install iTunes and File manager.
- Click on the button of the identified iPhone and go to the “Programs” section.
- Select the File manager application from the two windows at the very bottom of the section.
Connect your phone to your computer using a cable.
After completing all of the above steps, the copy function will open. To do this, you will simply need to “drag” the desired document into the window on the right or use the Add button.
Checking the cable and port
If no kinks, bites, breaks or other mechanical damage are found on the wire, check the USB port. Try connecting to a different connector or inserting another device into the same port - for example, a mouse.
If Windows XP is installed on your computer, then urgently look for an opportunity to upgrade to at least “seven”. But first, you can simply install the MTP protocol
so that XP learns to work with Android. The trick is that when the first version of Android appeared, Microsoft had already released Windows 7. Therefore, there is no MTP protocol in XP, and you have to install it separately. You can download MTP
If the computer detects any other device, but the phone categorically does not want to see it, then it’s time to shift the focus to Android settings and connection features. Yes, there is a possibility of mechanical damage to the microUSB connector on the phone, but I have not encountered this yet. If you have something broken, you will most likely notice it.
Most often, the inability to establish a connection between a computer and a phone is due to software errors. If none of the methods listed below help solve the problem, contact a service center - it seems that the smartphone really needs to be repaired.
Enabling ports in BIOS
To enter the BIOS during boot, press Delete, F2 or another key depending on the motherboard model. You can view it on the start screen.
In the case of a laptop, this screen does not appear because the fast boot feature is activated. You can temporarily disable this technology in the power settings:
Restart your computer. Without Quick Start, you will see all stages of Windows boot and can get into the BIOS. If this doesn't work on Windows 8 or 10 with UEFI BIOS, try the following method:
Once rebooted, select Diagnostics, then go to Advanced Options and open UEFI Firmware Options. Click "Reboot", the next time you start, the BIOS UEFI interface will appear.
To configure USB ports in UEFI, you need to go to the “Peripherals” tab and set the “Legacy USB Support” parameter to “Enabled”. If support for USB 3.0 ports is required, activate the corresponding item (USB 3.0 Support).
In the AMI BIOS, go to the “Integrated Peripherals” section and set the four options to “Enabled”:
- USB EHCI Controller.
- USB Mouse Support.
- USB Keyboard Support.
- Legacy USB Storage Detect.
In Phoenix AwardBIOS, you need to go to the “Advanced” tab and go to the “USB configuration” section. All parameters inside must be set to “Enabled” for the USB ports to work.
In all BIOS versions, to save the configuration, you must press the F10 key and confirm the selection by writing “Y”.
If you have connection problems
As mentioned earlier, modern devices are usually easily recognized by the system and do not require the installation of additional programs and drivers. At the same time, you can often encounter various situations when a connection cannot be established for unknown reasons. It is extremely difficult to foresee all possible solutions to problems, but the information provided can help.
Types of connection problems and methods for solving them:
- On Android it is difficult to find the location of the memory card. To make your search easier, you can download a special application similar to ES Explorer. With its help, the CD card can be easily displayed, and connecting to the computer will become much easier.
- In some cases, it helps to change the USB port, cable, or restart the device and/or computer. Such manipulations solve non-critical system problems and ensure good communication when connected.
- If the computer stops seeing the device after updating or installing new software, this may be the problem. The same rule applies to the telephone. Some applications may make it difficult to synchronize devices, so be sure to disable running programs, as well as Internet messages.
- Resetting to factory settings and saving the data first may also help solve the problem. Please note that in some cases it is impossible to resolve connection failures on your own, so you have to contact a service center.
Few owners of modern devices know that they can easily connect Android as a flash drive, saving time when transferring data. In addition, this function makes it possible to install the necessary programs on a tablet or phone without using wireless connections. The features and algorithm of this procedure are discussed in detail in our information.
Every day, thousands of users become owners of smartphones and tablets based on Android. Some of them may experience certain problems when working with the device. For example, the user decided to connect the smartphone to the computer via a USB cable. He connects the device and... And nothing happens. In this case, the necessary drivers are installed, the device is accurately connected, but is not reflected at all on the computer. The traditional question is what to do?
Ideally, the user should see something like this, where the device is connected as a data storage device:
In this case, it will be recognized and you will see the contents of your device on your computer. In addition, if you click on the connection mode, you will see an additional menu of connection methods:
On the computer, in turn, an autorun window for the device will appear:
Create a separate folder to store copied data
A memory card is a complex thing, and if you don't create a separate folder on it for extraneous files, you can cause a number of problems. Firstly, saving files in different sections of the directory in the future can lead to banal difficulties in searching. Secondly, you can accidentally damage system data and disrupt the operation of some applications, or even the system as a whole.
The folder can be created after connecting to the computer through the same explorer or specialized Apple software. It's better to place it in the same place where browser downloads are stored.
Difficult choice of cables
The confusion doesn't stop with standards and versions alone. If previously it was possible to limit the choice to one USB cable with the required types of connectors, with USB 3.1 and Type-C it will not be so easy. Here, as in the case of standards and versions, there is currently a huge lack of information: not all Type-C cables can transmit data, video and supply power. In many cases, it is not clear to users whether a Type-C cable supports Power Delivery fast charging or an alternative mode for video transmission, because logos and markings, as a rule, are simply not there.
Premium Motherboards Currently, only select premium motherboards support USB 3.1 Gen 2. Among them is Asus Rampage V 10, equipped with two Type-A and two Type-C ports, it costs about 38,500 rubles
It is often impossible to determine whether a cable supports USB 3.1 or just USB 2.0. On the Amazon website, there are very often reviews from upset customers who, after purchasing, discovered that the purchased cable does not support the fast charging technology of their smartphones. Even the designation by some manufacturers, for example, Aukey, of a USB 3.1 Gen 1 cable with Type-C and Type-A ends as a “Type-C to USB 3.0 cable” does not help to get out of this difficult situation at all - this is completely wrong.
If you decide to get a device with a Type-C connector, be sure to make sure that the package includes a cable - only then will all your requirements be satisfied. Computer hardware supplier Hama, for example, offers several Type-C cables with detailed specifications, but prices start at 1,000 rubles. Buying a Thunderbolt 3 cable will cost even more - you will need to shell out about 2,000 rubles. But all the functions are provided here. If this price is too high, then willy-nilly you will have to rummage through product descriptions and customer reviews about them in search of the right cable.
On Android, a USB flash drive does not turn on via OTG - what to do
If a USB drive (flash drive, external hard drive, hub, camera, etc.) does not turn on on Android, then first of all you need to check the serviceability of the OTG cable and the correct connection of the device.
This article is suitable for all brands that produce Android smartphones: Samsung, HTC, Lenovo, LG, Sony, ZTE, Huawei, Meizu, Fly, Alcatel, Xiaomi, Nokia and others.
Why doesn't the flash drive open on Android?
If you are interested, my article is a review of which Bluetooth headphones I bought for my smartphone for $13.
There are several reasons why Android may not detect or open a connected USB flash drive:
- The device does not support USB On-The-Go technology. The defect cannot be corrected by any software methods - you need another phone to connect the flash drive.
- The OTG cable or adapter does not support the technologies offered by the phone. For example, the smartphone has a Thunderbolt 3 connector, and the adapter works via microUSB. Also, make sure the cable/adapter is working properly.
- The smartphone manufacturer has set a software ban on expanding memory using external media. To bypass it, you need to gain root access.
- The flash drive is formatted in NTFS. Android only reads FAT. To fix the error, change the file system to exFAT or FAT32
Read: Android does not see a flash drive via a USB OTG cable or adapter
Another reason could be that the storage capacity is too large. Try connecting a smaller flash drive and see how the phone reacts.
Correctly connecting a USB drive to Android
To avoid problems when connecting the drive to Android, follow the instructions:
- Make sure your phone supports USB On-The-Go.
To do this, install the USB OTG Checker application on Android. Increase - Buy a USB OTG cable. It connects to the microUSB connector on your phone.
- Connect the flash drive to the port that is on the other end of the USB OTG cable.
On some devices, this is enough for the system to find the external media. All you have to do is open any file manager and go to the flash drive in the same way as to a memory card or internal drive.
How to safely remove a flash drive on Android
If the flash drive is connected correctly, and you are sure that the cable is working properly and supports USB OTG technology, but the phone does not read the USB flash drive, then:
- Install StickMount, a disk mounting application.
- Reconnect the flash drive.
- When you connect the drive, a message will appear asking if you need to launch the StickMount application. Agree to launch the program and mount the disk.
The mounted flash drive can be found in the /sdcard/usbStorage/sda1 directory. To safely remove media connected using StickMount, open the program settings and select the “Unmount” command.
The only downside to StickMount is that it requires root access to work. Applications for mounting removable drives on Android without root rights are only available on Google Nexus; there is no progress towards increasing the number of supported devices.
Useful article? Vote!
Android does not see the memory card
Situations arise in which the flash drive is not detected in the smartphone. In order to find it, it is recommended to use a file manager - ES Explorer or its equivalent. With the help of such programs you can find almost everything. In their functions they resemble the My Computer program.
In order to recognize a memory card, you need to launch ES Explorer by downloading it to your device prematurely. After launch, a menu will appear on the left side of the screen in which the memory card (SDcard) is located. All you have to do is click on it. It has been discovered and is open for business.
By following simple steps, anyone, even a novice user of a mobile device, will be able to detect a memory card in it. The reasons why the computer does not see the SDcard may be different. You may need to update the operating system on your PC or install the TransferProtocol (TTP) for Windows XP
How to connect a flash drive to an Android gadget via OTG
OTG is a USB-microUSB adapter, a replacement for a USB cable with a Card Reader device. Takes up little space - no more than a standard flash drive. In this case, the flash drive must be formatted in FAT32 - not everything is going smoothly with the NTFS file system for the Android operating system.
There is a more difficult way: install a special Android application that allows your smartphone or tablet to work with NTFS media. So, these can be exFAT/NTFS for Total Commander, Paragon NTFS & HFS+ and their analogues.
The OTG adapter must have a USB connector for the USB flash drive plug. This is exactly what you need. Most modern Android devices do not have a miniUSB connector, but a microUSB connector. Find an OTG adapter of the required standard in the store. The OTG adapter is available both as a solid device and as a special microUSB cable.
You need OTG with a socket, not a plug for USB drives
After connecting the flash drive, launch the “File Manager” on your device - its contents should be displayed at the address '/sdcard/usbStorage'.
Select the USBdisk folder
If the flash drive is not readable, you need special Android applications. Some of them require Root rights.
Install antivirus
Of course, when using a smartphone as a flash drive, there is bound to be a need for an antivirus. In general, their installation is a simple process that does not require a separate review. The following apps are the most popular for Android:
- Antiy AVL;
- Bitdefender Mobile Security & Antivirus;
- Cheetah CM Security;
- Kaspersky Antivirus & Security.
The most commonly used to protect iOS are:
- Avira Mobile Security;
- Trend Micro Mobile Security;
- McAfee Mobile Security;
- Lookout.
- Author: Elena
Rate this article:
- 5
- 4
- 3
- 2
- 1
(9 votes, average: 2.9 out of 5)
Share with your friends!