Setting up a Yota modem - a universal means of accessing the network! Find out how to choose and configure the Iota modem correctly!
The company today offers several models of Yota modems for Internet distribution, which differ in characteristics and various indicators.
You can connect up to eight external gadgets (laptops, smartphones, phones, etc.) to devices that are designed to distribute Wi-Fi. Their distinctive feature is that they work with all popular operating systems.
Setting up and activating the Yota Many Mikrotik modem, like other devices from the company, is done quite quickly and does not cause any particular difficulties even for inexperienced users. At the same time, some models can work without an additional connection to a computer (they can be powered from a regular household electrical outlet through a special adapter, which also needs to be purchased separately).
Instead of an introduction
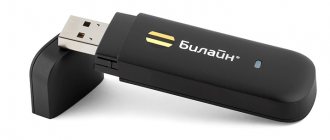
An image that almost everyone already knows - before Iota, all whistle modems were of the same type. Remember all these Beelines-MTS-Megaphones. The same China, in the same packaging. Yota got carried away with the wrapper and did something strong. And under the hood it's about the same.
- Freely holds up to 8 devices on the line.
- Connects via USB to a computer or laptop. It worked for us simply through a power adapter from USB to distribute Wi-Fi.
- Keeps the 4G network full.
- A beautiful and simple interface, which I propose to configure now.
But remember that there are many types of modems and their versions - there are pure 4G LTE, there are versions with Wi-Fi, Many, Micro, etc. – Settings may vary slightly. Setting up the version with Wi-Fi differs precisely in the presence of settings for this wireless network, otherwise all the principles are identical.
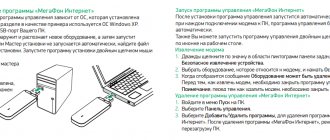
USB connection
If you select the connection option via a USB cable, the OS itself will begin installing the drivers. You should not abandon this and wait for the final installation. After this, the device will be detected and ready for operation and configuration. For the yota 4g router, the instructions are as follows:
- Select the tray icon;
- Enter all the necessary parameters for normal operation (network name, password and parameters for turning Wi-Fi on and off).
Important! Such a menu is much easier to set up than configuring through a browser.
For most people, this will be enough.
Login to settings
The easiest option is to connect a Yota modem:
- We plug the modem into the USB port on the computer or laptop. For the first setup of the Yota 4G modem, you cannot do without this.
- If this was the first time connecting, installation of the modem driver will begin via Yota Access (if nothing starts, go to the disk that appears in My Computer and run autorun.exe there). Wait for this process to finish so there are no errors at the end! You won’t have to install any applications like your competitors, it’s all advantages.
- Go to status.yota.ru or 10.0.0.1 - the same configurator will open with the current status page:
If for some reason you can’t log into the modem, first of all restart your computer, it often helps. The second possible reason is broken network settings (ideally they should be set to Automatic Receive mode, but sometimes it’s easier to do everything manually) - if you suddenly get stuck at this stage, write in the comments. I will redirect you to the desired article, and I will add one more instruction to this one.
How to register from PC
All Yota subscribers can register a personal profile. It doesn’t matter what device the SIM card is installed in, an LTE modem or a tablet computer. In automatic mode, the user enters his personal account. The system constantly prompts the user what actions to perform. Thus, you can quickly complete the registration and authorization procedure. What you need to do to start using your online account:
- First you need to install a Yota SIM card in your mobile gadget. Afterwards the subscriber will be immediately redirected to the home page. Please read the service agreement carefully. If you agree with all the stated points, put a digital signature. After this, a new window will appear in front of you asking you to register.
- We open our personal page in the system. To do this, go to my.yota.ru. The username and access key are the ones you received when you registered in the system.
- The final stage is linking the card. You can link any bank card to your personal account. With its help, you will be able to quickly replenish your balance in the future.
Registration and activation
After logging into the customizer, the first time you connect, you will be prompted with a registration form:
You fill it out, the modem is immediately activated - you can work. At the time of writing, we received a bonus of 24 hours to test any tariffs and speeds - such a promotion from Iota, maybe you will get something.
You don’t have to configure anything else if everything works well - the next section is for owners of a modem with Wi-Fi.
3G/4G WIFI router Internet center Yota Free Sim. Internet for home and office from any operator
Yota Internet Center
lives up to its name to the fullest: it is a router that works from a SIM card of any operator
and is capable of servicing absolutely all computers and gadgets in the house - and at the same time.
Obviously, we have an option for home use
, as well as for a small office, where “connecting” the Internet in other ways will be problematic.
Often companies are forced to use the Internet connection provided by the landlord of their office - for example, in business centers.
- Choose your tariff from Yota - description of tariffs for smartphones, computers, tablets
Using this modem, you can regain control of the Internet and stop sponsoring local “monopolistic” providers and allows you to use one Internet center without noticeable restrictions by all employees at once.
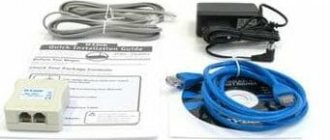
There really isn't much to unpack there. The wide rectangular box contains short instructions, a miniature power cable and one Ethernet cord - and not a “thick” one, as in most standard configurations, but a flat one. This one is convenient to stretch at a table or under a baseboard, and it looks rather unusual.
The triangular shape of the router allows you to install the router only vertically. The router case is plastic, with glossy outer sides. As befits a desktop modem, there are no buttons, just a row of ports on the back.
The Yota Internet Center has two ports for Ethernet cables, as well as two inputs for IP telephony handsets. The latter may come in handy if the router is used in an office. A rubber plug hides the Yota SIM card slot. Power supply is possible only through an outlet: the modem does not have its own battery. And it shouldn't be.
Bright blue indicators on the front panel.
The peculiarities of using a stationary router require a different approach to connection security. Therefore, the Wi-Fi network, which is automatically created when the modem is turned on, has a unique password out of the box, consisting of the last 8 digits of the Mac address. It is impossible to recognize them without physical access to the modem and the sticker on its bottom panel. After connecting and trying to open any page, the user will go to the initial setup menu, where he can set all the modem operation parameters he needs.
- Solving problems with the Yota Internet: what to do if it works slowly or does not work at all
Wi-Fi setup
In the configurator, go to the settings page:
The main parameters are here:
- Network name – how your Wi-Fi network will be visible to everyone, SSID.
- Security type – WPA2 – do not remove the protection, otherwise any neighbor will be able to connect to your network.
- Password – 8 characters or more, this is the password for accessing the Wi-Fi network.
Don’t forget to save the settings and reconnect to the network again - because the old password will now be inaccessible.
Wi-Fi is enabled by default. The only thing is that you may accidentally turn on auto-shutdown if there is no network coverage. If problems suddenly arise, disable this item.
Advanced settings
Advanced settings page – status.yota.ru/advanced or 10.0.0.1/advanced
Advanced options allow you to configure the Yota modem with slightly greater capabilities. This is not a professional Mikrotik, everything is much simpler here:
- Allowing connections from outside – DMZ
- Replacing the local IP address
- Port forwarding
- DHCP setup
That's all that is available to control the modem.
Speed setting
The speed is not adjustable within the modem settings. Separate places have been created for it:
- Personal account on the official website – HERE
- Mobile application (available on Google Play and App Store).
The setting is done by dragging the slider - here we see both speed and price:
The balance is replenished there!
Technical specifications
The average speed of the modem is 54 Mbit/s, and in terms of its technical parameters it is quite capable of competing with other devices of a similar price range.
| Technical characteristics of the Yota router | |
| System compatibility | Windows XP SP3 and above, MacOS 10.8 and above, Linux with ECM/RNDIS support |
| LTE band | 1800/2600 MHz |
| Battery | 2000 mA |
| Autonomous operation | up to 6 hours |
| Optimal operating temperature | from -10 to +60 degrees |
| Weight | 85.6 g |
| Guarantee | 1 year (from date of purchase) |
| Maximum transfer speed | 100 Mbit/s (declared), in reality - the provider limits it to 54 Mbit/s |
The cost of the Iota Wi-Fi router does not exceed 5,000 rubles (price range: from 2,900 to 5,000). It is possible to buy in branded stores and through the official website of the provider. A SIM card is included.
It is recommended to purchase an additional charger (not included).
Yota Many – portable
Yota Many is already a portable modem, with a battery and the ability to be carried. Settings are approximately the same as above. In order not to write about the same thing, I simply suggest watching the video:
Save, reboot, work! As you can see, using the modem is very simple - then you just need to supply power to it. If you still have any questions, write them in the comments below to this article. We’ll figure it out, help you, and if necessary, add to this article. If you yourself can supplement it, be sure to write it in the comments. It will be useful for everyone!
all-lab.ru
A selection of routers (routers) to which you can connect the YOTA Modem via USB (to create a local network with Internet access).
Surprisingly, there were quite a lot of such devices, and their ranks are constantly being replenished with new ones.
ZyXEL
- ZyXEL Keenetic 4G - Wi-Fi (150 Mbit/s), 3 RJ-45 connectors (auto-detection LAN/WAN, 100 Mbit/s), 1 USB connector;*
- ZyXEL Keenetic - Wi-Fi (300 Mbit/s), 5 RJ-45 connectors (auto-detection LAN/WAN, 100 Mbit/s), 1 USB connector;*
- ZyXEL Keenetic Giga - Wi-Fi (300 Mbit/s, MIMO), 5 RJ-45 connectors (auto-detection LAN/WAN, 1000 Mbit/s), 2 USB connectors;*
The most successful option for the home, in my opinion, are the Keenetic series routers - they are quite functional, stable, and have official support both from the manufacturer and from YOTA (if used in conjunction with a modem). Plus, for their functionality they have a low price.
DrayTek
- DrayTek VigorFly 200 - Wi-Fi (300 Mbit/s, MIMO), 4 LAN connectors, 1 WAN connector (RJ-45, 100 Mbit/s), 1 USB connector;
NETGEAR
- NETGEAR WNR2200 (exactly compatible only with lu150/lu156) - Wi-Fi (300 Mbit/s, MIMO), 4 LAN connectors, 1 WAN connector (RJ-45, 100 Mbit/s), 1 USB connector;
ASUS
- ASUS WL-500gP V2 - Wi-Fi (54 Mbit/s), 4 LAN connectors, 1 WAN connector (RJ-45, 100 Mbit/s), 2 USB connectors;**
- ASUS WL-520GU - Wi-Fi (54 Mbit/s), 4 LAN connectors, 1 WAN connector (RJ-45, 100 Mbit/s), 1 USB connector;**
- ASUS RT-N16 - Wi-Fi (300 Mbit/s), 4 LAN connectors, 1 WAN connector (RJ-45, 1000 Mbit/s), 2 USB connectors;**
D-link
- D-link DIR-320 - Wi-Fi (54 Mbit/s), 4 LAN connectors, 1 WAN connector (RJ-45, 100 Mbit/s), 1 USB connector;**
- D-link DIR-320/NRU - Wi-Fi (150 Mbit/s), 4 LAN connectors, 1 WAN connector (RJ-45, 100 Mbit/s), 1 USB connector;**
- D-link DIR-620 - Wi-Fi (300 Mbit/s), 4 LAN connectors, 1 WAN connector (RJ-45, 100 Mbit/s), 1 USB connector;**
TP-LINK
- TP-LINK TL-MR3220 - Wi-Fi (150 Mbit/s), 4 LAN connectors, 1 WAN connector (RJ-45, 100 Mbit/s), 1 USB connector;**
- TP-LINK TL-MR3040 - Wi-Fi (150 Mbit/s), 1 connector (auto-detection LAN/WAN, 100 Mbit/s), 1 USB connector, built-in rechargeable battery;**
TP-LINK TL-MR3040 has a fairly miniature size (100x16x62 mm) and can work autonomously. It’s hard to say how many hours a 2000 mAh battery will last when the router is running with a YOTA Modem connected to it (the modem consumes a fair amount of electricity), but I believe that the charge should be enough for at least 1.5-2 hours. And even 1.5-2 hours of battery life with a modem greatly expands the possible boundaries of using this router. Charging is possible both through an AC adapter and through any USB connector (with a standard voltage of 5V and a current of 0.5A). This device is quite a serious competitor to the official YOTA Mobile router.
- TP-LINK TL-MR3020 - Wi-Fi (150 Mbit/s), 1 connector (auto-detection LAN/WAN, 100 Mbit/s), 1 USB connector;**
TP-LINK TL-MR3020. The most budget-friendly solution at the moment is a small stationary router that works with a YOTA Modem with a cost of up to 1000 rubles (in online stores the price of a router starts from 640 rubles). For this money we get a Wi-Fi point and the ability to connect one device via Ethernet. The router can operate from any USB connector (with a standard voltage of 5V and current of 0.5A). Small size (74x22x67 mm) makes it convenient for travel.
Both routers have a full-fledged WEB interface with a standard set of functions for home use. Plus, compatibility with the YOTA Modem is declared by the manufacturer, which has technical support in the Russian Federation.
LEXAND
- LEXAND LXR-mini - Wi-Fi (150 Mbit/s), 1 connector (auto-detection LAN/WAN, 150 Mbit/s), 1 USB connector.**
LEXAND LXR-mini is currently the smallest router (64x15x23 mm) that works in conjunction with the YOTA Modem. The router can operate from a USB connector (with a standard voltage of 5V and current of 0.5A). The manufacturer claims the ability to simultaneously connect up to 20 devices via Wi-Fi and one via Ethernet. The small size makes it convenient for travel. According to reviews, the device is made well, which is reflected in the price - the cost of LEXAND LXR-mini in online stores starts from 1,290 rubles.
* Auto-detection of a port as LAN or WAN is only possible if router firmware V2.* is installed. If firmware V1.* is installed, then 1 port out of the total number works only as WAN.
** These routers do not participate in the official YOTA Ready program, so the router + YOTA Modem combination may not work properly. D-link and ASUS routers work with a modem when using custom firmware; in the case of TP-LINK and LEXAND, support is declared by the manufacturer.