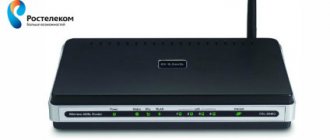
DSL 2640u is a rather ascetic and not very modern device. However, many Rostelecom subscribers have this particular router model. The model is designed for ADSL Internet connection operating over a telephone line. It is installed in places where there is no access to fiber optics. Let's discuss how to configure the d link dsl 2640u router under Rostelecom.
These instructions are also suitable for other models in the line: dsl 2640 NRU, dsl 2640 C4. Although all of them are designated by a different revision number and differ from each other in terms of hardware, they have almost the same interface.
D dsl 2640u how to reset settings
There may be several reasons for resetting the settings to factory settings: you cannot enter the modem settings, the modem software is faulty, or the modem is not configured correctly. Actually, these are the most common reasons why you need to resort to the Reset function on the modem.
See how to set up the Internet and set a WiFi password:
Each modem is equipped with a Reset function - this resets the modem settings to factory defaults. For example, on the D 2640U/c2 Reset is located on the back of the modem in the form of a hole for pressing with a match.
There are 2 ways to reset settings.
Turn on the modem, press and hold the Reset button with a match for 30 seconds. The modem settings will be reset to factory settings, after which the modem will reboot with factory settings.
On other models of modems, Reset can be implemented in the form of a button pressed with a finger, which you need to press and hold down for about 30 seconds.
You can return the modem to factory settings using the modem interface. An example is shown on the D 2640U/c2 modem.
To reset the modem you need to go to the modem settings. You probably already know how to enter the modem settings? If not, then take a look at the D 2640U/c2 setup category - there is an answer to this question.
Go to the Management menu, then to the Settings menu and click the Restore Default button. The picture below shows the necessary sequence of actions.
If the settings interface for your modem differs significantly from the example, don’t worry, just find the Restore Default Settings button in your modem’s settings.
D-: Reset to factory settings using the RESET button and through settings
You can clear all parameters either using a special button or through the router control panel.
Connect power to the router and find the RESET button on the case. There's not really a button there, but just a hole in the body. The button is recessed so that it is not accidentally pressed. Press this button with something sharp, hold it for at least 10 seconds and release.
Look at the indicators on the front panel. All should go out except POWER, and the router will reboot and the settings restored. If it doesn't work the first time, try again and hold the button for more than 10 seconds.
Update: in the comments there was information that the reset occurs only if you hold the Reset button pressed for exactly 10 seconds. Give it a try.
Restoring settings through the control panel
On D-, as on other routers, you can clear all settings through the router settings page. If you have access to settings. If not, then use the method I wrote about above.
Go to the control panel. Go to 192.168.0.1 in your browser and enter the username and password (standard - admin and admin). You can see detailed instructions for entering the settings on D-.
In the settings, hover over the System link and select Reset settings. Confirm the reset by clicking Ok.
Wait until the router reboots.
That's all, you can start setting up. If anything, we have a lot of instructions on D- on our website. See this section. Good luck!
source
Comments (5)
SMARTRONIX
Hello!
What router model?
Natalia
Router model DSL-2640U/NRU
SMARTRONIX
A factory reset can be performed using the hardware
RESET button located on the bottom panel of the router. To activate the button
insert a thin paperclip into the hole (with the device turned on), press and hold
it for 10 seconds. Remove the paperclip and wait until the router reboots (approx.
minutes). Now you can again access the router web interface using
Default IP address, username and password
Denis
I forgot my Wi-Fi password, what should I do?
SMARTRONIX
Denis, you can go to the router settings and look there.
This article is devoted to connecting and configuring the D 2640U modem. Here you will find complete step-by-step instructions, learn how to connect a router via a router, how to organize a Wi-Fi network that is secure and encrypted from other PC users, as well as Network settings for different providers.
Results
By connecting and configuring the DSL-2640U router, the user receives a fairly fast and high-quality connection to the Internet (or another type of network, including a corporate one).
This option is suitable in cases where a broadband connection using fiber optics is not available for some reason, and you have to use a telephone connection.
However, thanks to the functionality of a modem, you can get all the same benefits that a regular router provides.
And the maximum speed of 24 Mbit/s, which this model and ADSL technology supports, is quite enough to perform most tasks - from watching television to Internet surfing.
Connecting a modem
In this section we will look at how to connect a modem to a computer.
First of all, the router should be connected to power - insert the end of the wire from the power supply into the corresponding socket on the back of the modem, and the power supply itself into the outlet.
On the back side of your modem (router) there are 4 LAN inputs at once. It is there that insert one of the ends of the blue wire that comes with the D-2640U, and insert the other end into the LAN port on your PCM.
At the same time, be careful: the LAN light on your router should light up with the number of the modem port into which you inserted the local wire. In this case, both ends of the wire must be in place (port on the PC and port on the router).
After this, go to the next tab of the instructions, where you will be asked to connect your modem and splitter. There is one more cable included with the modem - insert it into your splitter (separator), and place the other end of this cable into the corresponding port of your router - “LINE”.
Factory settings
Each device has its own “factory settings”. We will talk further about how to reset the D-2640U to factory settings. You have to reset the settings to factory settings if you simply cannot go to the modem settings menu, or the modem was configured incorrectly.
The “RESET” function is available on every router and using it is much easier than you think:
find a needle or awl at home, look at the back panel of your router, where you will see a small hole labeled with the word “RESET”;
this is it: insert a needle (match) there, wait about 5-6 seconds. In this case, the router must be turned on;
After this time, all the lights on the router will go out one by one. It may restart, which means that the modem settings have been reset to factory settings. Now you know how to reset the D-2640U.
Firmware update
In this section we will tell you how to properly update the firmware of your router. After purchasing each device, we advise you to check for the latest firmware (updates), which will ensure trouble-free operation for a longer period of time.
First of all, you need to determine such a characteristic as the hardware revision of the modem. Look on your router (usually on the bottom cover) for a label with a few lines written on it. Among these lines, find the one signed with the letters “H/WVer”. This is what you need;
after that there will be only two characters - a letter and a number. For example, A1. This is a hardware revision;
let it be C4.
then go to the FTP server of the D- company and look for the firmware you need in accordance with the details;
after that, check whether your router is connected to your PC or laptop. Open any browser, enter the network address 192.168.1.1 in the browser window, enter your username and password (by default, in the factory settings, both are the word admin). Click on the “Login” button;
go to the “Manual Settings” tab, from there to the “System - Software Update” section and click on “Browse”;
select the firmware file you downloaded and click on the “Update” command;
Do not turn off the power to your computer and router. Wait until the modem update is completed;
This completes the D-2640U firmware update.
ADSL connection parameters
ADSL connection parameters are very important, because both the speed of your Internet connection and its uninterrupted operation will depend on them.
As described earlier, go to the web control panel of your modem:
Open your browser and enter 192.168.1.1 in the address bar. Enter your username and password (admin/admin by default) and click on the login button;
go to the “Network” tab, to the WAN section. If you just purchased the router, you should remove all connections. Use the “Delete” button to do this;
then click on the “Add” button and enter your Internet connection parameters;
and then follow the instructions below, because the ADSL connection parameters directly depend on your Internet provider.
How to configure the D-2640U router for providers
To connect the D-2640U router, you must first connect the router itself to the computer.
If you do not have signal separation, when you need simultaneous operation of both the telephone and the Internet, then do the following:
Connect the LAN cable at one end to the PC, and at the other end to one of the ports on the back of the modem;
connect the second cable to the only port of the modem, and then to a special socket for the telephone;
if you have a telephone, you will have to use a special device - a “splitter” or otherwise a splitter, the second cable will need to be connected to it;
after that, enter the address 192.168.1.1 in the browser window and press Enter. Enter your username and password (by default it is admin/admin);
log into the web panel, on the WAN tab, start creating a new connection (“Add” or “Add”);
Next you will need to set the connection parameters. Each provider has its own connection parameters. Follow the instructions below!
Rostelecom
open your browser, enter 192.168.1.1 in the address bar and press Enter/;
enter your username and password (by default - admin/admin) and click on the login button;
go to the “Network” tab, and from there to the “WAN” section. Clear all Internet connections using the "Delete" button.
Next, the configuration of the D-2640U Rostelecom router begins.
Click on the "Add" button and enter the following parameters:
name: cannot be changed. Check the box next to “Allow”;
set the values VPI/VCI, LLC;
go to the PPP block and enter your username and password that you received from your Internet provider;
check the “KEEPALIVE” box;
if you have IPTV connected, check the box next to IGMP.
Done - click on the “Save” button twice (including the WAN tab). Wait 1-2 minutes and you will connect to the Internet, provided that you entered the correct data.
Domolink
so, first of all, connect your modem to the PC and the splitter;
Next, you need to configure automatic acquisition of an IP address and DNS servers;
in the case of WINXP, go to the following address in the settings through the “Start” menu, go to the “Control Panel”, from where select the “Network Connections” and “Local Area Connection” section;
select "TCP/IP Protocol" and go to its properties. Check the box to obtain an IP address and DNS servers automatically;
open the browser page and enter the addresses 192.168.1.1. Enter your username and password (admin/admin by default) and click “Login”;
On the main page, select the WAN tab and click on “add”.
Specify the following options:
then fill in your login (username) and password (password), received from the provider when registering the connection;
check the “KEEP ALIVE” checkbox.
Simply skip the remaining pages with the NEXT button and confirm the settings with APPLY. Click the FINISH button to complete the router setup. In a couple of minutes the connection will be established.
connect your router to power, then connect the modem to the PC and splitter. We wrote to you above how this is done;
Enable your computer to receive an IP address and DNS servers automatically. How this is done was written in the Domolink section;
open your browser and enter the address 192.168.1.1 in the window. Enter your username and password (admin/admin by default);
configure your modem using the auto-connect function. To do this, in the HOME tab, check the DSL Auto-connect line;
if you do not specify DSL Auto-connect, you will have to configure the modem manually;
Enter the VPI and VCI parameters as specified by the operator. For clarification, you can call their help desk;
select the PPPoE connection type, enter your username and password;
then select the default service and gateway as required by the provider and click on NEXT. Do not touch the NAT configuration page, but continue further;
enable the DHCP server and set the IP address range. For example, 192.168.1.2 and 192.168.1.221. Confirm the settings and save. If everything was done correctly, then after 1-2 minutes the connection to the Internet will be established.
Ukrtelecom
Go to the configuration menu of your router via web management. And to do this, enter 192.168.1.1 in the browser and press Enter. Enter your username and password, click on the login command.
Uncheck DSL Auto-connect, and then proceed to configure the modem:
Encapsulation Mode: LLC/SNAP-BRIDGING;
Find out Username and Password from your provider;
Service name: empty field;
Authentication Method: PAP (For Ukrtelecom OGO);
then everything is default everywhere.
Save and wait about a minute for the router to reboot.
Click'n'Connect
A longer path to solving the problem, but each step is accompanied by hints and explanations. Setting up ADSL on a D-Link Wi-Fi router:
- On the Get Started page, click Click 'n' Connect.
- Specify your provider by selecting it from the list.
- Select your connection type.
- Place the checkbox in the desired position to change the interface.
- Enter the information specified in the agreement: login with account password, VCI and VPI.
- Check that the configuration is correct and apply it.
- After successfully checking the connection to the Google website, you can use the Internet.
Below are instructions for setting up a Wi-Fi access point on the D-Link DSL-2640U through the utility:
- Choose the first option.
- Enter a name, on the next page - the key to protect the network.
- Check the settings and save them.
- Reboot your device.
After starting the router, the network will begin to function.
Yandex.DNS
On the Yandex.DNS page you can configure a service with three levels of security. To activate, check the box next to “Enable Yandex.DNS”. Next you need to select a mode:
- Secure – blocks access to malicious sites;
- Children’s – blocks dangerous sites, as well as content that is undesirable for children to view;
- Without protection – the DNS server will work, but will not restrict access to malicious resources.
We have described the main and most necessary parameters. Full instructions can be downloaded HERE.
If you need help setting up any router, please contact us! Write in the comments or online chat, we are always happy to help our readers!
Wi-Fi network
Go to the web control panel of your router:
enter the address 192.168.1.1 in the browser line;
enter your login and password (by default it is admin/admin). On the HOME tab, go to the “Wireless” section;
check the Enable Wireless line, fill in the SSID field and enter any network name you wish;
Confirm all this with the “Apply” button.
A reboot will occur.
Continue setting up wifi, now you can enter the security parameters of your network:
select your network by name, fill the encryption type (Network Authentication) field with WPA2-PSK. WPA Pred Key - enter your password;
Fill in the WEP Encryption option with AES. Confirm your choice;
Next, go to the “Tools” tab and select the “System” section from the menu on the left. Save to the appropriate button.
In the article, we looked at all the options for setting up the D-DSL-2640U router, from connecting it to power and your PC, to setting Internet parameters for different providers. We hope that our article was able to fully reveal the answers to your questions.
Source
➤ Adblock
detector
Setting up D-DSL-2640U for Rostelecom users
Instructions for setting up the D-DSL-2640U router for using Internet and TV services for users of OJSC Rostelecom.
The D-DSL-2640U router is presented as an affordable and productive router that is suitable for most networks.
The speed and quality of access to the Internet is ensured by the ability of the D-DSL-2640U device to operate using two technologies - ADSL and Ethernet. Thanks to this, the modem allows you to save on creating a wired network, since it does not require installing a separate switch.
The functions of sharing a channel with several users, a wireless interface, a firewall, support for basic security standards and the use of WPS technology are available.
Since the device is equipped with additional security features, the possibility of network intrusions and access to sites that the user does not want to visit is eliminated. The device uses types of protection such as safety standards. These types are WEP, WPA/WPA2. They allow you not to be afraid of hacker attacks and to be confident in the safety of your personal data and your network. The modem is equipped with filtering of devices that are connected.
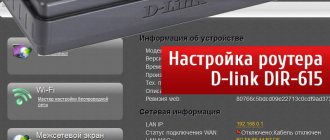
To configure the router, you can use the convenient web interface. A choice of work in two languages is provided. These are English and Russian.
Conclusion
Dsl Wi-Fi router d-link 2640u is a model that supports outdated ADSL technology. It is suitable for work mainly in remote settlements of the country, where, apart from the telephone line, there are no other alternatives to wired Internet.
For setting up a D-Link in a private home, the DSL 2640u is perfect. Nice and clear interface, minimum operations. Configuration is completed in 4 minutes.
pros
The 2640u network device belongs to the line of budget DSL routers, that is, its price is reasonable.
It is possible to use it in other modes besides the router. Great alternative as an access point
Minuses
The equipment uses xDSL connection technology, which is rarely used today. For its operation on modern protocols, firmware for third-party modes is often required. However, this results in the equipment not working.
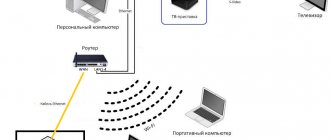
Connection diagram
- When you turn on the hardware for the first time, you must follow the following steps: turn off the PC and connect the modem to the telephone line.
- Next, connect the “DSL” connector of the splitter to the “DSL” connector of the D-dsl 2640u router, and combine the “LINE” socket with the telephone socket. A telephone line cable is used for this.
To connect to a personal computer you need to perform the following algorithm:
- Combine the power adapter and connection socket and plug into a power outlet. After a few seconds, the green “POWER” indicator will light up;
- Next, connect the Ethernet cable from the splitter to the WAN connector. To work with a PC, you can use one of the four ports of the device, and use the remaining ones for wired connection of other computers;
- You need to turn on the PC and wait until the operating system loads.
The correct operation of the D-DSL-2640U modem and the connection with the provider on the Rostelecom network is checked by the constant operation of the “POWER”, “DSL” and “LAN” indicators.
There are two types of settings to choose from and the user's professional level:
- using the web interface of the router;
- auto-tuning (using the installation disk).
Communications
See router review here:
There are a number of LED indicators on the front panel of the device:
- Availability of power supply.
- Wired connection for each of the 4 LANs.
- WLAN – status of the wireless module.
- WPS – quickly connect devices via Wi-Fi without entering a password.
- DSL and Internet.
The rear panel contains a button to turn the device and wireless module on/off, reset the configuration to factory default, and ports for:
- power cable;
- WPS fast connection settings;
- activating and disabling the wireless module;
- connections to a PC (4×LAN with data transfer speeds up to 150 Mbit/s) and a telephone line.
The device is not equipped with USB interfaces, so it cannot be flashed from a flash drive, and you cannot connect a 3G modem to it. Also, an outdated router does not know how to create VPN servers and cannot be used as a torrent server.
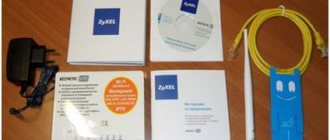
In addition to the router itself, the packaging box includes:
- network cable or patch cord to connect the router to the computer;
- cable for connecting to a telephone line;
- power adapter;
- splitter for dividing channels into voice, necessary for using a telephone, if the landline number is still relevant, and a modem - for the Internet;
- CD with software, paper documentation.
The D-Link DSL-2640U wireless Wi-Fi router can be configured either using a proprietary utility or via a web interface via a browser. Let's focus on the second option first, since it is simpler, faster and provides access to all device parameters.
Detailed video instructions are presented in the following video:
Connection setup
When starting to install the D-DSL-2640U modem, you need to open a browser and enter the address to enter the modem settings: 192.168.1.1;
Open the browser, enter https://192.168.1.1 in the address bar
The browser line is used for this. Next, a new tab will open. In it, indicate your access data (“login” and “Password” = admin).
After going to the web interface of the modem, you will need to select the “Advanced settings” item.
To establish a connection using PPPoE for Rostelecom, you need to enter the “Network” → WAN column and click “Add”.
Next, you need to fill in information about the connection format: connection type - PPPoE, port - DSL, name - Internet. In the ATM item, in the VPI and VCI fields, you must enter information about the Rostelecom branch (in the “User Name” line, indicate the login used to establish communication with the Internet; in the “Password” line, indicate the login password provided by the provider) and click “Save” .
If you connect to the IPTV interactive television service of the Rostelecom network, the connection in question will need to be marked “Enable IGMP”.
Forming another PVC connection requires a sequence of steps: click “Add” in the WAN sub-item, where the following information is indicated: connection type (BRIDGE), port - DSL, name - TV. The VPI and VCI fields provide information about the desired Rostelecom branch. Next, click the “Save” button. After this, another line will appear in the WAN table window.
To ensure the functioning of IPTV, you need to create a LAN port for the TV set-top box. This port is combined with a PVC connection. To do this, you need to select the “Port Grouping” sub-item in the “Advanced” column, click the “Add group” button and enter a name in the new tab (iptv, for example). Next, move one of the LAN ports to the right field from the left. In the WAN connection, move TV to the right and save the changes. The result will be the creation of two groups. The next step is to save the interfaces in the union.
First, you need to find the “Basic settings” item in the “wifi” column and check for the “Enable wireless connection” checkbox.
Next, in the “SSID” line, assign the name of the new wifi network. In the “Country” item, select “Russia”. Do not change the channel.
In the wifi subsection “Security Settings” you need to enter the following data: network authentication type - “WPA2-PSK” and “Encryption Key”, where you enter the password for the created wifi network (any combination of letters and numbers of at least eight characters). Next, click on the “Change” button.
Manual installation of the parameters of the D-DSL-2640U router for the Rostelecom network using the web interface is completed at this stage.
To save the settings, in the “System” menu section, select the “Save and Reboot” sub-item.
IPTV
Setting up IPTV usually does not require any manipulations, however, if the set-top box requires an IP address issued by the provider to operate, then you need to make a number of settings. Go to the “Network” - “WAN” menu and add the “Bridge” connection type and set the values for the “VPI” and “VCI” parameters.
These settings vary by region and can be obtained from your digital TV service provider. It happens that paired values are used, in these cases you need to create 2 “Bridge” connections.
To continue configuration, you need to create a new group in the “Interface Grouping” tab. The name can be arbitrary, but it must contain all the created “Bridge” connections. After creating a group, you need to assign it to one of the free LAN ports. After proper configuration, a signal for IPTV will be received on this port; all other ports will have Internet.
Auto-tuning
If you select the automatic setting using the installation disk, the sequence of actions after inserting the disk into the CD-ROM and starting the program will be described on the monitor. For proper configuration and correct operation of the D-DSL-2640U device, it is important to strictly follow all recommendations and be careful when implementing them.
PC setup
In order to ensure proper uninterrupted operation of the device, it is necessary to set it to automatically retrieve the IP address. To do this, follow the following sequence of steps: “Start” → “Control Panel” → “Network and Sharing Center”. After the transition, in the pop-up window on the right, select the “Changing adapter settings” section.
Further actions are as follows: in the list of connections, find and right-click on the item “Local Network Connection”. Designate the sub-item “Properties”. In the window that opens, select “Internet Protocol Version 4 (TCP/IPv4)” and click “Properties”. O and “Get DNS server address.”
Repeater mode
This mode is used to strengthen the Wi-Fi network. The essence of its work is that one device connected to the Internet emits a wireless signal, and the second one receives it, amplifies it and transmits it further. The result is a seamless connection with enhanced range.
In standard firmware, configuration in DSL 2640U repeater mode is not supported. The device can be used as the main device that distributes the signal, but it cannot receive and amplify it as a repeater. To activate this function, you need alternative D-DSL 2640U firmware with WDS function, for example, such as DD-WRT.
Installation of non-native firmware is done at the user's own risk, since the firmware process can easily damage the device. The process of installing custom firmware is not specified in this article in order to protect user devices.
In general terms, to activate the repeater function, you need to find a similar function in the menu and select the Wi-Fi network that you want to strengthen.