Having purchased and connected a router, we often encounter difficulties in setting it up. There is no universal set of configuration options that can be assigned to a router under all circumstances. If such a set existed, we would not have any problems at all with setting up these devices - the parameters hardwired into the device would work once and for all.
Unfortunately, each provider operates with its own settings, which differ in many respects. The first option you need to focus on is the type of Internet connection. There are many such types developed for all occasions.
In this article, we will discuss connecting to one of the largest Russian operators, Beeline, using the L2TP protocol. However, we will not pay attention to technical details such as the specific router model.
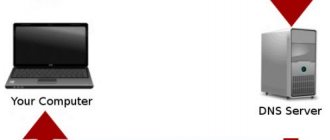
Let's assume that our router is connected according to the classic scheme shown in the figure below:
That is, the provider’s cord is directly connected to the WAN port of the router, and the connector of the computer’s network card (or, alternatively, a laptop) is connected to any of the four LAN connectors on the rear panel of the device.
In this case, configuration will be reduced to a sequence of two operations: setting up the TCP/IP protocol on the personal computer and setting up wireless network options on the router itself. Here are brief instructions for setting up the L2TP Beeline protocol, keeping in mind this specific provider.
Server addresses:
- tp.internet.beeline.ru - for connecting via L2TP protocol.
- vpn.internet.beeline.ru - for connecting via PPTP protocol.
For the VPN connection to work correctly, make sure that your security software does not block the ports used when establishing the VPN session.
- L2TP - 1701
- PPTP - 1723
- WWW - 80/8080
Equipment - routers, switches.
We support and recommend the following router models for working on the Beeline network:
- Wi-Fi router Beeline
- Beeline Smart Box
- Beeline N150L
- Beeline D150L
- Asus 520GU
- D-DIR 300/NRU rev. B1-B6, C1
- sys WRT610n
We have tested this equipment and meets all the requirements for working on the Beeline network. You can find detailed information on setting up this equipment in the “Router Settings” section.
If your router is not on the recommended list, you can try setting it up yourself:
- Make sure your router supports L2TP/PPTP.
- Download the new firmware from the manufacturer's website.
- Enter tp.internet.beeline.ru or vpn.internet.beeline.ru as a VPN server
- Set the acquisition of IP addresses and DNS addresses to automatic (via DHCP).
- Enter your registration details.
You can find more detailed information on setting up non-recommended equipment on the Beeline Home Internet user forum.
Step-by-step instruction
The procedure includes several stages, starting with connecting the router to the PC.
Each router has LAN ports for connecting a computer to it.
Connecting the router to the computer
At this stage, perform the following actions:
- Find a blue connector with the inscription WAN on the device body. Insert the plug of the provider cable into it, which was previously connected to the computer.
- Find the yellow ports on the device body. The router's network cable is inserted into one of them. The other end of the cable is inserted into the PC network card connector.
- Turn on the computer and go to the start menu. Find the “Control Panel” section. Open the “Network and Internet” tab. Open the “Manage connections” item, the “Changing adapter settings” subsection. Here are the icons for Internet connections.
- Select the “Local networks” option. Call the context menu with the right mouse button. Select the “Properties” section.
- Find the “Internet Protocol Version 4” tab. Check the boxes next to the “DNS server” and “Obtaining IP” items.
- Confirm the actions by pressing the OK key.
Setting up a router to connect to the Internet from Beeline
At the second stage, perform the following actions:
- Pay attention to the lower part of the router case. There should be a sticker with authorization data and IP address.
- Open any browser. Enter the previously found IP address in the top line and call the web interface
- In the menu, look for the section responsible for the Beeline connection. It may be called WAN or "Internet".
- In the “Type” line, select the L2TP value. The DNS and IP address fields should contain the words “Automatic”.
- In the Server tab write tp.internet.beeline.ru. Enter the username and key specified in the contract.
- Save the changes made and reboot the router.
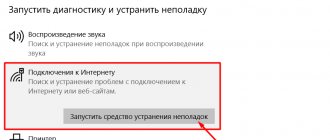
When connecting to the Internet, it is important to configure the router correctly.
To broadcast a wireless signal
The last step is setting up Wi-Fi. Open the “Wireless Networks” tab in the web interface. Set custom values for:
- SSID - the name of the wireless network that will be displayed in the list of connections;
- personal data protection method - WPA2;
- encryption method - TKIP or AES;
- password - a key for connecting to the network, consisting of 8 characters.
Save the changes made. They try to establish a wireless connection on a phone or laptop with Wi-Fi.
On the working screen of the device, find the Internet connection icon. After clicking on it, a list of available connections opens. Select the desired name and enter the password. If after this the Internet pages load normally, the setup process is considered complete.
Watching TV on a computer:
To watch television on your computer, install the free VLC program and download the channel list. You can find out more detailed information on the Beeline Home Internet user forum.
- SMTP - 25
- POP - 110
- IMAP - 143 (993 IMAP over SSL)
- SSL - 443
- FTP - 21
- SSH - 22
- Telnet - 23
- WWW - 80, 8080
- PPTP - 1723
- L2TP - 1701
- NTP - 123/UDP
Maximum Transmission Unit (MTU).
For VPN connection:
- PPTP - 1460
- L2TP - 1460
Maximum Receive Unit (MRU) - 1500
Maximum Segment Size (MSS).
For VPN connection:
- PPTP - 1452
- L2TP - 1460
Server addresses:
- tp.internet.beeline.ru - for connecting via L2TP protocol.
- vpn.internet.beeline.ru - for connecting via PPTP protocol.
Local network settings.
IP address, routes, Default Gateway, Domain Name Server (DNS) - your computer or router receives via DHCP.
To access the Internet, a VPN connection is used via L2TP (without IPsec) or PPTP protocols. We recommend using an L2TP connection.
For the VPN connection to work correctly, make sure that your security software does not block the ports used when establishing the VPN session.
Port numbers of the most common protocols
- SMTP - 25
- POP - 110
- IMAP - 143 (993 IMAP over SSL)
- SSL - 443
- FTP - 21
- SSH - 22
- Telnet - 23
- WWW - 80, 8080
- PPTP - 1723
- L2TP - 1701
- NTP - 123/UDP
Network protocol settings values
Maximum Transmission Unit (MTU).
Maximum Receive Unit (MRU) - 1500
Maximum Segment Size (MSS).
For VPN connection:
Possible errors and failures
There are many reasons for malfunctions. The most important thing is considered to be the inattention of the user who incorrectly enters the login, password, and server address. The second reason is considered to be the features of the L2TP protocol. When changing parameters and settings, you must set the automatic receipt of the necessary data. For local networks, the ability to use proxies is disabled.
Wireless technologies do not work correctly with static IPs. The only way to solve the problem is to combine several terminals into a virtual or local network via an L2TP server. Own addresses, logins and passwords are assigned to each computer. If errors occur in this case, use free DNS. They are provided by Google.
Low speed when using a router.
If, when using a router, your Internet access speed decreases, but when you connect the cable directly to your PC, it corresponds to the selected tariff, you should consider the following restrictions.
Router speed limit
Low speed may be due to hardware or software limitations of the router, which will result in insufficient information processing speed when the device transfers it from the provider to the home computer.
One of the main ways to solve the problem is to update the router firmware. Firmware versions for supported Beeline models tested on our network can be found by opening the router card at router.beeline.ru.
Also at router.beeline.ru you can find a list of router models recommended by Beeline that support high-speed tariffs. Most non-recommended or outdated models are not able to provide speeds of more than 30 Mbit/s.
Low speed when connecting to the router's Wi-Fi network
As you know, wireless networks use radio waves as a signal propagation medium. In this regard, the operation of wireless networks is affected by a greater amount of various types of interference. If, when connecting your computer with a cable to the router, the speed corresponds to the selected tariff or router limitation, and when Wi-Fi is running, the speed on the devices is lower than expected, read the information below.
Nominal and actual speed
On the packaging, router manufacturers indicate the maximum speed of Wi-Fi in a local network at the physical level according to the IEEE standard, summing up the incoming and outgoing speeds. The actual incoming data transfer rate on a wireless network depends on many factors:
- obstacles in the signal path, presence of radio interference,
- correct operation of the Wi-Fi adapter driver, features of the Wi-Fi adapter on the computer,
- features and settings of the router, the number of clients on the network,
- the presence of other wireless networks, Bluetooth devices, baby monitors, CRT monitors, radio interference in the same range.
Obstacles in the signal path
Problems when working over a Wi-Fi network can be caused by:
- thick load-bearing walls;
- reinforced concrete floors;
- mirror or other reflective surfaces;
- devices that emit electromagnetic waves in the 2.4 GHz range (for example, an operating microwave oven).
Here it is recommended to test the Wi-Fi speed in close proximity to the router and with minimal interference from other devices.
1)
Wi-Fi adapter driver
Often, when reinstalling the operating system, users do not specifically install drivers for the Wi-Fi adapter: they are either installed automatically by the operating system or using a driver pack. In both cases, you may receive a driver that does not match your adapter. At first glance, it may work, but not as it should. This is the cause of many wireless connection problems.
A mandatory step when solving a speed problem is to install the Wi-Fi adapter driver from the manufacturer’s official website.
Availability of other wireless networks
Wi-Fi devices are susceptible to even small amounts of interference from other devices operating in the same frequency range.
Wireless networks use two frequency bands - 2.4 and 5 GHz. Most modern budget Wi-Fi devices operate in the 2.4 GHz band. Therefore, other Wi-Fi devices (access points, wireless cameras, etc.) operating within the range of your device affect the transmission speed of your Wi-Fi network.
If you have a modern Wi-Fi adapter standard 802.11ac or 802.11n (Wireless Dual Band N and Wireless N technologies only, 450Mbps), it is recommended to install a router operating at a freer frequency of 5 GHz. Among the routers recommended by Beeline, the following models are equipped with 5 GHz adapters: Smartbox One, Smartbox Pro, Zyxel Keenetic Ultra.
If your adapter or router does not support the 5GHz band, you should pay attention to choosing the optimal Wi-Fi channel on which the router will broadcast.
In the 2.4 GHz frequency band, 13 channels are available for wireless networks. A wireless device using one of the 13 frequency channels creates significant interference on adjacent channels. For example, if an access point uses channel 6, then it will have strong interference on channels 5 and 7, and also, to a lesser extent, on channels 4 and 8.
As a rule, by default in the wireless network settings of any modern router, the “Channel” line is set to “Auto”. Some routers randomly select a channel. Others are looking for the most free one. To avoid mutual interference between different wireless networks, on some routers you must manually configure the channel number.
How to find an open Wi-Fi channel
To search for a free channel from a Windows computer, the free inSSIDer program is suitable. For similar actions from an Android phone or tablet, it is recommended to use the Wifi Analyzer application.
These utilities can be used to diagnose Wi-Fi networks and the congestion of wireless channels. Using them, you can view a list of all detected wireless networks, find out the signal strength, channels used, signal strength, network speed and congestion, and much more. Using these utilities, you can measure the signal level and select the most free channel with maximum speed and minimal interference.
Example of using inSSIDer.
If you see that your network operates on the same frequency as your neighbors, and there are unoccupied or less occupied frequencies, select the appropriate channel in the router settings.
Of course, it’s easy to get an accurate answer to the question posed; just read the contents of the subscriber’s contract with the Internet provider or call the provider’s 24-hour support service.
However, if you are too lazy to get up and look for documents and don’t want to strain yourself by talking on the phone, then you can find out the address by opening the official page of the communication service provider on the Internet.
The methods listed are so simple that they do not require instructions, and below is a guide on how to find out the DNS address using the built-in Windows tools the way advanced users do.
Features of L2TP (Beeline) Internet connection
Beeline L2TP is one of the protocols with which the Internet connection works stably.
This is the name of one of the methods of establishing a connection. It is based on VPN technology using tunneling. When connecting computers to the Internet, this method ensures maximum security of personal data.
This is achieved not only by blocking access to the channel, but also by encrypting the output data. Verification codes are required on both sides. Without knowing the automatically generated keys, you will not be able to access personal information. In addition, all data is encrypted.
Required connection conditions
Before creating a connection, pay attention to a number of requirements. If these conditions are not met, the connection will not be established. The main technical requirements are:
- Operating system Windows Vista and higher. In older versions, customization is possible, but it is difficult.
- Availability of a corporate server to which network computers will connect.
- Create a login and password to protect the connection from unauthorized access.
How to find out the address using Windows tools?
OS developers from Microsoft have equipped all Windows with a powerful tool called “CS” (Command Line). Using "KS" allows you to quickly determine the network parameters used by telecom operators for accessing the user's computer to the global network.
Experienced users are not always satisfied with the stability of communication even from such popular providers as Beeline or Byfly.
Knowing simple techniques for using third-party DNS and setting them in the settings as preferred and alternative, you can significantly increase the speed of your PC on the World Wide Web.
But before replacing the default address with an alternative option, you need to look at the current one.
In order to independently resolve the question of how to accurately find out your preferred DNS server, you will need to perform the following sequential steps:
- Click “Start”;
- Move the arrow to the line “All programs”;
- Next, a list of applications installed on the computer will expand, where you should enter the “Standard” section;
- In the contents of the section, find “KS” and click on it to launch the console;
- If calling “KS” with numerous mouse clicks caused difficulties, then you should press the “Win” key on the PC keyboard with your finger, and click on the button with the Latin letter “R” with the other finger. This deft move will bring up the Run menu;
- Then type "cmd";
- Click “Ok”;
- Next, in “KS” type “nslookup”;
- Click “Enter”;
- Ready. The searched address will be displayed in “KS”.
This is how simply any user can determine the DNS address and it does not matter which provider he has an agreement with, for example, for Kyivstar and Rostelecom subscribers the actions will be the same.
We fix Beeline Internet (DNS)
Let's do the work for the Beeline techies. They themselves are either lazy or have problems with their hands or organization. It is almost impossible for an ordinary subscriber to get a solution from Beeline support.
We continue the topic of the semi-non-working Beeline Internet via a USB modem on a computer. At least on mine, even with a freshly installed operating system (XP) and native drivers.
The modem is used ZTE MF823, incl. as part of the ZyXel Keenetic 4G Internet center, more details:
Modem test ZTE MF823 (+Keenetic 4G) >>
I wrote about the problems of the Internet itself, its glitches and attempts to solve it here:
How (NOT) Beeline Internet works >>
Further, after Beeline cheated its subscribers by changing their unlimited tariff to a limited one, I wrote that interruptions in the Internet have noticeably decreased, almost disappearing:
How Beeline Internet works >>
However, it later turned out that the plugs had not completely disappeared. Periodically, the Internet on my computer again began to work only through Yandex.Browser in “Turbo” mode, or sites that worked only through the https protocol opened. Apparently, reconfiguring the Beeline server when changing the option parameters gave only a temporary improvement, but this is just my guess.
Solution
For several days now, Beeline Internet has been working well for me and does not shut up. To do this, I registered Google DNS servers . You will say, after reading the above-cited articles, that this has already been done. Yes, however, DNS can be specified in the settings of the network adapter, in the settings of the router itself, as well as in the web admin panel of the ZTE MF823 modem itself. It was the last option that turned out to be effective.
To do this, click on the icon of the installed modem and go to its page in the browser https://m.home/index.html#home
There we click “Settings”, then “Connection” and see the selected one of two preset profiles with Beeline settings. Inside is an automatically assigned DNS.
Built-in profiles cannot be edited. However, at the top right we see – “Add new”. Add your profile. I called it Beeline My. In the settings I specified:
- APN: internet.beeline.ru
- DNS 1: 8.8.8.8
- DNS 2: 8.8.4.4
- Authorization: PAP
- Username: beeline
- Password: beeline
It looks like this:
Since then, Beeline Internet has been running on my laptop through a Google server (and not my own), it often works quickly (except for regular network overloads, which Beeline traditionally does not solve and I have to connect to a stable MTS at these moments) and without problems associated with with someone's crooked hands.
I hope you find this information useful. Good luck!
Beeline: will we develop the network? >>
Using the fastest DNS
The use of high-speed DNS for specific connection conditions of the user’s PC is one of the best methods for increasing Internet speed.
You will need to complete the following steps:
- Download the “NameBench” application (the utility is freely distributed on the global network);
- Run the utility (no need to install it);
- There is no need to configure the utility. Immediately click “Start Benchmark”;
- Wait;
- A detailed report will be displayed;
- The report shows information with optimal connection parameters, which the user can only use by entering the preferred and alternative addresses in the properties of the protocol used;
If the user has difficulty entering network parameters, then the instructions described below will help even a beginner to quickly cope with the task.
Changing DNS Settings
It is not enough to be able to check the network settings you are using; you need to know how to change them. The procedure is simple and is carried out through the “NUS and OD” (Network and Sharing Control Center).
- Open the “CUS and OD” menu. The most convenient way to do this is by clicking on the network icon in the tray;
- In the menu that appears, click “CUS and OD”;
- Next, in the “NCC and OD” window, click “Local Area Network Connection”;
- In the “General” tab, click “Properties”;
- Select the protocol used;
- Click “Properties”;
- Enter the parameters that were determined after the execution of the previous paragraph of this manual;
- Restart PC;
- Ready.
Problem solving
Sometimes a connection error appears, and it is first recommended to make sure that the network cable is securely connected to the PC. If you connect your PC via a router, you will need to test the operation of the computer by directly connecting its network card to a wire from the provider.
If you can access the network, then the problem is in the router. A simple router reboot procedure will usually resolve connection problems.
To reboot the device, you must complete the following steps:
- Open an Internet browser on your PC;
- Enter the IP address written on the nameplate at the bottom of the device and click “Enter”;
- Next, from the nameplate, rewrite the name and access code to the device’s web configurator and click “Login”;
Note: If the user has previously changed authorization parameters, then he knows them.
4. Go to the “System Tools” tab; 5. Go to the “Reboot” tab; 6. Click the “Reboot” virtual key; 7. Wait;