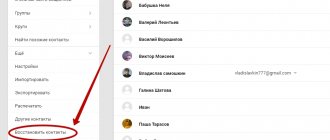
Have you lost your Android contacts from your phone book? We will discuss in detail what to do and how to restore it in our publication. Options for missing contacts may be different, let’s look at several options, and you will find exactly your case.
Before you start restoring or returning missing numbers from the phone book of your Android phone, you need to find out why they might disappear in the first place.
Lost contacts on Android how to recover
Recovering with Google
Smartphones and tablet PCs running on the Android operating system can save some data on Google servers - the user just needs to have an account there.
And since almost all users have Google accounts, restoring contacts is not difficult. If for some reason they are deleted, turn on synchronization and make sure that you are downloading contacts from Google servers. If for some reason your contacts do not load, try going to the Gmail service website from your computer and find the “Contacts” section there.
. All telephone records saved from the smartphone are stored in this section. After making sure that you have contacts, you must do one of the following:
- Reboot your phone and try to start forced synchronization;
- Try installing another application for working with contacts;
- Reset your phone to factory settings, specify your account information and wait for the data to sync to an empty device.
The last method, if there are still contacts on Google servers, helps in 100% of cases.
Recovery utilities
EaseUS MobiSaver for Android
To restore contacts deleted from an Android smartphone using the EaseUS MobiSaver for Android program, you will need:
- Download (link - easeus.com), install the application, connect your phone and click on Start.
- Wait until the software prepares the necessary data.
- And, immediately going to the Contacts section, mark the deleted number - or all lost numbers.
- And click on the Recover button.
Advice: if the program refuses to restore contacts, citing the use of a trial version, you should simply copy the found numbers onto a piece of paper and then manually enter them into the device’s memory.
MiniTool Mobile Recovery for Android
Another working program for restoring numbers deleted from the phone book; works like the previous ones, only if Android has access to the root folder. The owner of the smartphone will have to:
- Download (download - minitool.com), install and run the application, and then select the Recover from Phone option in the main window.
- If the connection cannot be established, check the integrity of the cable, restart the phone and try to connect it again.
- Upon completion of information processing.
- Switch to Quick Scan mode.
- And uncheck all the boxes except Contacts - otherwise the process will drag on indefinitely. Now, click on Next.
- The owner of the phone should switch to the Contacts tab.
- Find and mark a deleted number - or all numbers.
- And click on the Recover button.
- Selecting the directory to save the data.
- The user will receive three content options - an Excel table.
- HTML link.
- And a contact card in VCF format.
The card can be copied to the device’s memory, then opened and added to the phone book; in other cases, the user will have to manually create records for each contact found.
Android Data Recovery
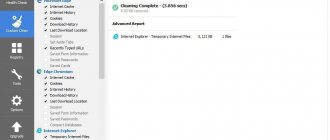
Android File Recovery is one of the effective and useful data recovery programs. You can use this program to scan all your lost or deleted data and selectively select files to recover:-
- messages
- contacts
- photos
- video
everything is supported.
Don't add new files to your device or delete unnecessary ones.
Adding or deleting files may overwrite your Android files. Therefore, to prevent your Android backup from being overwritten, stop updating your data.
Download and install Android Data Recovery on your computer. Follow four simple steps.
1. Launch the program on your computer and you will see the following interface. Then connect your Android device to your computer.
2. As shown in the window below, you need to enable USB debugging on your device (you must be in developer mode to enable the feature) for the program to detect it.
3. Now that your device has been detected by Android Data Recovery, select what you want to recover and click “Next” in the window.
4. The program has collected all the deleted phone numbers and offers you to select those that need to be restored. To finish, just click the “Recover” button.
Contacts Recovery
You can recover deleted contacts on Android, even if they were stored on a SIM card, using special applications, many of which are available in the official Google store. The owner of a smartphone must prepare in advance for a possible failure: some of these programs do not work at all, while others, having successfully found some numbers that for various reasons disappeared from the phone book, stubbornly do not see others.
Still worth a try; One of the best products of its kind is the Contacts Recovery application, which allows you to restore contacts in a few clicks:
- After downloading and installing the program, the user must launch it and click on the Recover Contacts button.
- Give Android permission to access the contacts storage.
- Next, you should find the desired number in the general list and click on the Recover button located next to it.
- Repeat the action in the next window.
- And, going to the phone book, make the necessary adjustments to the newly created card.
- Select a new data storage location.
- And click on the “Save” button.
The main drawback of the application is the need to repeat the listed manipulations for each lost number. It will not be possible to automate the process - the owner of an Android smartphone will have to look for either another program without any guarantee of its performance, or switch to other methods of restoring contacts.
Extracting information from a broken Android
Even if the problem can be solved without financial investment, by simply flashing it, users have an important question - how to save the data stored in the phone’s memory. There are no problems with the memory card: you just need to remove it from the device. But how to save data from the internal drive? For example, pull out contacts.
If you backed up the system or at least, then getting contacts will be very easy. All you have to do is go to the Contacts app on Google to see the full list of synced contacts. If you want to transfer them to another device, all you need to do is add a Google account to it.
To make it as easy to get other information, you need to periodically backup Android. Then if
The biggest fear of any smartphone owner is losing all existing contact information from your address book.
If this problem does happen, then it is very important to know how to restore contacts on Google Android
The main reasons why such data may be lost:
- the user accidentally deleted all the numbers;
- after resetting to factory settings;
- a Trojan has appeared on the device, which deletes all contact data;
- due to obtaining Root rights or after the operating system was updated.
Why do contact numbers disappear on a smartphone?
There are many reasons why contact numbers disappear from a smartphone. The most popular are:
- careless attitude of the user towards data (accidental deletion).
- The phone was reset to factory settings.
- when trying to root your phone.
- firmware update.
- problems synchronizing with services.
- the phone is infected with a virus.
Another popular reason is a failure in the smartphone system, and the contacts are not deleted, but simply become invisible. This can be fixed quite easily.
Methodology for solving the problem The system application is not responding
To get rid of the “system application is not responding” I recommend using the following methods:
Method No. 1. Reboot your gadget
The easiest way to get rid of System dysfunction that has arisen on a device is to simply reboot the gadget. Of course, the specifics of its implementation may differ for each specific device, but usually pressing the power button with your finger for a short time is enough. If this does not help, try holding down the “Power” and “Volume Up” buttons and wait until the screen turns off. Then press the “Power” button again to activate the gadget.
Method No. 2. Free up space
As I mentioned above, a factor in the problem may be the lack of free space on your device. Try to free up a significant part of the previously occupied space (including by uninstalling a number of unnecessary applications), and reboot the device. Perhaps after downloading the problem with launching the application and the System response will be successfully resolved.
Method No. 3. Remove the SD card to restore the System app
In some individual cases, this error may be caused by incorrect operation of the SD card connected to your device (the data on it may be damaged). In such cases, it is recommended to remove the SD card from your gadget to make sure that it is not causing the problem. If it contains any necessary software, transfer it to your phone’s memory.
Method No. 4. Deactivate root rights
One of the common causes of the problem discussed in this article is the root rights available on the user gadget. It is recommended to get rid of them, for which you need to use one of the specialized applications, for example “SuperSU”. Go to its settings (Settings), select “Full unroot” (full derooting), and confirm the operation by clicking on “Continue” - “Yes”.
Method No. 5. Try Safe Mode
In some cases, the cause of the error in question is a conflict of applications on the user's device. To test this hypothesis, you need to boot into safe mode, which blocks the launch of all third-party applications. If the problem disappears, it means that some third-party applications (often recently installed) are to blame and need to be removed (disabled) on your device.
The specifics of actions for switching to the specified mode may differ for the specific model of the device taken. Usually, when the device is turned on, the power button is pressed until a prompt appears to turn off the device. After this, click on the menu item “Turn off power” and hold your finger until a question appears about the need to switch to safe mode, which must be confirmed. After confirmation, the gadget will boot in the specified mode.
Method No. 6. Hard reset
If none of the methods listed above helped and the “system” application does not respond, I recommend resetting your device to factory settings (for example, I do this through “Settings”, then “Backup” and “Reset data”). Please note that all your files (including game progress) stored in the gadget’s memory will be deleted.
If your device is not functional, or is completely blocked, then you can perform the specified reset through recovery mode (the so-called “Recovery Mod”). To do this, simultaneously hold down the “Power” and “Volume Up” buttons for more than 10 seconds, and after the device reboots and enters the specified mode, select “wipe data\factory reset”, if necessary, further indicating “yes – delete” all data". After this, reboot your gadget.
Backup copy
To protect yourself from losing information, you need to regularly copy it to external media.
- Go to your notebook.
- Click on "Import/Export".
- The source of copying will be the phone memory, and the target location will be the memory card.
As a result, a file with all the copied numbers from the address book will automatically appear on the memory card. If you've backed up to a micro SD card before, your numbers may already be saved.
It is better to additionally store the document with all copied data in the cloud storage of your PC. But many do not create such copies, what should we do then?
Video
For a better understanding of the process, you can watch the video, which describes in detail the step-by-step algorithm for restoring contacts on Android.
Accidentally deleting a piece of music usually does not cause serious problems - you can always download it again. It’s more difficult with photographs, but even here you can find a way out
The hardest thing for a smartphone owner is when contacts are accidentally deleted. Fortunately, under certain conditions you can return them too.
Theoretically, it is possible to restore deleted contacts without using third-party tools. But we recommend regularly backing up your phone book using the Super Backup
. In the future, you can use the same utility to get all your contacts back. This method is great for those people who do not believe in the privacy of Google servers. So, install the application on your Android and follow these steps:
1. Launch the program.
2. You can immediately go to “ Settings”
", selecting the path to save the contacts file. In this case, it is advisable to use some folder on the memory card.
4. Here you can back up or upload your contacts to a cloud service. But first, in any case, you will need a backup copy, because it will be uploaded to the “cloud”.
5. When you create the file, you will be asked to give it a name. It must consist of Latin letters, otherwise problems may arise with further uploading the file to the cloud.
6. That's it! In the future, you can use this file to restore phone numbers on Android if you lose them or buy a new device. When creating a file with contacts, you will be asked to send it by email - this is also a good way to store it, although not the most reliable. The program can also automatically create a new backup file on a schedule.
Solutions
When contacts disappear on Android, it is important to know why this happened. The recovery method directly depends on the cause of the failure; each case is individual. But more often the reasons are as follows.
- Mechanical damage, shock. This happens if the phone has recently fallen. Only a few numbers may disappear, but often all of them disappear.
- Network connection. It happens that when you turn on the Internet, the system deletes some information.
- Memory problem. Deletion of information can occur if the memory is full or bad blocks begin to appear in the “electronic brains”.
- Synchronization. Lost numbers occurred when trying to synchronize with my @gmail.com account.
- Everything went into the Hidden category for some reason.
- The device system has been reset to factory settings.
Sometimes the reason is difficult to find out. For example, a phone simply does not display some information after many years of service. Therefore, it is better to take care of the data in advance and copy it into a notepad or transfer the numbers to a PC. Let's look at how you can solve this problem in several of the most effective ways.
How to add a new entry
To add a new contact, click on the round pink “Create” button at the bottom right.
Next, fill in all the necessary user information. To see all available fields to fill out, click “More”. Then click “Save”.
A window like this will open with the newly created data, click on the cross to close it.
After you add a new entry to your account, it will automatically appear in the phone book on your smartphone. This is provided that synchronization of contacts with Google account on the device is enabled (we will talk about it below).
All added entries can be divided into groups. Expand the corresponding item in the menu on the left. In the example, there is only one, and three users are added to it - the number in brackets. If you want to add a new one, click “Create a group”.
Come up with a name for it and click “OK”.
To add a user to a group, hover over the user and click on the three vertical dots, this is the “More” button. From the drop-down list, click on the name of the desired group.
There are two more buttons here: “Add a note” - the entry will appear at the very beginning of the list, “Edit” - a window will open for changing the contact.
After selecting a group, a check mark will appear opposite it, and in the list on the left, the number of users included in it will increase.
If you hover your mouse over the name of the group, buttons will appear using which you can edit the name or delete it. When you select any of them, a list of users who are included in it will open. To remove a person, click on the dots next to him and uncheck the box next to the group name.
How to Delete Duplicate Contacts on Android Device
There is no point in delving into the cause-and-effect jungle, so let's immediately move on to solving the problem.
There are several options for solving this issue, each of which solves the problem 100%. The only differences are in the means at hand to implement one method or another.
Removing duplicate contacts in Android phonebook
You can, of course, open the phone book and manually start deleting or merging all duplicate contacts, but what if you don’t have a hundred or two of them? For such cases, there are special applications that work with contacts. Let's look at the most popular of them:
Let's look at the process of deleting or merging duplicate contacts using the example of the Simpler Merge Duplicates program, which can be downloaded for free on Google Play.
After installing the application, open it and log in via Facebook or Google+. Next, the program itself will determine which duplicate contacts are in your phone book and offer you to choose which of them to merge. Select the desired duplicate contacts and click the “Merge” button.
The program itself will put your contacts in order and notify you at the end of the process.
Removing Duplicate Contacts on Android Using PC
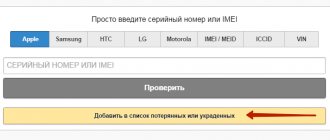
To delete contacts that are repeated on an Android smartphone, you need to go to https://google.com/contacts. You can do this on a smart phone too.
- Click “Find similar contacts”
- After this, you will see a list of duplicate phone book contacts. I recommend that you carefully review the contacts that are repeated. Because it happens that the names of different people are the same. To view in detail the contact that is duplicated, you need to click “details” next to the name. For those contacts that do not need to be merged, uncheck the box.
- The last and easiest step in deleting duplicate contacts on an Android device is to click “Merge” - this is the button at the top of the contacts list.
- Then synchronize your contacts on your smartphone and that’s it!
The procedure for deleting contacts that are repeated in the smartphone’s phone book will take no more than five minutes.
Sometimes the phone creates two or more than two copies of the same contact. This happens mainly when you restart your device, synchronize contacts or change your SIM card and randomly sync all contacts.
This can be very cluttered and difficult to navigate through your contacts. If you have duplicate contacts on your Android smartphone, you may get confused as to which one is correct. You might even be able to message a legacy number.
Are you looking for an easy way to merge duplicate contacts? Don't worry, in my tips and tricks section I will show you several ways to remove duplicates.
Why it doesn’t turn on and how to solve it
In most cases, the problem is related to the gadget's battery. A less common option is problems with the operating system. Before taking your device to a service center and preparing money for repairs, we recommend taking a few independent steps to identify the problem. The problem may be trivial, which you can solve without outside help.
Battery faults
There are several reasons why your phone won't turn on. Perhaps the battery is simply dead and charging is not having any effect. This is the most popular problem, but there may be several reasons:
- Another reason why Android won’t turn on is that the power button is broken. If you have a new smartphone, then this may be a defect. Then take it back and exchange it for a new copy. Otherwise, you will have to contact a workshop, where they will replace the button for money if the problem really lies there.
- The worst case scenario is that the power controller on the phone has burned out. It is he who is responsible for the charging process of the gadget. The only way out is to take the phone to a service center and then have it replaced.
As you can see, users can solve most problems on their own if the phone does not turn on. To extend the life of the battery, do not frequently discharge the gadget to zero, but use only certified chargers from the manufacturer.
Memory card
The problem may be that you inserted an SD card into the gadget that the smartphone does not support. This may lead to failures in the program code and impossibility of inclusion. How to turn on the gadget? Just slide out the wrong memory card. If it still does not activate, you may have to reflash your smartphone.
Beforehand, always read the specifications which memory cards your mobile device supports and up to what capacity. You can also get advice from mobile showroom sellers.
Incorrect system update
- Hold down the "Volume Up" key.
- Without releasing it, hold down the Home key.
- At the same time, press the third “Power” key.
On some smartphones, the transition is carried out by pressing “+. - volume" and "Power" buttons. Using the volume keys, you need to move the slider to the line “Wipe data/factory reset”, and then confirm your choice by clicking “Yes - delete all user data”.
You will be able to clear the cash and data section. But be careful as all personal data (photos, contacts, videos and apps) will be lost
If there is something important on the phone, contact the service center
This is relevant if loading your phone hangs at the “Android” icon. This also indicates that the firmware is not working correctly. On some devices there is a special button that can only be pressed with a needle or toothpick.
Viruses
If your phone won't boot, the operating system files may have been damaged by a virus. Here you will need to reflash the phone. In some service centers, specialists will be able to restore the phone’s functionality by cleaning it from viruses. To avoid such situations, we recommend downloading applications only from the official Play Market and installing an antivirus. You can choose ESET or Dr.Web for mobile devices.
Restoring contacts through a mobile operator
You can return your contacts through your mobile provider. Each operator has a function for detailing the expenditure of funds. Using it you can collect phone numbers for any period of time. You can order details in your personal account.
The method works, but is labor-intensive. In fact, they will have to be collected manually and entered into the phone.
The big disadvantage is that the numbers will be anonymous and you will have to call everyone.
In the mobile version, on the contrary, there will be only names without a number.
Method 2: display contacts from SIM card
If you don't store contacts in your Google account, they may be on your device's SIM card. Accordingly, you only need to activate the visibility of contacts saved on the SIM card of your device.
Method 3: Import contacts from a file
Very often, users have a contacts file with a VCF extension on their hands, but do not know how to insert it into their phone. If you have such a file, then you can transfer it to your device, quickly adding to your phone book.
numbers disappeared from phone
? What could be causing this? Is it possible to somehow restore them? Let's look at this situation using the example of such well-known platforms as Android and iOS.
How to recover numbers that have disappeared from an Android phone?
To do this, we can use the standard recovery method that Gmail offers us, or a special application. Often the need for this arises after we have reset the settings, updated the firmware, or after being infected with some kind of virus. The reasons can be very diverse.
Most Android mobile devices are constantly synchronized with a Google account - of course, provided that you have access to the Internet. To restore, go to your account, select “Gmail”, and then select “Contacts” > “Advanced”. Select the contact recovery option. Don't forget to indicate the time period for which we need to perform the restoration.
If this does not help, you need to delete and re-add your Gmail account through the settings of our device. Problems with recovery may occur if the contacts were saved not as Google contacts, but on the device or SIM card.
As already mentioned, if numbers have disappeared from your Android phone, you can use special software. For example, Super Backup Pro would be a suitable application.
What to do if numbers disappear from your iOS phone?
Let's start with the fact that restoring numbers on this platform is possible if we have taken care of backups in advance. Typically, contacts are restored through iTunes, the “cloud” (iCloud), or through a special application in OS X.
Of course, the reasons for the disappearance of numbers can be very prosaic. For example, there are often cases when we simply placed the slider in iCloud in the inactive position (opposite the “Contacts” item).
If contacts have been deleted from cloud storage, we can also restore them. Disable Wi-Fi on your PC. After this, we launch “Contacts” in iCloud (if we restore them through OS X, this item may be called slightly differently, for example, “Address Book”). We find the number we are interested in, open it and export it to Vcard (that is, we save it with the vcf extension in case something goes wrong).
Contacts can also be easily restored from a backup of the iTunes application on a PC (provided that a backup was made).
Other news on the topic:
Viewed: 6,978 times
__________ _____________ __________ ______ ____ ______ ______________ __________ ________ ______ ________ _____ ________ _______ _____ _________ ____ ______ _____ ______ ___ __________ ____ _______ ______ ______ ______ ________ ______ ____ ________ ____ ________ _______ ______
All owners of devices running Android OS know that it is most convenient to store various information on the gadget. The same applies to contacts. Storing phone numbers in a notebook has long been an outdated option. They can be stored, for example, on a SIM card. If there is not enough memory, transfer them to your phone memory or memory card.
Contacts on Android will always be at your fingertips. But sometimes it happens that data disappears. By an absurd accident, important contacts can be lost. For example, you gave the phone to children or an inexperienced user and he deleted it. Or you yourself “clicked something wrong,” as often happens, and lost the necessary information. Fortunately, there is a way out. How to recover lost data will be discussed further.
conclusions
Certain unforeseen circumstances may result in the deletion of phone book entries. To recover contacts on Android, you use Google cloud storage, the built-in Contacts app on your phone, and software on your PC.
Every year, smartphones and tablets running on the Android platform are becoming more and more popular. Over the course of many years, we accumulate numbers on our phone, forming our social circle. But any system fails. Users often encounter a situation where contacts saved in the phone memory or on the SIM card disappear.
But you shouldn’t panic in this situation, because if you didn’t intentionally delete the numbers, then they didn’t disappear without a trace. So, why do contacts disappear on an Android phone and how to fix it.
Solutions to the problem
Checking the Internet
The first thing you should do before you start troubleshooting is to check whether your device has an Internet connection. To do this, open a web browser and go to any page or run a program that requires network access to enter. For obvious reasons, it is unlikely that it will be possible to solve the problem without a connection.
It won’t be superfluous to check your access to Google mail - enter your login and password on gmail.com. In addition, you should make sure that there are no failures on the company’s servers.
To make sure your account is active, try going to the Play Market and start downloading any program. If there is no access, the service will give you a corresponding warning about the need to create a new one or log into an existing Google service.
Checking auto-sync
It is also worth paying attention to whether the auto-sync mode is activated. It is necessary so that all data is automatically connected to the Cloud, which does not require any additional actions from you
Automatic synchronization is enabled in the settings of the mobile gadget. Scroll through the menu and go to the “Accounts” section, inside which you will find the Google line, in the window that opens, in the upper right corner you need to click on the vertical ellipsis and in the drop-down menu activate the “Auto-sync data” function.
Turn off airplane mode
Try turning airplane mode on for a few minutes and then turning it off. To do this, click on the tray icon. After it is disabled, re-registration will occur in the network, and a new automatic exchange of information will start.
Clear storage
When the device's internal memory is full, no data is recorded or sent. To restore functionality, delete unused applications, duplicate photos and music, or files that you no longer need. This also applies to the list of required numbers, since when the memory allocated for them is full, the phone will not be connected to the Cloud.
Delete gmail data
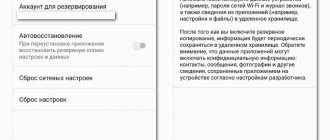
Be careful before starting this step. The fact is that after it is carried out, all SMS drafts and saved signatures, sounds of incoming alerts and other related settings will be deleted. Delete data only as a last resort when other methods cannot solve the problem. Follow these steps:
- Go to your phone settings menu.
- Select “Applications and notifications” and in the window that opens, click on the “Application information” line.
- Click on the Gmail button where you need to go to Storage.
- Click on the “Erase data” function.
- Restart your smartphone.
- Re-login to your Google account manually.
Instructions
- Go to your smartphone settings.
- Select "Users and Accounts".
- Click on your account.
- Click on the “Synchronize accounts” option.
- In the upper right corner, tap on the three vertical dots, and then on the “Synchronize” line.
- Google account synchronization on Android is running.
Removing and re-adding a google account
When carrying out this procedure, you don’t have to worry about the safety of your files and contact list, they will all remain on the server.
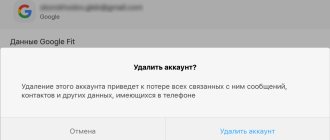
To delete an “account”, go to “Accounts”, select the Google tab and call up the submenu (three dots in the right corner), click “Delete”. Now you need to reboot the device and re-login to your account by entering your username and password.
Using Third Party Programs to Export Android Contacts
The Google Play Store has many free apps that let you save your contacts to the cloud, to a file, or to your computer. However, I probably won’t write about them - they all do almost the same thing as standard Android tools and the benefits of using such third-party applications seem dubious to me (unless such a thing as AirDroid is really good, but it allows you to work far from only with contacts).
We are talking a little about other programs: many manufacturers of Android smartphones supply their own software for Windows and Mac OS X, which allows, among other things, to save backup copies of contacts or import them into other applications.
For example, for Samsung it is KIES, for Xperia it is Sony PC Companion. Both programs make exporting and importing your contacts as easy as it can be, so there shouldn't be any problems.
And maybe this will be interesting:
Manual search
Android OS does not create backup copies of contacts on its own in case of factory resets and other troubles; nevertheless, for the owner of the device who has previously used any backup applications, it makes sense to look for a file with the VCF extension in the internal memory of the device - it, as already mentioned, is used to store contact cards.
If you are lucky and the file is found, you need to:
- Tap on it.
- Select “Contacts” as the processing application.
- How to recover phone numbers on iPhone
- And again save the card - or all the cards.
Advice: in the future, you should edit the found data, deleting what has become truly unnecessary - and, of course, do not forget to make a backup copy of important contacts.
Lost contacts on Android: how to recover them yourself
To begin with, I would like to give an example of a list of programs that you can work with to achieve your goal:
- Wondershare Dr.Fone;
- Super Backup Pro;
- Recuva;
- Android Data Recovery;
- Undelete Beta and others.
Besides them, there is a lot of similar software. Most often, you will need to connect your phone to your computer, but in some cases you can download the utility only to your gadget and use only available methods.
It is best, of course, to take care of the safety of your data in advance and store it in the cloud or synchronize it with other devices. Android does its job perfectly. If s, then they definitely won’t get lost. And you can edit them even from your computer, the main thing is not to lose data from your account.
We hope you will be able to restore all the necessary contacts, or even better, if you don’t lose them at all.
Help from specialists
If computers and laptops do not help, contact a specialist. Check to see if you have used the data filtering feature. This function could transfer the necessary information to another folder, and where you are used to seeing it, it will not be displayed. You could also accidentally switch to displaying contacts only from the SIM card. There are also contact groups. Check to see if the filter is only showing a specific group that is empty. After a thorough check, when all the tried solutions to the problem have not been successful, take the device to a specialist. Professionals will conduct a full diagnosis of the device and help you recover lost data.