When purchasing a new device, a user may find that the keyboard is set to a completely different language. It is inconvenient to use, since a person who does not know the language simply will not be able to write messages normally or enter search queries on the Internet. The phone can work in a foreign language if it was previously purchased abroad, but there are cases when the device was purchased in Russia, and the interface is in a different language in any case.
Also, sometimes there are cases when the user accidentally switched the phone to another language, and then could not do anything about it. In such situations, it is also necessary to translate the keyboard language in order to use it normally.
If a user bought a device in an official store, but a similar case occurred there, it is worth paying attention to the legality of this device, including the retail outlet where it was purchased.
Method 1: Keyboard App
You can add any desired and supported language by the operating system to the virtual keyboard used for data entry through its settings. In most of these applications, this is done using an identical or extremely similar algorithm, but as an example, we will further use the Gboard solution from Google, which is preinstalled on many Android smartphones by default.
- Open any application or field (such as the search bar) that allows you to enter text, and tap it to activate the on-screen input tool.
- Call up the application settings. For this purpose, a separate button made in the form of a gear may be provided, or the desired option can be called up by holding down one of the buttons - most often the one responsible for switching layouts (usually a planet is depicted on it) - and then selecting the corresponding menu item.
- In the settings section that opens, tap on the “Languages” item.
- Next, use the “Add Keyboard” button located below.
- In the list of available languages, find the one you want to add to the keyboard and select it.
To do this faster, use search.
- Determine your preferred layout type (there may be more than one), then click “Done.”
How to add an input language on Android tablet and phone
Despite the fact that, having read our article up to this section, typing in Russian will no longer be a problem, many owners of Android devices will probably want their favorite device to have a completely user-friendly interface with Russian localization. We will now figure out how this can be done.
If you have an old version of Android OS (before 4.2), then proceed as follows.
Download and install MoreLocale 2 - the most popular application that localizes Android firmware. Then, to Russify your system, perform the following steps:
Launch MoreLocale 2 and select “Custom locale” in the program window:
In the field that appears, click the “ISO” button, which is located next to the “Language” menu item and select the language – in our case, “Russian”.
Then click “ISO”, which is located opposite the “Country” item and from the list of countries that appears, select “Russian Federation”, press the “Set” button to confirm.
Now our smartphone can speak Russian. It’s really worth noting that if in applications that are installed in the operating system, Russification is not provided initially, then it’s possible that something won’t be completely Russified, but that’s the tenth thing, right?
For versions with Android OS 4.2 and higher, our actions will be completely different, we read:
Full Russification for the latest versions involves some difficulties, but not for us, because in this case we have a couple of methods in our arsenal, one of which should definitely help.
First option. We install the Set Locale & Language program, which makes it possible to set the system language, even if it is not in the firmware.
However, some users complain that the program is not always stable, and after a reboot the localization settings may disappear. Well, what can I say, only personal testing can decide how suitable this program is for your device.
The second option is using a computer. If the above method was useless for you, then we suggest using another option to translate the system language on your tablet or phone into Russian.
- Download and install on your PC the latest version of the ADB program and drivers for your device.
- You need to install More Locale 2 on your mobile device
- On your Android, enable the “USB debugging” mode (“menu”, then “Settings”, then “Developer options”, and “USB debugging”). If there is no “Developer options” item in your menu, find the “About phone” item in “Settings”, then on the name of the device model or on the firmware version itself, click “Developer options” ten times in a row so that the settings menu appears.
- Unpack the ADB program on the PC to the root of the “C” drive (the path to the executable file is: C:\adb\adb.exe).
- Connect your smartphone to the computer.
- We launch the command line application on the computer (cmd.exe command).
- To go to the C:\adb\ folder, enter the command cd c:\adb
- We are looking for our device, for which we enter the command adb devices
- Below the line “List of devices attached” the identifier of our mobile device should be given, after which we enter “adb shell pm grant jp.co.c_lis.ccl.morelocale android.permission.CHANGE_CONFIGURATION”, wait for the response “locale android.permission.CHANGE_CONFIGURATION” "(if an error was made, you will have to carefully enter the command again).
- We disconnect the smartphone from the PC and launch the MoreLocale 2 application (the sequence of actions is described in the first section of this article).
If you couldn’t find the latest version of ADB (the word “offline” next to the identifier), then you can download the Android SDK developer package; after installation on your PC, the latest version of ADB will be located in the /platform-tools/ folder.
It remains to draw your attention to the following detail: all the described localization methods for Adroid work at the software level, but not at the OS level, therefore, if you decide to reset your device to factory settings, i.e. perform a “hard reset”, then everything that you have achieved in terms of localization will go to... (in general, you know where). But you will always have the opportunity to return to this article and refresh your memory of how to install the Russian language on Android, so that your “Andryukha” can communicate in Russian again.
Method 2: System Settings
In step No. 3 of the previous method, from the application settings for data entry, we were redirected to the “Languages” section of the system settings. You can get into it to solve the problem stated in the title of the article directly.
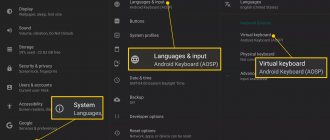
- Open Android's Settings and scroll down the list of available options. Select the "System" section.
- Tap on the item “Language and input”.
Tip: You can move to the subsection you are looking for much faster if you use the search by parameters. To do this, tap the line at the top, enter the query “Language” and follow the corresponding prompt.
- Next, select the “Virtual Keyboard” (or “On-Screen Keyboard”) option.
- Tap the name of the app you use as your primary input tool. In our case it's Gboard.
- Repeat steps No. 3-6 of the previous instructions.
SwiftKey
One of the best keyboards on Google Play. It’s not for nothing that its manufacturer was bought by Microsoft.
SwiftKey has a very simple and pleasant interface. The application can suggest words and correct mistakes, supports gestures and themes. You can change the amount of space that the keyboard takes up on the screen.
SwiftKey allows you to manage your clipboard, provides access to stickers and calendar events. It adapts to your typing style and shows detailed statistics about how efficiently you type.
Keyboard settings are synced across your devices.
Microsoft SwiftKey Keyboard
SwiftKey
Price: Free
Download
Price: Free
Setting up and changing language layouts
When using two or more languages in a virtual keyboard, the issue of convenience becomes relevant - their order when switching and the possible presence of unnecessary ones. The order of layouts can be adjusted at your discretion, and unused ones can simply be deleted.
- Repeat steps 1-3 of the first instructions in this article.
- Click on the button at the top with the image of a pencil - “Edit”. Determine the desired order of layouts by moving them in the list.
- If necessary, remove unnecessary ones by checking them and clicking on the button made in the form of a trash can.
Tip: If you use three or more layouts, it will be faster and easier to switch between them by holding down the language button and selecting the one you need in the pop-up window.
ai.type
Quite a popular keyboard with a huge number of functions. It suggests suitable words as you type, corrects errors and typos, and allows you to add emoticons and pictures.
A particularly interesting feature is automatically inserted correspondence templates that are collected from user messages. Sometimes you come across funny gems.
In ai.type you can create layouts, there is a built-in theme store and a lot more. It’s not easy to figure this out right away, and lovers of minimalism will be horrified by the keyboard.
In addition, the free version is overloaded with advertisements. But still ai.type is worth a try.
Application not found
Simple Keyboard
As the name suggests, this keyboard is simple. Even too much. It has a minimalistic Android-style design and only four themes (however, the user can assign a specific color to it).
There are no dictionaries, spell checking, auto-corrections or other bells and whistles - just text input. Ideal for those who don't like it when the keyboard tries to be smarter than its owner.
Simple Keyboard is open source. This means it can be used to enter passwords and credit card details if you don't trust proprietary keyboards.
In addition, the application takes up very little space and will work even on old and low-power smartphones.
Simple Keyboard
Raimondas Rimkus
Price: Free
Download
Price: Free