Android's autocorrect feature can be both a blessing and a curse. One minute, this will save you from making an embarrassing typo in a message to your boss. Then you'll blush if you send something completely inappropriate to a family member.
It's time to take back control. If you want to know how to enable autocorrect on your Android device, as well as how to disable autocorrect again, keep reading. We'll also touch on a few other settings to help you work with AutoCorrect the way you want.
How to disable autocorrect on Android
By default, most Android devices come pre-installed with Gboard, Google's own keyboard app. If you use Gboard, you can follow our instructions to turn off AutoCorrect.
However, if you instead use one of the many third-party Android keyboards
, instructions may vary slightly. Consult the official keyboard developer literature for more information.
The switch to turn off autocorrect on Gboard is hidden deep in your phone's settings menu.
To do this, you need to open Gboard settings. You can do this through the Settings app by going to Settings > System > Languages & input > Virtual keyboard > Gboard . For a faster method, open the keyboard and long press the comma key, then tap the gear icon that appears.
Once you reach the Gboard settings using either of these methods, select Text Correction and under Corrections , slide the toggle switch for Auto-correction to the off position.
↑ Installing a new dial pad
Many modern phones have a standard typing panel, and therefore it is not possible to disable T9 input. To do this, you need to download the “Russian Keyboard” application from Google Play and install it on your phone. After successful installation, follow these steps:
- Open your phone settings.
- Go to the “Language and Keyboard” section.
- Change the keyboard type to the installed one.
If the change did not occur and T9 appeared again when entering messages, when typing words, lower the curtain and select “Rus Key” in the “Input Methods” menu.
If there is no T9 mode in automatic mode and in the settings, then you can download the same application and select the desired mode for further work with the gadget.
After installation, go to the “Language and Keyboard” section, click on the gear located on the same line with “Rus Key”. Then go to general settings, click on the “Portrait Mode” button and click on the checkmark next to T9.
If after this action the T9 mode does not work as expected, you need to download and install the dictionary. You can open the store and use the search bar to find the application. You can go to the “Language” tab and click on “Download dictionary”. The system will take you to the application store, where you can choose the one you like. See the rating and read reviews from users.
In the Google Play store you will find different applications, but before downloading, read the reviews, many of them lag or are oversaturated with advertising. One of the good applications for installing T9 typing can be called Smart Keyboard.
By following our instructions, you can disable T9 mode and the fix or enable this function if it is not built-in. It causes a double impression among users; initially, this mode was created for quickly typing text messages, but in practice, many users of smartphones and tablets are annoyed by using it. After all, sometimes correcting words can lead to an awkward position for the owner of the gadget. If you want to use the T9 function, you need to re-read them before sending a message.
How to enable autocorrect on Android
If you change your mind later, you can turn AutoCorrect back on at any time.
Just follow the same instructions as above, setting up the last step:
- Open the Settings app and go to System > Languages & input > Virtual keyboard > Gboard. Or open your keyboard, hold the comma key and tap the gear icon.
Again, if you're using a different Android keyboard, you may find that the instructions may be different. Any installed keyboard should appear under the Virtual Keyboard section settings . Open it from there, then you will need to find the appropriate settings.
SwiftKey, for example, has AutoCorrect under Typing > Typing and AutoCorrect > AutoCorrect .
Disabling autocorrection and word suggestions
Greenbot resource manager Florence Ion faced this difficulty because she had to type texts in Romanian.
And I decided to compile instructions for all users who would like to disable autocorrection (autocorrection), but do not know how to do it or do not want to spend a lot of time delving into the settings. The user's vocabulary may be wider than that offered by the operating system. In addition, these tips are often simply confusing. And I would like a person to decide for himself what exactly he is going to write, and not resort to the help of computer pseudo-intelligence to do this.
Android is known for its over-automation. Now this operating system can be found in a wide variety of technical devices - from watches to cars. But sometimes the computer's concern for the user can be too intrusive. An operating system's keyboard strives to predict what word its user is about to type. These hints can be completely far from what the user needs. For example, in cases where he uses the English layout to type text in another language with the Latin alphabet. In this case, auto-correction of entered words will only interfere with the user.
Undoubtedly, sometimes auto-correction of words and displayed hints can be very convenient. But in some other situations they are not needed. Luckily, these features are easy to disable and enable again. It’s enough just to know where the corresponding settings are located in the Android mobile operating system.
Without a doubt, among our readers there are many experienced Android users who know how to configure things even more complicated than disabling automatic correction. But we are also read by new users of the world’s most popular mobile operating system, who have not yet had time to comprehend the full depth of its intricacies. Auto-correction is not one of the main problems of Android, although it sometimes causes dissatisfaction among users.
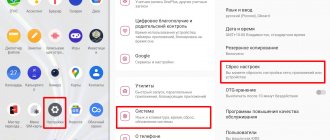
First of all, you need to go to the Android settings panel, which helps you tailor the operating system to your tastes. In this panel you need to find the “Language and input” item (the names may vary depending on the version of Android and its interface shell, the meaning is important). Next, select “Android Keyboard” and touch it with your finger.
In the menu that opens, scroll to the “Auto-correction” item and tap on it.
By default, moderate autocorrection is selected.
You can change this setting by turning off autocorrect completely, or by making it active or very active if that operating system feature helps you. Touch will be enough. The dialog box will close and the new setting will be accepted by the operating system.
But the Android keyboard also tries to suggest to the user the words he is supposedly about to type. The mobile pseudo-mind does not always guess correctly. It is difficult to imagine that these clues would help in the correspondence of two mathematicians discussing the fine points of the complex science they are studying. And there can be many similar situations. This means that it is sometimes advisable to turn off automatic suggestions.
The next item is “Show correction options.” By default, Android always shows them. This item allows you to configure the operating system so that it provides hints only when the device is in a vertical (portrait) scan of the screen or never shows correction options at all, leaving the user to decide for himself what word he is going to enter and what errors he intends do it in it.
It must be said that the method of disabling auto-correction described above is common to all Android devices. Some custom keyboard apps provide an easier way to disable automatic correction of user-typed words. There are also third-party keyboard apps for Android.
Users who are not confident in their experience should write down the sequence of actions so that, if they want to return the settings to their original state, they will always be able to do this.
Do you think the auto-correct feature is more useful or more of a distraction? Is she helpful or just annoying?
How to disable autocorrect on Samsung devices
If you've ever owned a Samsung phone or tablet, you know that the company doesn't use the stock Android operating system. Instead, Samsung devices run their own Android skin. This is now known as Samsung Experience, but was previously called TouchWiz.
Stock Android and Samsung skin are very different
One of which is to turn autocorrect on and off.
Below are the instructions to disable autocorrect on Samsung devices running Android 10:
- Visit Settings > General management > Language & input > On-screen keyboard .
- Select Samsung Keyboard provided you are using the built-in solution.
- select Smart typing ,
- Change Predictable text off.
To disable autocorrect on older Samsung phones and tablets, you must use the following instructions:
- Open the settings app towards Applications > Settings .
- Scroll down to the system section.
- Click on the icon that says Language & Input .
- Select Default from the list of available options. This may have a different name if you have a different keyboard installed.
- Scroll down until you find the Auto Replace menu item and select it.
- Move the switch in the upper right corner to the off position.
( Note: If you have multiple keyboard languages installed, you can turn AutoCorrect on/off for each language layout separately using the checkboxes next to the languages on this page.)
How to fix Android spell check problems
Although it started as an element that made our existence more difficult, Android spell checker has been improved to become something important in everyday life. Thanks to your help, we can write faster and avoid mistakes that could cause someone to misinterpret us. Nevertheless, problems can arise frequently.
Through various forums and social networks, several users have complained about problems with spell checking on Android phones, something that could cost us a real headache until we find a solution. Luckily, in most cases, what you need to do is very simple, and we're going to show you so you can get back to typing at your best on your smartphone.
How to Improve AutoCorrect on Android
We've all seen those funny autocorrect screenshots. When you read some of them, it's understandable why you might have a sudden urge to disable AutoCorrect on your Android device.
In reality, however, such drastic measures are rarely required. Android keyboards have many options that allow you to customize, enhance, and improve the autocorrect feature, thereby making it work better for your needs.
Let's take a quick look at some other options worth exploring. This mostly applies to Gboard, but you'll find similar options in most keyboard apps.
Automatically replace lowercase letters with uppercase ones
Android can automatically capitalize sentences and proper nouns as you type.
Under normal conditions this is a useful feature. But for some people this may not be ideal. Many words are both proper nouns and regular nouns (for example, “Turkey” is a country and “turkey” is a bird). If you find yourself using such words regularly, you may want to disable the autocapitalization feature.
You can do this by heading to Settings > System > Languages & Input > Virtual Keyboard > Gboard > Text Correction > Auto Capitalization . Slide the switch to the off position to disable it.
Spellchecking
Instead of relying on AutoCorrect to correct mistakes, you can simply use Android's built-in spell checker. It will alert you to typos and other misspelled words using the familiar squiggly red lines below the text.
To enable or disable spell checking on Android, you need to go to Settings > System > Languages & input > Virtual keyboard > Gboard > Text correction > Spell checking and move the switch to the desired position.
( Note: If you wish, you can run the spell checker and autocorrect tools at the same time.)
Customize Android Dictionary
You will always come across some legal words that are not part of Android's built-in dictionary. Unclear place names, brand names, and specific jargon related to your job are common culprits.
It gets outdated very quickly when Android constantly tries to automatically replace "Sonos" with "sonar" or "Logitech" with "logic". To prevent this from happening—and save yourself some stress in the process—you must add words to your personal vocabulary.
You can access the dictionary by going to Settings > System > Languages & Input > Virtual Keyboard > Gboard > Dictionary > Personal Dictionary . Tap on the language you want to change the dictionary for, even if you only have one installed. Then you can use the Plus button to add new words.
Try Voice Dialing
Some keyboards (including Gboard) provide alternative input methods on Android
One of them is to use your voice rather than the on-screen touch keyboard.
From an autocorrect perspective, you'll be less likely to misspell when you're speaking rather than typing. However, you will present a question about potentially misunderstood words.
If you want to try voice typing, go to Settings > System > Languages & input > Virtual keyboard > Gboard > Voice typing and turn the toggle switch on. Then you can click on the Microphone icon in the top right corner of the keyboard to speak.
If you're using a different keyboard, you can also switch to Google Voice Typing using the switch keyboard button that appears when you're typing.
My concealer options are different
Although we have already seen how we can fix all the corrector problems on Android, it is likely that you will find that your smartphone does not offer the same keyboard and therefore the options are different. This usually happens in Huawei and Samsung, but also in other manufacturers using SwiftKey, another of the most popular keyboards, which also has the same or very similar glitches in Android terminals. To solve this problem, we have the option to install Gboard from the Google app store and follow the previous steps after setting it up.
On the other hand, the solution to SwiftKey spell checking problems on Android is as follows:
- We enter the application about which we can write.
- When the keyboard opens, we play at the three dots at the top right.
- Then click on Settings.
- Then tap Email.
Here we can activate or deactivate auto-correction, make other modifications to the auto-correction that do not convince us. To add other languages we will have to touch the corresponding section in Settings and we will be able to select the ones we want to combine in order to use them simultaneously without errors or changes.
Third Party Keyboard Personalization
When you use third-party keyboards, the process of adding new words works differently. With Swiftkey, the app typically learns from your behavior and stops correcting words if you use them frequently. If this does not happen, you can use the prediction field that appears above the keyboard, through which you can add words to the dictionary. In Swype, you can add new words by clicking on them in the word selection list. A long press on a word removes it from the dictionary. In the Touchpal application you need to go to settings, in Fleksy a swipe up cancels autocorrect, a second swipe up saves the word in the dictionary.
Quick shutdown T9
If you cannot find the “Menu” or find it difficult to find the “Settings” item in the menu itself, we offer you a quick way to disable the T9 function in smartphones with Android OS. To do this, you need to go to “Notes” or messages. In the “Input field”, hold your finger for a few seconds. The desired “Input Method” tab will appear, by clicking on which you can disable or enable the T9 dictionary function. It happens that disabling T9 alone is not enough; many smartphones that are “tailored” to the Android OS have an auto-correction function. How can I turn it off? Let's look further.