To connect to the Internet on a laptop via a wireless network, you need not only a WiFi module, but also a working access point. To do this, you will need to buy a router at home, and to access the Internet while sitting somewhere in a cafe, it will be enough to turn on Wi-Fi on your laptop and enter the password for the desired network: installing an access point is the task of the owners of the establishment.
A WiFi module is installed in almost all modern laptops, and it’s easy to check whether your device has such a function. To do this you will need:
- Open “Control Panel”;
- Launch “Device Manager” (you can use the search bar);
- Expand the “Network adapters” block.
An existing device with the word “Wireless” in the name means that your laptop supports wireless Internet.
Checking Wi-Fi availability on a laptop
All modern models, without exception, are equipped with Wi-Fi modules. You can verify this using the documentation. In the technical manual, in the specifications of your laptop, you should see the inscription IEEE 802.11 (the letters a/b/g/n may be present at the end). This indicates that your device supports wireless data transfer protocols and, accordingly, has a Wi-Fi module.
You can go online. Find your model in any store or on the website, look for the line “Wi-Fi standard” or “Network adapters”. You can check the availability of hardware using the task manager, but this will be discussed later.
Checking the WLAN function
I’ll say right away that this function automatically controls all network devices, and in theory it should be enabled. But sometimes when installing some programs or due to damage from viruses, the setting may fail.
- + R
- services.msc
- The list will arrange the data in alphabetical order. So just scroll down to the bottom to the “WLAN AutoConfig Service” section. After that, select the properties of this section.
- In the line “Startup type:” set automatic startup. Then click “Apply” and “OK”.
Enabling Wi-Fi on the case
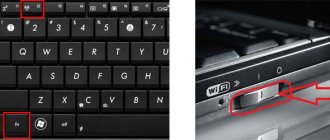
To make life easier for users, some laptop manufacturers place a Wi-fi power button on the device body. Inspect the main panel with the keyboard. The button can be placed above the Escape key, on one of the function buttons, or in the right corner. It shows an antenna icon with signals emanating from it. Many models have a light indicator that indicates the functionality of the Wi-Fi module.
If the required button is not located near the keyboard, inspect the side panels. They may have a toggle switch with On/Off positions or a regular button. Move the toggle switch to the On position to turn on the wireless network module.
LEDs can tell you whether Wi-Fi is working. They can be built into the housing on the front panel or directly into the button.
Now you know where to look for the buttons and how to turn on Wi-Fi on your laptop. Before moving on to other methods, carefully inspect your device from all sides.
Enable via control center
- Press the keys (May look like a window) and R at the same time. You already know how to do this.
- After this you will see a window like this. You need to enter the command ncpa.cpl in the field and click on the “OK” button below.
- Find the wireless connection with the ladder icon, right-click on it and select “Enable.”
Enabling by keyboard shortcut
You can also turn on Wi-Fi on a laptop using a key combination. As a rule, additional laptop functions (changing the backlight, turning off the screen, and so on) are placed on the F1-F12 keys. In order not to interfere with the main purpose of the buttons, additional functions can only be activated in combination with a special key. On products from Acer, Lenovo and others, the Fn key has been added to the keyboard for these purposes.
The user should hold it down and then press the button with the Wi-Fi icon (this can be F2, F3 or F12. It all depends on the laptop model). Upon successful activation, the indicator light should light up (if provided by the design), and an icon for selecting a connection point should appear on the toolbar in the lower right corner.
Using buttons
On 50% of laptops you can find a separate button or switch that turns the Wi-Fi network on and off. For starters, I'd look at the extra buttons next to the main keyboard. You need to find a button that will show an antenna or computer with waves emanating from it.
If there is no such button, then you can look for it on the side of the laptop. Sometimes laptop companies put power buttons there. But as I wrote earlier, not all laptops have such a button. But you can enable it in another way; to do this, you need to find a similar icon on the main keyboard in the row of F keys.
To activate, you must simultaneously press the auxiliary key “Fn” and this key. On my laptop this is the combination “Fn+F2”, but sometimes the keys F3, F5, F9, F12 are used.
| Laptop | Fn+ |
| Samsung | F9 or F12 |
| Asus | F2 |
| Lenovo | F5 |
| Acer | F3 |
| MSI | F10 |
| HP | F12 |
If nothing happens when you press it, it means that you do not have the drivers installed on your machine that are responsible for these buttons, so we will turn it on differently.
Checking the adapter in Device Manager
If there are no hints about the presence of an adapter, we recommend looking at the task manager. The following instructions will help you do this:
- Right-click on the “Computer” shortcut and select “Properties” from the drop-down list.
- On the left side of the window, click the “Device Manager” line.
- In a new window, open the “Network adapters” item.
- In the list you need to find a line with the words Wireless. If there is one, this means that your laptop has a Wi-Fi adapter.
Attention, if there is a yellow exclamation mark next to the adapter, this means that the device is not working correctly, accordingly, you need to reinstall the drivers (or install them). This will be discussed in subsequent paragraphs.
Check driver
- Press + R.
- We write the command devmgmt.msc
- Go to the "Network Devices" section. Now look carefully - is there an icon with an arrow down? If it is there, then right-click on it and then select “Engage”.
Enabling Wi-Fi in the OS network settings
If the driver is installed correctly, but you cannot connect to the wireless network, you need to activate the adapter in the network settings of the operating system. Next, we will describe how to enable Wi-Fi on a laptop in various versions of the Windows operating system.
Windows 7
To enable the Wi-Fi network adapter on a laptop running Windows 7, you must do the following:
- Click Start and go to Control Panel.
- Select the “Network and Internet” menu item.
- Click on "Network and Sharing Center".
- On the right side of the window, select Change adapter settings.
- Find your network adapter (with the word Wireless). Its icon will be black and white. Right-click on it and then select Enable.
Wait for connection. This will take a few seconds. After this, you will be able to connect to the wireless access point.
Windows 10
The “Ten” has a different interface from the “Seven”, so many users do not know how to enable Wi-Fi through the network settings. This instruction will help you solve all problems:
- Right-click your computer's Start icon and select "Control Panel."
- In the menu that opens, click on the already familiar “Network Center...” item.
- On the left side of the window, click on the line “Change adapter settings”.
- Find your wireless adapter. Right-click on it and then click Enable.
You can also get to the adapter settings menu through Windows settings. To do this, you need to select the “Network and Internet” section (Ethernet sub-item).
How to update your Wi-Fi driver
The most common reason why Wi-Fi does not work on a laptop is the absence or incorrect installation of drivers. This is specialized software that allows the module to function correctly in your operating system. There are several ways to update drivers:
- through the standard Windows interface;
- independently, i.e. manually;
- using specialized software.
Let's consider each of the methods separately.
Updating the driver using Windows
The standard interface of Windows 7-10 operating systems allows you to update the driver for any laptop component. This can be done through the “Task Manager”:
- Enter the “Task Manager” (this was described in detail earlier). Find the required network adapter.
- Right-click on it and then click “Properties”.
- Select the Driver tab and click Update.
The system may display a message that you have the latest driver installed, but this information is not always true. If updating the driver using this method did not work, perform a self-installation.
Manual installation
This is the most reliable way. It consists of downloading the necessary driver from the official website of the developer. You can find the driver in the “Support” or “Products” sections. In the list, you need to indicate the model of your wireless adapter. Be sure to find out the bitness of your operating system (32 or 64 bits). This will be needed when downloading some individual drivers. Typically, the file has ".exe" permission.
Once you download it to your computer, run the installer and follow the installer prompts. After installation, the system may require you to restart your laptop. Make sure the Wi-Fi module is working. Then try connecting to your wireless access point. An example of the official website and driver download is shown in the image below.
Using utility programs
Errors may occur during driver installation. If trying again does not bring positive results, use auxiliary software. A prime example is the Driver Genius program. It allows you to scan your entire laptop to determine which drivers are outdated. It can also be used to perform backup and restore.
To update using this program, follow these steps:
- Download and install Driver Genius.
- Click the Start Scan button. Wait for the process to complete.
- In the list of update suggestions, leave a checkmark next to the wireless adapter only. Click the Update (or Fix Now) button.
- Wait for the driver to download. Finally, click on the “Install” button.
After installing the software, naturally, restart the laptop, and be sure to check the functionality of the Wi-Fi wireless module.
If the Internet via Wi-Fi does not turn on
If Internet access on your laptop still does not appear after all of the above, connect the network cable to the computer directly, open Device Manager through the Control Panel, select the Network Adapters tab, find your Wifi module in the list and try updating the drivers. After that, disconnect the Internet cable and restart the laptop.
If you still cannot turn on the Internet after this, there may be either problems on the provider’s side, or incorrect router settings, or the Wi-Fi module is faulty. The cost of repairs at a service center ranges from 1000 to 2000 rubles, but you can get by with an external WiFi module - on Aliexpress such devices cost about 150 rubles.
Procedure for Windows 7
The algorithm of sequential actions is as follows:
- Open “Network and Sharing Center”;
- Next, go to the “Change adapter parameters” tab;
- Then go to Wi-Fi connection properties$
- Set the necessary values for the functioning of the TCP/IPv4 protocol;
- Reopen the “Network and Sharing Center”;
- Click “Connect to network”;
- Specify the required connection and click “Connect”;
- If Wi-Fi is protected by an access code, you will need to type it and press “Enter”;
- Ready"! Now you can go online.
The procedure in Windows 8 and 10 is almost completely similar to the “Seven”.
If there is no ladder or wave icon
This means that drivers for the network card and, in particular, for the built-in Wi-Fi adapter are not installed. This happens when the laptop is new or the operating system has recently been reinstalled on it.
- We cannot connect to the Internet because we do not have drivers for the network card, so we will download them elsewhere.
- If you have drivers on the disk that came with the laptop, then simply insert the disk and do a complete installation of the drivers. Sometimes the software is located on the hard drive directly on the laptop in the Drivers section.
- If there is no disk, we will have to turn to friends for help
- We come to a friend’s flash drive and go to the website – https://drp.su/ru/foradmin.
- Scroll down a little and download only drivers for network equipment on the flash drive.
- Now we come home and install the firewood.
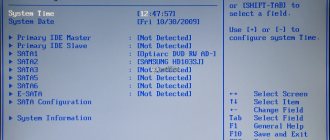
BIOS setup
The operating parameters of the motherboard elements are set in the BIOS.
By disabling (either accidentally or deliberately) the wireless adapter in these settings, you will not be able to use Wi-Fi on your laptop. The specific steps to activate the adapter are determined by the laptop model, firmware type and BIOS version. In general, when you go into the BIOS when booting your PC, you need to:
- Go through the menu items and look in the settings for names like “Onboard WLAN”, “Wireless LAN”, “Wireless”, etc.
- If such an item is detected, its value should be set to “Enabled” or “ON” mode.
- Press the “F10” key (or the one that is o in your case).
- To restart a computer.
Possible problems with the wireless signal receiving device
Often, even after the correct procedure for turning on the WiFi adapter, there is still no wireless connection. This problem occurs due to the following circumstances:
- Incorrectly installed software (problem with drivers);
- Computer damage by malicious software (viruses);
- OS operating errors.
It is necessary to establish the cause and solve the problem, since without this the laptop will not be able to establish a wireless connection. Most often, reinstalling drivers leads to a successful solution to such difficulties, however, sometimes, without completely curing the computer of viruses, it is not possible to restore the connection.