Wireless wi-fi networks are widespread not only in offices and Internet clubs, but also in ordinary city apartments. Using such a connection, you can access the Internet through personal computers, tablets and smartphones, and, in general, using any device equipped with a wi-fi module. Despite the abundance of such devices, the largest number of such wireless connections comes from laptops. How to connect a laptop to wi-fi and what problems may arise will be the topic of our publication.
Creating an access point
The process of creating a wireless Internet access point consists of several steps:
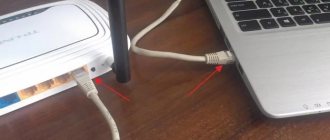
- Connecting the router First of all, connect the RJ 45 connector of the cable you have, through which the provider connects the equipment to the network, to the wan connector of the router. As a rule, such a connector is located separately from the others and is painted in a different color. Use the router instructions that come with the device. Now you need to connect the device adapter to a 220V socket and a laptop, after which you need to turn on the router itself.
- Setting up the router. It makes no sense to describe the setup process; each manufacturer’s setup menu and operating principle are different. It is best if professionals deal with these issues.
- Setting up Wi-Fi and then connecting the laptop to the intended access point. And here we will go into more detail.
Creating an access point
Modern laptops can not only connect to Wi-Fi, but can also distribute it themselves. This is a very convenient feature - you can share the Internet with friends or colleagues in any location, provided that there is an Internet source (for example, a connected modem).
To configure a wi-fi access point yourself, follow the instructions:
- Go to “Start” and enter the phrase “Command Prompt” in the search.
- Left-click on “Run as administrator”.
- A window will open to create your own access point, enter the special command netsh wlan set hostednetwork mode=allow ssid=My_virtual_WiFi key=12345678 keyUsage=persistent.
- Further actions: go to “Network and Internet/Network Connections”, the system will show the new device that has appeared.
On a note. The meaning of the command word ssid is the name of the new network; you can come up with it yourself and write it in Latin letters after the “=” sign. The key command is a unique password that you also need to come up with yourself and enter after the “=”. It will be used by group members who connect to the new access point.
You must come up with a password, otherwise the Internet will become public.
Procedure for Windows XP
The following sequential steps must be followed:
- Through “Start”, enter the “Control Panel”;
- Next, go to “Network Connections”;
- Then, in the window that appears, call up the context menu for the wireless connection and click on the “Properties” line;
- Open the “General” tab;
- Next, in the “Components” section, click on “TCP/IPv4 Protocol”;
- Click “Properties”;
- Activate receiving IP, DNS automatically or print them (depending on the router parameters);
- Exit the protocol properties and open the “Wireless Networks” tab;
- Set the network through which you plan to access the World Wide Web and click “Connect”;
- If Wi-Fi is protected by an access code, you will need to type it and press “Enter”;
- Ready"! Now you can go online.
Check and install the driver for Wi-Fi
If you can't connect to Wi-Fi, you probably need to install a driver. To do this, download and install the program manually. In newer versions this issue is easier - for example, version 10 of the software independently installs all the necessary drivers.
So, to check the driver, follow these steps:
- Right-click on the computer icon.
- Go to “Properties”, then go to “Device Manager”.
- Click on “Network adapters”, in which we look for the presence of a driver for connecting to WiFi. If the driver is not installed on your device, the device will be shown with an exclamation point in a yellow icon instead of programs. This means that the laptop does not recognize the existing adapter because there is no driver.
If there is no connection to the wireless Internet, then the adapter is not recognized. The next step is to install the driver. The required program can be selected on the official website of your laptop manufacturer, in accordance with the model of equipment and the operating system that is installed on it.
The program is downloaded in archive format, you need to run it. When the installation is complete, reboot your laptop. Then search and run the driver again.
Connection via Network and Sharing Center
To establish a connection this way:
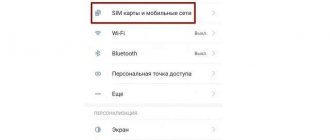
- In the laptop settings menu, go to the “Network and Sharing Center” section. You can open this section in the same way you opened the command line - through the search line in “start”.
- Next you need to switch to the advanced settings tab. At this point, enable the “network discovery” and “password protected sharing” commands. Then save the changes and return to the “Network Center” section.
- The next step is to configure the adapter settings. To do this, go to the settings section of the same name. In the window that opens, connect to an available network: select the device that the laptop found, right-click, select the “Properties” tab. In the “Access” tab, check all the boxes. Now you need to select the desired network in the “home group connection” item.
How to position and turn on the router?
First, let's look at the places where it is strictly not recommended to install the router (otherwise it may not work correctly):
- The first and basic rule is not to place the router near other devices that operate at frequencies from 2 to 6 GHz (cordless phones, microwave ovens, wireless extenders, etc.). The explanation for this is very simple - two devices operating on the same wavelength interfere with each other.
- There is no need to place the router at a short distance near reflective surfaces, for example, a mirror. In this case, the signal will be much worse or disappear altogether.
- It is advisable to have as few electrical devices as possible between your access point and your laptop.
- It is best to avoid installation near a load-bearing wall.
The recommended location for installing the router is a wall, the higher the better. Very often, the routers themselves already have special grooves, so you don’t need to drill a hole.
How to connect a laptop to WiFi with Windows 7,8,10
To connect your laptop to the Internet via WiFi (home router, access point in a cafe), just click on the network symbol in the lower right corner of the screen and select an available network without password protection. Otherwise, you will have to work a little harder.
First of all, let's look at the connection on a laptop with Windows 7:
- Go to the Internet network settings section.
- Click “Set up a wireless network” and click “Next” at the bottom.
- In the special field, write the name of the network, and in the “security type” item, select WPA2-Personal.
- Create a password to connect to the network. It must have at least 8 characters. Then you can enable "Save". We turn on “Next” and wait for the connection to occur.
- If in the future you need to distribute the Internet to other devices, go to “Enable sharing”. Select the “Close” button.
On a note. On a laptop with the XP version, you must select WEP in the security section.
In version 8 you can try using the same method as in Windows 7. But in some cases they may not work.
Then we use the command line window method:
- the code should be like this: netsh wlan show drivers
- if in the text “Protection of management frames” the answer is “Yes” - write a command with a created password and the name of the Internet point: netsh wlan set hostednetwork mode=allow ssid=”network-name” key=”connection-password”
- The code for creating the installation is similar to version 7. netsh wlan start hostednetwork
You can connect from any existing laptop or computer.
In the case of version 10, connecting to the network has become much easier. The driver is installed by default, there is an easy panel to connect and disconnect WiFi.
It is worth mentioning just a few details that will greatly facilitate the task of familiarizing yourself with the connection in version 10:
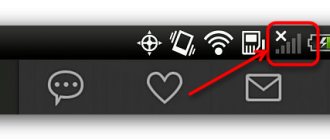
- By clicking the network icon, we check for the presence of an adapter. If it is simply turned off, a red cross will light up, and if it is turned on and sees available networks, a yellow asterisk will appear.
- To turn on the adapter, simply click on the icon with a red cross.
- The adapter will then calculate available networks. Select the one you need and connect.
Important! If you select the “No authentication” option in the security settings, you can connect to the network without a password.
Forgot your password or it doesn't work
If the router is fresh out of the box and has not yet been configured, then the password is on a label under the device. Otherwise, you can make a connection via WPS. For this:
- We find the WPS button on the back of our Wi-Fi machine. It can be combined with the reset button or located on the side or on the top cover of the device. On Zyxel routers, a similar button is located at the top and has a Wi-Fi wave icon.
- Press it for 2-3 seconds, no more.
- Now we are looking for available connections and trying to connect. Next, a window will appear where you will need to enter the PIN from the WPS network. It is located on the label. But if it’s not there, then just click on the same button once and the password request will disappear.
If you don’t remember it, you will have to reboot the router to factory settings and configure it again. This is done very easily and instructions for each model are on our website. Just enter the name of your router into the search bar (it's located in the upper right corner).
Possible connection problems
Most often, the connection problem lies with the driver. It may be incorrectly configured or absent altogether.
A more serious reason may be incorrect operation of the entire system on the laptop in general or infection of the system with viruses. Whether this is true or not, other problems in the operation of the laptop will help to understand, for example, incorrect operation of various programs, the appearance of advertising and even file corruption.
To check for viruses, just run an antivirus program. If the result turns out that there really are viruses, they need to be removed. Most often, after this, connecting the laptop to the wifi router and other problems solve themselves.
Enabling the adapter
Before you start creating a new connection, you need to check if the Wi-FI adapter is turned on.
Each laptop model has its own function key to turn the adapter on/off. For example, ASUS laptops use the combination Fn+F2, and Acer laptops use Fn+F3. On some Lenovo models, adapter status is controlled using a hardware switch located on the front panel.
To determine which key you have installed, look at the F1-F12 row. One of the buttons should have an icon - an antenna that distributes a signal. Press this button in combination with the Fn key and check that the Wi-Fi adapter indicator light changes from red to blue or green.
What to do if the Wi-Fi adapter does not turn on?
There are situations when, after pressing a function key, the adapter does not turn on. Typically this problem occurs due to one of the following reasons:
- Incorrectly installed drivers.
- Incorrect operation of the system.
- Virus infection of laptop.
Until you eliminate the cause, the question of how to set up Wi-Fi in a laptop will not receive a positive resolution. Most often, the problem lies in incorrectly installed drivers, but it would also be a good idea to check the system for viruses. If no malicious applications are found, reinstall the Wi-Fi module drivers and try turning it on again.