Unlike iOS, the Android platform is more open and amenable to so-called deep control. But even here there are some restrictions and prohibitions. The system will not allow the average user to tamper with their files or experiment with potentially dangerous settings.
These restrictions can also be circumvented if you open Root access on Android, that is, gain superuser rights. Such interference in the system can have a negative impact on the platform, especially when it comes to newbie experiments. So you should think several times before getting Root rights and access to Android. The consequences of inept actions can be the most tragic. But first things first.
How to get root rights?
From our article you will learn how to get Root access on Android and what tools you will need for this. Let's look at the main stages of this procedure and give some useful tips. The latter will help you avoid critical mistakes.
As an “experimental” we will take one of the most popular gadgets in the mid-price segment - Xiaomi Note 3, and we will try to enable Root access on Android on it. But first, let’s conduct a brief educational program, which will obviously not be superfluous for beginners.
Root ToolCase – get root capabilities with one click
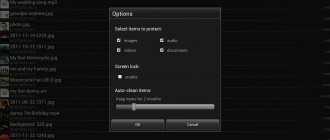
This is a universal application that allows you to configure and manage your smartphone without any restrictions, remove unnecessary utilities, clear the cache and much more without root rights. After installing the program from PlayMarket, we will see the following window:
IMPORTANT, this program does not root the device, but provides a number of system features that are not available without installing it (information from the developers in the image below).
The application's start window prompts us to select what we need, namely:
- Click Advanced Reboot and get acquainted with the following features:
The user can customize the smart startup process, access safe mode if problems arise, and also reset to factory settings by pressing just one key.
- App Manager
Allows you to edit installed applications (including system ones) and even remove malware that cannot be removed using built-in protection systems.
- Additional system settings.
Ability to work in the ADB development environment using wireless networks, mounting partitions, changing the language, etc. The Build.prop Editor allows you to change ROM properties. An installer function for flash devices is available, which makes it possible to configure almost any functionality on the phone, thereby making it completely individual.
Toverloop
A kind of “veteran of the root”. A well-known application that works on almost all devices with old Android firmware (up to version 5 inclusive). Despite this, it is very popular because the rooting process is possible in one click. A list of devices available for upgrade is on the application website.
- Download the apk file from the official website to your smartphone and install it.
- By clicking on the key, we root the device.
A list of devices available for upgrade is on the application website.
Why do you need Root or superuser rights?
Such rights are necessary to gain full access to the system and its files. This allows you to upgrade the Android platform to suit your needs to perform some specific tasks. Moreover, we are talking here not only about mobile phones and tablets, but also about other devices running this OS.
For example, if you enable Root access for Android on a TV set-top box, you will be able to install a noticeably larger list of applications on it: codecs, file managers, games and other software that was previously unavailable or is somehow limited for installation.
Features of a rooted gadget:
- fine-tuning the interface (fonts, animation, icons, element sizes, etc.);
- removal of applications built-in by the developer/manufacturer;
- free purchases in gaming applications;
- backup of all files, including system ones (for future experiments with the platform);
- block built-in advertising (Aliexpress, taxi services, etc.);
- install programs on the memory card.
What are the pros and cons of root access?
Activating superuser mode on your smartphone will provide you with several significant benefits.
- Complete removal of advertising. Install the AdAway application, give it root rights and forget about advertising in your browser, programs, YouTube and other places.
- Removing junk applications. In principle, you can remove pre-installed programs without root rights by following our instructions, but this method does not always work. With root access, you can easily remove any unnecessary application.
- Get additional features using Magisk and Xposed modules. These programs can do a lot of interesting things to your system. For example, make YouTube play videos in the background, move the notification bar or clock to any place convenient for you, add new control gestures, and so on.
- Extending the life of your smartphone on a single battery charge. There are a huge number of utilities that promise to optimize your smartphone's battery, but most of them are completely useless. Greenify is not one of those: it actually works. But she needs root access.
But all these manipulations can also have negative consequences.
- Possible voiding of warranty. Some manufacturers and service centers refuse to provide warranty service to your smartphone if they discover that you have unlocked root access to it. Therefore, it is worth turning it off before taking the device to a service center.
- Damage to your smartphone. If you did not carefully follow the instructions for getting root, the device's firmware may be damaged and it will refuse to turn on. This is called “bricking” the device. Sometimes you can reflash the device via a USB cable and bring it back to life on your own, but in other cases you cannot do without a trip to the service center.
- Root access makes the smartphone more vulnerable. Install some dubious application on your smartphone, give it root rights, and it will probably break something for you. So you will have to be more careful when downloading programs.
- Some programs refuse to work with unlocked root. For example, banking applications. The solution is to activate the Magisk Hide option in the settings of the Magisk program that manages root rights.
- System updates may remove your root rights. You'll have to get them again. The solution is not to update the system, do it less often than usual, or install custom firmware.
Consequences of obtaining administrator rights
But before you install Root access on Android, you should know that you can cause harm not only to your gadget, but also add headaches to yourself.
Possible consequences of obtaining root rights:
- loss of warranty;
- the ability to receive updates “over the air” is lost;
- There is a small chance that your device will fail.
So, before you enable Root access on Android, think a hundred times, do you really need it? It is quite possible that to implement the assigned tasks there will be some specialized applications or other tools that do not affect the platform system files.
Rooting a Phone Tasks
The Android operating system is a software environment that gives the user the ability to install third-party applications, change basic settings, and finally reset the current OS settings to their original state. In order to preserve the functionality of the mobile device, access to the Android kernel containing system files is closed.
Here is the answer to why you need root rights on Android: rooting, or rooting, opens access to the system (root) folder, which means it gives you the opportunity to change previously inaccessible operating system settings.
Preparation
If you are going to enable Root access on Android, then first you should prepare your device for this procedure. This will avoid losing important data such as contacts, passwords, work files, some notes, etc.
Before rooting your device, be sure to back up your important information to an external storage device. This procedure can be performed either using specialized software or manually using local means.
Creating a backup copy (consider on Android 6.x):
- Open “Settings” – “Memory and backups”.
- Click on the “Backup and Restore” item.
- Then call up the “Backup” window.
- The utility will prompt you to select a storage location (select an external drive).
- We place beacons on the data that needs to be copied.
- We agree with the procedure and wait for it to finish.
Also make sure that your gadget is charged at least 80%. If the process of obtaining superuser rights is interrupted due to a dead battery, that is, the device is turned off, then the likelihood of your device being “bricked” increases significantly.
USB debugging mode
Debug mode is used to communicate between smartphone and PC to perform advanced operations under Android SDK when developing or testing mobile applications in Android Studio without any additional coding process.
We recommend reading → The best applications for Android: a list of the most necessary ones
But in the context of this material, debugging mode is used to obtain root rights using a PC. This mode also serves as one of the steps when installing a customized Android OS on a smartphone.
Using ADB mode with debugging enabled, you can install various apk application files on your phone using a PC (a useful technique when installing any specialized software without using the root rights of your smartphone).
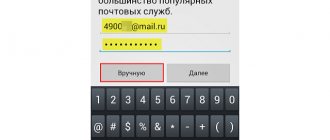
To enable this mode, you need to open the smartphone settings, select “About phone”. There, find the value “Build number”, press this inscription several times (5-8 depending on the phone software) until the inscription “You have become a developer!” is displayed. After this, you need to find the “Developer Options” item in the “About Phone” subsection and switch the “USB Debugging” slider to the ON position. After this, you can connect your smartphone to your PC and, after confirming access to USB debugging in the pop-up window, perform the necessary manipulations.
Using this function requires increased user attention - connecting to a computer with public or remote access can initiate theft of personal data, even when the device is locked. That is why it is not recommended to enable this function if you do not plan to use it at a given time.
Features of the procedure
It would also be a good idea to allow installation of applications from unknown sources in the settings. If you are going to enable Root access on Android via a personal computer, then you need to activate USB debugging mode.
Installation from unknown sources:
- Open “Settings” – “Fingerprints and Security”.
- At the bottom of the list, move the toggle switch to the active position in the “Unknown sources” section.
- Reboot the gadget.
USB debugging mode:
- Open “Settings” – “About phone”.
- Click on the line with the firmware version 6-7 times until the message “You are now a developer” appears.
- Again, open “Settings” - “Special Features”.
- Select the “For Developers” item.
- Switch the toggle switch in the “USB Debugging” line to the active position.
- Reboot the gadget.
Dangers of Using Root
When using your device in superuser mode, remember:
- if the system is damaged (due to the deletion of an important file), the phone will not be restored under warranty;
- OS auto-update does not work (it will work again after disabling Root rights).
Therefore, do not activate root rights aimlessly.
Obtaining administrator rights from a mobile device
First, let's look at how to enable Root access on Android directly from your phone. For this we need a program from Chinese developers KingRoot. You can download it from the official website. There, if necessary, you can find a localization tool. The latter is not executed in the best way, so it is better to get by with the native English version, because there will not be any special difficulties here.
This application is compatible with almost all popular brands of smartphones. The developer assures that the chance of the device being “bricked” when using its software is extremely small – about 0.1%. Judging by user reviews, this is true: out of a hundred users, only one or two complained about a completely damaged gadget. And even then, after the investigations, it turned out that some conditions and points for obtaining root rights were violated.
Rooting process:
- Download the application to your device and install it.
- Launch the program and wait for the analysis of your gadget to finish.
- If the main window says Root access is unavailable, then click on the Try to Root button.
- Wait for the rooting process to complete (the time depends on the performance of the device).
- If the operation was successful, the message Root Succeeded will appear.
- Reboot your device.
Sometimes some problems may arise when rooting; instead of a message indicating that administrator rights were successfully obtained, the program produces logs with errors. Owners of Samsung gadgets often complain about this. The brand and its proprietary firmware provide more reliable protection of the system from this kind of “intrusion”, so you can try running the program again.
How to disable root rights on Android
This may be necessary if you cannot install an application that does not work with root access (for example, a banking or payment program), and Magisk Hide does not help. Or you want to take your phone to a service center for repairs.
Instructions for canceling root access for your device can be found in the corresponding topic on w3bsit3-dns.com. In most cases, the process is quite simple: just download the Magisk Uninstaller ZIP archive and flash it via TWRP.
In order to remove TWRP, you will have to reflash your Android, which will delete all data and return it to factory settings. Find the “Official Firmware” section in the 4PDA topic dedicated to your device and follow the instructions found there.
Features of the program
The fact is that the utility uses different and not always compatible rooting algorithms. That is, they are performed one by one. Relaunching the program may well be more successful.
Many also ask the question: “Where can I find Root access on Android?” In order to find out whether your device is rooted or not, just launch KingRoot and one of the inscriptions should appear on the main window - Root access is unavailable or Root Succeeded. In the first case, administrator rights are not installed, but in the second, they are successfully obtained.
Is it worth using apps to root Android?
Sometimes you can get superuser rights by simply pressing a button in a special program. However, this does not work with all Android devices.
However, we (as well as the XDA Developers forum) do not recommend using one-click Android rooting programs because they often install adware or malicious applications on your smartphone. So such utilities should not be trusted. Remember: getting access yourself is always more reliable.
Obtaining administrator rights from a PC
Advanced users consider rooting via a personal computer more reliable, and the likelihood of successfully obtaining administrator rights in this case is higher. Judging by the reviews, the Kingo Android Root program can be called the most popular, and at the same time, effective tool.
The developers of this software are looking for vulnerabilities in the Android platform, so they know their stuff, and no serious mistakes have been noticed. You can find the program on their official website.
Rooting procedure:
- Connect your mobile device via USB interface (USB debugging must be enabled on your phone).
- Wait until the program detects your device and installs the appropriate drivers (check your Internet connection).
- On your mobile gadget, in the pop-up window, allow the connection by clicking on the OK button.
- The main window with a large ROOT button at the bottom should appear on the computer.
- Click on it, wait for the rooting process to complete (the time depends on the performance of your mobile device).
- If the procedure is completed successfully, the message Root Succeeded will appear!
- Disconnect the USB cable and restart your mobile gadget.
The program works with a large list of smartphones, tablets, TV set-top boxes and other devices running the Android platform. If the utility was unable to determine the model of your device or the necessary drivers were not found, then in this case it is worth looking for a proprietary application from the manufacturer for synchronization. You can find it on the official website of the brand. If you have an ultra-low-cost noname device from China, then it is better to obtain administrator rights in the first way, that is, directly from the phone.
Content
Kingo Root without a computer
Kingo Root on a computer
How to check if you are rooted
There are two ways to root Android using Kingo Root - with or without a computer. We'll look at both separately.
Attention: you perform operations with the device at your own peril and risk. The author is not responsible for possible consequences when following the instructions described in this article. In addition, hacking Android means losing your warranty. Root your gadget only if you are confident in your actions.
Removing Root Access
This section may also be needed, especially for those who want to take their gadget to a service center under warranty, or if, after rooting, some serious problems appear in the operation of the device. To remove administrator rights, we need the SuperSU program. You can find it on the Play Market.
Removing root access:
- Launch the utility and wait until it detects the gadget model and checks for root rights.
- Go to the “Settings” tab.
- Click on the item “Complete removal of Root”.
- The device will freeze for a while and then reboot.
- A message should appear in a pop-up window indicating that the removal of root rights was successful.
Types of Android rooting
Having figured out why you need root on Android, we will highlight three main ways to gain access to the root folder of your phone or tablet:
- "Full" Access is established forever, in full, including the ability to change or delete system files.
- "Shell" Access is established forever, access to the root directory remains closed.
- "Temporary" Access is established temporarily, usually until the operating system is restarted.
Root rights obtained using the latter method are the least dangerous for a smartphone or tablet: they are usually installed to perform a specific task, for example, uninstalling a system application, and after a reboot, root disappears, preventing the user from performing actions that threaten the “health” of Android.
Rooting Android 7 and above
Traditional methods of obtaining super user rights on new types of devices do not always give positive results. Installing the application will only allow you to control some functions of your smartphone, but not become super su.
We will provide a short guide for OS version 7 and higher.
- It is mandatory to unlock the Bootloader on your smartphone. Depending on the model and firmware, this procedure will be slightly different.
- Go to “developer mode” (again, depending on the model, this menu item may be in different places) and enable “USB debugging”.
- Download the development environment - Android SDK Platform Tools - to your PC.
- On a specialized website we find the custom firmware we need for your smartphone, usually TWRP.
5. After flashing, our initial TWRP window loads, select Recovery Mode using the volume keys, confirm the selection by point-pressing the power button.
6. Next, open the SuperSU.zip archive and thereby obtain root rights. Reboot the device and exit recovery mode.
Results
As we can see, establishing Superuser rights (aka root rights) on Android without using a computer or with its help is not difficult. To do this, just select the necessary software. The only catch may be that the selected utility will not support your specific device model. In this situation, you should try another program or use the manufacturer's proprietary application (if available).
If all else fails and root access to Android is still denied to you, you will have to carefully study the information on specialized forums in threads dedicated to your model. And, of course, to identify problems that interfere with obtaining elevated rights, you should definitely pay attention to the text of warning messages and errors that usually accompany the occurrence of various types of problems.
- 15shared
- 1Facebook
- 14Twitter
- 0VKontakte
- 0Odnoklassniki
Checking for extended rights
You can find out whether a particular mobile device has Superuser rights using the Root Checker . We install it from the Play Market, and then launch it.
To start checking, click the “Root Check” button.
If the required rights are not found, a red message will appear; if they have already been granted, then a green message will appear.
In the absence of authority, we proceed to direct actions to acquire it.