If you have just purchased new laptop, And all your data are still on the old computer, transferring files to the new computer takes time if you do it the old way - with laptop to flash drive and from a flash drive to a new device.
Now you can try the best way to transfer data from laptop to laptop without the need of additional tools and settings like data cables or routers.
The only requirement is that one of your computers must be running Windows 7. Instructions for Windows 10 are further down the list. If this is the scenario, you can transfer files through creating a WiFi Ad Hoc network connection between two laptops. In an ad hoc network, each node forwards data to other nodes and target nodes are dynamically discovered based on the Internet connection.
Create a Wireless Ad Hoc Network for Microsoft Windows 7
On a Windows 10 PC, open Control Panel > Network and Sharing Center. In the window, click “Create and Configure a New Connection or Network.”
In the new dialog box that appears, select “Set up an ad-hoc (computer-to-computer) wireless network.”
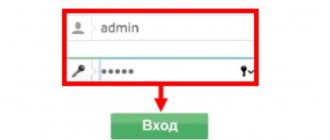
Next twice and you will be prompted to enter a network name and select a security profile. Select any name as you like and select " Security Type " as WPA2-Personal. Also enter a password , which must be entered by other hosts that try to connect to this computer (You can also select an open network, but this is not recommended for security reasons. Your shared files can be accessed by anyone on your premises).
Once done, click “Next” and your ad hoc network will be ready to use. In your bat task click on network notifications and it will be like below.
To connect other computers to your network, they only need to look for a WiFi connection and connect to it by entering a password.
Connecting to a router
You can connect to the router either via cable or via Wi-Fi. It makes no difference how exactly. One laptop or computer can be connected via wire, and the second via WiFi and vice versa. To connect via cable, take a network cable and connect it to one of the LAN (local) ports.
Usually there are several LAN ports, so you probably won’t go wrong. There is also an Internet port - a cable from the provider is usually inserted there.
You can also simply connect to the router’s wireless Wi-Fi network. We just search for networks, find the one we need and connect by entering the required key. As you can see, nothing complicated. After this, the two laptops or computers will already be connected to each other. But to access certain data, you need to fine-tune network security on both devices. And also share some folders. Therefore, let’s look at the chapter at the very end.
HOW TO ADD AN INTERNET CONNECTION?
To share a data connection you've already connected, right-click it and select Properties. Select the sharing tab and check about and click OK.
That's all. Now that you have learned how to connect a laptop to a laptop via Wi-Fi, we recommend that you read other useful guides: How to strengthen the Wi-Fi signal in the house ? Or how to connect a laptop to a TV via Wi-Fi.
Network security settings
The laptops are already connected to the network and see each other, but the problem is that they don’t trust each other, so to speak. Now we will try to fix this.
- First, you need to select a folder on one of the laptops, which we will make common for everyone. Select it with the right button and go to “Properties”.
- “Access” – “Sharing”.
- We set rights for all users - as in the picture above.
- Select “Everyone” and set the rights. Here you can set it so that the second laptop can only read or also write – as you wish.
We have expanded the folder, but the laptops do not yet trust each other. Further steps must be performed on both computers. For closer trust, you also need to change your security settings. Click on the connection in the lower right corner and select the first pop-up item.
- "Change advanced sharing settings."
- Check the box to enable network discovery. We also enable file and folder sharing.
- But most importantly, disable password access.
How to connect laptop to laptop in Windows 10
This version of Windows makes creating an ad-hoc network a little easier when compared to earlier Windows operating systems. If you want to set up an ad-hoc network manually without using any other software than what Windows has, follow these steps:
Open Command Prompt by pressing Windows + X, select Command Prompt and enter this command, replacing the italicized entries with your own network name and wireless network password:
netsh wlan set hostednetwork mode=allow ssid= network name key= password
Start a hosted network:
netsh wlan start hostednetwork
Now you can connect to this network from another laptop. Also, if you need to pause the network, enter the following command:
netsh wlan stop hostednetwork
In Control Panel, go to \Network and Internet\ Network Connections \ and go to the Sharing tab of the network connection properties (right-click to find Properties) to check the Allow other network users to connect through the Internet connection of this computer "
Select ad-hoc network connection from the dropdown menu and OK from any open prompts.
Connection via cable
Any network cable will do for this. We just plug one end into the first laptop, and the other end into the second.
Now all that remains is to correctly register the network parameters of the first and second laptops.
- To enter the parameters, press the keys and R at the same time. After that, enter the command “ncpa.cpl” in the window that opens.
- Right-click on the local connection and select “Properties”.
- Select protocol 4 and then “Properties”. Set the IP address as in the picture above on one of the laptops.
- On the second laptop you will need to do the same, but replace the last digit with 2.
Wired connection
You can connect multiple laptops without using a wireless connection via Wi-Fi. However, in this case, you will have to visit a specialized store and purchase a special HDMI or RJ-45 cable. After a successful purchase, it will be useful to familiarize yourself with the recommendations on how to connect a laptop to a laptop via an HDMI or RJ-45 cable.
Connection via cable
Many users wonder if it is possible to connect a laptop to a laptop via HDMI. To answer this question, it doesn’t hurt to understand what an HDMI cable is.
An HDMI cable provides communication between home appliances. In most cases, an HDMI cable is used when there is a desire to connect a computer or laptop to a TV, since the main functional purpose of an HDMI cable is to transmit audio and video signals.
Since HDMI guarantees high speed and quality of video and audio transmission, users actively use it when connecting two devices that support a network connection via HDMI.
If users want to avoid problems associated with connecting devices over a network via HDMI, it is rational to fully study the information whether it is possible to connect a laptop to a laptop using any other cable.
Such a connection may indeed be actively used if it is impossible to provide a wireless connection. The RJ-45 cable is used as a basis.
One end of the purchased cable is inserted into the network card of one laptop, and the other end into the network adapter of the second laptop. After this, you must make changes to the adapter parameters.
On the first laptop you should register the IP address 192.168.1.1, the subnet mask will be set automatically, nothing should be changed. On the second laptop, the IP address changes only slightly and can take the following form - 192.168.1.2, the subnet mask will again remain unchanged. After the corresponding changes take effect, both laptops will be visible on the network, so users can perform various actions, exchanging data quickly and comfortably.
It sometimes happens that the first login to the local laptop after connecting fails. However, there is no reason to despair, because everything can be fixed, ensuring successful use of the network in the future. To avoid connection problems, the user must go to the “Network and Sharing Center” menu, then go to the “Change additional sharing settings” section, in which set the access parameters by enabling sharing.
You may also need to make changes to your guest policy settings. To go to “Security Settings”, where changes will be made directly, type secpol.msc at the command line. In the dialog box that opens, go to the “Local Policies” line, then to “Security Settings”, where you select guest access.
Despite the fact that you have to perform a number of actions and make some changes, all these manipulations are quite simple, accessible and feasible. Each user, if there is a desire to provide communication between several laptops, can achieve what they want and become much more aware of this issue.
How to connect to another computer via local network in Windows 7?
First, connect two computers: using a cable or a "Wi-Fi" router (just switch between two computers on the same network). Now create a workgroup for two computers and give the devices different names and IP addresses (if the connection is wired). Provide access to files on each PC through Network Center.
Sources
- https://AlexZsoft.ru/2-sposoba-kak-soedinit-dva-kompyutera-mezhdu-soboj.html
- https://droidov.com/kak-podklyuchit-kompyuter-k-kompyuteru-cherez-usb-wi-fi-setevoy-kabel
- https://massgame.ru/mozhno-li-soedinit-dva-kompyutera-cherez-usb/
- https://WiFiGid.ru/raznye-sovety-dlya-windows/podklyuchit-pk-k-pk
[collapse]
Setting up a TV and laptop
To simply connect devices via cable, no setup is required. The main thing is that the TV and computer have the appropriate “female” connectors, and have a working cable ready to connect the devices through these connectors.
Configuration may be required if the connection uses a local network or wireless connection technology via Wi-Fi.
TV software setup
Depending on the system used by the TV (Android, Tizen and others launchers), the interface and name of the parameters may differ. But the setup algorithm is as follows:
- Turn on and go to the smart functions menu or TV-Box screen.
- In the settings, open “access points”, enter the login and password for the Wi-Fi network.
- If you are using an Ethernet cable, make sure it is connected to the TV and has Internet access.
- In the settings, find the Screen Mirroring wireless screen feature. If possible, put it on the main screen.
- If you work through Home Media Server or analogues, install VLC player from the application store.
In general, there is no need to make any further settings on the TV. Developers of large displays make equipment in such a way that all functions “work out of the box” and settings take place automatically.
Laptop setup
Before using a wireless connection using Miracast technology, on a laptop:
- Install Windows 7, 8 or 10 and update your network drivers. It is advisable to use drivers specifically tailored for your network card, and not randomly taken by the system from its database.
- Right click on Start and go to Device Manager. Open Network Settings and make sure the Wireless adapter is visible and configured to work correctly.
- Now make sure that the laptop supports the technology
- Press Win+R and enter dxdiag.
- On the first System tab, click the Save All Information button and convert the information into a text document.
- Open it and look for the Miracast line.
- If it says: Available, with HDCP, then the laptop supports the technology and is ready for wireless connection to the display.
When connecting a computer or laptop via DLNA technology:
- Make sure that the router is operating normally and that the laptop and TV have access to the Internet.
- Then you need to create a DLNA server. Home Media Server performs this role perfectly, but Windows 10 tools can also be used.
- Through Windows Search, open “Media Streaming Options.”
- Click "Enable Media Streaming" and then give the "media library" a name and click "OK."
- Ready. Now you can find network server folders from the TV through the file manager.
- And to start playback on TV, right-click on the file, and through the context menu, select “Bring to device.”
Connect using Widi Miracast
Widi Miracast is a technology that allows you to completely broadcast everything that happens from your laptop screen to TV. To synchronize two devices via Miracast, you must perform the following steps:
- Make sure that both products support this technology. WiDi is available for laptops with second generation Intel Core i3/i5/i7 processors.
- Turn on Wi-Fi on both gadgets and activate the Miracast function on TV.
- Press the Win+P key combination on your laptop, and then select the projection mode.
Once the connection is complete, no additional manipulations are required. This is a huge advantage of Miracast. You can find out whether your TV supports Miracast technology on the manufacturer's official website or by carefully studying the operating instructions.
To activate this technology on your TV, you should go to the menu, select “Settings”, then “Network” and activate the “Miracast” function (on some models it is called “Screen Share”).
TV software setup
When all devices are connected via cable, it is necessary to make the appropriate settings. To begin, open the main menu of the TV and select the input through which the laptop was connected.
For some models, immediately after connecting the cable, the name of the input to which the device was actually connected appears. Activate it, after which you will immediately see the laptop desktop on your TV screen.
Sometimes you have to adjust the connection manually, but there is nothing complicated about it. For example, to select the VGA interface, go to the menu and check the box next to PC. For maximum convenience, some manufacturers mark absolutely all inputs with a special icon, by which you can identify the port without unnecessary difficulties.
Many models are equipped with backlighting for active connectors; again, this makes it much easier to find the active synchronization method. Naturally, there are differences in the settings, since each TV has a special menu.
Also read: TOP 20 best 43-inch TVs: 2021 rating by price/quality and which budget model to choose
Connection methods
Let's start with the options for connecting a laptop to the Internet:
- The cable from the provider goes directly from outside to the home laptop.
- I have a router at home and need to configure it. Then you can connect your laptop in two ways: via cable or using Wi-Fi.
- 3G/4G modem.
- Satellite Internet – here all settings and manipulations are done by company employees.
In the next chapter we will start connecting. I advise you to read from beginning to end so as not to miss anything important.
Checking if the connection is working
The result of our work can be checked using the command line and the special PING command.
Don't be alarmed, there's nothing scary here.
We approach the device on which the IP address 192.168.1.1 was set; it can be either a computer or a laptop, depending on how you configured it.
By pressing the hot keys “ Windows + R ” (Windows is located to the left of Alt), we call up the “Run” window.
Then enter the command “CMD” into the line and click OK.
You will see a window like this.
As shown in the photo below, enter the command “PING 192.168.1.2” and see what the system “tells” us.
And the system tells us that 4 packets were sent, 4 were also received, which means the connection is established and the computer and laptop are connected.
Don't forget to share the disks and files you will be working with over the network.