Not all smartphones are fast. Sometimes these devices come with slow memory or an unoptimized operating system. All this leads to the fact that updating each application greatly slows down the operation of the gadget. And this update can start at any moment, which can drive the user crazy. Fortunately, you can disable updates on Android without much difficulty. In this case, you will be able to install new versions of programs and games only at a time when it is convenient for you.
Why do you need to disable updates?
Disabling updates may be necessary in the following cases:
- there is not enough space on the smartphone - the storage medium is no longer capable of storing data or it is missing, and the internal memory of the phone is too small;
- the old version of the application consumes fewer resources than the new one, which affects the performance of weak devices;
- the owner of the smartphone does not use specific applications too often and does not want to fill the device’s memory in vain.
Automatic updating of many tools interferes with the normal operation of the smartphone, since it often happens that the process runs in the background and takes up a lot of the device’s operational resources. For example, if a user is watching a video in the YouTube application and some software starts the process in the background, the video loads with delays.
Some applications stop working without installing the latest version. For example, this applies to bank clients, who install more reliable security parameters with each new data package.
Removing a system update
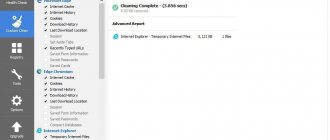
If the system downloaded the update before you managed to prevent it from doing so, you can delete the update.
However, you will need root rights for this, otherwise you will not get into the Android file system. If your phone is rooted, install the Root Explorer application and find the Updates.zip file in the Cache folder. Delete it, and your phone will no longer have the latest downloaded but not installed update. But you shouldn’t play too much with root: if you do something wrong, problems may arise - for example, the computer will stop seeing Android via USB.
Disabling Android system updates
Many users of Android devices disable the automatic option, leaving notifications about the availability of data packages that can replace the old ones.
To disable you need:
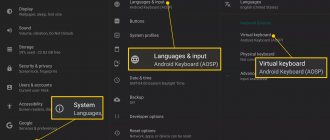
- go to the “Settings” of your smartphone and select the “Component Update” section (varies depending on the phone brand and OS version);
- make the required settings.
Deactivating the automatic procedure for system components is highly not recommended, since in this case the manufacturer will not be able to guarantee the correct operation of the OS.
How to revert to the old update version
If the download of new software on Samsung happened automatically, it’s okay. The application can be returned to its original version, but only for “factory” software. To return the software to its original state, do the following:
- go to Settings;
- go to Applications and select the desired option;
- Click Disconnect and confirm disconnection;
- When asked to Install the original version... click OK.
After completing these steps, the updates are removed.
Disable automatic sync
By default, automatic synchronization is not activated on Android. Since it is done through a Google account, its connection is only possible if you have an account.
How to cancel an operation:
- Find the “Synchronization” section in your phone’s “Settings”;
- deactivate it by clicking on “Auto-sync data”.
This option does not in any way affect the state of applications and system components on the device, but will help save information at risk of loss. It is not recommended to disable automatic synchronization for system partitions. For example, “Contacts”, “Call Log”, “User Settings”, etc.
Disabling auto-updates for apps and games
By default, Google Play offers to automatically update every app you install. But, as mentioned above, this causes certain problems when using a budget device with slow memory. On such devices, auto-update should be disabled. But how to do that? You probably remember that you were asked about automatic updates only when you first used Google Play. Later, this item magically disappeared from the pages of games and programs. All this is for the sake of speeding up the download and installation process, as well as to make each page easier and, accordingly, speed up its loading. You can now find this item in another way:
Step 1 . Open Play Store.
Step 2 . Pull out the curtain with the main menu from the left edge, then click on the “Settings” item.
Step 3 . Click on "Auto-update applications".
Step 4 . Here you can disable this feature by checking the box next to “Never”.
Step 5 . If you do not want to receive notifications about the availability of updates, then a corresponding subsection has been created for you in “Settings”. Just uncheck the “Availability of updates” checkbox.
This is how easy it is to disable updates on Android. But do not forget that from time to time you need to install new versions of programs and games, as developers regularly improve their stability and functionality.
How to remove an update for a specific software
There are situations when the owner of a Samsung phone wants to disable auto-update only for a specific application. In this case, the rest of the software should load automatically.
To solve the problem, proceed as follows:
- Log in to the Play Store and click on the Menu button.
- Enter the My apps and games section.
- Open the Installed list.
- Select the required software and click on its name (not the Open button).
- Bring up additional options at the top right (Three dots).
At the final stage, all that remains is to remove the automatic update marks on the necessary programs.
Various Ways to Disable Android Auto on Android Smartphone
Here are different ways to stop Android Auto from starting automatically in your car.
Remove the application
The first solution is the one that seems obvious, but which you should consider first. If you no longer use Android Auto, uninstall it.
If you have an old version of android , it is very easy to remove Android Auto.
Uninstall Android Auto on an earlier version of Android.
If you have a version older than 10, you can Uninstall Android Auto manually . Hold the app logo on the main menu for a few seconds and you will see the uninstall option appear.
Disable automatic start
Block startup on Android 10
However, if you have Android version 10 , you probably know that Android Auto is now included in the system apps . This means that you cannot remove the application, you can only deactivate it. Here are your options:
- Disable automatic Bluetooth connection
As soon as you get into the car, if you have activated this option, Android Auto will launch in your control panel. To turn it off, here's how:
- Go to settings from your smartphone
- type Android Auto in the search bar, then open
- In different options, go to Phone Screen Settings
- Open the Automatic Start
- Disable automatic start as shown in this photo
Block launch on older versions of Android
If you are using an older version , you then use the Android Auto app downloaded from the Play-store. It is possible to disable automatic app connections without uninstalling the app . Here's how to do it:
- Open Android Auto
- Open the settings menu
- Tap the Connected Cars
- Make sure the Add cars to Android Auto feature is unchecked
- In the upper right corner click on the 3 small dots and delete all pre-registered cars
So here's how to disable Android Auto from starting automatically in older versions of Android. However, if you are using Android 10 and want to connect your smartphone via USB without running Android Auto, follow these steps:
Application update mode settings
To set up the mode on Honor, launch the Google Play Store. And then follow the steps:
- open the Google Play Store menu by swiping the screen or pressing the button with three stripes;
- click on “Settings” / “Auto-update” / “Only via Wi-Fi”;
Afterwards, notifications will only occur when Wi_Fi is connected. This significantly reduces mobile traffic consumption. You can also open the App Gallery, Huawei's own app store. Works similar to Play Store.
How to return to the previous version of Honor and Huawei firmware
After all the preparatory work has been completed, we begin the operation. To uninstall an EMUI or Magic UI update. which do not work correctly, you will need to:
- Connect Huawei to your computer or laptop via a USB cable.
- Windows will appear on both devices asking you to confirm your actions. Here you should click “OK”.
- Next, in the HiSuite program that opens on the computer, you should enter the 8-digit code, which at this moment will appear on the smartphone screen.
- Go to the main page of the program.
- Click on “System Update”.
- A warning window will appear asking you to allow further action.
- In the new window, click “Other version”.
- HiSuite will show what is available for download to the device, its functionality and size in gigabytes.
- Click the “Restore” button.
- A window with the latest warnings will appear. After this stage you will not be able to go back. It’s worth checking again that all the necessary data is saved on the memory card or in a cloud service.
- Then click on the “Roll back to previous version” button.
Now all you have to do is wait until the old firmware version is downloaded to the device and installed. The process takes a lot of time, so you can do other things. The main thing is to exclude the possibility of disconnecting the USB cable connecting the computer to the phone.
After the installation is complete, you will need to re-configure all the settings, as is the case when purchasing a new smartphone. That is, set the date, region, language, connect to your Google or Huawei account, and so on.
Preparation before rollback
Before performing a firmware rollback on Honor or Huawei phones, you should prepare for this operation.
- First, you need to save all the necessary files, since rolling back the EMUI (MagicUI) shells entails deleting all information. Music. Photos and videos can be transferred to a memory card and removed from the phone. You can also use a cloud service and transfer all data there or run a data backup.
- After saving all the necessary information, you should charge your smartphone. The battery must be at least half charged, since the rollback operation on Huawei and Honor is very energy-intensive and takes a lot of time. And if the phone dies during this operation, it can lead to irreparable consequences.
- The next stage is clearing the memory. Installing the shell requires quite a lot of space, on the order of several gigabytes. So you should provide enough free space.
- To restore the previous version of the shell, you will need a computer or laptop on which the HiSuite program must be installed.