Rostelecom Sip telephony is a technology that makes it possible to connect regular telephony and the Internet.
The basic principle of operation is quite simple - the subscriber's voice is transformed into compressed data packets, which are then transmitted to the recipient via the network and then decoded again into regular speech. This is what makes it possible to significantly reduce the load on the telephone network, thereby reducing the cost of calls. For IP telephony you can use both special equipment and classic means of communication such as a computer, cell phone or even a landline.
IP telephony capabilities
IP telephony is one of the youngest types of communication, based on the SIP protocol. It has taken telephony to the next level, and now, knowing your SIP ID, you can move around the world, seamlessly make voice calls, participate in video conferences, play games online, transfer media files and exchange text messages, all for "symbolic" fee. You can call your friends and colleagues via the Internet; IP telephony from Rostelecom also allows you to call mobile and landline phones, for which the system provides for the use of special gateways.
It is worth noting that calls passing through the World Wide Web have nothing to do with traditional telephony. In this case, only Internet traffic is paid, and given that most packages are unlimited, we can confidently say that calls can be made for free. By the way, even if you are in a remote part of the planet, by connecting a softphone to your gadget, you can stay in touch anywhere on the planet.
Important! This is an ideal solution for business, because even while on vacation, you do not lose contact with your partners, who can still simply call you on a landline phone number.
Errors in Asterisk configuration
Let's look at common mistakes when setting up a virtual PBX "Asterix" and give instructions that will help them.
- Asterisk does not register with the server and returns a Forbidden response in debug mode.
Reason: the password was entered incorrectly, the SIP ID or domain was specified. Check the contents of the sip.conf file. - Incoming calls are dropped.
Reasons: internal user is not registered. Check the registration with the sip show registry command. - Outgoing calls are not received.
Reason: the number template was specified incorrectly (the “_” character was missing before the template). - Sound travels only in one direction.
Reason: You are using NAT. Enable debug and use tcpdump - this way you will see where requests and audio traffic are going.
Connecting and setting up IP telephony Rostelecom
Being a leading telephone operator and an experienced Internet provider at the same time, Rostelecom was one of the first to use the SIP protocol. Now, in addition to providing standard telephony services, each user has the opportunity to organize inexpensive, and at the same time, high-quality telephone communication. To do this, just use the package after receiving the Rostelecom IP telephony settings. The package of services provided includes:
- Access to the cloud telephone system from Rostelecom, which means reduced costs for telephone calls and connection.
- From anywhere in the world, you can continue to receive calls, set up call centers, and continue to provide 24-hour support to your clients.
- Free call service for clients, in fact, you receive a free landline number.
- Possibility of connecting a Rostelecom home phone, external (landline and mobile) telephone numbers.
- Fast office telephone installation with the ability to simultaneously connect several workstations.
In addition, by performing certain manipulations and setting up the IP telephony software from Rostelecom, you can organize a real PBX on your computer. This means you can manage calls, arrange call forwarding, record calls, set greetings, create voice menus and much more. All IP telephony services from Rostelecom, moreover, do not require expensive equipment, and in order to always be in touch you will need to purchase an IP phone or install a softphone on your computer.
Initial setup files
Setting up Asterisk is essentially editing configuration files in the /etc/asterisk/ . These files include:
- pjsip.conf – setting up the PJSIP multimedia library;
- extensions.conf – dialplan settings: calls, forwarding, melodies on hold, auto attendant, etc.;
- asterisk.conf – setting paths to used Asterisk folders;
- cdr.conf – basic settings for the call report Call Detail Record;
- rtp.conf – RTP protocol settings;
- features.conf – parameters for call interception and parking, maximum dialing and forwarding time, DTMF codes for subscriber features;
- modules.conf – data about loading modules when Asterisk starts;
- musiconhold.conf – music on hold configurations;
- iax.conf – connections using the IAX protocol for connecting two or more PBXs;
- voicemail.conf – voicemail parameters;
- logger.conf – parameters for logging Asterisk operation.
Rostelecom SIP telephony tariffs
No matter how attractive the offer of SIP telephony from PJSC Rostelecom is, you should not count on “free cheese”, since each service costs its money, and in the case of communication tariffs using the SIP protocol, this is a low cost with high quality of communication. When choosing a basic tariff, which costs 423 rubles per month, you have the opportunity to connect 5 workstations at the same time, each additional workplace will cost another 41.5 rubles. per month. If you want to record telephone conversations of office employees, then you will have to pay an additional 70 rubles monthly for each workplace. Incoming calls to 8-800 number cost 1.3 rubles per minute, and outgoing calls are charged as follows:
- A call to a landline number will cost only 60 kopecks per minute.
- The cost of dialing numbers on a mobile phone in the region is 1.6 rubles. in a minute.
- You can call landline and mobile numbers in Russia for 1.75 rubles/minute.
- Payment for international calls is made depending on the chosen direction.
The conditions listed above are for users from Moscow; as for other regions, you can obtain information by contacting Rostelecom support. By the way, you can get acquainted with the advantages of IP telephony and identify possible shortcomings absolutely free, since the provider offers a 7-day trial period.
- How to register a SIP account?
What tariff plans are available for legal entities when connecting to IP telephony?
Examining Internet queries for Rostelecom, analytics show that network users are trying to find more detailed information about the provider’s IP telephony, tariff plans for individuals and legal entities, and additional system capabilities.
You should take into account the fact that individuals will not be able to connect to this Internet resource, but individual entrepreneurs, private companies and government organizations can.
Rostelecom includes 4 tariff plans in this range of services, which have different monthly payments, a limit on outgoing calls, the ability to store recordings for a certain number of days and a limited number of places for use. TP are as follows:
- base;
- minimum;
- optimal;
- maximum.
At the same time, the provider took care of the availability of additional functions on any tariff plan, such as:
- control of incoming calls;
- voice menu control;
- the ability to conduct statistics and analysis of calls at any time;
- entering a certain number of numbers into the automatic telephone exchange.
How to call via IP telephony Rostelecom
If you have made international calls, you know that they begin with dialing the number 8, but you should forget this rule, since in the case of IP telephony everything happens differently. The dialing combination for a landline number includes: country code (1-3 characters), landline number code, and the number itself. Calling a mobile phone number occurs in approximately the same way, only instead of the landline number code, the mobile operator code is dialed. To improve the quality of communication and better sound transmission, you can first enter two zeros - in this case, even the city tariff will be charged as an international one, but its quality will be an order of magnitude higher.
Rostelecom Sip telephony is a technology that makes it possible to connect regular telephony and the Internet. The basic principle of operation is quite simple - the subscriber's voice is transformed into compressed data packets, which are then transmitted to the recipient via the network and then decoded again into regular speech.
Setting up sip in Rostelecom
The VoIP telephony service is available to dctv FTTB users and can be provided either in one cable (IPTV, Inet, VoIP), or separately at the request of the customer (it may be more expensive), by dividing it into separate VLANs.
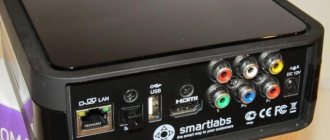
Parameters you will need to configure Rostelecom sip yourself:
- auth. password: xxxxxxxx.
- auth. name: 83147ххххх.
- SIP server port: 5060 (standard is used).
- SIP server: 172.22.1.1.
- Proxy server - not used.
- STUN server - also not used.
Other settings necessary for successful network operation:
Sip Rostelecom setup. Answers to some frequently asked questions:
(An external address would make it possible to call subscribers of the Rostelecom operator via the Internet and the number would look like: [email protected] , also a classic SIP phone can support several SIP providers at once. By the way, it is also possible to select them so that it is more profitable for you to call.
Modern developments and solutions in the field of communications make it possible to expand the boundaries of familiar telephony, thanks to the possibility of combining with a global network. The Rostlecom company offers business entities SIP numbers 8-800 within the framework of this technology in addition to multi-channel landline numbers, as well as short numbers for internal communications.
- PBX in your pocket: setting up IP telephony for remote work
Content:
Setting up SIP telephony from Rostelecom
To set up digital telephony using SIP technology from Rostelecom, you need to determine what will be used as a communication device. There are two ways: using a headset or a VoIP device.
In the first case:
- download the application (client for computer) from the official website;
- unpack and install;
- enter your login information;
- Go to the “advanced settings” menu and fill in the SIP parameters (issued to the subscriber upon concluding a service agreement);
- adjusting audio playback and recording parameters.
When using an IP phone:
- we connect to the general network;
- dial the phone’s IP address on the PC (the address is indicated in the instructions for the device);
- enter user data (login and password);
- open the home page;
- find and fill out the tab with SIP settings;
- We save all entered data and reboot the device for activation to take place.
Thanks to SIP technologies, subscribers have advantages that were not available when using standard telephone communications, namely:
- low cost of service;
- inexpensive equipment;
- the ability to connect both external and internal additional numbers;
- lack of a fixed subscriber point;
- ease of transferring the communication line in case of moving.
It has become much more profitable for legal entities to organize negotiation processes. Tariffs for calls both within the country and abroad with IP telephony allow you to save money.
- Integration with Bitrix24 telephony
Setting up SIP from Rostelecom in Asterisk
Asterisk is one of the most common solutions used as a SIP server. This program has the capabilities of call forwarding, transfer, call hold, and also supports conferencing and Call center options.
Find out how to restore communication with the server if there is an error “IP address not received” on IPTV from Rostelecom.
You can read about setting up the Eltex NTP-RG-1402G-W router for provider services here.
When setting up SIP telephony from Rostelecom based on Asterisk, you need to find out the username, password and the phone number itself. To achieve positive results, you need to determine which functional features are important:
- how many digits will be in the phone number;
- on what basis should you choose the first digit;
- how to distribute numbering among departments;
- how to group call groups;
- consider the moments when calls need to be forwarded;
- think over the logic for servicing incoming calls.
After, you need to create a new trunk with a name and specify the parameters using the appropriate commands.
Attention! You also need to fill in the data of the SIP-based IP telephony proxy server from Rostelecom. To do this, in the settings we mark the values according to the available details.
Installing Asterisk from source
Build and install the necessary dependencies and packages.
First you need to install additional packages that are necessary for installing and running Asterisk. Without some of these packages, Asterisk will refuse to install at all (for example, if gcc is missing). Without some packages, Asterisk will install and even work, but some of the functionality will not be available.
For example, the bison package is required to process expressions in the extensions.conf file. Another example: libnewt is required for the astman management interface to work. The Asterisk server does not require it, but without this package you will not have the astman application, which is a separate program.
Here is an example of installing Asterisk 13 on Cent OS 6.9:
yum -y install gcc gcc-c++ make ncurses-devel libxml2-devel sqlite-devel bison kernel-headers kernel-devel openssl openssl-devel newt newt-devel flex curl sox binutils
For versions 12-13 of Asterisk, the installation of the uuid and janson packages is required. To install the uuid library on RHEL/Centos, run the command:
yum -y install libuuid-devel
. To install the jansson library on RHEL/Centos, run the command:
yum -y install jansson-devel (requires installing the epel repository first): yum install epel-release
Then we update the system to the latest version with the command yum update –y and reboot it: reboot
Installation and installation of their sources
Asterisk is configured in its pure form, without additional expansion cards and modems. This way you will get the most effective and working solution - a software PBX that can be easily transferred from one server to another. To do this, you need to install Asterisk from scratch, install pjproject with jansson, update the system and disable SELinux.
First, let's disable Selinux . To do this, go to /etc/selinux/config and set: SELINUX=DISABLED.
Also turn off FireWall (iptables) :
- Checking status: service iptables status;
- Disable: service iptables stop
- Disabling from startup: chkconfig iptables off
- Reboot the system: reboot
Download and install pjproject:
d /usr/src
git clone git://github.com/asterisk/pjproject pjproject
cd pjproject/
./configure –libdir=/usr/lib64 –prefix=/usr –enable-shared –disable-sound –disable-resample
make dep
make
make install
ldconfig
ldconfig -p | grep pj
To convert mp3 files you need the Lame package. Let's install it from the repository:
rpm -Uvh https://pkgs.repoforge.org/rpmforge-release/rpmforge-release-0.5.3-1.el6.rf.x86_64.rpm
yum repolist - check installed repositories
Next, install the package itself: yum install lame
Download and install the Libpri library:
cd /usr/src/
wget https://downloads.asterisk.org/pub/telephony/libpri/libpri-1.4-current.tar.gz
tar xvfz libpri-1.4-*.tar.gz
cd /usr/src/libpri-1.4.*
make
make install
If the wget command does not exist, then install it with the command yum –y install wget
Next, download and install asterisk 13 :
cd /usr/src/
wget https://downloads.asterisk.org/pub/telephony/asterisk/asterisk-13-current.tar.gz
tar xvfz asterisk-13-current.tar.gz
cd asterisk-13.*
contrib/scripts/get_mp3_source.sh
./configure –libdir=/usr/lib64
If there are no errors when checking and preparing the assembly of the necessary settings and models, then the Asterisk
make menuselect - all the necessary parameters are selected, but in principle you can leave them by default, the main thing is that the necessary channel drivers are enabled
Select modules and sounds (can be left as default). In modules we select only sip. (we don’t install pjsip):
Install voice acting for core and extra (for the second it is available in Russian). We recommend g729, alaw, ulaw, gsm codecs. Next, it’s up to your taste which codecs are needed:
Other settings can be left as default. If you installed a module, but realized that you don't need it, just disable it in the configuration and build again using make. Save the selected changes.
Continue installation:
make
make install
make config
make samples
ldconfig
If Asterisk is installed successfully, the Asterisk logo is visible in the log lines (appears after the configure stage) .
Add Asterisk to startup and get started:
chkconfig asterisk on
service asterisk start
Check that it starts correctly via the console:
asterisk -r
Reboot your computer to check that Asterisk . When entering asterisk –r we should get to the console, as in the screenshot above.