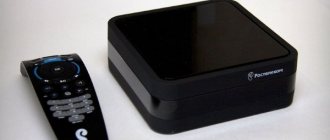
The Rostelecom digital set-top box is a mandatory device for receiving broadcasts. According to the company's rules, subscribers can watch using the receiver only a certain number of channels, which is determined by the connected tariff package. The firmware of the Rostelecom set-top box is carried out to enable free viewing of all possible channels, as well as to increase the capabilities and functionality.
The positive side of the new firmware is the ability to watch additional TV channels without paying for operator services. In addition, a convenient home media center with WI-FI and DLNA support will be available.
Flaws
Users have not found any significant shortcomings in reflashing interactive TV. The only change after updating the Rostelecom router is the loss of standard built-in services - weather, exchange rates.
What set-top boxes does Rostelecom provide?
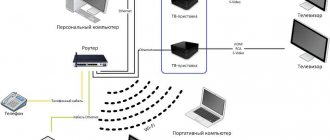
Interactive television cannot work without additional equipment. However, like the Internet. To access the network, customers are asked to buy or rent a router (modem). It connects to a power source and a fiber optic cable, which provides a connection to the Internet.
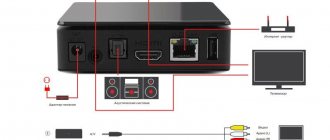
To watch digital channels on a TV, Rostelecom installs a special set-top box. It also connects to the power source as well as the router. To ensure the connection, in most cases a patch cord is used.
SmartLabs is developing set-top boxes for Rostelecom. It is not the first year that it has been producing high-quality equipment, with the help of which the provider’s clients have the opportunity to watch their favorite channels and take advantage of interactive TV.
The client has the right to choose a set-top box to connect to the TV. But most often, Rostelecom employees decide what equipment needs to be installed. For several years they have been connecting a variety of set-top boxes from SmartLabs.
Rarely found prefixes:
- SML-282 HD Base.
- SML-482 HD.
- SML-292 HD Premium.
The most popular consoles:
- SML-5010CT.
- SML-5010.
- SML-5041.
- SML-5050.
Equipment models differ in their range of functions and cost. Typically, the main criterion for providing a particular set-top box is the capabilities of the TV itself. For example, for an outdated device there is no need to connect advanced equipment.
The most popular set-top box today is SML-5010. It is relatively inexpensive, but at the same time guarantees a stable signal and image transmission in high definition format. This and other set-top boxes run on Rostelecom’s own operating system. The firmware has a characteristic interface, which displays the provider's signature features.
As a rule, the firmware on set-top boxes is updated automatically as soon as the next software version arrives. But more and more often, people are looking for ways to reflash the console themselves. This may be due to a variety of reasons, each of which must be considered separately.
SML-282 HD Base
This set-top box is practically no different from the SML-292 Premium model, and the differences between them are quite minor. Externally, they are approximately the same - the premium model, which provides digital TV, has two USB connectors versus one for the standard one, it is worth noting that it has slightly more powerful hardware and is distinguished by support for USB-Wi-Fi modules. A good set-top box with excellent hardware potential. There is also no information that these Rostelecom set-top boxes are characterized by frequent defects or insufficient build quality.
PROS and CONS of flashing the Rostelecom set-top box
Reflashing hardware is a process that anyone can do. But at the same time, the operation is labor-intensive and requires certain knowledge. Therefore, before updating, you need to understand why the flashing procedure is performed at all.
- IPTV RT STB HD Standart: TV set-top box for Rostelecom television
Reflashing the set-top box can provide access to new channels, as well as increase the stability of the equipment. However, the reverse consequences of the update cannot be ruled out.
Self-flashing is a controversial process. On the one hand, performing the procedure entails several advantages. On the other hand, reflashing can lead to dire consequences. In this regard, it is recommended that you familiarize yourself with all the advantages and disadvantages of flashing before engaging in this procedure.
Pros:
- Possibility to increase the number of available channels.
- Additional opportunities may become available.
- Installing good firmware will speed up the interface.
Minuses:
- Some pre-installed services, such as weather or exchange rates, will probably disappear.
- Deterioration in operational stability cannot be ruled out.
- After flashing, the set-top box may stop working.
The client performs reinstallation of the software at his own peril and risk. If problems arise during the process, Rostelecom employees will, of course, help solve them, but an attempt to illegally open additional channels may lead to sanctions from the provider.
Is it possible to connect IPTV without a set-top box?
Indeed, such a possibility is currently envisaged. Recently, it has begun to actively promote a new service, which involves subscribing to several packages of TV channels at once, and also allows you to watch digital television directly through a laptop, computer, smartphone or tablet.
It is also worth noting that the Zabava application is being actively implemented by the company as pre-installed on many TVs from LG, and in the near future it is also planned to additionally integrate it into equipment from manufacturers Philips and Samsung. However, you need to correctly understand that you will not be able to connect digital TV services if you do not rent a TV set-top box, because the activation certificate for this service requires the mandatory provision of such a device to the subscriber for rent or full purchase.
Preparing for firmware
Regardless of whether the client is going to switch from one official firmware to another, or wants to install new software to access blocked channels, it is important to be well prepared for this procedure.
To prepare for flashing, you need:
- Make sure your Internet connection is stable.
- Have a computer or laptop at hand.
- Download the firmware file.
- Download additional utilities MCAST and DHCP server.
- Reset the set-top box settings to factory settings.
Each of the five points will be extremely important. Failure to complete at least one of them will greatly affect the software reinstallation process. In this case, the set-top box will work unstable, or it will not be possible to reflash it at all.
Reset settings
This is perhaps the most important step in the preparation process before flashing your hardware. Without resetting to factory settings, stability in the operation of the set-top box cannot be guaranteed. There is nothing complicated in this procedure.
Before resetting to factory settings, you must remember your username and password to log into your account. Without this information, you will not be able to log in.
The first way to reset to factory settings is by pressing a button. Just one touch, after which the firmware will be reset to zero. The corresponding button is located on the back panel of all set-top boxes provided by Rostelecom. This may not be a SmartLabs product.
In a situation where nothing happens after pressing the button, you should proceed to another option for resetting to factory settings:
- Firmware IP RT TV HD mini from Promsvyaz Rostelecom complete firmware instructions for AllChan
- Turn on the set-top box.
- Open menu.
- Go to the "Settings" section.
- Click the “Reset to factory settings” button.
After the operation is completed, the device will be turned on again and will undergo initial setup. But for manual flashing you do not need to turn on the device. Otherwise, you will have to reset it again, and only then roll out the software update.
How else can such prefixes be used?
This question is often asked by those subscribers who have already disconnected from, but at the same time bought a set-top box and do not understand how it can be used profitably. In fact, it is unlikely that it will be possible to use it anywhere else, and the only exception here can be called devices from, as well as RT HD Standart, which, if desired, can be easily flashed using standard software so that they can later be used in as a standard media player.
It is also worth noting that from time to time you come across some models SML-282 and SML-482 that have the MTS logo, and, quite likely, it will be possible to use such set-top boxes in the future as devices from this operator, while other models will remain in any case you have dead weight.
Official firmware from USB flash drive
This option is the most popular among those who are planning to reflash the console. To complete it you will need:
- Stable Internet.
- Computer or laptop.
- USB drive.
- Operability of interfaces on the computer and set-top box.
If all conditions are met, you can safely proceed to the actual firmware update. It is worth noting that this will take 20-30 minutes. Advanced users can carry out the procedure faster, but it is better to have a certain amount of free time.
To flash the set-top box via USB, you need:
- Download the official software from the section support.ab.ru/settings/actual_firmware/.
- Create a folder on the flash drive with the name of the set-top box model.
- Place the downloaded firmware files into the folder.
- Insert the USB drive into the console.
- Turn on the equipment.
- Go to settings.
- Go to the “Software Update” section and select “Update via USB”.
- Click the “OK” button.
If all steps are completed correctly, the device will begin flashing. A complete update usually does not take more than 10 minutes. In this case, it all depends on the model of the console and its power.
If an error occurs during the installation of updates, you should rewrite the firmware data or use another method of reinstalling the software.
This update method is not the only one. It is also possible to reflash using the equipment’s engineering menu. There are no more difficulties in the procedure.
To flash the firmware via the engineering menu:
- Complete the first 5 points from the previous algorithm.
- Press and hold the “Menu” button on the remote control.
- In the window that opens, select “Upgrade Tools”.
- Click on “USB Bootstrap”.
The second method does not look more complicated, but still requires some skill. If you are not confident in your own abilities, it is better to contact Rostelecom so that a technician can be sent to your home who can reflash the set-top box.
Is it possible to watch video from a flash drive through a set-top box?
For quite a long time, it was customary to save user files contained on a flash drive in the cloud, and each subscriber had the opportunity to place files there up to 7 GB or expand it up to 30 GB for a certain amount. Ultimately, the company was faced with the problem that after downloading the video, it required additional processing in order to then transfer it to the subscriber’s screen. At the same time, transcoders could not cope with such a load, as a result of which the video was processed over several months. For this reason, the service quickly lost its popularity, and many negative reviews appeared about it. That is why, starting in 2013, set-top boxes allow you to view video files directly from USB drives without any problems.
Today, all set-top boxes can play video from USB drives, but there are some restrictions on the video and audio codecs used. So if you encounter a problem where you have no sound when trying to play a movie, you can simply try to compress it with some other codec.
Official firmware via Multicast
It is not always possible to find a flash drive at hand. Plus, both methods of flashing using a USB drive can result in failure. In this case, do not despair, as there is an alternative option to update the software.
- Step-by-step setup of interactive television from Rostelecom via router
An alternative flashing method is multicast. It is used in situations with set-top boxes that are connected to the router via a patch cord. If the connection is via Wi-Fi, it will be enough to connect the mentioned cable, provided that the equipment has a connector.
Multicast is a method of transmitting data over the Internet. Accordingly, no flash drive is needed here. At the same time, it certainly cannot be called simpler. Firmware via multicast will take a lot of time and, most likely, can fray the user’s nerves. So, without self-confidence, you should not consider this option.
To reflash via multicast, you need to:
- Place the utility and firmware files in one folder on your computer or laptop.
- Connect the set-top box to the PC via a patch cord.
- Turn on the equipment.
- Press and hold the “Menu” button on the remote control.
- In the window that opens, select “Upgrade Tools”.
- Open the properties of network connections on your computer through the Control Panel.
- Select the section “Internet Protocol version 4 (TCP/IPv4)”.
- Enter the data for the IP address – 192.168.1.1, for the subnet mask – 255.255.255.0.
- Open the command line using the Win+X key combination.
- Enter “dualserver”.
- Select the previously changed connection type and click on the “Select” button.
- Register the IP address of the first flow – 224.50.0.70:9000, the second – 224.50.0.51:9001.
- Click on “Start” and wait until the processes complete.
- Go back to the engineering menu of the console by holding down the “Menu” button.
- Click on “Upgrade Tools” and select “MC Upgrade”.
- Wait for the process to complete.
On average, it takes 30 minutes to flash the firmware via multicast. Users have difficulty working with the command line and update files. But if you properly prepare for the procedure, problems will be avoided.
What gives?
In addition to the fact that firmware provides certain benefits, each user may face some risks. The most popular among the available models is IPTV RT-STB-HD Standart. In terms of functionality, it resembles the MAG-250. In this case, the subscriber is given the opportunity to return to the original settings. To do this, you need to get an answer on how to flash the Rostelecom set-top box. It is worth noting that you should use standard firmware from Infomir, as well as slightly modified ones. As practice shows, it is best to initially work with the standard one, only after that, if necessary, use the modified one.
It is immediately worth highlighting some of the advantages that the subscriber acquires when performing such manipulations:
- Supports DLNA as well as Wi-Fi.
- Watching television channels without any restrictions from the provider at the set tariff.
But we must not forget that in any case negative qualities will also appear. Here they are:
- Interactive services of Rostelecom will stop working. To operate them, you should use only original software.
That's where the cons end. There will be no more difficulties for the user.
Preparatory activities
In order to learn how to flash a Rostelecom set-top box, you should complete some preparatory steps. Almost always and every subscriber should be able to complete the flashing process. There are no difficulties in this. To perform the action you must:
- A computer with a wire used to connect a set-top box.
- The software itself. This could be mcast.exe, as well as a dhcp server.
All files must be in one folder and placed on drive C. Then the fun begins.
Step-by-step instruction
When you have confidence in performing actions independently, you can begin, following the sequence.
- The settings of the set-top box are reset to factory settings. For this, the “Reset” button is most often used. Otherwise, the work is performed through the menu, where the “Def.Settings” item is selected.
- The work switches to the computer, where after selecting “Run” in the main menu, enter ncpa.cpl and click OK.
- A list of network connections will be displayed, from which you need to select the required item. After this, work continues with the “Properties” section.
- When working with protocol version 4 (TCP/IPv4), in the property parameters, enter IP – 192.168.1.1, and instead of the subnet mask, write 255.255.255.0.
- Having launched the mcast.exe program via WIN + R, click on “Local Area Connection”. On the right side, click the “Select” button.
- The IP address values are entered - stream No. 1: 224.50.0.70:9000 and stream No. 2: 224.50.0.51:9001. Each thread must be running.
- After connecting to the set-top box and starting it, click Upgrade Tools, and then MC Upgrade.
After everything has loaded, you should reboot the device. Now the user can enjoy the functionality of the new media center.
The Rostelecom digital set-top box is a mandatory device for receiving broadcasts. According to the company's rules, subscribers can watch using the receiver only a certain number of channels, which is determined by the connected tariff package. The firmware of the Rostelecom set-top box is carried out to enable free viewing of all possible channels, as well as to increase the capabilities and functionality.
Alternative firmware for Rostelecom set-top box for free viewing of all channels
Official firmware for the Rostelecom set-top box software is required only in cases where the client is not satisfied with the performance of the system. After the update, subscribers' equipment begins to work faster, but at the same time the channels that were previously available by subscription remain open. For many, flashing is a process that allows you to open blocked channels. This way, customers avoid having to pay unaffordable subscription fees.
In the case when a person wants to reinstall software in order to open new channels, he is committing illegal actions. You need to remember this if you suddenly need help from a Rostelecom employee.
The informal update process also requires some preparation. So you should make sure that the equipment meets the following parameters:
- There is a flash drive, the volume of which does not exceed 8 gigabytes.
- The USB storage device is in FAT format.
- There is a folder on the flash drive with the name of the console.
- The folder contains the Bootstrap and imageupdate files, as well as utilities from the preparatory stage.
In addition, we must not forget about resetting to factory settings. Without this operation, the update is unlikely to install correctly. If all conditions are met, you can proceed to flashing the equipment.
How to hack a Rostelecom console through the menu
The process of reinstalling software from official to unofficial is similar to the procedures that were described earlier. But still there are a few exceptions.
To hack a console through the menu you need to:
- Connect the flash drive containing the firmware to the equipment:
- Turn on the set-top box.
- Enter settings.
- Select "Software Update".
- Click on “Update via USB”.
- Click on “Start”.
- Wait for the installation to complete.
The update process is completed by rebooting the set-top box. After the first turn on, the user will see that absolutely all channels are unlocked. If problems arise, it is better not to contact Rostelecom, as company employees may notice that the equipment has been hacked. And this will lead to sanctions.
Alternative firmware via BIOS parameters
BIOS or engineering menu is another way to install alternative firmware. For flashing, the same tools are used as in the case of installing updates using the standard interface.
Firmware flashing via BIOS is performed in several steps:
- Insert the USB drive with the necessary files into the console.
- Turn on the equipment.
- Press and hold the “MENU” button on the remote control.
- In the menu that opens, click on “Ugrade Tools”.
- Select “USB Bootstrap”.
- Click on “OK” and wait for the installation to complete.
In conclusion, it is worth noting once again that all the described actions for alternative flashing are performed at your own peril and risk. In this case, Rostelecom cannot guarantee support, since by removing the block from the channels, the client is engaged in illegal activities.
The Rostelecom TV set-top box is a mandatory device when connecting digital television. As part of this service, the user can view a certain number of channels, determined by the selected tariff plan. Some users reflash the device to increase the functionality, capabilities of the set-top box, and the number of channels. How effective is flashing the set-top box, what advantages does it provide, and what disadvantages does it have?
Content
hide1Pros2Cons3How to reflash4Preparation5Hard RESET (parameter reset)6Official firmware7Preparation for flashing
IPTV HD 101
This is the first Rostelecom 2.0 set-top box, which began to be supplied in a branded box with headphones. The packaging of this device includes an HDMI cable, but users often note that it does not always work correctly and appropriately. If we consider the hardware characteristics of this equipment, they are almost identical to the MAG-250 model, since it has exactly the same processor, but it has almost twice as much RAM.
Set-top boxes can be classified as average in quality, and from time to time they are delivered to service centers with various power problems. It is also worth noting that they completely lack an internal portal, as a result of which the company almost immediately switched to connecting the Rostelecom set-top box model IPTV HD 103, which had not only a standard version of the configuration, but also an additional Wi-Fi and mini option.
How to reflash
The procedure for flashing a TV set-top box consists of four stages:
- Preparation;
- hard reboot (RESET) or factory reset;
- stock firmware;
- flashing with alternative software.
Attention! Not all console models can be reflashed. The procedure was successfully carried out on MAG200250, as well as RTSTBHD Standart.
Reflashing the Rostelecom TV set-top box is carried out in two ways:
- By connecting to a computer.
- Using a USB stick.
MAC address
To find out the MAC address of your set-top box, just look at the sticker located on the bottom panel of the device from. The 2.0 box also often has a sticker with the serial number and this address on the box. Another option: after the operator menu loads, you can go to the “Settings” item and go to the “System Information” section.
Thus, you can independently connect and configure the purchased equipment without resorting to any assistance from qualified specialists. Often, the setup and connection procedure does not cause any difficulties, and in addition, you can always check the instructions that come with each model of set-top box or router.
If you are unable to cope with this problem on your own, then you can turn to specialists. In the vast majority of cases, service centers are present in almost every major city, and at the same time provide subscribers with the opportunity to order paid services for connecting such devices. Among other things, there are a lot of private craftsmen who perform similar work.
Preparation
The preparatory stage before updating the firmware of a set-top box includes:
- computer with Internet connection;
- network cable for connecting the set-top box to a computer (LAN);
- USB drive (you can use an 8 GB flash drive);
- firmware from Infomir;
- special utilities for work (dualServer, mcast).
Software replacement is carried out by installing the official firmware. First you need to install the stock one, and then an alternative one, which will remove the restrictions.
Hard RESET (parameter reset)
The set-top box contains firmware in which the settings are set. These settings must be reset, that is, brought to factory values. To do this, use the RESET or DEFAULT button on the back of the console. It is slightly recessed so as not to accidentally reset the settings. This button must be pressed and held for several seconds. If such a reset does not work (this happens very rarely), then you can reset the settings through the standard menu in Default settings. After confirming the selection of this item, the set-top box will reboot with clean parameters (factory settings).
Official firmware
- We move the downloaded files from Informir to the Mag250 folder created on the flash drive (to work with the corresponding set-top box model).
- We insert this flash drive into the console.
- Go to the receiver menu in the settings and find “Update software”.
- Select USB update and click “start update”.
- Check the integrity of the files on the flash drive and click OK.
It happens that errors occur during the flashing process. Nothing bad happened, just follow the instructions below:
- We delete all data from the media and write it again (there should be no broken files).
- We check the folder name, if there is an error, we correct it.
- We start the flashing process in a different way.
The second option includes the following points:
- Insert the flash drive into the receiver.
- Press Menu on the remote control until the BIOS parameters are displayed.
- Select Upgrade Tools in it.
- Enable USB Bootstrap.
Immediately after flashing, the device will automatically reboot. If you are flashing via a computer (multicast), then you need to do the following:
- Copy all files to a previously prepared folder.
- Turn on the set-top box and in the BIOS (after holding down “Menu”) click on Upgrade Tools.
- Connect the device to the computer's LAN using a network cable.
- On the computer, open connection properties and select IPv parameters
- Set the IP of the connected device with a subnet mask
- Launch the dualserver utility
- Select the connection type and click on “SELECT”.
- We drive two streams into the window. The first is 224.50.0.70:9000, the second stream is 224.50.0.51:9001.
- We start both threads and wait for the process to complete.
- Next, in the BIOS of the TV set-top box, select MC Upgrade.
- After notification of the start of the firmware process and its completion, we reboot the set-top box.
This was the process of flashing the official program. Now you need to install alternative firmware, which removes the restrictions.
Where can I download the firmware and how to use it?
Set-top boxes from Rostelecom are configured in such a way that after connecting to the provider’s network, special Smartlabs firmware is automatically downloaded and installed. At the same time, there is no way for subscribers to download this firmware on their own, and even if you have it on hand, it is unlikely that you will be able to upload it to the device yourself.
In order for your Wi-Fi TV set-top box to receive the necessary firmware, you just need to reboot it. When you turn it on again, the device will automatically check for new available software versions, and if there are any, the automatic update procedure will be activated. That is why, if you have any problems during the operation of such equipment, first of all try to simply reboot it, since in many cases a standard firmware update to a newer version is required.
Preparing for flashing
- You need an 8 GB flash drive formatted in FAT.
- Create a folder on it “mag250”.
- Move the Bootstrap and imageupdate utilities to this folder.
Next, select one of the flashing methods. If using the console menu, then do as described above:
- We insert this flash drive into the console.
- Go to the receiver menu in the settings and find “Update software”.
- Select USB update and click on start update.
- Check the integrity of the files on the flash drive and click OK or Start.
Automatic reboot of the set-top box will mean the end of the process. Using the BIOS, install alternative firmware in the same way as the official one:
- Insert the flash drive into the receiver.
- Press Menu on the remote control until the BIOS parameters are displayed.
- Select Upgrade Tools in it.
- Enable USB Bootstrap.
- Click OK.
If error windows pop up, simply clean the flash drives, rewrite them and try to do everything again.
Each user uses alternative firmware at his own peril and risk, since they are not officially supported by the provider. But using this software is not prohibited, because not everyone has the opportunity to pay for expensive tariff plans, but still want to watch interesting TV programs and talk shows. Alternative firmware or modified software will not close the main standard capabilities of the set-top box, but will open up new opportunities, including additional channels.
Many users of Rostelecom digital interactive television who use Rostelecom IPTV STB RT-HD Standart set-top boxes know that this set-top box is a copy of the MAG-250 micro set-top box from Informir. And MAG-250 is already a full-fledged home media center, with a bunch of goodies,
Firmware
There are three main ways to flash MAG250 firmware. In fact, the set-top box is quite capricious in terms of reinstalling software and quite often does not accept installed images from the OS. If errors occur while applying one method or another, simply move on to the next one. The most effective and trouble-free method is method No. 3, but it is the most labor-intensive to implement from the point of view of the average user.
Method 1: Built-in tool
If the set-top box is working normally and the purpose of the firmware is to simply update its software version or switch to a modified shell, you can use the built-in tool that allows you to update directly from the MAG250 interface.
Preparing a flash drive.
Attention! All data on the flash drive will be destroyed during the operations described below!
As mentioned above, the volume of media for manipulating the MAG250 TV Box should not exceed 4 GB. If you have such a flash drive, format it using any available means in FAT32 and proceed to step No. 10 of the instructions below.
In the case when the existing USB-Flash is more than 4 GB, we perform the following from the first point.
- To make the media suitable for use as a MAG250 firmware tool, you can reduce its size using software. One of the most convenient solutions for such an operation is the MiniTool Partition Wizard program.
- Download, install and run the application.
- Connect the USB-Flash to the PC and wait for it to be detected in MiniTool.
- Click on the area displaying the space of the flash drive, thus selecting it, and follow the “Format Partition”
on the left side of the Partition Wizard window. - In the window that appears, select “FAT32”
as the file system and save the settings by clicking
“OK”
. - Select the flash drive area again and go to the “Move/Resize Partition”
on the left. - To change the size of the partition on the flash drive, move the special slider to the left so that in the “Partition Size”
the value is slightly less than 4 GB.
Click the "OK"
. - Click on “Apply”
at the top of the window and confirm the start of the operation –
“YES”
. - You wait for the process in the MiniTool Partition Wizard to complete,
and in the end you get a flash drive suitable for further manipulations with the MAG250. - Download the firmware components from the link at the beginning of the article, unpack the archive if you downloaded a modified solution.
- Rename the resulting files to “Bootstrap”
and
“imageupdate”
. - On the flash drive, create a directory with the name "mag250"
and place the files obtained in the previous step into it.The directory name on the flash drive must be exactly as indicated above!
Installation process
Method 2: “BIOS” of the set-top box
Installing system software in MAG250 using the configuration environment options and a USB drive with firmware is one of the most effective and popular methods among users. Very often, doing the following helps to restore a non-functional software device.
Method 3: Recovery via Multicast
The last method of installing system software in the MAG250, which we will consider, is most often used to restore “bricked” TV Boxes - those that do not work properly or do not start at all. The recovery methodology involves using the proprietary utility of the set-top box manufacturer, Multicast File Streamer. In addition to a program that allows you to transfer files via a network interface, you will need an application to create a DHCP server on your PC. The example below uses DualServer for this purpose. You can download the tools from the following link:
We remind you that the first thing you need to do when you decide to flash your set-top box is to install the official version of the system. Even if you ultimately plan to use a modified solution, you should not neglect this advice.
- Place the downloaded firmware files, as well as utilities, in a separate directory located on the “C:”
.
Rename
Bootstrap_250 file Bootstrap
. - During the operation of flashing MAG 250 firmware via Multicast, temporarily disable the antivirus and (required) firewall installed in Windows.
- Configure the network card to which the flashed set-top box will be connected to a static IP «192.168.1.1»
. For this: - Connect the MAG250 to the PC network connector using a patch cord. The power supply of the set-top box must be turned off!
- Launch the settings menu by pressing and holding “MENU”
on the remote control, and then connecting power to the set-top box. - Reset your device settings by selecting the option "Def.Settings"
,and then confirming the intention by clicking the “OK”
on the remote control.
- Reload the options menu by selecting "Exit&Save"
and confirming the reboot with the button "OK".
- “MENU”
button on the remote control . - On the PC, call the console in which you send the command:
C:\folder_with_firmware_and_utilities\dualserver.exe –v - After entering the command, press "Enter"
, which will start the server.Do not close the command line until the software installation process in MAG250 is completed!
- Go to the directory with utilities and system software files. From there, open the mcast.exe
. - In the list of network interfaces that appears, mark the item containing “192.168.1.1”
, and then click
“Select”
. - In the main window of the Multicast File Streamer application, in the “IP address, port”
“Stream1/stream1”
section , enter the value 224.50.0.70:9000.
In exactly the same field in the “Stream2/stream2”
, do not change the value. - Press the buttons "Start"
in both streaming sections,which will lead to the start of broadcasting firmware files via the network interface.
- Go to the screen displayed by the set-top box. Change the value of the “Boot Mode”
to
“Nand”
. - Go to "Upgrade Tools"
. - Next is the entrance to “MC Upgrade”
. - The process of transferring the bootloader file to the internal memory of the TV box will begin,
and upon completion the corresponding message will be displayed on the screen. - The following steps will not require intervention, everything is done automatically:
The above methods for flashing the MAG250 TV set-top box allow you to expand the functionality of the solution, as well as restore the functionality of the device. Carefully prepare and follow the instructions, then the process of converting the software part of the entire excellent device will take about 15 minutes, and the result will exceed all expectations!
Many users of Rostelecom digital interactive television using Rostelecom IPTV STB RT-HD Standart set-top boxes
, they know that this set-top box is
a copy of the MAG-250 micro TV set-top box
from Informir.
And MAG-250
is already a full-fledged home media center, with a bunch of goodies,
How to flash the Rostelecom IPTV STB RT HD set-top box in Infomir MAG-250.
The procedure for flashing the Rostelecom IPTV STB RT HD set-top box into Infomir MAG-250 is not complicated, but there are several pitfalls, which I think should be mentioned right away:
1. Before flashing the STB RT HD set-top box, you will need to find a playlist of Rostelecom channels for your Rostelecom branch. For example, here are Rostelecom playlists. Otherwise, you will not be able to watch Rostelecom digital television .
2. If you have a Rostelecom remote control , like this:
Then you need to flash the Rostelecom IPTV STB RT HD set-top box with modified firmware , since this remote control will not be able to work with standard firmware from Infomir, since it does not have some of the necessary buttons.
3. If you want the Internet and digital television on the Rostelecom IPTV STB RT-HD set-top box at the same time, then in most cases you will not be able to do this due to the technical implementation of the connection. This feature is available on routers that support UDP-to-HTTP Proxy.
4. You will not be able to use Rostelecom’s interactive digital television services, because they are only available on Rostelecom firmware.
Firmware for TV set-top box Rostelecom IPTV STB RT HD
Standard firmware for MAG-250 (regular remote control) - link. Modified firmware for MAG-250 (Rostelecom remote control) - link.
Resetting the Rostelecom IPTV STB RT HD set-top box to factory settings.
Before changing the firmware of the STB RT HD set-top box from Rostelecom to Infomir, it is advisable to reset the set-top box settings to the factory settings. To do this, turn on the set-top box and press the Menu on the remote control. The BIOS of the STB RT HD set-top box will open :
Select Def. Settings and press the button to the right (>). The following message should appear:
Click the OK . Next, select Exit & Save :
Press the right button (>). The following message should appear:
Press the OK and wait for the Rostelecom STB RT HD set-top box .
Firmware for Rostelecom IPTV STB RT HD TV set-top box:
1. Download the MAG250 firmware files - Bootstrap and imageupdate and put them in one folder - let it be the mag250 folder on the C: drive. You should also put the mcast.exe and DualServer files there.
1. Turn on the IPTV STB RT-HD Standart set-top box , press and hold down the Menu on the control panel.
2. We get into the BIOS of the STB RT-HD set-top box :
Select the Upgrade Tools .
3. Connect the computer to the set-top box using a LAN cable. Cable crimping is normal, straight.
4. On the network card of your computer, write the IP address 192.168.1.1 and the mask 255.255.255.0 .
5. Run the dualserver.exe . To do this, you need to launch the command line ( Win+R and in the Open line, enter cmd , click OK ).
6. On the Windows command line, write the command C:mag250dualserver -v . The server should be up and running. Minimize (not close) the command line window.
7. Launch the mcast.exe by double clicking the mouse. She will ask you to select the network interface through which we will flash the IPTV STB RT-HD:
Select 192.168.1.1, Local Area Connection . Press the Select . The following window will open:
Here you need to change the broadcast address of the first stream (Stream 1) to the one that listens to STB RT-HD - 224.50.0.70:9000. We do not change the address of the second stream (Stream 2). Press both Start .
7. On the MAG-250 set-top box , select the MC Upgrade and press the > button (right):
After this, the STB RT-HD set-top box will start catching Bootstrap at the address of the multicast stream:
If everything is normal, the IPTV STB RT-HD set-top box will first display the message Reception of an image is started . If the firmware downloads successfully, you will see the message Writing the image to flash :
If the firmware is successfully written to the STB RT-HD , the set-top box will display the message Writing image to flash successfull :
After this, the Rostelecom STB RT-HD set-top box should reboot with the new firmware.
Attention! It will most likely not be possible to reflash the Rostelecom STB RT-HD to the MAG-250 via USB File mag250/imageupdate not present , even though the file is in the folder, the flash drive is formatted in FAT32 and its size is no more than 8GB. Therefore, flash Rostelecom STB RT-HD via Multicast.
The Rostelecom digital set-top box is a mandatory device for receiving broadcasts. According to the company's rules, subscribers can watch using the receiver only a certain number of channels, which is determined by the connected tariff package. The firmware of the Rostelecom set-top box is carried out to enable free viewing of all possible channels, as well as to increase the capabilities and functionality.
How to flash a TV set-top box (Step-by-step instructions)
Let us analyze in detail the process of flashing the firmware of the Rostelecom set-top box model MAG-250.
- Create a folder on your computer and place the previously downloaded server and program in it: mcast.exe and dhcp. In addition, you need to place two files bootstrap and imageupdate.
- Call the command line by pressing the Win+R keys. You need to enter the ncpa.cpl command in it. A network connections window will open, select the one we will use and right-click on it. By clicking on “Properties”, select the component (TCP/IPv4). In the window that opens, you will need to manually enter the IP address 192.168.1.1 and the mask 255.255.255.0.
- Connect one end of the network cable to the computer and the other to the set-top box.
- Turn on the set-top box and quickly press the “Menu” button, after which the device’s BIOS should open.
- Enable the dhcp server installed in a folder on the computer. To do this, in the command line, specify the path to the folder with the file, for example: C:\Rostelecom\dualserver.exe, and press the Enter key
- Run the mcast.exe program and specify IP 192.168.1.1, then click on the “Select” button. In the menu that appears, you will need to specify the broadcast addresses Steam1: 224.50.0.70:9000 and Steam2: 224.50.0.51:9001. Then, next to each stream you will need to press the “Start” key.
In the BIOS you should follow this path: Upgrade Tools - MC Upgrade
.
During the loading process the following messages will appear sequentially:
Bootstrap message: Reception of an image is started!
Bootstrap message: Writing image to flash. Writing image to flash successfull!
Then the device will reboot and start with the new firmware version.
What is needed for flashing
To flash a TV set-top box from Rostelecom, you need to go through four steps:
- Preparation.
- Reset settings.
- Official firmware.
- Alternative firmware.
It is important to understand that not all models can be reflashed. The instructions described below are suitable for the MAG-200, MAG-250 and IPTV RT-STB-HD Standart brands.
There are two ways to flash a Rostelecom set-top box:
- By Multicast.
- C USB flash drives.
Preparation
Before you begin the software update process, you must have the following ready:
- A PC or laptop that includes a network card for connecting to the Internet;
- a special cable (LAN), with which the set-top box will be connected to the computer (if the firmware is flashed via multicast);
- flash card less than 8 GB (for the USB flashing method);
- Infomir firmware program (available at https://soft.infomir.com/mag250/release/);
- DHCP server and MCAST utilities (can be downloaded from the link https://yadi.sk/d/PJxJM6KJsY7US and https://yadi.sk/d/wQdEmBL2sY7Wx).
It is best to flash the device in two stages: first with the official firmware, then with an alternative firmware to remove restrictions.
Reset settings
For the firmware process to work correctly, it is recommended that you start resetting the receiver to factory settings. This can be done using a special “DEFAULT” button, which is located on the back panel of the device and is slightly pressed into its body to protect it from accidental pressing.
If after pressing the button nothing happens. Resetting the settings can be done through the main menu by selecting “Default settings”. Confirming the selected command will delete the parameters.
Alternative firmware for MAG-250 and IPTV RT-STB-HD
Firmware from DNA and Impulse
DNA firmware for MAG-250, Aura HD and IPTV RT-STB-HD Standart turned out to be the only sensible and worthwhile alternative firmware. The rest were minimally modified variations of the regular Infomir firmware.
Update 2021: Since there is no more DNA firmware at the moment, the only worthy alternative is Impulse . You can download it from here - link.
Differences from the official Infomir firmware: - TV program from tv.mail.ru/yandex.ru. — Setting the audio track for each IP-TV stream separately. — Integrated torrent client and samba. — Support for custom menus in the internal portal. — Added support for the Rostelecom remote control. — Added the “Sleep” function (On the Infomir remote control there is a button next to the power supply). — Recording the broadcast to a network drive (NET-USB, connection via the menu in the media browser). — Quick switching between the last 2 channels. — Added autostart of iptv broadcast (TV mode). — Preservation of the screen aspect ratio and the last watched channel when rebooting the set-top box (TV mode). — Package manager (via SSH). — Automatic recovery of set-top box files after firmware update.
Installing Alternative firmware for MAG-250 and IPTV RT-STB-HD
Before flashing the MAG-250 or IPTV RT-STB-HD TV set-top box with alternative firmware, it is first recommended to install the usual software from Infomir. If you try to flash directly from Rostelecom (Smartlabs) to an alternative firmware, problems may arise. Yes, and you can continue to flash it via USB.
Official firmware from USB flash drive
Flashing steps:
- Download the Informir software version.
- Upload the bootstrap and imageupdate files to the “Mag250” folder on the prepared removable media.
- Insert the flash drive into a special slot on the device body.
- Go to the console menu.
- Follow the path: “System settings” - “Setup” - “Update software” - “Update via USB” - “Start update”.
- Check the serviceability and correctness of the files copied to the flash drive.
- Click "OK".
If an error occurs during the installation process, do the following:
- delete data from the memory card and write it again;
- check the folder name for errors and correct them;
- start the process in another way.
An alternative way to flash the MAG-250 console
The best option for an alternative device update is DNA firmware.
Thanks to it, functions such as:
- TV program from Yandex;
- recording broadcasts to disk;
- autostart of broadcasts from Rostelecom;
- Recovery after the update occurs automatically.
It is important to install the original version before installing alternative firmware. Otherwise, problems often arise with updating the device.
The DNA firmware process itself occurs without the use of a network cable. To work, you will need a flash drive with a capacity of up to 8 GB, formatted in FAT32.
Then, on the USB drive you should create a folder with the name of the device and install the firmware files there: “ Bootstrap
" and "
imageupdate
".
In the future, there are two options for updating the device:
- from the internal portal;
- from BIOS.
In the first case, you need to go into the settings and go to the service menu by pressing the “ SETUP”
"
Selecting “ Update software
”, select the option “
via USB
” and click “
Start update
”.
Before starting the process, you will need to click the “ Check
” button.
The program will check for the presence of the necessary files on the flash drive. If all requirements are met, the “ Start”
».
A common error: “Invalid file header.” In this case, it is recommended to reformat the USB drive to FAT32. In addition, you should check the name of the folder on the flash drive. It must be without spaces, for example, MAG250. If this does not help, then you should use the firmware option from the BIOS.
After connecting a USB drive with files, you need to reboot the device. In this case, you should hold down the “ Menu”
"
After the menu appears, select “ Upgrade Tools
”, then go to “
USB Bootstrap
”.
If everything is in order with the information on the flash drive, the process of updating the software version will begin. The successful completion of the installation will be indicated by the message: “ Writing image to flash successfull
».
Then, the device will reboot and will start with the new firmware.
Alternative firmware
Before you start, you must also prepare a bootable USB flash drive:
- Select a flash card no larger than 8GB.
- Format it in FAT system
- Create a folder “mag250” on the media.
- Transfer the Bootstrap and imageupdate files to it.
Alternative firmware via the console menu
Stages of work:
- Open the “Settings” section in the device menu.
- Press the “SETUP” button.
- Select the “Software Update” section.
- Find “Update via USB”.
- Click "Start".
- Check the integrity of the data on the media.
- Click "Start".
After the update is completed, the bailiff will reboot on its own.