Author of the article
Mikhail Romanovsky
Computer repair engineer, technical support specialist
Even the most budget wireless routers can be fraught with surprises. Zyxel Keenetic Start is just one of these. It's easy to set up, has all the modern features and sacrifices very little to be cheap. Here you can watch IPTV, there is support for a large number of connection protocols and excellent firmware that allows you to quickly change any device parameters. We'll talk about setting up the Keenetic Start router, its capabilities and appearance in this article.
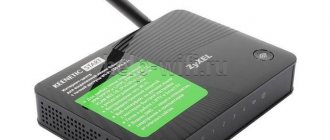
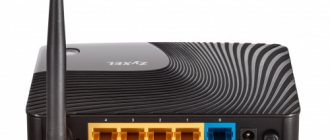
Indicators and connectors
On the back wall there is a completely standard set of connectors and buttons. From left to right here are:
- factory reset button.
- 5 already mentioned network ports.
- power connector.
- on/off button.
On the front are indicators of various device states. The first, Power, shows the power status. Those marked with numbers from 0 to 5 indicate the occupancy of the LAN and WAN ports. The Wi-Fi symbol indicator indicates the presence of a wireless connection. The last globe icon is responsible for demonstrating the Internet connection.
Router configuration and appearance
The router's equipment is minimal: a small network cable, documentation and a power supply. All inscriptions on the device body are made in Russian. The device is available for wall mounting. In a convenient place is the WPS activation key, a function that allows you to easily and quickly connect Wi-Fi devices to the router, without using an encryption key.
In appearance, the router in question is very similar to its older brother (Keenetic 4GII). It only differs in the absence of USB ports and the presence of only one 2dBi antenna.
The device is quite compact (140x110x30 mm). Its weight is only 180 grams.
On the top side there is a trademark of the manufacturer, a WPS button to enable an automatic secure Wi-Fi connection, and LED indicators for power, the inclusion of a wireless Wi-Fi module, the presence of an Internet connection and connection to lan ports.
All ports and connectors are located on the back of the router.
Connection
To connect to the Internet, just insert the cable installed by your provider into your home into the WAN port, and the patch cord that comes with the router into any LAN port on the device. In addition, to connect the Keenetic Start router to the mains, you need to insert the power cord into the appropriate socket and press the power button. Depending on the type of connection, the router will be configured either automatically, or according to instructions from the provider, or by a technical support representative.
Preliminary preparation for work
In order for the router to work for the first time, you need to take a few simple steps:
- Connect the device to the network using the power supply and pressing the power button;
- Connect the router to the external network (provider cable) via the WAN port (highlighted in color on the rear panel);
- Connect the PC via the included cable (inserted into one of five connectors);
- Check the correct execution using the indicators on the front panel: the power light, network connection light and the port indicator with the PC cable inserted should be on;
Afterwards we can open the computer, check the network connection (if there is an “Access Restricted” error) and set an important setting:
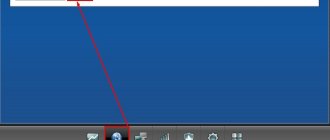
- From the tray (the place on the Start panel next to the time and date) open “Network Center...” by right-clicking on the network icon;
- In the window that opens, find the adapter settings tab and open it;
- On a working connection, right-click and select properties;
- In a new window, look for the fourth version of the Internet protocol, using the button under the list, open properties;
- For both selectors we set automatic retrieval (IP and DNS);
This is where the connection to the Wi-Fi network begins for the Rostelecom provider and any other service provider.
Login to router settings
Immediately after connection, a pre-configuration wizard appears on the user’s computer screen. To ensure that the default connection parameters (point name and password, for example) are not used, the captive portal service notification automatically redirects any requests to the initial setup page. To launch the NetFriend Connection Setup Wizard, there is an "Open Network Login Page" button shown in this screenshot.
If the wizard does not start, you can find it yourself by entering the address 192.168.1.1 in the address bar of your browser. To log in, you will need a login and password, which should be admin in both cases, if the provider has not made any preliminary settings. In some firmware versions, the password is 1234, but such devices are now rare on the market. Alternatively, if none of the options are suitable, you can look at the bottom cover of the router - there may be a sticker with these parameters.
The first screen is to select a setup method. There are two buttons here - “Quick setup” and “Web configurator”. The first one will configure the router automatically, the second one will configure it manually. Let's talk about the differences in these two methods in more detail.
Overview of functions and features
Network protection
WPA2 is recognized as the most secure security protocol. It is recommended to select it in the “Network protection” field. Next, it is proposed to set (check) the following parameters:
- password (at least 8 characters);
- region;
- version standard – 802.11b/g/n (installed automatically).
If you plan to organize a public network (without a password), then the encryption field should be left blank.
Channel selection
The speed of the Wi-Fi network depends on the channel selection. If one channel is used by several devices, then the data transfer speed will tend to the minimum.
Finding free channels is quite difficult. They are used by all routers operating in the same signal sector. The least loaded channels are from 3 to 8.
Signal strength
This parameter is set independently (depending on the presence of interference within the signal range). Walls, furniture and wiring are obstacles that can significantly degrade the quality of communication.
If the router is mounted at a height of at least 1 meter from the floor level, the signal coverage area will increase. It is also recommended to fix the router antenna in a vertical position.
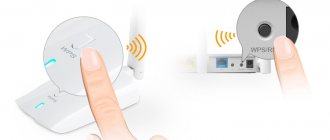
WPS
The WPS option is used to connect devices with a similar function. It becomes active both when Wi-Fi is turned on and during the setup process.
It should be taken into account that if you long press the button to turn on/off WPS, the network parameters will be reset and all stages of the settings will have to be repeated. Therefore, this function can only be activated by briefly pressing it.
Before connecting equipment using WPS, you must enable this option on all devices. The appearance of the “Connect using WPS” button on the authorized device indicates a successful connection. When you click the "Connect..." button, access to the network opens automatically (no password required).
Setting modes
The Zyxel Keenetic Start Wi-Fi router can be configured in the following modes:
- access point;
- amplifier;
- repeater (repeater);
- adapter.
Settings are available in the “Modes” section (in configurations). After setting the mode, you should reboot the device. When using a modem as an amplifier, the Internet is not needed. Internet access is required by the router, the signal of which will be amplified by Keenetic (both devices must operate in Wi-Fi mode).
IPTV
It is possible to connect the set-top box after updating the software to the latest version. Next you will need to do the following:
- Connect the receiver to the LAN port.
- Go to the WAN section (in modem configurations) and in the “Select ports” field, designate the connector to which the device is connected.
- Specify IP and password (information from your provider).
IPv6 protocol
IPv6 connection settings are available in the “Internet” section (in the Start settings). Here you should select the required protocol and activate the “Add connection” option.
In the “Description” field, indicate the name of the network (optional), and check the first two lines. You will also need information provided by the provider (to fill in the addresses: server and IPv6). In the “IPv6 Prefix” field, copy the previous line, but without the “/64” characters and activate the “Apply” option.
Security Settings
To configure security settings, go to the “Security” section and in the “Firewall” panel, set restrictions on access to certain sites. To do this, it is proposed to perform the following actions:
- In configurations, activate the “Add rule” option.
- In the field that opens, select prohibition (or permission).
- Determine the order of filter operation (personal network, external resources).
- Configure parameters for protocols: ICMP, TCP, UDP.
- In the “Ports” line, set the “Any” parameter.
You can add the free Yandex.DNS service to your security settings (built into Keenetic). It will also protect your computer from infected resources: it will block the downloading of malicious files and warn you about a potential threat.
Parental control
This function is supported by the SkyDNS service. Here you can independently determine the list of sites available to small users.
To activate the restriction, the “Schedule” option is provided (section “System”).
Setting a new schedule limits both guest Wi-Fi and data transfer in general. The administrator can also select a specific device (to restrict access). The set parameters must be fixed with the “Apply” option.
Setting up a VPN server
The VPN server connection algorithm involves the following steps:
- Selecting the PPPoE/VPN protocol (in the network settings).
- Enter "VPN" and select the "L2TP" protocol in the "Description" field.
- Enter your login and password (provider details).
- Enter data in the “Server Address” field (from the provider).
- Configuration activation.
Reset
Resetting settings in some cases helps solve a number of problems that arise during the operation of network equipment. To reset the settings, use the corresponding button located on the back of the device (next to the antenna).
To activate the reset key, it is recommended to use a needle (or other similar device). The button must be held for at least 10 seconds.
Automatic setup
The easiest way. If the provider assigns the IP address via DHCP and does not require binding a MAC address, the connection will be established without user intervention, you just need to wait a few minutes. If the IP is static and unknown or you need to find out the MAC address, the easiest way to do this is through the command line.
First you need to run it: Win + R – cmd – Enter:
After that, enter the command ipconfig /all and look at the output lines marked in red in the following picture:
These are the MAC addresses of network adapters. You need to enter the one that is registered with the provider. If the user does not know which one, it is better to ask the support service.
After all these manipulations, setting up Zyxel Keenetic Start will take place without the user’s participation, and in the end he will receive a completely ready-made Internet connection.
Model overview
Models of the Keenetic series appeared on the world market in 2010. Their manufacturer is Zyxel. After a short time, the manufactured products earned enormous popularity among users of 4G Wi-Fi routers. This is due to the fact that consumers are attracted by the optimal price-quality ratio. The 4G Keenetic router is provided with a wide range of functions.
The Keenetic model is designed and manufactured to meet the needs of a wide range of users.
- The torrent client cannot be configured.
- Does not support DLNA server.
- The printer cannot be connected. Only 3/4G modems are connected via the USB input.
- Updates via USB are not performed.
If the user needs individual settings, you need to take a closer look at other Keenetic router models.
Appearance
The 4G model is a compact device in a rectangular plastic case. Dimensions 140x110x30 mm. The front upper part is decorated with an inscription with the name of the manufacturing company Zyxel. A sticker with the main characteristics of the Wi-Fi router is located on the bottom of the device. Here are the following:
- MAC address;
- password;
- model name Keenetic;
- country of origin.
On the top front of the Keenetic there is a large WPS button in the lower right corner. There are operation indicators on the front of the router case. When you turn off or change 4G settings, the “lights” come on, blink or go out.
The bottom panel of the router is equipped with feet with a rubber base for firm installation on a horizontal surface and eliminates the possibility of slipping. It is possible to install 4G on the wall through plastic holes.
There are inputs on the back panel of the Keenetic router. Through them, the device connects to the Internet or local networks. Depending on the version of the router, the number of ports changes:
- Version “A” has one WAN and four LAN ports.
- In version “B” there is one LAN and WAN port.
Other versions/revisions of the Keenetic router also have a USB 2.0 port on the rear panel. Early models of the 4G router were noted for their left-hand orientation. In the new model there are holes for ventilation. Additionally, the structure is equipped with two antennas. Each of the 5 dBi antennas, due to their power, provides a large radius of distribution of the Ethernet connection from the router.
To reboot the 4G device, there is a Reset button recessed into the case on the reverse side. Nearby there is an input for connecting the unit responsible for power supply.
Connecting Keenetic and preparing for work
Before using a Wi-Fi router, you need to prepare it for use. To do this, you need to perform a number of actions:
- First of all, you need to choose a location. The 4G router requires installation near an outlet, and also in a place where the device cannot be damaged by careless movement. It is advisable to choose an acceptable height for easy adjustment if necessary.
- Connect the plug to the outlet. The 4G router is connected via a power supply.
- Connect the Keenetic router with a cable for an Internet connection.
As soon as Keenetic is connected to power, a Wi-Fi access point appears, displayed on devices with wireless network scanning enabled. The router itself has standard DNS connection settings, factory settings for gateways and ports. Experts recommend doing the initial setup of Keenetic.
Manual setting
The first step in this instruction is also setting the MAC address. After this, you need to select the IP protocol configuration. The choice of the desired option here is also influenced by how the provider assigns a network address to the user within its network. If via DHCP, then you need to select “Automatic”. If the address is static and it is known, select “Manual” and fill in the following three lines:
- IP address: static IP obtained from the provider.
- Subnet mask: default value – 255.255.255.0
- Default Gateway: IP-dependent parameter, basically repeats the address specified in the first paragraph, differing in the last digit - it will be either “0” or “1”.
It is not necessary to specify DNS servers. They are edited in special cases - for example, if the user wants to pass traffic through Google servers for greater security or block certain types of advertising in the browser.
After this, just click the “Go online” button on the screen that summarizes all the settings made and, if nothing else interferes with the connection, the user will have a connection to the network.
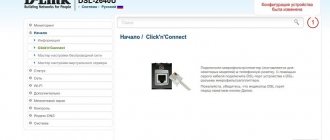
In addition, there is configuration exclusively through the web interface if, for example, the connection is made via the PPPoE protocol and preliminary configuration of Keenetic Start is required. To do this, go to the web configurator on one of the first screens. After this, a browser page will open that will look something like this.
As you can see, each type of protocol is placed in a separate tab. Configuration of PPPoE or IPoE will occur using the parameters provided by the provider.
Setting up the router
To start setting up Zyxel Keenetic Start, you need to go to the main interface. And to do this, we need to open the browser and enter the number 192.168.1.1 into the address bar - the standard address of the Kinetic family. Immediately after loading the page, we will see an authorization form, into which we will enter the standard data: login - admin and password - 1234. Behind it, a Setup Wizard, unified for the entire line of routers, awaits us.
To enter settings, open your browser and enter the address:
On the newly opened page we will find only two buttons to choose from: “Quick setup” and going to the “web configurator”. In this case, we are interested in the first option. After clicking on it, we will see three selectors that allow us to specify the relationship of our provider to MAC addresses. Most of the modern service providers do not record address data and for them you should select the first option (selector). But if your company is not Rostelecom, but, say, Dom.ru, you need to look at the contract or call technical support to get your MAC address. Then we indicate the resulting alphanumeric combination in the field next to the “Other” selector and click on the “Next” button.
On the page that opens, set the automatic IP configuration option or indicate your own address, as well as NDS, if the provider gave you this information. Let's move on. We indicate the login and password if they are included in the contract for the supply of Internet services, or check the box for “I don’t have a password...”. It is important not to confuse this data with the key and name for the Wi-Fi network, which are indicated on the bottom of the router. These are completely different data, because... Rostelecom is a service provider, and Zyxel is an equipment provider.
When we go further, we get to the status page, where connection data is indicated and information about whether we were able to connect to the Internet (wired connection only, not Wi-Fi) or not. In most cases, the setup will be successful and you will have access to the network.
Setting up via mobile application
The Play Market for Android and the App Store for iOS have the My.Keenetic branded application. It is supported by all router models, but for more modern devices there is also more modern software for smartphones. Setting up the Zyxel Keenetic Start router is possible through such an application and is no different from previous types. First you need to install My.Keenetic on your smartphone by finding it in the appropriate store. Zyxel Keenetic Start does not have a QR code for downloading it, as in modern models.
Setting up a router begins with connecting to its access point. Then in the application you can click the “OK, Wi-Fi connected” button on the start screen.
After this, another window will appear, in which a “Run NetFrient Setup Wizard” button with an image of an animal will be displayed.
By clicking on it, a slightly simplified visual wizard will launch, completely repeating the functions of its desktop counterpart. All the steps described for manual and automatic configuration above in the article are applicable here.
How to use Zyxel Keenetic Start as a Wi-Fi signal repeater
This model can take on a secondary role - being only a repeater of the Wi-Fi signal that you have already configured on another router (we will call it the main device). If this is your case, follow these instructions:
- Open the panel with the gear at the bottom. In the section with modes, mark the amplifier and click on the “Apply” button to proceed to the settings.
Set Amplifier as Mode
- Confirm mode switching.
- The device will restart - on the platform you will see short instructions for connecting the main router and Keenetic Start. According to it, you need to press the Wi-Fi button on the top panel of the repeater, and then press WPS on the main device. The gadgets themselves will communicate with each other. Keenetic Start will copy the network information. His IP address will change - the main router will come up with a new one for him. You will need to log into the web platform at a new address.
Follow the instructions described in the web shell to connect the main router to the repeater
Wi-Fi connection and settings
The My.Keenetic program is quite functional and easy to use. All connection parameters are collected in menu items, which are displayed in a list on the left side of the screen. Basic setup can be done in the “Wireless ISP” menu. There may be either two tabs responsible for different frequency ranges, or one. In the case of Keenetic Start, there is only one band - 2.4 GHz.
The switch at the very top of the tab is responsible for the state of the access point and its visibility by external devices. Below it is a drop-down list with work schedule settings. You can choose to have the access point inactive at night or when no one is in the house.
Below are the connection parameters, the name of the network (its SSID) and the type of protection. It is not recommended to set the latter to the “No protection” position; it is better to enable WPS and set a password combination. Even lower are the parameters for obtaining an IP address and additional IP settings. For some providers, for example, Beeline or Rostelecom, it is not recommended to change them.
The menu items belonging to the “My Networks and Wi-Fi” group also have several interesting settings. For example, in the “Guest Network” sub-item you can enable an access point that is very limited in its functionality and will not be protected by a password. You can make it significantly slower than usual and set connection time limits. In the “Device List” sub-item, you can ban those devices whose connection to a wireless connection is undesirable. This is useful, for example, when restricting Internet access to children.
How to make an access point and put a new password on it
The Wi-Fi network (access point) is created automatically in the settings. Its name is standard - with the name of the manufacturer. Not everyone likes it. In addition, there is not always a password on the network, and even if there is, it is a weak one. How to set new, unique data for your network:
- We open the central section at the bottom for Wi-Fi. In the first menu, we first activate the network (check the box).
- We set a suitable name in English (you can write Russian words, but also only in English letters, insert numbers and dashes with underlining).
- The most important thing is to install WPA2 PSK protection. Below in the key field we enter the most complex password. Write it down separately in your notebook.
- What else can be changed is to indicate the country and the combined bgn network standard. Save everything at the end.
In the access point, enter the network name and password
Setting up IPTV
To activate this feature, you first need to make sure that the latest version of the router software is installed. If not, read the “Updating Firmware” section of the article.
The router does not have a built-in set-top box, and its processor also does not support such a function at the hardware level. Therefore, to configure, you must first connect the digital receiver provided by the provider to one of the LAN ports.
After this, you need to go to the WAN item of the modem configuration, find “Select ports” and click on the connector with the connected set-top box. Two more input fields will open - IP and password, where you need to enter information from the provider. It is worth noting that IPTV from Rostelecom has the simplest setup.
We connect two devices: a computer and Zyxel Keenetic Start
To configure, you can use a desktop computer or laptop (notebook). First of all, create a communication channel between the Zyxel router and the laptop - use the cord from the kit. Connect the two ends to the network connectors of the PC (connector on the side panels of the case or the back) and the router (any yellow output).
Fully insert the provider cord that comes from the entrance or the modem in the hallway into the Internet socket. And of course, turn on the gadget itself to distribute Wi-Fi.
Connect your PC and router using the included power cord
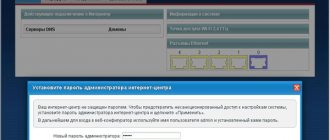
Change Password
Editing the security combination has already been described above; here we will show you how to change the administrator password. To do this, you need to go to the “System” item on the main page, and then – “Users”. If the router does not have a guest network configured, only admin will be displayed here. The default password is also admin. You need to click on it, after which a menu with changing the password will appear:
It is recommended that you not only enter it, but also write it down in a safe place - for example, in your phone notes or on adhesive paper, which you can then stick on the router itself.
By clicking the “Apply” button, the password will be changed to a new one.
Let’s move on to the computer: after connecting the router, we’ll configure the PC’s network card
The computer itself should recognize that you connected it to the router via a cord. In rare cases, this does not happen if the laptop’s network card is not configured as needed. To enable automatic recognition, follow these short instructions:
- Expand “Start”, find the “System” folder, and in it “Control Panel”. If you have Windows 7, look for the panel immediately in the right list of sections.
- On the panel, go to the “Network Center” block.
- Click on “Change adapter settings”.
- Call the context menu of the Ethernet adapter or “Local connection”. Click on "Properties".
- Select IPv4 protocol. Go to its properties. Set automatic retrieval of DNS and IP. Save your changes.
Set the value to “Receive data automatically”
Repeater mode
The signal amplifier is a useful feature in the case of Keenetic Start. It only has one antenna and the signal in some parts of the house may fade or even disappear. Therefore, you can use the router itself as a signal repeater for another, more powerful device. To do this, you need to enter the setup program, select the “Mode” tab and set the switch to the “Amplifier” position.
Features and Specifications
The RT5350 SoC, which is the computing center here, is familiar to many specialists from a galaxy of other routers (mainly from China) equipped with the same or similar characteristics. In theory, thanks to this, Keenetic Start should have support for OpenWRT firmware, but in practice the chip has been modified and free software cannot be installed instead of the native one from Zyxel. Fortunately, the firmware here, as always, is good and functional.
There is traditionally an excess of RAM - 32 megabytes, permanent memory - 4, without doubling, which means it is impossible to quickly backup and roll back to the latest stable software version.
Kinetic Start has only one antenna, the signal power is only 2 dBi, but, as users note, this is quite enough for a small room or apartment with thin brick walls. There are 5 ports, all 100 Mbit/s, there is one WAN and 4 LAN connectors.
WiFi operates in the 2.4 GHz band, the maximum wireless local network speed is 150 Mbit/s. The speeds for the IPoE/PPPoE and L2TP/PPTP protocols are lower - 90 and 60 Mbit/s, respectively.
A router can work as a signal amplifier for another device, a network router, or an access point.
Convenience and ease of setup
9
Firmware update
There are several ways to install the latest version of software on your router:
- Automatic - you need to go to the “About the system” tab and click on the “Update available” link:
- Manual – download the firmware from the website, enter the “Configuration” section, click on the gear and point to the firmware file. After the update, the router will reboot automatically.
- Through the mobile application, you need to go to the “System” tab and tap on the “Firmware” button, and then just follow the instructions.
Users should be warned: during an update using any of the above methods, under no circumstances should you reboot or turn off the power to the device. It may fail.
Appearance
The device is presented in the form of a rectangular case made of plastic. On the front of the case there are indicators that record:
- Wi-Fi network activity;
- charging;
- number of connected devices via LAN network;
- position (on/off);
- authorization status with the Internet service provider.
In the right sector (top) there is a Wi-Fi control option. On the back of the case there is:
- ports – 5 pcs. (one WAN port for the Internet cable, four LAN ports for connecting network equipment);
- input for power supply;
- Reset option RESET.
Users will appreciate the simplicity and convenience of the router's control panel. Thanks to the inscriptions on the buttons and connectors of the case, the process of setting up the router will take very little time.