Setting up a ZTE router is one of the main stages of connecting to the network.
Moreover, regardless of what connection is used to access the network - wired or wireless - it will take a little time.
It does not affect the settings and models of routers - only the speed of Internet access and the method of distributing it to computers and other equipment depend on this characteristic.
Choosing a Router
ZTE is one of the largest manufacturers of electronics, including routers.
And, although today the most popular are wireless routers that receive the Internet via wireless 3G and 4G channels, universal models can be one of the best options for purchase.
That is, devices that can receive and transmit data via cable and other methods (mobile communications, Wi-Fi).
The ZTE brand provides potential customers of its equipment with a wide range of different models, differing in functionality, speed of network access and data transfer.
All modern devices, even those from the lowest price categories, provide wireless communication (Wi-Fi), and many even connect to the network in the same way.
Thus, even relatively cheap models meet the requirements of most users.
Although, as a rule, the higher the price of a router, the more features it provides - including a wide range and a clear signal.
One of the most important characteristics of a router is the number of antennas - the more there are, the greater the gain.
An even more convenient option is a router with the ability to connect additional amplifiers.
This is exactly the kind of equipment you should choose for a large apartment and, even more so, for a private home, the territory of an entertainment center, a cafe or an office.
ZTE E5501
A popular router, released back in 2014, but still popular and sold online at a price of about 1000 rubles, is the ZTE E5501.
The advantage of the model is its attractive design (not so important, but still a characteristic taken into account when purchasing), support for 802.11n wireless technology and the presence of two antennas that amplify the signal by 10 dBi.
A small drawback is the inability to connect a 3G modem and use other methods of connecting to mobile communications.
Rice. 1. A little outdated, but still quite functional and stylish router ZTE E5501.
ZTE ZXHN H118N
A newer model ZTE ZXHN H118N with a price of about 1000–1200 rubles. already has a USB port for a modem, allowing you to connect to the network using mobile technologies.
At the same time, there is also a WAN connector for wired access.
And the data is transmitted to other devices located within the range of the router both via cable (4 LAN ports) and via Wi-Fi.
Rice. 2. ZTE ZXHN H118N – for wireless and wired network access.
ZTE 5502
Another model, similar in functionality and price (about 900 rubles) to the E5501 router, also looks quite stylish.
However, it has practically no advantages over other devices - only wired access is possible, and network distribution is carried out only in one band (at a speed of about 300 Mbit/s).
Although the ZTE 5502 encrypts information quite reliably (using WPA-PSK, WPA2, etc. technologies).
Fig.3. Bright and functional router ZTE 5502.
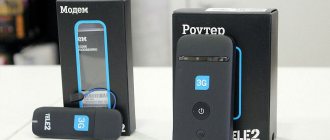
ZTE MF283
The MF283 model is capable of receiving the Internet using both 3G and 4G technologies (connection via a SIM card), and with two wired connections at once.
In addition, you can connect a USB drive to the router to download information from the network directly without a computer, and a telephone cable.
This means that such a router will be an excellent option for both a large home and an office.
Moreover, the antennas of the device are removable and can be replaced with more powerful elements.
Rice. 4. Model MF283 – a router with replaceable antennas and connection to a mobile network.
ZTE MF28D
The router works great with both wired connections (broadband and telephone) and the mobile network.
It is worth noting that the wireless connection is provided not using 3G/4G modems, like most routers of this type, but due to the SIM card installed in it.
You can also connect up to 2 antennas to the device, each of which amplifies the signal by 3 dBi.
Rice. 5. Router MF28D – for working with 3G/4G Internet and wired connection.
More about the router
ZTE optical ONT terminals are used to route traffic between the customer's local area network (LAN) and the provider's fiber optic network (WAN). At the same time, the router allows you to provide all services - broadband access, digital television, telephony, video surveillance and security alarms, etc. with data transmission over one optical line without mutual influence (attenuation, interference) of signals. Accordingly, the equipment performs the following functions:
- ONT
– optical modem and router for connecting the client’s equipment (local network) to the provider’s optical lines; - Wi-Fi access points
with the organization of several wireless networks in the 2.4 and 5 GHz bands, the possibility of guest access; - Switch for cable connection of
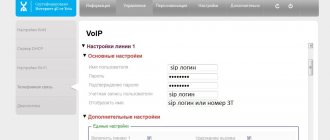
client devices via Ethernet; - VoIP gateway
, with connection of up to 2 analog phones to digital lines; - When connecting an external device via USB
- network storage, print server, file server for local network.
The devices are used to connect to “high-speed” tariffs from 200 Mbit/s to 1 Gbit/s.
Preparing for setup
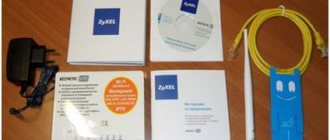
Before connecting a router of any selected type, you should first check its configuration. The router should come with:
- power unit;
- Ethernet cable for connecting to a wired network (except for options for connecting to the Internet only using mobile technologies);
- instructions, warranty and software disc.
The network cable is connected to the WAN port (less commonly, ADSL if the connection is made through the telephone network).
Another cord is installed with one side into the LAN connector on the same router (you can select any port from LAN1 to LAN4), and the second - into the corresponding RJ45 slot on the network card of a computer or laptop.
Important: When connecting two networks from different providers to the router at once (for example, via WAN and mobile communications), it is advisable to also install a splitter to filter the signal. And you can increase coverage with the help of additional antennas.
Rice. 6. Connect the cable to the laptop’s network card.
After connecting all the cables, you can turn on the router using the button located on the back.
The next step is to check the connection using the indicators on the front panel of the ZTE router. Here you can see signals showing:
- to which connector is the PC (laptop) connected?
- Is the wireless connection working?
- Is there a network connection?
If your device is connected to the Internet and your computer, and your wireless connection is working, you can continue setting up your router.
To do this, use the web interface, which is present on any Wi-Fi router.
And after setting up the device, you can use it without a computer - just turn it on to connect with any gadget, including tablets and smartphones.
About the GPON technology used
GPON, which MGTS uses when connecting subscribers, is one of the most modern technologies for broadband multiservice access. The abbreviation stands for Gigabit Passive Optical Network. It involves installing an ONT optical terminal (modem, router) at the client and laying a network to it (read: to the subscriber’s apartment or house) using fiber optics. The fiber optic line speed and channel width ensure simultaneous connection:
- Internet at speeds over 200 Mbit/s to 1 Gbit/s;
- Digital television;
- IP telephony;
- Video surveillance;
- Security alarm and other services.
At the same time, even with simultaneous operation of all programs and services and peak load, speed losses and mutual interference are excluded.
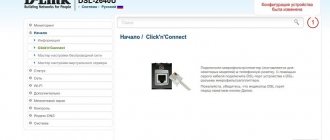
Creating an Internet connection
ZTE routers for wired and wireless connections are managed using a special interface, which you can connect to by entering an address like 192.168.1.1 in your browser (you can check this value in the router’s data sheet).
If the device is already connected to the PC, after entering these numbers, a setup window appears on the screen where you need to:
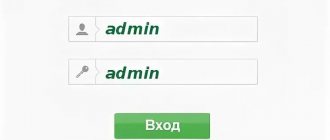
- Enter the user login and password. By default, the word admin is entered instead of each of them (if desired, they can be replaced with any others);
- After filling out the fields, click on Login;
- In the window that opens, select the Network section;
- Open the WLAN tab one by one (sometimes you can select it immediately from the list, without going to the Network tab), and then Basic;
- Select the WirelessRFMode column;
- Change status from Disabled to Enabled;
- Click the Submit button to enable wireless data distribution.
- for example, in the Multi-SSID section you can make the network both open and closed;
- the connection name is changed in the SSIDName column;
- the maximum number of simultaneously connected devices is set in the MaximumClients item (most models support up to 32 connections simultaneously);
- in the EnableSSID item, the network can be turned on or off;
- The HideSSID section allows you to hide your wireless network.
Important: Most often, when connecting by cable, the network is detected automatically. If this does not happen, you may have to update or install the network card drivers. And then set up a new connection.
Now that Wi-Fi is turned on, you can set up the connection itself.
In the WAN Connection menu, PVC0 is selected in the Connection Name line, and Route is set in the Type line.
After this, you need to choose to enter the connection name and password (for a PPPoE connection), which will be used to log into the network.
The ADSL network is configured in approximately the same way, although the transition is to a different tab.
Rice. 7. Router connection process.
If the connection is made using a 3G/4G connection, the setup is carried out through another tab - 3G WAN Connection.
Here you select only the access point name APN (you can find it on the provider’s website or check with the company’s technical support).
The rest of the settings are usually installed automatically.
You should know: Depending on the router model, the names of the tabs may differ. For example, the access point name sometimes needs to be entered on a separate APN Settings tab. At the same time, all user actions will be approximately the same.
Additional sections
In addition to setting up a network connection, the user of a ZTE router has the ability to change other parameters:
Rice. 8. Setting up router protection.
If in the settings menu there is a Security section, where you can select the WPAPassphrase encryption key with a length of 8 to 32 characters.
As well as the Authentication encryption type and the appropriate information transmission security algorithm WPAEncryptionAlgorithm.
When setting a password, you should follow a number of rules.
First of all, choose a combination consisting of at least 8 characters, including both lowercase and uppercase letters, as well as numbers.
In addition, it is not advisable to use user names and dates of birth as passwords.
Preparatory measures
First, let's spend a little time on the preparatory steps that need to be completed before moving to the router's web interface. If you haven't already unboxed your device and connected it to your computer, now is the time to do so. When choosing the location of the router, take into account the future laying of cables from the provider and provision of the local network. Thick walls and the presence of active electrical appliances such as a microwave oven can affect the quality of the wireless network signal, so take these aspects into account when choosing a location for ZTE products.
Now that the equipment is installed in the optimal location in your home or apartment, look at its back panel. Connect the cable from your provider to the connector labeled “WAN” or “ADSL”, and the local network wires to one of the four available ports, which are most often marked in yellow. Connect the power cable and click on “Power” to turn on.
Before logging into the web interface on the host computer, you should check some settings so that during the configuration process you do not cause network conflicts. This applies to methods for obtaining IP addresses and DNS servers. You need to open the adapter settings and make sure that this data is received automatically. For more detailed information on this matter, see a separate guide on our website by clicking on the link below.
Read more: Windows Network Settings
Features of settings for different providers
Setting up ZTE routers differs slightly depending not only on the device model, but also on the service provider.
Among domestic providers, users most often choose the services of Rostelecom, Beeline and MGTS.
In addition to the fact that these operators have maximum coverage of the country, you can find a wide range of tariffs in their list of services.
When setting up a router to work with the Rostelecom network, you need to not only enable Wi-Fi (according to the standard method), but also perform the following steps:
For the correct operation of the ZTE router, which must work in the MGTS or Beeline network, the same steps are performed as for standard connection setup.
That is, entering a password and login, activating Wi-Fi and setting the parameters of Multi-SSID sections. At the same time, routers of this brand are no longer used for ADSL connections.
WiFi router ZTE E5502 overview of interface settings
Setting up a ZTE router is an important step in connecting to the Internet. Detailed instructions for setting up your router
« Previous entry
Common Problems
Saving readers' time, the thoughtful admin installed a plugin that draws convenient navigation according to the generated subheading tree. Therefore, we will devote a separate small section to each problem. ZTE primarily produces mobile modems, sometimes supplemented with a GPON fiber optic line interface.
Doesn't turn on
First of all, we remember whether the flashing was carried out. If unsuccessfully carried out manually, the operation completely removes access to the router. It is noteworthy that the appearance of the device (indication, backlighting of the Ethernet interface) is the same. However, it is impossible to connect a PC or equipment to the router. The browser writes: Unable to connect.
The hardware reset button is powerless to solve the problem. The firmware needs to be updated. Reputable manufacturers provide specialized utilities that help savvy technicians solve the problem. However, the Chinese manufacturer is keeping mum for now. Hackers have released the ZTE Unlocker utility, but the interface deals exclusively with the issue of unlocking (unlinking from a specific provider). The software actively exploits the diagnostic port specification.
A working device understands the terminal language, including the Windows command line. The operating system allocates a virtual directory to the device, within which commands stored in the router's memory are executed. For example, adb shell. However, standard management paths will refuse to help restore the firmware on the router. Enthusiasts offer the following option.
Sometimes the desire to unblock is caused by someone else. For example, the developer removed support for the FTTB protocol from the H108N model. All users of the interface were forced to immediately rollback. Only now... the manufacturer has released one utility that performs an upgrade. One way ticket.
Recovery utility
Often a broken ZTE modem is detected by the diagnostic interface. The official website (ztedevice) provides owners of MF30 (Beeline) exclusively with an update utility. There are no other models at all! The site 3ginfo.ru offers those who wish to download: “ZTE MF30 recovery kit”.
We disclaim liability by recommending this software. However, readers are free to try the effectiveness of the proposed measures themselves. We present an algorithm of actions according to the recommendations of the mentioned RuNet resource.
- Install the ZTE Diagnostic Interface driver.
- Unzip the downloaded recovery kit (firmware image).
- Install the latest version of the QPST modem file system boot driver (2.7.323).
- Launch the configuration dialog. Click the Add new port button of the QPST interface. Select the diagnostic one suggested by the operating system (see above).
- If the utility is unable to detect what you need, manually open Device Manager (Windows) and look at the number of the COM port containing the diagnostic interface. Write the appropriate settings to the utility.
- Launch QPST Software Download. Provide the program with the following basic information:
- Firmware port.
- Multi-image: location of the unpacked image file.
- Boot System: Multi Img 1.0.
- Advanced: if autodetection fails, check the firmware files.
- Trusted mode: check the box.
- Start the process with the Start button.
- The device will then reboot on its own, and Windows will begin installing the drivers.
Now the folder containing the previously unpacked firmware image needs correction. The software read the device memory, adjusting the contents of the internal directory. However, the utility is powerless to enter IMEI. Therefore, edit the Channel1.nvm file yourself. Please enter the correct IMEI.
Now run any flashing utility (for example, 3ginfo.ru/downloads127.html). Feed the program the files, including the edited Channel1.nvm. Now the router is finally restored.
A similar sequence of actions helps to revive some other mobile access points (for example, MF90).
It helps bring back life to many dead devices. Let's briefly describe the essence. In the 80s of the twentieth century, integrated circuit switching standards were deprived of a debugging interface. Therefore, in 1985, a special JTAG group was created to solve the problem. The industry standard became commercial (IEEE 1149.1-1990) in 1990. Intel immediately provided the 486 generation of processors with a debugging interface.
Now the standard is used by electronics manufacturers everywhere. Initially, the interface was solely for testing purposes. Then the opportunity became of interest to debuggers, including the machine code level. Later, manufacturers figured out how to exploit JTAG by updating the firmware of flash memory chips. Real boards use the number of pins:
The latter options are more often used when there are many parallel-connected microcircuits. The first option accompanies the star topology. Therefore, the problem is limited to calculating the pin layout of the JTAG port. Modern interfaces often contain 10 or more contacts, so take the trouble to find technical documentation that explains the meaning of the contact pads. The contacts themselves are round or rectangular in shape, often located along the edges, sometimes in two rows.
The pinout is difficult to find, since the subject is the bread and butter of repair shops. Try to puzzle thematic forums (for example, gsmforum.ru). You will also need a complete memory dump, take, for example, here 4pda.ru/forum/index.php?showtopic=255231&st=3040#entry36468746. The current memory dump (in reserve) is merged by the H-JTAG utility. You will need an adapter connector (the type is entirely determined by the utility used for recovery). Craftsmen usually adapt the now outdated LPT. Solder the adapter with shunt resistors, get specialized software (for example, Z_Flasher Reanimator is used to restore cellular USB modems).
A memory dump using the Giveio utility helps determine the processor type. This will be needed later when flashing. So, for work you need:
- A utility for backing up the current memory dump.
- Compatible modem firmware version. Try going to byfly. The FTP server provides a certain choice: H208N, ZXHN H208L, H201L, W300. By the way, the Belarusians took the trouble to post a beginner resuscitator kit, including instructions, in the shared server folder (ftp.byfly.by/byfly/firmware_modem/ZTE/).
- Flashing utility via JTAG interface.
- DIY connector. The utility sets detailed requirements for the adapter. An example of using LPT was given above.
Along the way, they exploit the capabilities of supporting software. For example, determining the type of processor.
Doesn't allow me to access settings
The live router is accessible via a browser or remote administration interfaces (TelNet, SSH). However, the admin panel does not launch inside. The factory settings have probably been changed. After making sure that you have the ISP password written down, try resetting the device with the Reset key (otherwise you will lose the Internet until your mother arrives). Then the previous equipment characteristics will return:
- IP address.
- Login.
- Password.
- SS >Refuses to distribute Wi-Fi
Ukrtelecom subscribers have flooded the TP with complaints: ZTE H108L refuses to connect wireless subscribers. You will need to change your settings. - Open the admin panel (192.168.1.1 in the browser).
- Click Administration → System Management → Restore Factory Settings.
- Apply the changes and wait until you reboot.
- Re-enter your ADSL connection login/password.
- Set the following settings on the Administration → TR-069 page:
Enter your login/password (admin).
- ACS URL – https://localhost
- Login – loose
- Password – 12345678
Logging into the ZTE router via the web interface in a web browser
ZTE has a web interface for configuration. You can use any web browser you need to log into ZTE. In this example we will use Internet Explorer.
Enter ZTE internal IP address
Place your ZTE's internal IP address in the address bar of your web browser. It looks like this:
Asus password
Then press the Enter key on your keyboard. A dialog box will appear asking for your ZTE username and password.
ZTE router password and default username
You need to know your username and password to log in to ZTE. All default usernames and passwords for ZTE are listed below.
| H220N | HPN | blank |
| MF28B | none | none |
| MF65 | none | smartbro |
| MF923 | none | attadmin |
| MF93D | admin | admin |
| ZXDSL 831 | ZXDSL | ZXDSL |
| Unite US | unknown | unknown |
| Z-917 | none | admin |
| Z288L | admin | printed on router |
| ZXHN H208N | cytauser | cytauser |
| ZXHN H298N | user | user |
| ZXV10 W300 | on | on |
Enter your username and ZTE password in the dialog box that appears.
How to use a USB modem with Wi-Fi ZTE 79RU.
USB modem with Wi-Fi
ZTE 79U is configured out of the box, i.e. In order for it to work, you do not need any special knowledge or skills, everything is extremely simple. First of all, remove the modem cover; it moves away from the USB port.
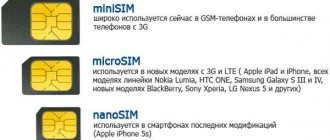
Insert the SIM card, we remind you that the size must be microSIM.
Close the lid.
Now you can connect to the USB port. The uniqueness of this modem is that it can be connected not only to a computer/laptop.
But also charging from the phone (5V and at least 1 A).
USB port in a car, car radio.
Those. A computer and laptop are not required at all. Even ZTE 79U settings can be done via a smartphone or tablet.
ZTE 79RU |
Port forwarding
It is often necessary to set up a home PC from the outside and organize a server. Network protocols use communication ports everywhere. The modem was originally designed with protection against hackers. Access inside (Intranet) is completely absent. Therefore, port availability needs to be configured. Let's demonstrate the technique of making adjustments using the example of H118N.
Note. The specified model shares Ethernet. The previous one (H108N) is equipped with two interfaces: FTTB, ADSL.
The simplest option to defeat Rostelecom hardware is to use the built-in Application menu. Activate the UPnP subkey. The port number is specified as a number. A little lower is a specialized section. The Port Forwarding menu will help you set the required numbers. Take the trouble to check the Enable box.
The third way is to set up a demilitarized zone. Creating a dedicated service helps limit the damage of a possible hacker attack. The settings are the same:
- Connection type + port (in one line).
- Local IP address of the PC.
Note. Sometimes translators call port forwarding redirection.
First check the functionality of the service provided externally within the network. Helps reduce setup time.
Unlock
It happens that sometimes a subscriber wants to change provider. I bought an MF823D, I was eager to switch to Iota, or I was tired of MGTS, and the F670 refuses to eat someone else’s SIM card. To change service provider, you must unlock the hardware. Megaphone MF823 is called M100-3 - the essence is the same. Unlocking is closely related to flashing issues. A provider-neutral binary image is selected.
Attention! Before installing the firmware, carefully study the forums. Some home-grown versions of the software partially break functionality. Example - H118NV2.0.1d_E04_OV DOMRU removes the web interface (via browser). Telnet access remains. I have to reflash it.
Instruction: Model MF823D
You will need a firmware image. Get it using search engines.
- Download the PuTTY terminal emulator.
- Install the ZTE diagnostic mode driver.
- We turn on the equipment.
- We feed the browser an intricate link 192.168.0.1/goform/goform_process?goform >The hardware should go into diagnostic mode. Check by opening Windows Task Manager. The properties contain the number of the serial port; opposite the corresponding COM there should be the inscription ZTE Diagnostic Interface.
Open a PuTTY terminal, copy the image to the serial port, the number of which is shown in the task manager. All that remains is to rescue the device from diagnostic mode. Open the terminal again, set the mode parameters:
The terminal window will be completely blank. Enter the commands one by one, pressing Enter each time:
Each time a device response may occur containing the number of successful and failed operations. The operation is completed. Reboot your device.
Changing LAN IP Address on ZTE
If you followed our navigation guide above, you should see this screen.
zte password
We start this guide on the home page of the ZTE router. Want to change your IP address? You've come to the right place. We'll show you how:
Start by clicking Quick Settings on the left side of the page. Then click on LAN and DHCP Server just below that.
Set up the LAN section of your ZTE
zte password
This will take you to a new page.
You can now change IP address . Enter the desired address in the field. Don't know what you should change? Try 10.0.0.1
After this Subnet Mask. By default it is 255.255.255.0, and you should leave it at that.
Congratulations! That's all. Just remember to save your changes before closing the page.
Possible problems when changing the IP address of your local network
When you change your local network IP address, you are making a fundamental change to how your network functions and all the computers on your network will operate. When you apply these changes, you will lose your internet connection. Your router may reboot and take a couple of minutes to start responding again.
Also note that some computers may need to be rebooted after making this change before they can connect to the router or the internet again.
All about smartphones: Moto Z2 Force Edition, Moto X4, Oppo R11 (Review) and Huawei Mate 10 (Review), BlackBerry KEYone, HTC U11, Meizu Pro 7, Samsung Galaxy Note 8 and Nokia 8.