Users of this provider simply must know how to strengthen the WiFi router signal and create protection against slowdowns or interruptions in connection speed. Today, experts name a large number of effective methods that can help make the signal much more effective. This includes both setting up the router and purchasing or manufacturing devices that serve as an addition. Below we will present simple but quite effective solutions.
Reasons for a bad signal from a Wi-Fi router
First, it’s worth understanding what could cause a router’s Wi-Fi signal to be bad. This will help you decide on a method to solve the problem in the future. Let's highlight the most popular cases:
- It's not the router, but the quality of the connection itself. You can check this by connecting to the Network via a wire. If the speed is equally low, then this is exactly the case. In this case, you do not need to do anything with the router. It is recommended to contact the technical support service and request a free visit of a specialist to your home.
- The router operates at full power, but this is not enough for a good signal throughout the house. It is best to purchase or rent a stronger router or terminal, which will immediately solve the problem. However, there are other ways, which we will look at below.
- The device is not positioned or configured correctly.
Changing the broadcast mode
You can change the default settings for your wireless network b|g|n. Modern devices are configured according to new standards - 802.11ac; if this method does not give the desired result, then you can switch to the old route - 802.11n. This method will help increase not only the network coverage radius, but also the transmission speed. This method does not work on equipment with a single antenna or that does not support these standards.
To change the broadcast mode:
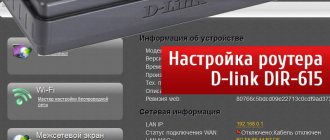
- Enter a new address in the settings – 192.168.1.1.
- Log in to the wireless network in the Wireless section.
- Select the value N-ONLY and click on save.
After the settings have been entered, reboot the device. The router will boot and work in enhanced mode.
Signal improvement
Let's look at the main methods that help solve the problem in almost all cases. We will consider each of them in detail and separately.
How to properly install a router indoors
Few people know, but a lot depends on the correct location of the device in the room. This is especially true if the subscriber installed it himself or if he came across an unscrupulous technician.
It’s easy to guess that the most optimal place for a router is the center of your home. This way you will bring it as close as possible to all signal receivers. However, this requires a long wire, which not everyone is ready for. It is for this reason that many people place it right at the entrance to the apartment.
Determine in advance where the devices that receive the signal will be located. And place it closer to them. In addition, it is recommended to consider the following tips:
- There are many materials that prevent the Wi-Fi signal from propagating properly. These are reinforced concrete walls, mirrors, glass and any metal. The terminal should not be located near such structures.
- Point the antenna towards obstacles so that its vector falls on walls or other structures at 90 degrees. This will improve spread throughout the house.
- Do not place the router near any electrical appliances that may interfere with their operation. This could be a microwave oven, home phone, etc.
- Install the device as high as possible.
How to replace the antenna on a router
Quite often, experts recommend using a more powerful antenna if the standard power of the equipment is not enough. You can do this yourself. It is recommended to adhere to the following algorithm:
- First, you should check whether antenna replacement is supported on your model. To do this, completely turn off the router, unfold it and carefully inspect the mechanism. Try unscrewing the antenna. If it works, then you can buy a more powerful one.
- Go to the nearest Rostelecom sales office or any other Internet equipment store, taking with you the disconnected antenna from your router.
- Show your consultant your antenna or choose a more powerful one yourself. The main thing is that it has exactly the same connection mechanism to the main device.
As a rule, the cost of such products varies between 500-2000 rubles. However, there are also more expensive models that boast a maximum dBi value (up to 24 dBi). After the purchase, all that was left was to return home and screw on the new antenna in the same way as the old one was unscrewed.
How to add another router
Modern home Internet technology allows you to connect several routers in series. So, the cable coming from the entrance or from the street is connected into one device. And the next one connects to it via Wi-Fi.
You can also use a cable, but this is not always convenient. The second modem can be placed either near the first or at the other end of the apartment. Requires appropriate configuration. The difficulty is that the procedure depends on the specific model. Therefore, it is difficult to identify a universal algorithm suitable for all cases.
A serial connection using Wi-Fi is called bridge mode or WDS. Let's consider the procedure using the example of the Rostelecom F670 terminal:
- Open any browser and enter the local IP of the router in the address bar. Typically this is 192.168.0.1. However, there are other options. It is recommended that you look at the label on the back of the device for information.
- The username and password can also be found on the label. Usually this is admin/admin.
- Select the “Network” section and go to the WAN category. Here you need to switch the “Type” line from Route to “Bridge connection”.
How to change the channel in a Wi-Fi router
Experts know that when distributing a Wi-Fi signal, the router uses several channels. When turned on, it automatically selects the most free channel and transmits information over it. However, the problem is that sometimes the system makes mistakes by making the wrong choice.
This may result in signal disruption. In this case, you can manually change the channel to a better one. You can determine it using special applications for a PC or smartphone. For example, Wi-Fi Analyzer.
Having decided which channel you will set, follow these steps:
- Open any browser and enter the local IP of the router in the address bar. Typically this is 192.168.0.1. However, there are other options. It is recommended that you look at the label on the back of the device for information.
- The username and password can also be found on the label. Usually this is admin/admin.
- Select the “Network” section and the WLAN category. It is important to note that many routers distribute 2 networks at once - 2.4 Ghz and 5 Ghz. It is always recommended to choose 2.4. Next, find the “Channel” item. By default it is set to “Auto”, change it to a suitable one.
It is also recommended to check the Transmit Power field. By default it is set to 100%, however, if this is not the case, change the value.
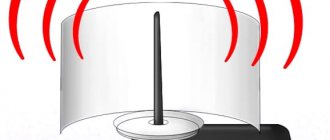
Directional and omnidirectional antennas
In addition to the transmitter itself, the antennas used at the access point have a strong influence on the quality of the wireless network. Unfortunately, in most cases, weak omnidirectional antennas of 2-3 dBi are installed on inexpensive home devices. At best 5 dBi. If you replace them with more powerful ones - 9 or 12 dBi - you can increase the WiFi router's coverage area by a third.
But here we must take into account that the final result directly depends on the surrounding conditions (the material from which the walls, ceilings are made, the presence of interference and “neighbors” in the range.
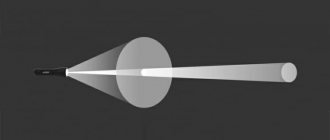
If you need to expand the coverage area in a certain direction, you can buy a special directional antenna, connect it through the RP-SMA connector with a special cable and place it in the right place.
You can choose equipment that will cover a fairly large area. A very convenient thing, but the prices are steep and for the average user this is already a rather expensive “pleasure”.
For those who have a modem or router with antennas located internally, that is, hidden in the case, this option is not suitable at all. In their situation, there are two options - either change the head unit, or buy additional devices, which I will discuss below.
Life hack - how to strengthen the signal with your own hands at home
Now let's look at small folk life hacks, which also sometimes help. Of course, real professionals are quite skeptical about them. However, it's worth a try if there are no other options left. Their list is as follows:
- You can increase the power of the antennas with your own hands by making a stand for them from an aluminum can. Then the signal from below will be reflected upward, which will improve its distribution throughout the room.
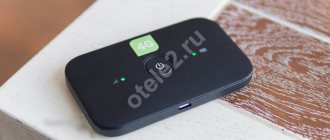
- There is special equipment that acts as a second Wi-Fi source. A repeater (also known as a repeater or repeater) is a small device that plugs into an outlet anywhere. It doesn't use any cables. It is recommended to install it in places where the signal is the worst. The principle of operation is simple - the gadget receives a Wi-Fi signal and amplifies it, distributing it further around the room.
- You can try updating the firmware on the router. However, it is recommended to do this only if you have the appropriate knowledge. Otherwise, the equipment may be damaged. Then you will definitely have to buy a new one.
- Try calling the support hotline. Number - Rostelecom throughout Russia: 8 (800) 100 0 800 . Perhaps the operator will be able to offer interesting ways to solve the problem.
Additional recommendations
You can ask a call center operator about how to strengthen the wifi signal of a Rostelecom router with your own hands. An experienced employee will conduct consultations over the phone, using the method of elimination to eliminate factors that disrupt the signal. The subscriber will be offered several options to solve the problem. Under the guidance of a company employee, the user enters settings and checks the operation of the set-top box.
If all the manipulations performed do not give the desired result, then a specialist will be sent to the subscriber’s address. Upon arrival, he will test the signal level and make adjustments if necessary. In some cases, there is a need to replace outdated equipment with new one.
For wireless data transmission, it is best to use modern devices with a power of at least 5 GHz. In this case, such a problem as a weak signal never arises. It is best to take care of the comfortable use of the Internet in advance rather than subsequently purchasing additional equipment or studying the router settings yourself.
Where to go to get your router replaced with a more powerful one?
If even after all this you cannot achieve a good signal throughout the entire apartment or house, the only option left is to order a more powerful device. If you are a Rostelecom client, you should contact technical support to order a full-fledged terminal with a high signal level. There are several ways:
- call the hotline at: 8 (800) 100 0 800 (toll-free throughout Russia);
- go to the nearest sales office in person and talk to a specialist;
- use the feedback form on the official website.
Option 2. Turn the router into a repeater
Go to the settings of the old router, as shown earlier, and open the wireless mode settings there. Give the device a new IP address - like your main router, but with a different number at the end.
Set a name and password for the new Wi-Fi network that your router will distribute. As in the previous paragraph, it is better to make the names similar. You can set any password.
Find the repeater function in the wireless settings section. It may be called Repeater, Wireless Bridge or WDS on different models.
Turn it on. Click the search button and find your main router that distributes Wi-Fi there. Connect to it.
Enter the password for your Wi-Fi network and save the settings.
Finally, open the DHCP settings again and select the “Disable DHCP Server” option. Reboot your router.
Now place your old router in a suitable place, preferably closer to the middle of the apartment. And the repeater is ready.