The latest generation Zyxel Keenetic 4G routers are distinguished by increased network coverage due to a powerful antenna and maximum throughput, which in theory reaches 300 Mbit/s. They support all existing network types and work with all providers. It is advisable to use such a device for distributing 3G/4G Internet in a private home, small office or enterprise. The device can also be used as a regular router. Let's take a closer look at how to configure the Zyxel Keenetic 4G III router.
Ease of connection
For a video review and instructions on setting up the Zyxel Keenetic 4G III router, see the following video:
The device comes with a USB extension cable that allows you to place the access point in a convenient place - one end of the cord is connected to the router, the other to the modem (at this end there is a suction cup for attaching the cable with the modem to the glass).
To connect, you need to turn on the power supply and connect it to the device, connect the modem via a USB port located on the back panel of the router or through a special extension cord. When using wired Internet, we insert the network cable entering the house or apartment into the WAN port. We connect the Internet station to a computer or laptop for configuration via LAN.
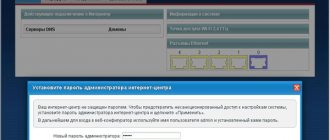
After loading the device, a Wi-Fi access point will appear, which anyone can join. The settings of the Zyxel Keenetic 4G III router are protected by a simple password; it is better to change it to something reliable.
What do Zyxel Keenetic 4G II and III routers look like and what parameters do they have?
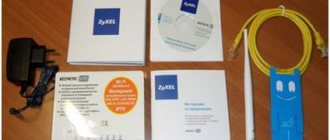
The models differ slightly in appearance. The second version comes with more indicators on the front panel. The USB input is on the side. On the back there are 4 local ports (yellow) and one blue for the provider cable. On the left is a button to reset the device to factory settings.
Only 4 ports for home network and one for Internet cable
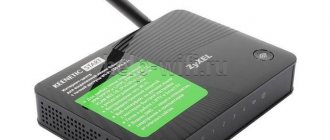
The third version has a more compact body. There are only 4 indicators. On the back there is one local port and one connector for the Internet. There is also a USB output for the modem.
The modem is connected to the device through the rear output
These routers are practically no longer available for sale in stores, as the models are outdated. But you can buy them secondhand on various sites like Avito and others.
Table: technical characteristics of models
| Zyxel Keenetic 4G II | Zyxel Keenetic 4G III | |
| Wireless Standard | 802.11n, frequency 2.4 GHz | 802.11n, frequency 2.4 GHz |
| Maximum speed | 150 Mbit/s | 300 Mbit/s |
| Local port speed | 100 Mbit/s | 100 Mbit/s |
| Number of external antennas | 1 x 2 dBi | 2 x 3 dBi |
| Additionally | Yandex.DNS and SkyDNS support | Link Duo and TVport technology; setting up LAN ports to work as WAN ports; SkyDNS and Yandex.DNS |
Preparation
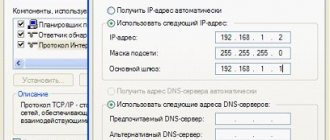
For normal functioning of the network, you should select automatic distribution of IP and DNS servers. This is done as follows.
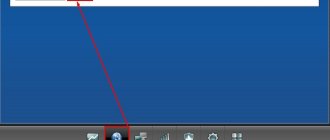
- Open “Network Settings...” through the context menu of the network tray icon.
- Call up the window for changing adapter settings, then open its properties through the context menu.
- Click on the line responsible for changing the parameters of the fourth edition protocol, and set the automatic method for obtaining DNS and IP.
- Save the new configuration.
Setting up Wi-Fi (how to change the password)
Everything is quite easy to set up:
- We go to the fourth section on the panel below (indicated by a ladder - this is the “Wi-Fi” icon).
- At the access point, select the WPA2 PSK security type and boldly write a new network key - this is the password.
- Set the country to Russian Federation. Everything else can be left unchanged for now. Click on “Apply”. Now, using the set password, you can log into your Wi-Fi network.
Write a complex password in the key
Connection
Everything is very simple here.
- We connect a LAN cable, crimped at both ends, between the router and the computer or laptop through which the device will be configured.
- We turn on the power supply to the network by plugging its other end into the corresponding connector on the back panel of the wireless access point.
- We connect the modem directly or through an extension adapter, or WAN, if you will be distributing the Internet received via cable.
Firmware update for Zyxel Keenetic 4G router
The update can be semi-automatic, when the system looks for an update for itself and installs it:
- In the settings account, switch to the “System Monitor” section. In the system, look at the “Updates” item on the right.
- If the value “Available” is there, it means there is an update for your firmware. Click on this word.
Click on “Available” in the “Updates” line
- You will find yourself on the update page. Just click on “Install” and wait for the upgrade to complete. During this time, do not press anything.
Run the installation of the router firmware update
Configuration
Configuring the Zyxel Keenetic 4G 3 router to suit your needs and connecting it is carried out in two ways:
- through the “Configuration Wizard” (automatic);
- via the web interface (manual).
Automatic
For novice users, a semi-automatic mode is provided, which allows you to configure the Kinetic 4G router in a step-by-step mode, just by answering the wizard’s questions.
- To open the page where the Zyxel Keenetic 4G is configured, launch the Internet browser.
- In its address bar we write 192.168.1.1 or my.keenetic.net (look for information on the sticker on the bottom of the case).
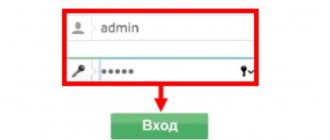
- Enter your login information, usually “admin” in both fields.
- We immediately enter new data to protect the router configurator. The password here can be removed completely.
- Click on the button to launch the configuration wizard.
- Click on the button with the same name again.
- After identifying the modem, click “Next”. If it was not found, disconnect and connect the device again, make sure that drivers for it are available on your computer.
- Afterwards, you will be able to update the firmware for the device by downloading the current version from the Internet.
- We indicate the country of residence.
- We select a city to search for providers who work there.
- We indicate the Internet service provider, and if it is not in the list, try to find it or leave a checkbox next to the “My provider is not in this list” option.
- If necessary, you can enable “Safe Internet with Yandex.DNS” by checking the box next to the option.
The application will protect all network devices from fraudulent web resources and adult content. In the settings there is the ability to specify filters.
- We go online by clicking on the button of the same name.
Then the browser will automatically launch with the equipment manufacturer’s page. If there are no problems with the connection, a green indicator with a planet icon will light up on the router. Now you can disconnect the network cable if it does not connect your computer to the wireless Internet.
Manually
Here you need to know a number of parameters in order to specify the correct settings for each of the providers. There are no difficulties here, just a couple of features.
Dom.ru and Rostelecom
When concluding a contract with this service provider, we perform the following steps after pairing the modem with the router, and the latter with the PC.
- We go to the web interface, as shown earlier, and click “Internet”.
- In the “PPPoE/VPN” tab, click on the button to add a new connection.
- In the “Protocol Type” drop-down list, select “PPPoE”, just below we enter the authorization information specified in the contract, and apply the changes made.
Beeline
This Internet provider uses a different protocol, so the setup is slightly different.
- We create a new connection, as in the previous case.
- In the text form “Type (protocol)” write “L2TP”, enter the server address as “tp.internet.beeline.ru” and registration data for identification with the service provider.
- Apply the settings.
NetByNet and Megafon
Providers require registration with a MAC address. For NetByNet:
- Create a new connection and select “IPoE” in connection types.
- In the first line “Use connector” we indicate the interface numbered “0” – WAN.
- In the MAC address line, specify the value “Default”.
If necessary, enter it manually. This information is located on a sticker at the bottom or bottom of the router case.
All described configuration settings are also suitable for the Zyxel Keenetic 4 G II router model.
Watch the video review of the Zyxel Keenetic 4G 2nd generation router here:
Operating in repeater mode
In addition to the classic operating mode, the Keenetic device can also work as a signal repeater to cover a larger area. Switching is done in the “Mode” tab: set the trigger switch to the desired position and apply the new configuration. Afterwards the device will reboot.
IPTV
Zyxel Keenetic 4G III is designed for use for watching digital TV on devices that support TV-port. If it is missing, updating the firmware and pre-configuring it can help:
- connect the TV to the router;
- in the access point settings in the “Internet” section, activate the “Connection” tab;
- click on the “Broadband connection” profile;
- check the box next to “IPTV set-top box” opposite the port to which the TV set-top box is connected;
- save the changes, after which the router will reboot.
Setting up ZyXEL Keenetic 4G as a repeater
Zixel routers can work not only as the main router in the house. They can simply repeat the signal of another device, thereby expanding the Wi-Fi zone in the apartment. How to set up such a connection:
- Go to the “Mode” section in the “System” settings block.
- Put o. Click on “Apply”. The router will reboot.
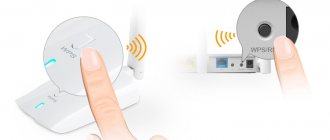
- Follow all the steps described in the instructions in the account window. In short: you just need to press the WPS button on the main router and the Zixel button almost simultaneously. This action will connect the two devices.
Highlight "Amplifier" in the list
Subtleties of working with the IPv6 protocol
When using the new IPv6 protocol, you must:
- make sure the protocol is supported by the provider;
- update the router firmware to the latest version by downloading it from the official website;
- Check the activity of the “IPv6” tab in the “System Monitor” subsection.
Now you can get started.
- Launch the Command Line.
- Run the command: telnet 192.168.1.1 to establish a connection with Keenetic.
- Enter the following commands into the command line in the given sequence to distribute IPv6 to all clients (you can copy one line at a time and execute it with the Enter button):
- Interface
- ipv6 address auto
- interface ipv6 prefix auto
- interface ipv6cp
- ipv6 subnet Default bind Home
- number 0
- slaac
- exit set net.ipv6.conf.all.forwarding 1
- ipv6cp
- ipv6 address auto
- ipv6 prefix auto
- ipv6 name-servers auto; ipv6 subnet Default bind Home
- number 0; mode slaac
- system config-save
Safety
To set conditions and actions assigned to them for incoming packages, you must:
- In the “Security” tab, click “Firewall” and click “Add”.
- Select the condition: allow or deny and protocol.
- Apply the condition to the desired device (enter its IP).
- Make changes.
At first, there may be problems with the functionality of the rule, but after several attempts, an understanding of the algorithm for the operation of the built-in firewall appears.
Parental Control Feature
Allows you to create a schedule for distributing the Internet to devices with specified IPs on firmware version 2.08.B0 and higher.
- In the web interface, go to the “Home Network” tab.
- In the menu of connected devices, select those that fall under the created filter and assign them static IP addresses - o.
- In the “System” tab, click “Schedule” and add a new one, where we set time limits for one device.
Local LAN and DHCP
How to set up Zixel's home network:
- Click on the icon of two computers below. This block is precisely intended for debugging the local network.
- In the first section you will see all the devices that are currently connected to the router. In the second block “IP Settings” you can change the main IP address of the local network (this is the address of the router that we went to in the browser to open the settings account).
In the first settings block you can set a new router IP address
- In the “DHCP Server” settings block, you can change the DHCP server parameters. Firstly, it must be turned on. Second, set the starting address of the local address range. The following indicates the number of addresses in this range. What value to set depends on how many devices are simultaneously on your Wi-Fi network.
- You can also specify a pair of DNS servers that the router should use. After changing all the values, do not forget to click “Apply”.
VPN server
After updating the firmware to version 2 and later, VPN configuration is carried out according to the following algorithm.
- In the “System” tab, click on the “Components” section.
- Go to the “Applications” subsection, where we activate the “VPN Server” tab.
- In the drop-down menu in the “Network access” option, indicate the desired interface.
- Activate the “Broadcast client addresses...” option.