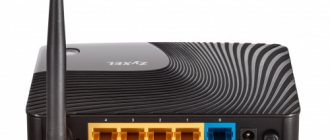
Internet provider Dom.ru is one of the three largest providers in Russia. Today I want to tell you how to connect and configure a router for Dom.ru. Moreover, it is quite simple and accessible even to those who have very little experience in setting up network equipment. In this guide we will look at two options. The first is setting up branded Dom.ru routers. which are issued to new subscribers upon connection. These are devices from Sagemcom, D-Link, TP-Link, flashed with proprietary firmware. The second option is any other WiFi router that you can buy in the store. It will also work without problems on the network of this telecom operator.
Connecting the device
The order of interaction with a router or router occurs according to the following scenario:
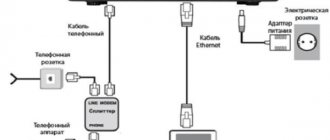
- The Ethernet cable laid into an apartment or house by Dom.ru employees must be connected to the WAN connector (sometimes the inscription reads INTERNET, but in most cases you can distinguish the required connector by its location - WAN is always on the outskirts and stands out from the rest of the slots).
- Connect the cable included with the router first to LAN 1, and then to a laptop or personal computer.
- The prepared equipment remains to be connected to the network and, if necessary, additionally press the ON or OFF button, if one is found on the case. Alternatively, special indicators indicating the operation of the router or router will appear automatically.
Checking Windows service and network settings
After the equipment is unpacked and prepared, interaction with the computer begins. Moreover, the procedure here is almost the same for both Windows XP and Windows 10 - only the names of some menus and directory navigation differ:
- In the tray, find the icon of a computer connected to the network and right-click.
- In the list that appears, select “Network and Internet settings”.
- Next is the Ethernet section and adapter parameters (in XP or 7, the required section will open automatically).
- On the version with Ethernet, right-click, and then “Properties”.
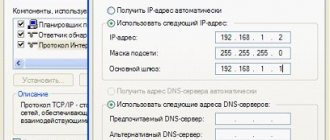
- From the proposed list of possible settings, you should only interact with IP version 4. It is not recommended to touch the rest. Otherwise, you will have to reset the settings to factory settings or undo the changes made in a step-by-step mode (it’s better not to risk it again).
- After going to the properties, you need to check the boxes next to the options for automatically obtaining IP addresses and DNS servers.
Without the settings performed, other actions are meaningless, and therefore it is worth double-checking in advance both the method of “arranging” the wires and the selected checkboxes in the settings.
Setting up connection on DIR-300 NRU with firmware 1.3.1, 1.3.3 or other 1.3.x
- On the router settings page, select “Configure manually” and select the “Network” tab. There will already be one connection there. Click on it and click Delete, after which you will return to an empty list of connections. Now click Add.
- On the connection settings page, in the “Connection Type” field, select PPPoE, in the PPP parameters, indicate the username and password provided to you by your provider, and check the “Keep Alive” box. That's all, you can save the settings.
Setting up PPPoE on DIR-300 with firmware 1.3.1
How to enter the router settings
Before moving from the general to the specific, it is worth understanding the universal instructions, consisting of two points:
- Manufacturers of routers and routers indicate the address for going to the settings, as well as the login and password for authorization on the back of the device on a special sticker. Sometimes such an insert appears in the shipping box along with instructions and related materials.
- If you can’t find the required IP address, you can either go to the manufacturer’s website (not the most practical option), or use the “Network” directory, which is located on the left side of the standard Windows Explorer. After the transition, all you have to do is select the correct “Network infrastructure” item and double-click on the appropriate option.
The required page will open automatically in the browser, and then all you have to do is enter your login and password information.
After the transition did a login form appear? It's time to understand the particulars.
Login IP address for different router models
- D- Link. The standard IP address options are 192.168.1.1 or 192.168.0.1. Login information – Admin . Password – Admin (sometimes it is important to leave the field blank).
- Keenetic. IP address is 192.168.1.1, login information is Admin in both text fields.
- TP- Link. The situation is slightly different: the IP address is 192.168.0.1, but the Admin is the same.
- Xiaomi. The address here is no longer standard - 192.168.31.1 , and the rest of the authorization information changes depending on the model. But, as a rule, Admin is suitable for the login, and Password is suitable for the password. In some cases, the last field should be left blank.
- ZTE. For ZTE equipment, the standard combination is 192.168.1.1, login information is Admin in both text fields;
- Netgear. Here again is the familiar set - 192.168.1.1 and Admin in each free text field.
- ASUS. It will not come as a surprise to ASUS – 192.168.1.1 and Admin for login and password.
Comments (7)
Nikitos
11/28/2013 at 5:43 pm
Thank you for the lesson, you are very helpful, everything works now!!!!Answer
Alexandra
01/11/2014 at 04:17
Thank you very much! I suffered for two hours with the setup, but under your strict guidance I managed it in about 20 minutes!!! Thank you
Answer
Andrey
06/24/2014 at 23:42
thank you, I have firmware version 2.5.4 but everything worked fine)
Answer
Denis
09/01/2014 at 19:24
Good afternoon Please tell me, is it possible to increase the range of the Wi-Fi signal on the DIR-300 NRU B5/B6 model?
Answer
admin
09/05/2014 at 13:28
Only by searching for a free Wi-Fi channel (there are special programs). Well, or by buying another antenna.
Answer
Alexei
08.11.2014 at 21:37
Thanks a lot! Only with your instructions I successfully changed my login and password! On D-Link DIR-300 D1
Answer
Black13
03/15/2019 at 08:08
Very good instructions (detailed and clear)! The unfortunate specialists from dom.ru sang to a friend that dir-300 will not work on their network. I started looking for “pitfalls” and the first link led me to this article, which cleared up all my questions. Everything, of course, worked without their router (just in case, I updated it to the latest version from the official D-link website). Added to favorites. I will recommend your page to my friends!
Answer
Basic router settings
If the steps described above have already been covered, and the interface of the selected equipment has long appeared on the computer in the browser, then all that remains is to fill out a few text fields and deal with a couple of parameters. Namely, to find an agreement that specifies the login and password for authorization on the Dom.ru network, you will also have to remember the type of protocol used - PPPoE. But you don’t have to touch the other parameters - either the router will handle the task, or the provider will adjust.
Changing access point parameters
The Wi-Fi access point is configured after connecting to the network in the corresponding section in the router interface. Of the important parameters:
- SSID – point name. Any name can be chosen, the main thing is in Latin letters (allowed symbols and numbers will not hurt, here the choice depends on personal preferences);
- Network authentication – WPA-PSK or WPA.
- Encryption key – from 8 to 63 characters. Latin letters or numbers are suitable. To maintain a high level of security, you should choose a really clever password.
- WPA encryption - available options depend on the manufacturer, D-Link has traditional TKIP + AES options.
The remaining parameters are not important, but it is better not to check unnecessary boxes and not make any adjustments.
After selecting the parameters, it is important to reboot the equipment. And then use your smartphone or tablet to check whether the access point that has appeared appears in the Wi-Fi section or whether errors occurred during setup.
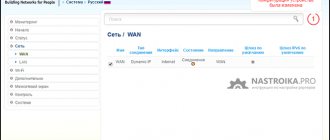
How to set up a connection to Dom.ru using Dom.ru firmware
When working with “verified” equipment, after going to the interface at 192.168.0.1, a welcome message from the Internet provider will immediately appear in the browser workspace.
And then, instead of unfamiliar tabs and confusing actions, an additional login form will appear.
And there are no surprises here - indicate your login and password for Dom.ru, select a city, name an access point, and come up with a password. The rest of the settings are selected automatically. And in this case it’s impossible to miss and click “somewhere in the wrong place.”
Setting up a router with standard firmware
If the firmware is standard, then the procedure is different:
- Go to the “Network” section.
- Select the connection type (or interface) – PPPoE.
- Next, bind the computer’s MAC address to the router interface.
- Fill in the login and password information.
- Leave the network name blank and the connection address too.
After setting up, be sure to reboot and start a test run!
Firmware from Dom.ru
As I said at the very beginning, if you see that the device has a sticker from this company, then most likely it has unofficial firmware from the provider.
- Select the operator: “DOM.ru” or “DOM.ru – InterZet”.
- Select the connection type. If your provider is simply “DOM.ru”, then select “PPPoE”. If “Interzet”, then select “IPoe”.
- Do not look at the connection status, you need to click on the “Change settings” link.
- First enter the “Login” and “Password” from the agreement. Below you enter the data for “Wi-Fi”. If you have a dual-band router that supports two frequencies (2.4 and 5 GHz), then the password is entered separately for each network. For convenience, you can enter the same key. To change the name of the wireless network, click “Advanced settings”.
- At the end, click “Save”.
Setting up a router with Dom.ru firmware
The provider offers various models of routers with firmware from Dom.ru. One of their main advantages is easy setup. When connecting, you will only need to provide the registration data from the contract. To configure such a gadget you:
- Connect the Internet cable to the appropriate socket of the router. Usually it differs in color (blue or red), while the sockets for local connection are yellow.
- Turn on the router and connect it to the computer using the included network cable. To do this, one end needs to be plugged into the network connector of the computer, and the other into the yellow socket of the router.
- Configure the network card of your computer or laptop to automatically obtain an IP address and DNS server (Start - Control Panel - Network and Sharing Center - Change adapter settings - Ethernet / Wireless network - Internet Properties version 4 - Properties - check the appropriate boxes).
- Launch the browser, enter the address 192.168.0.1 to enter the settings interface.
- Wait for the automatic initial setup to complete.
- In a new tab, go to the ya.ru website, after which the system will display an authorization portal window.
- Enter the contract number, login and password Dom.ru issued upon connection, click “Register”.
- Go back to the settings page at 192.168.0.1, where you can see the current settings of the router.
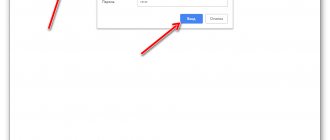
- If you want to change something, click “Change settings”. You can change the Dom.ru login and password, wireless connection mode, select a communication channel, encryption type, change the network password, and also reset the settings to factory settings.
- Save changed settings.
In the router settings menu window that opens, select “Network”
If you have a D-Link DIR-300, your steps should be as follows:
- Enter the address 192.168.0.1 to go to the options menu.
- Type your login and password Dom.ru.
- Remember or write down the name and password of the Wi-Fi network, click “Yes, I remember” and wait for a connection to the Internet.
- Re-enter the router menu and click “Change settings”.
- Select the network mode, if desired, you can change the channel or encryption method, click “Save”.
Setting up a router with standard firmware
If the firmware is standard, then the procedure is different:
- Go to the “Network” section.
- Select the connection type (or interface) – PPPoE.
- Next, bind the computer’s MAC address to the router interface.
- Fill in the login and password information.
- Leave the network name blank and the connection address too.
Possible problems when setting up a Wi-Fi router
In 99% of cases, problems arise for four reasons:
- The equipment is incorrectly prepared - for example, the cable is not connected to the WAN, but dangles somewhere “between”.
- In the network settings, there are no checkboxes for automatically searching for IP addresses or DNS servers.
- Errors were made inadvertently when selecting parameters.
- The router has inappropriate firmware or is not designed to work on the specified network. It’s worth either looking for a suitable option on the forums or waiting for an update from the manufacturer for the domestic market segment.
Until recently, ASUS had a problem with L2TP, when the required provider address simply did not fit into the text field and the setup ended with an unskippable error - the problem was solved within a month.
Selecting encryption type and password
Currently, two types of encryption are used in the civilian market for such equipment:
The last two are different from each other, but have a common operating principle.
It is the most vulnerable encryption method of all the above. To hack it, you don’t need to have any super-deep knowledge, so even a novice hacker or a fairly experienced user can do it within just a few minutes.
This acronym stands for Wired Equivalent Privacy. This encryption algorithm exists in two variations: WEP-40 and WEP-104. There is no fundamental difference in their operation, the only difference being the key length, which can be 5 and 13 alphanumeric characters, respectively.
Firmware update
There are two ways to search for the latest firmware for your equipment:
- In the router interface, which is located at 192.168.1.1. As a rule, such information is located at the top of the menu or in the settings.
- Directly on the official website of the manufacturer. To quickly find suitable options, you should use the search by router number. Next to the proposed instructions there will definitely be an archive with innovations.
It’s also important to deal with the network card in advance using the Driver Booster , which, as the name suggests, can load the appropriate drivers and increase the chances of compatibility.
Router for rent
Telecommunications operator Dom.ru offers network devices in installments, rental or for purchase. The listed options are in the “Equipment” section and depend on the region (you should immediately select the appropriate one in the upper left corner).
And, although prices in most cases here are noticeably higher than those of competitors, such as online stores, some of the advantages of this approach are:
- Maximum compatibility;
- Free setup;
- Increased warranty;
- Proven speed and coverage.
Helpful 1