Instructions for setting up the D-Link DSL-2640U router for using Internet and TV services for users of OJSC Rostelecom.
The D-Link DSL-2640U router is presented as an affordable and powerful router that is suitable for most networks.
The speed and quality of access to the Internet is ensured by the ability of the D-Link DSL-2640U device to operate using two technologies - ADSL and Ethernet. Thanks to this, the modem allows you to save on creating a wired network, since it does not require installing a separate switch.
The functions of sharing a channel with several users, a wireless interface, a firewall, support for basic security standards and the use of WPS technology are available.
Since the device is equipped with additional security features, the possibility of network intrusions and access to sites that the user does not want to visit is eliminated. The device uses types of protection such as safety standards. These types are WEP, WPA/WPA2. They allow you not to be afraid of hacker attacks and to be confident in the safety of your personal data and your network. The modem is equipped with filtering of devices that are connected.
To configure the router, you can use the convenient web interface. A choice of work in two languages is provided. These are English and Russian.
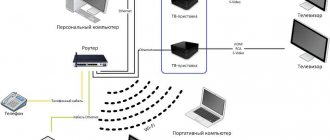
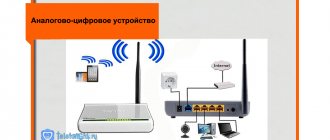
Connection diagram
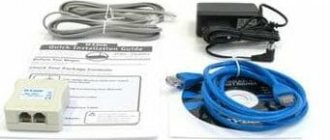
- When you turn on the hardware for the first time, you must follow the following steps: turn off the PC and connect the modem to the telephone line.
- Next, connect the “DSL” connector of the splitter to the “DSL” connector of the D-link dsl 2640u router, and combine the “LINE” socket with the telephone socket. A telephone line cable is used for this.
To connect to a personal computer you need to perform the following algorithm:
- Combine the power adapter and connection socket and plug into a power outlet. After a few seconds, the green “POWER” indicator will light up;
- Next, connect the Ethernet cable from the splitter to the WAN connector. To work with a PC, you can use one of the four ports of the device, and use the remaining ones for wired connection of other computers;
- You need to turn on the PC and wait until the operating system loads.
The correct operation of the D-Link DSL-2640U modem and the connection to the provider on the Rostelecom network is checked by ensuring that the “POWER”, “DSL” and “LAN” indicators are constantly working.
There are two types of settings to choose from and the user's professional level:
- Provincial old-timer - setting up the D-LINK DSL-2500U ADSL modem
- using the web interface of the router;
- auto-tuning (using the installation disk).
Driver installation issues
After the entire circuit is assembled and the power supply is connected, you need to install special control software called drivers (so that the operating system installed on the computer can initialize the device, and it, in turn, works without failures).
Standard models, as a rule, are recognized automatically by the system, and installing drivers does not raise any questions. If something goes wrong, you can always use the special disk that should come with the modem. If you did not purchase the modem from the provider or if there is no disk, you can download the necessary drivers directly on the official website.
When the entire procedure is completed and the device becomes fully operational, the Rostelecom modem should be directly configured. The first step is to access the web interface of the device itself.
Connection setup
When starting to install the D-Link DSL-2640U modem, you need to open a browser and enter the address to enter the modem settings: 192.168.1.1;
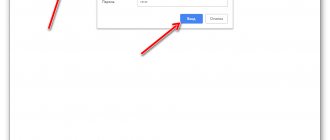
Open the browser, enter https://192.168.1.1 in the address bar
The browser line is used for this. Next, a new tab will open. In it, indicate your access data (“login” and “Password” = admin).
After going to the web interface of the modem, you will need to select the “Advanced settings” item.
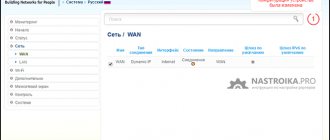
To establish a connection using PPPoE for Rostelecom, you need to enter the “Network” → WAN column and click “Add”.
Next, you need to fill in information about the connection format: connection type - PPPoE, port - DSL, name - Internet. In the ATM item, in the VPI and VCI fields, you must enter information about the Rostelecom branch (in the “User Name” line, indicate the login used to establish communication with the Internet; in the “Password” line, indicate the login password provided by the provider) and click “Save” .
- How to set up a D-Link modem using an old DSL 2500U as an example
Brief summary
As a summary, it remains to be said that setting up a Rostelecom modem of any known type is not particularly difficult. The main thing is to choose the right parameters that were presented in the material above.
As for the choice of equipment, ADSL devices, when using a connection from the Rostelecom provider, are the best option compared to the same Ethernet or USB devices, which are quite limited in their capabilities.
The settings of 3G modems were not considered, since, after all, users at home or in the office give the main preference to modems that combine the functions of routers with wireless communications. Well, in terms of settings, if I would recommend something very simple, it is best to use the “Wizard” disk so as not to deal with unnecessary things. But if this is not possible, you can safely use the instructions given above.
IPTV
If you connect to the IPTV interactive television service of the Rostelecom network, the connection in question will need to be marked “Enable IGMP”.
Forming another PVC connection requires a sequence of steps: click “Add” in the WAN sub-item, where the following information is indicated: connection type (BRIDGE), port - DSL, name - TV. The VPI and VCI fields provide information about the desired Rostelecom branch. Next, click the “Save” button. After this, another line will appear in the WAN table window.
To ensure the functioning of IPTV, you need to create a LAN port for the TV set-top box. This port is combined with a PVC connection. To do this, you need to select the “Port Grouping” sub-item in the “Advanced” column, click the “Add group” button and enter a name in the new tab (iptv, for example). Next, move one of the LAN ports to the right field from the left. In the WAN connection, move TV to the right and save the changes. The result will be the creation of two groups. The next step is to save the interfaces in the union.
WiFi
First, you need to find the “Basic settings” item in the “wifi” column and check for the “Enable wireless connection” checkbox.
Next, in the “SSID” line, assign the name of the new wifi network. In the “Country” item, select “Russia”. Do not change the channel.
- Setting up D-Link DSL-2640U for Rostelecom users
In the wifi subsection “Security Settings” you need to enter the following data: network authentication type – “WPA2-PSK” and “Encryption Key”, where you enter the password for the created wifi network (any combination of letters and numbers of at least eight characters). Next, click on the “Change” button.
Manual installation of the parameters of the D-Link DSL-2640U router for the Rostelecom network using the web interface is completed at this stage.
To save the settings, in the “System” menu section, select the “Save and Reboot” sub-item.
Updating DSL router firmware
Connecting to wireless Internet: what you need and how to do it
You need to update the 2500U router, that is, its software version, if numerous problems accumulate. Before starting DSL firmware, you need to carefully study the stickers on the product body, determine its hardware version (H/W) or revision type. As well as the software version (S/W) at the time of release. S/W version or line type are: annex a, annex b. And the revision is A, C, D.
On the website www.dlink.ru you need to download the latest file with the bin extension from the Firmware folder and save it on your computer.
On the main page of the interface, go to the “System” tab. In it, select the “Software Update” item, and on the new page, click the “Browse” button. After finding the downloaded file, click on the “Update” button to install the new 2500U router software. Once the update process is complete, your computer will automatically restart and return to factory settings. You will have to re-configure the DSL router using the technology described above.
Auto-tuning
If you select the automatic setting using the installation disk, the sequence of actions after inserting the disk into the CD-ROM and starting the program will be described on the monitor. For proper configuration and correct operation of the D-Link DSL-2640U device, it is important to strictly follow all recommendations and be careful when implementing them.
PC setup
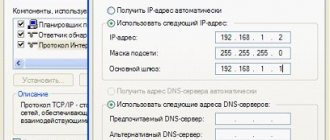
In order to ensure proper uninterrupted operation of the device, it is necessary to set it to automatically retrieve the IP address. To do this, follow the following sequence of steps: “Start” → “Control Panel” → “Network and Sharing Center”. After the transition, in the pop-up window on the right, select the “Changing adapter settings” section.
Further actions are as follows: in the list of connections, find and right-click on the item “Local Network Connection”. Designate the sub-item “Properties”. In the window that opens, select “Internet Protocol Version 4 (TCP/IPv4)” and click “Properties”. O and “Get DNS server address.”
Possible malfunctions and ways to eliminate them
Zyxel Internet center: Keenetic Lite router
All problems that arise during the operation of DSL routers model 2500U are divided into the following groups:
- consumer equipment software;
- system hardware;
- faults occurring at the service provider.
In the first case, it is necessary to separate situations when they arise at the initial stage of setup, and failures that appear during operation of the DSL modem. At the initial stage, setting up the 2500U must be carried out in strict compliance with all the requirements of the manual, the sequence of operations, and saving the entered data at each stage. After completing the DSL setup process, you need to check the resulting results.
The causes of failures that occur during operation of the 2500U are often external factors: sudden surges in supply voltage or thunderstorms. In these cases, the use of uninterruptible power supplies (UPS) with an autonomous battery will be of great help. If it is impossible to continue DSL operation, you must reset the 2500U router’s settings to factory settings. And also carry out work to restore previously entered data. Firmware updating to the latest software version will be of great help.
The DSL modem indication on the front panel will help in troubleshooting the hardware (“hardware”). The exception is when the Power LED is not lit. For this option, replacing the AC voltage adapter will be useful. It is necessary to check the serviceability of the wires and measure the voltage using a multimeter. It will be useful to examine all cable connectors for their reliable connection and check the serviceability of the communication lines of the system equipment. Sometimes the PC is to blame for the lack of Internet information. If it is possible to check this version, it can be replaced for a while.
After the verification activities have been carried out, the service consumer must call the operator’s technical support service and report the problem. If the provider's equipment operates normally, assistance from warranty or repair shops is required.
Restoring factory settings
The D-link modem is equipped with a Reset button on the rear panel. It allows you to reset the router settings to factory settings.
- First, check the operation of the “Power” indicator (in active mode it should light green).
- Press and hold the “Reset” button for five to seven seconds. Release the button and wait until all indicators turn off. After this, the D-link router returns to its default settings. The reboot process begins.
Found a typo? Select the text and press Ctrl + Enter
Greetings! In this article, using the D-Link 2500U model as an example, I will show the entire process of setting up D-Link modems. In fact, although the model is old and does not even support a wireless network, using its example it is quite possible to show all the features of setting up ADSL modems, which are slightly different from ordinary routers. Begin!
If you have any questions or have any additions, please leave a comment. Perhaps this will be useful to other people!
We have a separate ARTICLE on setting up routers.
Content
Modem market overview
Before setting up the Rostelecom modem is considered directly, it is necessary to dwell on the equipment that will be used to organize an Internet connection at home or in the office.
What can you use at the moment? Among the most popular options, there are several main groups of devices:
- modems-routers (DSL/ADSL);
- Ethernet modems;
- USB modems;
- 3G modems.
The first group is the most popular and is suitable for installation at home or in offices. The approximate cost of the simplest model is about 800 rubles, but models of a higher rank will cost about 1,500 rubles.
The second category is also quite popular, but mainly due to its low cost (about 750 rubles).
USB routers have not gained much popularity, although they are quite cheap. Their main problem is that very often there are situations with “gathering” of drivers. 3G devices are mainly used when moving around the city with a laptop.