Author of the article
Vitaly Leonidovich Cherkasov
System administrator, computer systems engineer.
Ask a Question
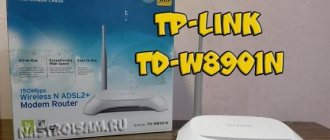
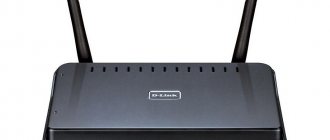
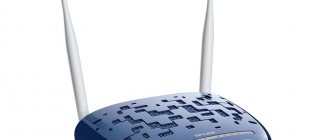
ADSL technology, which allows you to connect to the Internet via a telephone line, has become quite widespread. It is especially popular in rural areas, where it is difficult to find another reasonable alternative. In addition, it is worth considering that now there is not one device in the house that connects to the World Wide Web, but several. In addition, some of them, for example, a smartphone or tablet, can only be connected via Wi-Fi. To receive Internet via a telephone line and distribute it to a desktop computer and several mobile devices, you can use the TP-LINK TD-W8961N ADSL router or its analogue TP-LINK TD-W8961ND.
Indicators and connectors
On the front panel of the ADSL router, from left to right, there are the following indicators:
- Nutrition. If the indicator is on, it means the router is connected to the electrical network;
- ADSL. When the indicator is on, it indicates that the connection is established; if it is blinking, it means the router is connecting to ADSL;
- Internet. This indicator lights up when connected to the World Wide Web;
- WLAN. Lights up when Wi-Fi is on but no data is being transferred, a flashing indicator indicates that data is currently being transferred;
- WPS, this indicator lights up after connecting another device to it using WPS, after 5 minutes it will go off. A flashing indicator indicates that the mobile gadget is now connecting to the router;
- four indicators that show the status of LAN ports.
On the back panel of the ADSL router there is:
- “POWER” connector, which is designed to connect a power source;
- ON/OFF button turns the power on and off;
- WPS button is used to configure WPS;
- The RESET button is responsible for resetting the settings to standard. To return to the original settings, you need to hold this button for 5 seconds when the router is turned on;
- Using the Wi-Fi switch, you can turn the wireless network on or off;
- LAN ports 1, 2, 3, 4 are used to connect the router to a PC and other devices;
- The ADSL port is used to connect the gadget to the phone.
Back panel
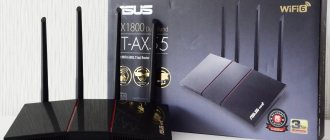
Appearance
The review would not be complete without at least briefly touching on the type of equipment. The designers should be given credit for the excellent design of the device.
Despite the fact that it turned out to be largely original, all connectors and LED indicators are installed conveniently and ergonomically.
The saturation of the case with ventilation holes does not allow the device to overheat even under increased loads.
Traditionally, the user will find all the sockets and buttons on the back.
The ADSL connector is installed in the far right position. Near it, there are four LAN sockets lined up in a row, marked in yellow; one of these ports, if necessary, can be used as a WAN, of course, if the house has the ability to connect using an Ethernet cable.
After installing the removable antennas, thanks to the hinges, they can be oriented as convenient for the owner of the device. The size and brightness of the light indicators are optimally selected and do not irritate the user even at night.
The compact dimensions (19.5×13×3.5 cm) allow the device to be installed almost anywhere where it is convenient for the owner of the house. There are recesses on the bottom cover of the case that securely hold the device on vertical planes.
If the device is installed on a vertical surface, it is recommended to hang it with the back panel facing down. This will avoid kinks in the connected wires.
Connection
Connecting TP-LINK TD-W8961ND can be done in the following order:
- connect the router to the telephone line. To do this, connect the ADSL port located on the rear panel of the device to the MODEM connector of the splitter;
- connect one end of the Ethernet cable to the network connector of the computer, and the other to one of the 4 LAN connectors of the router;
- turn on the PC;
- plug the power adapter into the POWER connector and plug it into a power outlet;
- then press the ON/OFF button.
ADSL router connection diagram.
Login to router settings
To go into the router settings, you need to enter https://tplinkmodem.net in the address bar of your browser. You can also use the IP address 192.168.1.1. After this, a window will open in which you need to enter your username and password. By default, the username and password are the same and consist of the word admin. This data is on a label that is stuck on the bottom of the router.
If the password does not work, it means that it has been changed, and the TP-LINK TD-W8961ND settings need to be reset to factory settings. To do this, press the RESET button with the router turned on and wait 5 seconds. After this, you can log into the router's admin panel with the default password.
Contents of delivery
The device is supplied in a cardboard box, which contains the main characteristics of the device.
Already in the store, simply by examining the packaging, you can get a clear idea of all the capabilities of the device.
For reliability and to avoid possible damage during transportation, TP-link additionally packed the router in another inner box made of thick cardboard.
The manufacturer has included all the necessary components so that the future owner of the router does not have problems with the connection and does not have to hastily run to the electronic goods store to buy the missing materials.
The list of elements included in the kit consists of the following:
- Router;
- Antennas (2 pieces), each length 20 cm;
- Splitter (3-port);
- Telephone cables (2 pieces);
- Patch cord (1 piece);
- Power supply;
- CD with software for quick setup;
- User guide.
Fast automatic setup
In the ADSL router model TP-LINK TD-W8961ND, configuration can be done automatically.
- In order to launch it, you need to select the “Quick Start” menu item and click on it to open the initial window;
Quick setup initial window.
- In the Time Zone window, you can set your time zone;
- In the next window, select the type of connection to the provider. Most often this is PPPoE/PPPoA. You can find out the type of connection in your agreement with your provider.
- In the new window you need to enter information about your Internet connection, which you can find out from your provider by looking in the contract;
- In the window that appears, enter information about the Wi-Fi network parameters.
Setting up Wi-Fi.
- The next window is the final one. To finish the setup, click the "Next" button.
Possible difficulties
Sometimes users encounter an incomprehensible request for multicast data. In this case, even technical support may be powerless. The bottom line is that in most typical configurations, traffic comes to the user without a tag, and for IPTV multicast to work, such a parameter is necessary.
Therefore, even if you do everything “by the rules,” you won’t be able to watch IPTV normally. What you need to do: in the router menu, find the “VLAN ID for using an IP phone” item, where you indicate the VLAN ID received from the provider. Next, the LAN port (any, for example, 4) should be switched to IP phone mode. If the router’s web interface contains the “IGMP Proxy” line, the “Enabled” position is indicated there.
Some older TP-models may be capricious (TL WR, WR, TL-WR741, TL-WR 740N, 741 ND, 841N, 940N). It is advisable to update the software for them. “Archers” C2, C5, C7, C20, C50 are easier to configure for IPTV.
Source
Manual setting
Manual setup of TP-LINK TD-W8961ND consists of entering Internet connection and Wi-Fi parameters.
To set up Internet, you need:
- Enter the “Interface Settings” menu;
- Go to the “Internet” submenu;
- Select channel PCV0;
- Specify the value of the VPI and VCI parameters provided by your Internet provider;
- Set the mode PPPoA/PPPoE or another;
- Enter the username and password specified by the provider.
More detailed Internet configuration
You can configure the Internet in more detail through a regular configurator. To do this, go to “Advanced settings” - “Network” - “Internet”. The old connection will already be there, you can delete it and add a new one. Next, simply enter the required data and save.
New firmware
Old firmware
Go to “Interface Settings” and then select “Internet”. Afterwards, similarly select the necessary data and enter additional information from the contract. If some information is missing, then simply skip and leave the fields with default values.
IP TV connection
The router supports IPTV technology. In order to connect it, you need:
- Go to the “Interface Settings” menu, “Wireless Network” submenu and select PVC1 in the “Virtual channel” line;
- Set VPI/VCI values, which must be confirmed with your Internet service provider;
- In the “ATM QoS” line, select the UBR value;
- Select the type of connection - bridge;
- In the encapsulation line, select the value 1483 Bridged IP LLC.
Now you need to configure the LAN ports. For this:
- Go to the “Advanced Settings” menu, “VLAN” submenu. We check that the VLAN function is enabled;
- Select the line “Define VLAN group”;
VLAN window.
- In the new window we set the parameters as in the figure. After that, click the “Save” and “Next” button;
The first window with VLAN settings.
In the window that appears, set the parameters from the image again and click “Save”, “Next”;
- In the next window, in the line “Virtual channel No. 1” we change the value to 2, in the line “Port 4” we set the same value;
Now you can connect interactive television through the 4th LAN port.
Specifications
The device has the following capabilities:
- data transfer speed – up to 300 Mbit/sec;
- frequency range – 2.4-2.4835 GHz;
- additional functions – DDNS, virtual server, VPN traffic passthrough;
- the temperature at which the router functions normally is 0-400C;
- relative air humidity for operation of the device is 10-90% without condensation.
Repeater mode
It happens that the power of a conventional router is not enough to cover the area of an apartment or house. Repeaters - wireless signal amplifiers - come to the rescue. By connecting such a gadget, the user receives a strong, good signal where a standard router does not work. For example, the Tp-Link TL WA850RE device belongs to the repeater class.
But you can also use a regular router as an amplifier. To operate the TP-LINK TD-W8961ND in repeater mode, you need to enable WDS in the Wi-Fi settings (“Interface settings” -> “Wireless network”) and enter the MAC address of the access point to which your router will connect.
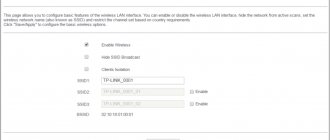
How to set up WiFi on TP-Link TD-W8151N
Setting up a Wi-Fi wireless network on a TP-Link ADSL modem is relatively simple. Open the menu section Interface Setup> Wireless . Please make sure that the Activated checkbox is checked in the “Access Point” line - it is responsible for the operation of the wireless module.
In the “Channel” field you need to put the value “Russia”. In the “Channel Bandwidth” field, set the value to 40 MHz. Below, in the “SSID Index” list, set the value to “1”. “Use WPS” is set to “No” to disable this technology, since it is a gap in Wi-Fi security. In the “SSID” field, you need to come up with and enter a network name in Latin. We select WPA2-PSK Authentication Type - it is the most secure today. Encryption type - Encryption - set to AES. All that remains is to come up with a password for connecting clients to the network and enter it in the “Pre-Shared Key” field. Make your Wi-Fi password no shorter than 8-10 characters, and it’s best to use a mix of letters and numbers. This way it is most reliably protected from hacking. WiFi setup on the TD-W8151N from TP-Link is complete. Click the Save button to save the modem settings.
Firmware update
Before changing the firmware, you need to download the latest version from the official website and save it to your computer. After that, go to the “Device Operation” -> “Firmware” menu. The following window will open:
Before updating the software, it is recommended to make a copy of the current state of the router. To do this, click the “Save settings file” button and save the file to your hard drive.
After this, you can start updating. In the line “Location of file with new firmware” there is a “Browse” button. Click it and select the file with the latest firmware version downloaded from the official website. After that, load the old settings.
Online viewing
Available in 2 versions - on Smart TV or with a “regular” TV receiver via a set-top box. The m3u playlist must be downloaded: it can be found in the TV settings (some manufacturers create such an option) or on the Internet. Without a ready list of TV channels, viewing is impossible.
As a rule, with properly configured equipment, no difficulties arise with broadcasting. Except for situations where the channel link is inactive. In the additional settings of the TV and set-top box, playback quality, resolution and frame rate are indicated.