The official firmware of TP-Link routers is initially not characterized by stability and quality of work. This especially affects entry-level routers, which are universally installed by most providers when connecting to Internet services. When buying a router in the price category of up to 1000-1500 rubles, you can’t count on anything else - many people think, but in fact this is far from the case.
The goal of the provider is to get an Internet cable, connect it, show that the Internet is available and then receive a subscription fee. At the same time, providers do not care how stable this business will work and what difficulties you may encounter. Remember what solution technical support almost always offers? Insert the cable directly into the PC and check the connection, reboot the router. If it works directly, it means they don’t have the problem.
The reason for the unstable operation is caused by:
- Buggy operation of the official firmware. It is not clear in what language it is written, but TP-Link owners always know where the reset button is on the router. Most routers lose connection frequently and require constant rebooting every 2-3 days or more.
- Poor parameters of the iron included in the composition. As a rule, this is 32 Mb of RAM and a single-core processor with a frequency of 600 MHz (the main thing is that the link is raised).
- The work of torrents on routers with entry-level hardware . If you do not artificially limit the number of connected peers per torrent in the software settings, then the router will lie down to rest within a couple of minutes after the download starts. A large number of connections are raised that the router is simply not able to support.
- Large number of connected devices. This is approximately the same as with torrents, only within the local network. A PC with a torrent, a TV, phones of all family members, a laptop that is in another room and a couple of smart gadgets are connected to a weak piece of hardware. This does not cause a permanent freeze, but it greatly reduces the speed of all devices on the local network. We get packet loss when transmitting traffic.
- The router is heating up . Installed on a windowsill near a heating radiator or on a system unit, or covered with something and does not receive natural cooling.
Supported Versions
| Brand | Model | Version | Current Release | OEM Info | Forum Topic | Technical Data |
| TP-Link | TD-W8960N | v1 | 19.07.0 | https://www.tp-link.de/products/details/cat-15_TD-W8960N.html | https://forum.openwrt.org/viewtopic.php? > | View/Edit data |
| TP-Link | TD-W8960N | v3 | 19.07.0 | https://www.tp-link.com/en/support/download/td-w8960n/v3/ | View/Edit data | |
| TP-Link | TD-W8960N | v4 | 19.07.0 | https://www.tp-link.com/en/download/TD-W8960N_V4.html | View/Edit data |
| Version | Unsupported Functions |
| v1 | DSL modem |
| v3 | DSL modem |
| v4 | DSL modem, WiFi 2.4GHz partly |
Connecting IP TV via a router
Usually, you don’t need to enter any additional settings, the TV receiver should connect to the network itself, but if nothing happens, take the following steps: Open the router interface on your computer and go to the network page - IPTV. Specify the router port to connect to - LAN4. Now you need to connect the set-top box to router via a cable to the LAN port. Save the changes made and restart the set-top box, the television should work. Important! Sometimes it happens that all the settings you have made are lost; this can happen if, for example, the general supply of electricity or home Internet is turned off.
In order not to configure the equipment every time, you can reserve software settings on your website on the Internet:
On the router’s personal page, open the system tools tab. Here you need to select the “Backup and Restore” line. Click on the settings backup item, indicate where your file will be stored (for example, on removable media), and the changes made must be saved. In case of any failure operation of the equipment, you can easily use the recovery option; you should do everything in reverse order and set the previously existing settings from your saved file.
See also:
What should Rostelecom clients do if their home phone does not work? Connect a second TV to the Rostelecom set-top box. Configuring the Rostelecom remote control on a TV and set-top box. How to set up a Rostelecom modem yourself: 2 ways.
Hardware Highlights
| Model | Version | SoC | CPU MHz | Flash MB | RAM MB | WLAN Hardware | WLAN2.4 | WLAN5.0 | 100M ports | Gbit ports | Modem | USB |
| TD-W8960N | v1 | Broadcom BCM6358 | 300 | 4 | 32 | Broadcom BCM43222 | b/g/n | — | 4 | ¿ | ADSL2+ | — |
| TD-W8960N | v3 | Broadcom BCM6318 | 333 | 8 | 64 | Broadcom BCM43217 | b/g/n | — | 4 | ¿ | ADSL2+ | — |
| TD-W8960N | v4 | Broadcom BCM6328 | 320 | 8 | 64 | Broadcom BCM43227 | b/g/n | — | 4 | ¿ | ADSL2+ | Mod |
(for version 1 and version 3)
| CPU | Ram | Flash | Network | Wireless NIC | Wireless Standard | USB | Serial | JTag | ADSL2+ Modem |
| [email protected] | 32 MB | 4 MB | 4x 100mbps | BCM4351 (onboard) | b/g/n | NO | YES | YES | YES |
Wi-Fi setup
A wireless access point can also be configured in the web interface:
- Open the Wireless - Basic menu.
- Make sure the first checkbox is Enabled.
- You can enter any network name in the SSID1 field.
In basic settings you can instantly enable or disable the access point
- You can also add two more networks distributed by this router. Check the box next to SSID2 or SSID3 and enter a name for the new network. This can be useful if there are a lot of devices to connect.
- Click Save/Apply.
- Then go to Wireless - Security.
- We are interested in the Manual Setup AP section.
- Select the network for which you want to set a password from the drop-down list.
- On the next line, select WPA2-Personal.
- In the Network Key field, enter the password - it will be the key to access the network.
You can change your Wi-Fi password without even knowing the previous one
- Leave the rest of the fields intact and click Save/Apply.
Installation
| Model | Version | Current Release | Firmware OpenWrt Install | Firmware OpenWrt Upgrade | Firmware OEM Stock |
| TD-W8960N | v1 | 19.07.0 | https://downloads.openwrt.org/releases/19.07.0/targets/brcm63xx/generic/openwrt-19.07.0-brcm63xx-generic-96358VW2-generic-squashfs-cfe.bin | https://www.tp-link.de/download/TD-W8960N_V1.html | |
| TD-W8960N | v3 | 19.07.0 | https://downloads.openwrt.org/releases/19.07.0/targets/brcm63xx/generic/openwrt-19.07.0-brcm63xx-generic-96358VW2-generic-squashfs-cfe.bin | https://www.tp-link.com/en/support/download/td-w8960n/v3/ | |
| TD-W8960N | v4 | 19.07.0 | https://downloads.openwrt.org/releases/19.07.0/targets/brcm63xx/generic/openwrt-19.07.0-brcm63xx-generic-96328avng-generic-squashfs-cfe-8M.bin | https://www.tp-link.com/en/download/TD-W8960N_V4.html |
Setting up IPTV
If you have a set-top box, you can connect it to this router:
- Connect the set-top box to the router using an Ethernet cable into any free LAN socket. Remember the socket number (they are all numbered below).
- Login to the web interface.
- Open the IPTV item.
- Check the Enable IPTV checkbox.
- Just below, check the box next to the port into which you connected the set-top box - LAN1, LAN2 or LAN3.
Turning on IPTV will not take much time
- Click Save/Apply.
Hardware
| Architecture | MIPS |
| Vendor | Broadcom |
| bootloader | cfe |
| Board ID | 96358VW2 |
| System-On-Chip | BCM6358 |
| CPU/Speed | BMIPS4350 V1.0 / 300 Mhz BMIPS Dual Core |
| Flash Chip | Spansion S25FL032A (on v1.3 hardware) |
| Flash size | 4 MiB |
| RAM-Chip | DDR-400 |
| RAM size | 32 MiB |
| Wireless | Broadcom BCM4351 802.11b/g/n (onboard) |
| Ethernet | Broadcom BCM5325 w/ vlan support swconfig |
| Internet | ADSL2+ |
| USB | no |
| Serial | Yes |
| JTAG | Yes |
Photos
How to open the case
TD-W8960N is a little tricky to open.
Serial
→ port.serial general information about the serial port, serial port cable, etc.
Pin: TX,RX,GND,VCC (3.3v)
Don't connect VCC! Just use TX,RX and GND and then power on the device. Also, you MUST short those 2 pads marked in yellow to enable serial RX and TX. Don't forget that RX connects to the RS232TTL-TX and TX to the RS232TTL-RX!
| Serial connection parameters for TP-Link TD-W8960N | 115200, 8N1 |
→ port.jtag general information about the JTAG port, JTAG cable, etc.
How to connect to the JTAG Port of this specific device: Insert photo of PCB with markings for JTAG port
Preparing for setup
So, you bought a new device, took it out of the box along with all the components (namely an Ethernet cable and a power cord). How to set up a network connection now?
First, let's make a physical connection:
- Connect the power supply to the POWER port on the back of the case. After inserting the plug into the outlet, press the power button - the indicators should light up and start flashing.
- Now let's connect the router to the Internet. Take the cord that extends from the entrance and connect it to the WLAN port (the outermost yellow one, located closer to the white ADSL port).
You can also connect to the Internet via a USB modem, but since this article is about setting up Rostelecom, we will not consider this possibility now.
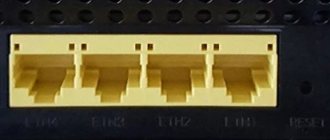
- Connect the router and computer with the Ethernet cable that comes with the device. Plug one end of it into any free yellow socket of the router (LAN), and the other into the computer’s network card.
How to automatically obtain a network address
In order for the Rostelecom router to work properly and for us to be able to configure it, it needs to automatically receive its network address. So let's check that this is true:
- Turn on your computer and right-click on the Start button.
- Select “Control Panel” from the drop-down list.
- Then find the "Network" section.
- There will be a “Network Connections” item. Click on it.
The window we need looks like this
- You will see a window containing a list of all previously used network connections. We are now interested in what is called Ethernet. Right-click on it.
- Select "Properties" from the list.
- Now click on the TCP/IPv4 line and the “Properties” button in the window that opens.
Here we will configure the IPv4 protocol
- Make sure that "Obtain an IP address automatically" is selected and not "Use the following". If this is not the case, then correct it.
- Click OK and exit settings.
Hardware mods
Because TD-W8960N is an unit that gets way too hot, adding 2 heatsinks is a good idea.
Give link to friends:
On this page you will learn how to connect a Wi-Fi router to a computer, and you can also find setup instructions in Russian. The staff of our information portal daily updates the official firmware for a particular device model.
Step-by-step setup of the TP-LINK TD-W8960N router for Rostelecom, Beeline and other Internet providers will take you a few minutes and after that you will be able to enjoy all the advantages of the TP-Link Wi-Fi access point.
Setting up a network schedule
One of the interesting features of this router is setting a schedule for a day or week according to which the wireless network will operate.
Instructions:
- Open the “Wireless” tab, select “Wireless Schedule”.
- Put “Enable” in the top line.
- Specify "Each Day" or "Each Week" to set a schedule for the day or week.
- Specify the days of the week during which the schedule will operate, and note the Wi-Fi operating hours.
For the schedule to take effect, you must save the changes.
Download firmware for the router
To download the firmware for TP-LINK TD-W8960N you just need to carefully read the page you are currently on. Don't forget to leave your reviews (the form for adding reviews is at the bottom of the page). If you don't mind, you can share the link to the firmware with your friends. Also, if you have not found the answer to your question, you can ask it using the form at the bottom of the site.
Here you will find the latest drivers for wireless devices. To download the new driver, you need to follow the “Download firmware” link, which is located just below.
| Russian Internet providers | Ukrainian Internet providers |
|
|
Connection and login to the configurator
To connect I will use the LAN port, I will simply take the network cable and insert it into one of the LAN ports (4 yellow ones). But you can connect to the device’s network via Wi-Fi. Look at the indicators. All three of these lights should be on.
- Instructions tp link td w8961n setup Rostelecom
If Wi-Fi is not lit, then press the same button on the back panel to turn on the wireless network. If the ADSL light does not light, check that the cable is connected correctly and is tightly seated in the port.
To connect from a phone, tablet or laptop via Wi-Fi, you need to turn it upside down and look at the label. There should be the name of the wireless network and its password. The network name must match the model name. And the password can be digital and consist of 8 digits (we are looking for these numbers). Then we simply connect to this network.
ATTENTION! If the password does not work, you will need to reset it to factory settings. To do this, find the “reset” hole and press it for 10 seconds.
After a successful connection, you need to open any browser and enter one of two addresses in the address bar:
- https://tplinkmodem.net
- 192.168.1.1
How to reboot the router
If your router freezes or starts to slow down a lot, you can try rebooting it. In most cases, it solves the problem.
If your router freezes regularly, you should check the firmware. Perhaps it began to freeze after the update? In this case, download the older version and install it instead of the new one. If the router starts to freeze without flashing it, then, on the contrary, try updating it.
To reboot the TD-W8968:
- Press and hold the power button on the back of the case.
- Wait until all the indicators on the front panel go out. Release the button.
- Wait three seconds and press the Power button again.
- Wait until the indicators stop flashing and remain steady. The router is ready to continue working!