10/12/2013 D-Link | Rostelecom
In this manual, we will look in detail at the process of setting up a Wi-Fi router D-Link DIR-300 NRU for the Internet provider Rostelecom. This guide is completely suitable for you if you need to configure the DIR-300 router in the following modifications and with the following firmware:
- DIR-300 A/C1 (firmware update may be required)
- DIR-300 NRU B7 with firmware 1.3.x and 1.4.x
- DIR-300 NRU B5/B6 with firmware 1.3.x and 1.4.x
Update: if you have a router with firmware 2.5.11, 2.5.19 or 2.15.12, and the web interface looks like the following screenshot, use the instructions: Setting up DIR-300 with new firmware 2.5.12 and 2.5.19
Preparing for setup
First of all, if you have already attempted to configure your wireless router (the same as a Wi-Fi router), I recommend resetting the device to factory settings. For this purpose, leaving the D-Link DIR-300 plugged in, press and hold the RESET button on its reverse side for 10-15 seconds. Then release her. It will take another 20-30 seconds to reboot the router.
Another recommended step before setup is to check the LAN connection settings on your computer. To do this, do the following:
- In Windows 8 and Windows 7, go to the Network and Sharing Center (you can do this through the Control Panel, or by right-clicking on the connection icon in the taskbar). In the menu on the left, select “Change adapter settings”, then in the list of connections, right-click and select “Properties”. Go to the third point.
- In Windows XP, go to “Control Panel” - “Network Connections”. Select the local network connection, right-click on it and select “Properties”. See below.
- The connection properties window will appear. In the list of components used by the connection, select Internet Protocol Version 4 TCP/IPv4 and click the Properties button.
- Make sure that the connection settings are set to “Obtain an IP address automatically” and “Obtain DNS server address automatically”, i.e. as shown in the picture below. If this is not the case, then make the necessary changes, and then save the settings made.
The last point is to disconnect the Rostelecom connection on your computer. Moreover, neither during setup of the DIR-300 nor after its completion, do not turn on this connection again, because it will have to be installed by the router itself. Otherwise, the Internet will only be available on this computer, but not via Wi-Fi.
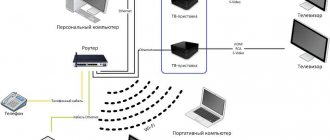
Connecting the router to the computer
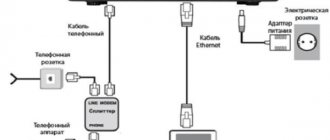
First you need to connect the router to the network. To do this, connect the Rostelecom cable to the router using the “Internet” port. Then, connect the patch cord coming from your personal computer to one of the router’s LAN ports. After these manipulations, connect the device to power and wait until it boots completely.
Now you need to configure the DIR-300 connection so that the device allocates an IP address to your PC. To do this, follow the instructions:
- Click on the network icon located in the Windows panel (next to the date and time).
- Click on the “Control Center” line.
- Select "Adapter Settings" from the menu on the left.
- Double-click the active network shortcut.
- Click on the “Properties” item.
- Select the category "TCP/IPv4 Protocol"
- Check the boxes “Get . . . automatically".
- Save the changes using the "Ok" button.
- After waiting a bit for the computer to receive a new IP address, click on the “Details” button.
- In the window that opens, find and copy the value of the “Gateway” parameter.
Connecting DIR-300 for setting up Rostelecom
Connecting a Wi-Fi router D-Link DIR-300 for Rostelecom
On the back of your Wi-Fi router there are five ports, one of which is signed Internet, the rest are LAN numbered from 1 to 4. The Rostelecom cable must be connected to the Internet port and nowhere else. Even if when you connected Rostelecom television, company employees came to you and connected an Internet cable to the LAN port, do not leave it like that - they did not do it because it was correct. Connect one of the LAN ports on the router to the network card connector of the computer or laptop from which you will configure. Plug the router into a power outlet.
How to go into the router settings and find out what firmware it is
Currently, there are two types of current firmware for Wi-Fi routers D-Link DIR-300 B5, B6, B7 and A/C1. We will look at setting up a Rostelecom connection and a Wi-Fi network on both. If you want to change the firmware to a newer one, then instructions on how to do this are at the end of this article.
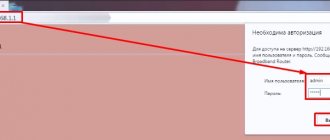
In order to go into the settings of the DIR-300 router (NRU), launch any Internet browser and enter in the address bar: 192.168.0.1, then press Enter.
When prompted for a login and password, enter the default values used on D-Link DIR-300 wireless routers - admin and admin in both fields. Immediately after this, if the router has been reset to factory settings or if you just took it out of the box, you will be asked to change the default password to your own. Do this and click "OK". After this, you will find yourself on the main router settings page, which, depending on the version, may have the following appearance:
First, let's look at setting up DIR-300 for Rostelecom on newer firmware - 1.4.x, if we are talking about a router with hardware revisions B5, B6 and B7 and 1.0.x, if we have DIR-300 A/C1 (however, for the latter, other firmware No). Then there will be a guide for setting up an older firmware version 1.3.0, 1.3.1, 1.3.3, so if you have exactly this version, you can immediately go to the corresponding section of the instructions. Or, if you wish, update the firmware to the latest official version from the D-Link website.
Connection and acquaintance
If the device is new, then remove it from the box. First, let's get acquainted with indicators or light bulbs. They will signal the correct operation of a particular area. It’s very useful when you don’t know why the Internet or Wi-Fi isn’t working - look at the indicators.
- Old model
- DIR-300S
- DIR-300A
- 1-4 with a monitor icon – LAN or local connection via cable.
- The planet icon (on the DIR300S is number 4) – Internet connection.
- Three waves – Wi-Fi.
- Nutrition – I think everyone understands this.
- WPS – available only on DIR-300S and located at number 3.
New models have a Reset button. Next comes the power button and the input for the power supply. All routers have a WAN port (on the old “Internet” model). Here we insert a cable from our beloved Rostelecom. Next are 4 LAN ports. To set up, I will use a direct cable connection and insert a laptop into the first port. There should be a spare cable on the box. Newer models should also have a WPS button.
On new models, Wi-Fi will work when you first turn it on. The network name will be the same as the model. Simply enter your password when connecting. The key is located on the label in the “PIN” line. If you cannot connect in this way, you will need to connect directly via cable to any of the LAN ports.
Setting up Rostelecom PPPoE connection on DIR-300 B5, B6, B7 firmware 1.3.0, 1.3.1, 1.3.3, 1.3.4
In order to configure Rostelecom on the DIR-300 with the specified firmware, on the main page of the router settings, click “Configure manually”, then on the “Network” tab, select “WAN” and click on the connection already existing there to open its parameters. Click "Delete".
Remove WAN connection Dynamic IP
This will take you back to the list of connections, but now it will be empty. Click “Add”.
All that is now required is to configure the Rostelecom connection parameters in our DIR-300. You can see them in the picture. Fill in as follows:
- Connection type - PPPoE
- Username - Login Rostelecom (for Internet)
- Password and password confirmation - Your password for Rostelecom Internet
- Check the Keep Alive if it is currently disabled
Click "Save". You will be returned to the list of connections, including the newly created one. Also at the top of the list there will be a notification that you need to save the settings. Save them. Now, if you have made no mistakes, and the Rostelecom connection on the computer itself is broken, you can refresh the page and see that the connection status has changed to “Connected”. Now you can proceed to setting up your wireless Wi-Fi network settings.
Login to the router admin panel
So, the DIR-300 router is connected to the computer. Now you need to make changes to the device settings. To do this, you will need to log into the special web interface of the router:
- Launch any browser on your computer.
- In the address bar, paste the previously copied value for the “Gateway” parameter and press Enter.
- In the window that opens, enter your username and password. This information is indicated on a sticker located on the back cover of the router. As a rule, a combination of “admin” and “admin” is suitable.
- After entering the data, log in to the network using the “Login” button.
- After successful authorization, the main menu of the DIR-300 router web interface will open on your screen.
Setting up Wi-Fi on DIR-300 with firmware 1.4.1 - 1.4.9
In order to configure the wireless network settings on the D-Link DIR-300 router with the latest firmware, return to the main page of the router’s administration panel (click “Quick setup” at the bottom of the page or simply enter 192.168.0.1 in the address bar of the browser).
On the left you will see the “Wi-Fi” item. Click on the “Wireless Network Setup Wizard” link. On the following pages you will be asked to step by step specify all the parameters of the wireless Wi-Fi network being created, as well as set a Wi-Fi password. The key points when setting up will be (the rest can be left unchanged):
- SSID is the name of the wireless network, by default it is visible to everyone within range of the wireless router and serves to help you identify it among other wireless networks.
- Country - here I recommend changing “Russian Federation” to “United States of America”.
- Network authentication - set WPA2-PSK as the most secure method.
- The PSK encryption key is your Wi-Fi password. With the type of network authentication specified above, it must consist of at least 8 characters - Latin letters and numbers.
- After that, click "Save".
- Also, don’t forget to click “Save” at the top (near the light bulb) - this will avoid resetting your settings after turning off the router’s power.
This completes the wireless network setup. Now you can connect via Wi-Fi from your phone, tablet or laptop and surf the Internet wirelessly. If you also need to set up IPTV television for Rostelecom, then proceed to the next section.
Setting up a D-Link DSL-2640U router under Rostelecom
Before you can configure or change any settings in the router firmware, you must log into its interface. On the device in question it looks like this:
- Launch your browser and type 192.168.1.1 in the address bar, then press Enter.
- In the form that opens, enter admin in both fields - these are the login and password values that are set by default and are written on the sticker on the bottom of the router.
- Access to the web interface has been obtained, now change the language to your preferred one through the pop-up menu at the top and proceed to setting up the device.
Quick setup
Review and configuration of the D-Link Dir-320 modem
The scope of the article does not allow us to consider all the subtleties of setting the parameters of devices of different revisions with separate versions of firmware software. In the latest versions for Rostelecom, the Quick Setup Wizard utility works successfully. In the interface it may be called Click'n'Connect. To start the “Wizard”, click the corresponding inscription in the “Quick Setup” menu. On the initial page it is suggested to connect the Rostelecom provider cable to the INTERNET socket and make sure that the WAN indicator on the front panel is DIR. If the result is positive, click the “Next” button.
On the next page, select the type of connection with the Rostelecom provider from the proposed list and specified in the concluded contract. Most “users” use a PPPoE connection.
It involves entering a username and password (with confirmation). Fill in the required fields for Rostelecom and click the “Save” button.
After returning to the start page, pay attention to the state of the light bulb in the upper right corner. If it is in the flash, move the cursor to the “System” field, select “Save” from the proposed list and click on this line. The blinking should stop and the WAN connection status will change from "Disconnected" in red to "Connected" in green. Now Internet pages from Rostelecom are available for viewing.
Manual setting
A simplified interface helps save time, but does not always solve the problem of setting up the D-Link DIR-300 modem: in different regions of Russia, Rostelecom services have different technical implementations, and the IPTV service can be delivered to the user in the form of both untagged and tagged traffic.
In the first case, it is enough to select a port through the “IPTV Setup Wizard” so that the set-top box receives an IP address and starts receiving data. But if the quick setup did not work and the TV receiver cannot contact the provider, it means that tagged multicast packages are being delivered from the Rostelecom server. In this case, setting up the D-Link DIR-300 router will look completely different:
1. If any settings have already been made, they will have to be deleted. To do this, it is better to use a factory reset.
2. Before you start establishing an Internet connection, you need to reconfigure the physical port into which the set-top box is connected. To do this, go to the “Advanced - VLAN” section:
The open tab presents a list of physical ports of the router, grouped into two virtual subnets LAN and WAN.
3. To set the LAN 4 interface with the necessary parameters, you will first have to detach it from the current group: go to the LAN and delete the fourth port;
4. Now the port is free and you need to organize switching so that data from the provider entering the router via the INTERNET port gets to the fourth interface, bypassing the DIR-300 NAT. This requires creating a new virtual subnet.
5. The name can be arbitrary; the checkbox will allow traffic transmission within the created group; the type is set to “Transparent”, but you will have to find out the VLAN ID from Rostelecom technical support. In the lower field of the tab, you need to select the fourth port, configure it as “Untagged”, and then save the changes.
6. The created group is a bridge that ensures parallel operation of LAN 4 and INTERNET ports as if the provider’s cable was directly connected to the set-top box. At the same time, the DIR-300 processes traffic at the data link level - it removes tags from headers and forwards untagged packets to the set-top box port.
7. Now you need to set up your Internet connection. To do this, go to the “Network - WAN” section:
- The username and password are specified in the agreement with the provider;
- The Keep Alive, IGMP, NAT, Firewall checkboxes must be checked.
Additional settings
Let's complete the process of basic adjustment by considering several important points from the “Additional” category. Many users will need to edit these parameters:
- Expand the “Advanced” category and select the “EtherWAN” subsection. Here you can mark any available port through which the WAN connection passes. This will come in handy when the wired Internet does not work even after proper debugging.
- Below is the “DDNS” section. Dynamic DNS service is provided by your provider for a fee. It replaces your dynamic address with a permanent one, and this allows you to work correctly with various local network resources, for example, FTP servers. Proceed to install this service by clicking on the line with the already created standard rule.
- The window that opens specifies the host name, the service provided, username and password. You will receive all this information when you sign a DDNS activation agreement with your Internet service provider.
Setting up Rostelecom IPTV television on D-Link DIR-300
To configure IPTV on both firmware versions of the D-Link DIR-300 (NRU) wireless router, it is not fundamentally different. On the main page of the router with firmware 1.3.x, click “Configure IPTV”. If you have firmware 1.4.x, then click “IPTV Setup Wizard”.
After this, you will need to select the port that will be used to connect the Rostelecom TV set-top box (the Internet will not work through this port). Select and save. This completes the setup.
Setting up Wi-Fi on DIR-300 with firmware 1.3.0 - 1.3.3
In order to set the wireless network parameters on the D-Link DIR-300 router with firmware 1.3.x, go to the manual settings page and select the “Wi-Fi” tab. Then - the “Basic Settings” subtab. On the page that appears, you can set the following parameters:
Wi-Fi settings on the D-Link DIR-300 router with firmware 1.3.3
- The SSID is the name of your wireless network, which will help you differentiate your network from the others in your home. I recommend using the Latin alphabet.
- Country - I recommend setting the USA instead of "Russia".
- Save your settings.
Then go to the “Security Settings” subtab, here we will set a password for the wireless network:
- In the network authentication field, specify WPA2-PSK - this is the most secure method for home use.
- In the PSK encryption key , enter a password consisting of at least 8 characters.
- Click the "Edit" button.
- A notification will appear indicating that you need to save all the settings you have made. Do it.
The WI-Fi setup on your wireless router is now complete. You can try connecting wirelessly from any devices that support it. If you need to set up Rostelecom IPTV TV, then read on.
Comments (12)
muradin
01/06/2014 at 20:49
but for some reason after these settings my TV set-top box still doesn’t work? can you tell me what it should be?Answer
admin
01/09/2014 at 19:27
Did you specify the port for IPTV on the main settings page?
Answer
Misha
01/28/2014 at 19:54
I indicated everything, the port, etc. There is Internet on the TV, but it doesn’t show the channels through the app! writes - please wait. TV skis without smart LS, I connect smart via ski attachment sp820
Answer
admin
01/29/2014 at 10:30
So, I didn’t quite understand the configuration, but look: When setting up, you selected the IPTV port. If everything is selected and saved, then there will be no Internet on Rostelecom on this port, the port will be “transparent” and only IPTV will work through it (well, Rostelecom’s local network). Accordingly, the Internet is on all ports, but not on TV - you need to connect a TV set-top box to it. Are you connecting the SP 820 via Wi-Fi or wired?
Answer
Kolya
02/27/2014 at 20:07
Thank you! It helped a lot!
Answer
Ivan
03/24/2014 at 00:23
Dir-300 firmware 1.04. After setting up the Internet, there is no connection! WAN connection status: disabled; WAN pppoe type; unknown error, what to do?
Answer
Eugene
09/14/2014 at 03:20
I’ve been having this problem for several months now, I discovered a problem with uploading pictures to Radical, but that’s half the problem, the main problem is that I can’t upload any files, including pictures that are larger than a certain “weight” (I haven’t set the weight yet, because .i.e. let's say 30kb are uploaded and no more (as an example) on your blog. I tried it from 3 of my home PCs connected to the Internet via a DIR-300 router/
Here it would be possible to blame the hosting BUT, experimentally it was found that if you connect to the Internet directly without a router, the problem disappears. Everything loads in one go. PPPoE connection. The router's MTU is set to 1500 for Ethernet; for PPP it was 1492 by default. Again, empirically it was determined that with a direct connection to access my blog, the MTU should be 1452 (+28), while if you connect through a router, this value increases to 1464 (+28). On the router I tried changing the MTU up to 1400 - the result was zero. What to do?
Answer
Anonymous
10/26/2015 at 20:48
Where to register dns servers on firmware 1.4.9?
Answer
Vladimir
06/14/2016 at 00:49
Router - DIR-300, on the label - H/W:D1 F/W:1.0.4, in the device information, firmware version 2.0.1, provider Rostelecom, connection type: dynamic IP, does not want to establish a connection in any way, although Before this I worked fine with the local provider. Is there new firmware for it?
Answer
Nikolai
01/04/2017 at 11:51
Why does the wan connection say disconnected, not connected?
Answer
Setting up the router
01/13/2017 at 19:54
There may be various reasons. The parameters are incorrect, the cable is connected incorrectly...
Answer
Elena
08/01/2017 at 11:37
Thank you very much, everything is clearly and clearly stated. There were no problems setting up the connection after reading your recommendations, although it didn’t work before)
Answer