As soon as the box with the new modem is in your hands, check the package contents. The following must be inside:
- As a matter of fact, the D-link DSL u2640 device itself.
- Splitter (a kind of “tee” that will allow you to use the telephone channel not only for telephone communications, but also as an Internet conductor).
- Power supply device.
- Lan - cable (can be of any color, depending on the configuration: gray, blue or green)
In addition to this, you will have to buy a telephone cable, the length of which is easy to calculate - it is equal to the distance from the slitter connected to the telephone socket to the intended location of the modem.
It is recommended to place the latter near the computer: the length of the included Internet cable (Lan), which will need to connect the D-Link DSL u2640 and the computer, is not so long.
Connecting a modem
In this section we will look at how to connect a modem to a computer.
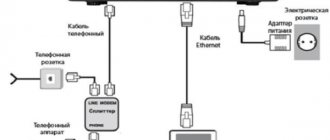
First of all, the router should be connected to power - insert the end of the wire from the power supply into the corresponding socket on the back of the modem, and the power supply itself into the outlet.
On the back side of your modem (router) there are 4 LAN inputs at once. It is there that insert one of the ends of the blue wire that comes with the D-LINK 2640U, and insert the other end into the LAN port on your PCM.
At the same time, be careful: the LAN light on your router should light up with the number of the modem port into which you inserted the local wire. In this case, both ends of the wire must be in place (port on the PC and port on the router).
After this, go to the next tab of the instructions, where you will be asked to connect your modem and splitter. There is one more cable included with the modem - insert it into your splitter (separator), and place the other end of this cable into the corresponding port of your router - “LINE”.
Factory settings
Each device has its own “factory settings”. We will talk further about how to reset the D-LINK 2640U to factory settings. You have to reset the settings to factory settings if you simply cannot go to the modem settings menu, or the modem was configured incorrectly.
The “RESET” function is available on every router and using it is much easier than you think:
- find a needle or awl at home, look at the back panel of your router, where you will see a small hole labeled with the word “RESET”;
- this is it: insert a needle (match) there, wait about 5-6 seconds. In this case, the router must be turned on;
- After this time, all the lights on the router will go out one by one. It may restart, which means that the modem settings have been reset to factory settings. Now you know how to reset D-LINK 2640U.
Possible malfunctions and ways to eliminate them
Modems for Rostelecom: features and configuration
If your DSL router has problems, the first thing you should try is to reboot the device. Another option is to reset the settings to factory settings. How to do this is described below.
It is also worth remembering that cables can also be damaged. It is worth carefully checking all connections on the equipment and devices connected to it. Sometimes situations arise when the problem is on the side of the Internet service provider. Then you should call technical support and get expert advice.
If the DSL router still does not work, it is recommended to contact a service center. Our technicians will diagnose the problem and help you solve it.
Firmware update
Equipment becomes obsolete over time. In order for it to last longer, it is periodically “stitched”. The manufacturer posts the latest updates on the official website. For the 2640u model they are downloaded from:
https://www.dlink.ru/ru/faq/370/935.html
The last update dates back to 2013. This means that this device is no longer supported by the manufacturer. Let's look at how you can update your DSL modem.
Via web interface
Via the “System” menu, “Software Update” item:
There are two update options in the window.
- First: specify the downloaded file manually, click “Update”:
- Second option: automatic mode. The DSL router will automatically connect to the update server and perform the necessary operation:
The current example uses a 2640u network device Wi-Fi dsl emulator, so the screen displays the message: “Unable to check for a software update.”
Via mobile application
There is also an update option via the mobile application. It exists for Android and iOS platforms.
Android link: https://play.google.com/store/apps/details?id=ru.dlink.drcu&hl=ru.
Link to iOS: https://apps.apple.com/ru/app/d-link-assistant/id1342564878.
Unfortunately, the 2640U is not currently on the list of compatible devices. Accordingly, the user does not have the opportunity to perform this operation through the mobile application. The list is constantly updated and its status can be monitored in the application store.
Resetting the router to factory settings
There are two ways to perform a reset on the DSL 2640U device. In the first case, just press the Reset button on the back side, holding it for 10-15 seconds. Resetting all LEDs at the same time will indicate that the process is complete.
The second option is through the web interface. To do this, select “System” in the upper left corner, then “Factory settings”:
Within two minutes, the network DSL device will roll back to the factory configuration.
Firmware update
In this section we will tell you how to properly update the firmware of your router. After purchasing each device, we advise you to check for the latest firmware (updates), which will ensure trouble-free operation for a longer period of time.
- First of all, you need to determine such a characteristic as the hardware revision of the modem. Look on your router (usually on the bottom cover) for a label with a few lines written on it. Among these lines, find the one signed with the letters “H/WVer”. This is what you need;
- after that there will be only two characters - a letter and a number. For example, A1. This is a hardware revision;
- let it be C4.
- then go to the D-Link FTP server and look for the firmware you need in accordance with the details;
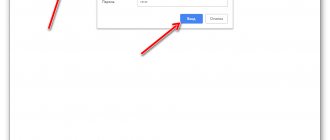
- after that, check whether your router is connected to your PC or laptop. Open any browser, enter the network address 192.168.1.1 in the browser window, enter your username and password (by default, in the factory settings, both are the word admin). Click on the “Login” button;
- go to the “Manual Settings” tab, from there to the “System – Software Update” section and click on “Browse”;
- select the firmware file you downloaded and click on the “Update” command;
- Do not turn off the power to your computer and router. Wait until the modem update is completed;
- This completes the D-Link 2640U firmware update.
Installing drivers
Modern routers are devices that solve problems independently. Manufacturers have already taught them to communicate with most modern operating systems. Therefore, when connecting a router, you do not need to install any additional drivers on your computer.
The only driver that should be is the driver for the network card. In most cases it is already installed.
Routers have their own software that needs to be updated regularly. This is what is most often meant by the word “driver” in such situations.
Updating the router firmware is simple, but in its own way for each firmware version. Go to the router configuration system; we will describe how to do this after the next subheading. Next, find the section called “Settings” or “Administration”, in it look for the section with the word “Update”. For example, in the screenshot below (Figure 3) the section is called “Firmware Update”. In it, click on the “Check” button, and the system will determine whether a new firmware version has been released. Depending on the result, the page will display a message that no update is required or display a Download button.
Figure 3 – Router configuration system
Updating the router is required for several reasons:
- no program is perfect. During operation, errors and problems encountered by users are identified. The developers are fixing them and including them in the next update;
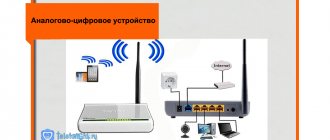
- Technologies are developing not only in routers, but also in user devices. In smart homes, even bedside lamps, not to mention TVs, work via Wi-Fi. In order for the router to communicate with new devices, programmers write new instructions for it, and you install them.
We recommend that you do not neglect updates and check them at least occasionally.
ADSL connection parameters
ADSL connection parameters are very important, because both the speed of your Internet connection and its uninterrupted operation will depend on them.
As described earlier, go to the web control panel of your modem:
- Open your browser and enter 192.168.1.1 in the address bar. Enter your username and password (admin/admin by default) and click on the login button;
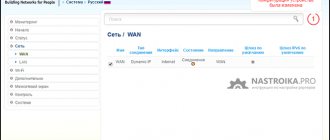
- go to the “Network” tab, to the WAN section. If you just purchased the router, you should remove all connections. Use the “Delete” button to do this;
- then click on the “Add” button and enter your Internet connection parameters;
- and then follow the instructions below, because the ADSL connection parameters directly depend on your Internet provider.
Bridge mode
A settings window will open where you need to specify the Bridge value in the “Connection type” parameter, “VPI” - 0, “VCI” - 35.
Confirm the settings by clicking the “Save” button. In the list that appears, you will see the connection you created.
How to configure the D-LINK 2640U router for providers
To connect the D-LINK 2640U router, you must first connect the router itself to the computer.
If you do not have signal separation, when you need simultaneous operation of both the telephone and the Internet, then do the following:
- Connect the LAN cable at one end to the PC, and at the other end to one of the ports on the back of the modem;
- connect the second cable to the only port of the modem, and then to a special socket for the telephone;
- if you have a telephone, you will have to use a special device - a “splitter” or otherwise a splitter, the second cable will need to be connected to it;
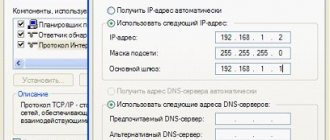
- then set the automatic connection of the IP address and DNS servers;
- after that, enter the address 192.168.1.1 in the browser window and press Enter. Enter your username and password (by default it is admin/admin);
- log into the web panel, on the WAN tab, start creating a new connection (“Add” or “Add”);
- Next you will need to set the connection parameters. Each provider has its own connection parameters. Follow the instructions below!
Rostelecom
- open your browser, enter 192.168.1.1 in the address bar and press Enter/;
- enter your username and password (default – admin/admin) and click on the login button;
- go to the “Network” tab, and from there to the “WAN” section. Clear all Internet connections using the "Delete" button.
Next, the setup of the D-LINK 2640U Rostelecom router begins.
Click on the "Add" button and enter the following parameters:
- type:
PPPoE; - port:
DSL new; - name:
cannot be changed. Check the box next to “Allow”; - set the values VPI/VCI, LLC;
- go to the PPP block and enter your username and password that you received from your Internet provider;
- check the “KEEPALIVE” box;
- if you have IPTV connected, check the box next to IGMP.
Done – click on the “Save” button twice (including the WAN tab). Wait 1-2 minutes and you will connect to the Internet, provided that you entered the correct data.
Domolink
- so, first of all, connect your modem to the PC and the splitter;
- Next, you need to configure automatic acquisition of an IP address and DNS servers;
- in the case of WINXP, go to the following address in the settings through the “Start” menu, go to the “Control Panel”, from where select the “Network Connections” and “Local Area Connection” section;
- select "TCP/IP Protocol" and go to its properties. Check the box to obtain an IP address and DNS servers automatically;
- open the browser page and enter the addresses 192.168.1.1. Enter your username and password (admin/admin by default) and click “Login”;
- On the main page, select the WAN tab and click on “add”.
Specify the following options:
- VPI=0;
- VCI=35;
- PPPoE type;
- then fill in your login (username) and password (password), received from the provider when registering the connection;
- check the “KEEP ALIVE” checkbox.
Simply skip the remaining pages with the NEXT button and confirm the settings with APPLY. Click the FINISH button to complete the router setup. In a couple of minutes the connection will be established.
MGTS
- connect your router to power, then connect the modem to the PC and splitter. We wrote to you above how this is done;
- Enable your computer to receive an IP address and DNS servers automatically. How this is done was written in the Domolink section;
- open your browser and enter the address 192.168.1.1 in the window. Enter your username and password (admin/admin by default);
- configure your modem using the auto-connect function. To do this, in the HOME tab, check the DSL Auto-connect line;
- if you do not specify DSL Auto-connect, you will have to configure the modem manually;
- Enter the VPI and VCI parameters as specified by the operator. For clarification, you can call their help desk;
- select the PPPoE connection type, enter your username and password;
- then select the default service and gateway as required by the provider and click on NEXT. Do not touch the NAT configuration page, but continue further;
- enable the DHCP server and set the IP address range. For example, 192.168.1.2 and 192.168.1.221. Confirm the settings and save. If everything was done correctly, then after 1-2 minutes the connection to the Internet will be established.
Ukrtelecom
Go to the configuration menu of your router via web management. And to do this, enter 192.168.1.1 in the browser and press Enter. Enter your username and password, click on the login command.
Uncheck DSL Auto-connect, and then proceed to configure the modem:
- VPI – 1;
- VCI – 32;
- type: PPPoE;
- Encapsulation Mode: LLC/SNAP-BRIDGING;
- Find out Username and Password from your provider;
- Service name: empty field;
- Authentication Method: PAP (For Ukrtelecom OGO);
- then everything is default everywhere.
Save and wait about a minute for the router to reboot.
Reassigning LAN to WAN on Dlink 2640u
By Editorial Board 2dsl.ru Modems
To use a LAN port as a WAN, you don’t have to sit through manuals or flash an ADSL modem, thereby voiding the warranty. Meanwhile, we have a backup channel that can be used for important tasks that do not tolerate network interruptions.
What can this be useful for? It is no secret that providers are suspicious of large traffic generation, especially if it is “mail” (smtp, pop3). Sending SMS messages via the Internet can also fall into the “spam” category. Even if you reboot the router (changing the IP address), it does not guarantee blocking by the provider. Therefore, the second channel will come in handy here.
If you decide to change your provider, switch from Rostelecom to TTK. Both providers currently do not provide equipment for free - you will need an additional router to work with TTK, because... a standard ADSL modem does not have a WAN RJ-45 interface. You have two options - either buy a router, such as DIR 300 or 620, or reconfigure one of the four LAN ports to the WAN direction. Our method is different in that we will not use special firmware, like DD-WRT or OpenWRT, but will perform all actions on standard firmware (using the example of Dlink 2640 nru)
Old firmware
Switch the wire from the modem to the computer to LAN2 before starting the settings! Go to the modem settings. At 192.168.1.1. Find the “Advanced” item and select “Interface Grouping”. In the Ethernet WAN Port item, put a dot on the port that we want to use for the WAN connection, for example, LAN1:
For some modems, the top menu is in the left column - they are identical:
Now you need to configure this WAN port. Let's say your provider uses PPPoE authorization (by login and password). This is how the TTK works, for example. To do this, go to the “Network” tab and select “WAN”. Click the “Add” button:
Next, set the following settings:
Name - WAN PPPoEConnection type - PPPoEPhysical interface - LAN1PPP user name - Here write your login for Internet access Without authorization - there should be NO checkbox Password - your password for Internet accessPassword confirmation - repeat the passwordMTU - 1492
The rest of the settings remain default!
Now plug your ethernet cable into LAN1 and you’re good to go.
New firmware
Switch the wire from the modem to the computer to LAN2 before starting the settings!. Go to Advanced settings:
Next, in the “Advanced” section, click on “Interface Grouping”:
Next, click on the LAN1 icon:
Below (scroll with your mouse if it’s not visible) in the menu, put a checkmark on the “Make WAN” item:
Next, by analogy with the first firmware, we set up a PPPoE connection on our new WAN port.
Write all questions in the comments.
Wi-Fi network
Go to the web control panel of your router:
- enter the address 192.168.1.1 in the browser line;
- enter your login and password (by default it is admin/admin). On the HOME tab, go to the “Wireless” section;
- check the Enable Wireless line, fill in the SSID field and enter any network name you wish;
- Confirm all this with the “Apply” button.
A reboot will occur.
Continue setting up wifi, now you can enter the security parameters of your network:
- select your network by name, fill the encryption type (Network Authentication) field with WPA2-PSK. WPA Preshared Key – enter your password;
- Fill in the WEP Encryption option with AES. Confirm your choice;
- Next, go to the “Tools” tab and select the “System” section from the menu on the left. Save to the appropriate button.
In the article, we looked at all the options for setting up the D-Link DSL-2640U router, from connecting it to power and your PC, to setting up Internet settings for different providers. We hope that our article was able to fully reveal the answers to your questions.
Conclusion
A review of the D-Link DSL-2500U router shows that the model is used where only ADSL telephone lines exist, through which the Internet can be transmitted at a satisfactory speed. DSL is an entry-level budget device. It is impossible to organize a local network on its basis. The principle “one modem - one computer” applies here. The operating history of the 2500U modem goes back more than 10 years. DSL has rightfully earned a “well-deserved pension.”
pros
The positive qualities of DSL include:
- The 2500U has a relatively easy setup process with the ability to quickly return to the original values in case of an error;
- the ability to use DSL in telephone lines with a high level of interference;
- availability of a large database of components for device repair.