The Russian company produces a router equipped with a standard set of Ethernet ports and a standard Wi-Fi module. This wonderful device has a name - “Intercross 5670”. The wireless module of the specified router is two-channel (2*20 MHz). Bandwidth in networks where this mode is used is 300 Mbit/s. Here we will look at how the Intercross router model “5670” needs to be configured. We will also talk about additional options such as port forwarding and IP television.
Login to router settings
As a rule, a connection with the router and computer is established automatically; after connecting, I recommend immediately trying to go into the router settings.
Open the browser and enter the address line 192.168.1.1, press the “Enter” key
If all is well, you will see a page asking you to enter your login and password:
For the ICxETH5670NE model, this window may look like this:
If you have an error:
You need to configure the network card, follow the recommendations specified in these articles:
Go to the graphical interface
First of all, you need to configure the network card correctly. First, while the DHCP server is disabled, you will have to use static parameters. By right-clicking on the connection icon in the system tray on the desktop of your computer, go to “Status” -> “Properties”. The TCP/IP v4 protocol must be configured like this:
Setting up a network card
Then, using a patch cord, the computer is connected to any LAN port except the first, and power is supplied to the device.
After waiting 1-2 minutes, open a browser on the PC and go to the address 192.168.1.1. The default password and login for the administrator will be “admin”. After logging in, you will see the following page:
First interface tab
Setting up a DHCP server
Now we will immediately enable the built-in DHCP server. Go to the "Network" -> "LAN" -> "DHCP" page, where you need to set the parameters as shown in the figure.
Configuring a local DHCP server
By default, the LAN1 connector is included in the virtual switch with an ADSL port. What has been done so that you can connect a TV set-top box. We won’t need all this, and the IPTV option will be available on all ports along with the Internet.
By setting the parameters on the above tab, we followed the steps:
- Selected the server settings page
- The “Mode” parameter is set to “DHCP Server”
- A check mark was placed in front of each of the local ports
- “Pool Range” is the range of local addresses (we chose it to be “22-254”)
- You can specify a local name, and finally click “Apply Changes”
Setting up a connection to a provider (PPPoE)
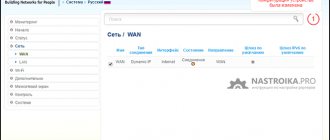
By default, the router can have two connections configured, one of the “PPPoE” type, and the other of the “bridge” type for IP-TV. All of them must be removed:
How to get rid of unnecessary connections
- We moved to the “Network” section
- Then, you need to open the “WAN” tab
- Move the scroll bar down
- Click on the “Trash” icon
- If all of the above does not have an effect, set the selector in the first column
- Click “Delete”
Now we will create a new connection. Set the parameters at the top of the page, and then click “Add”.
As you can see, the top part of the page contains different parameters. Their values are set as follows:
PPPoE connection
- Set the "VPI" setting used for the Internet
- Also, you must fill in the “VCI” field
- The mode should be called “PPPoE”, IGMP does not need to be enabled now
- Check the “NAPT” box, select the encapsulation method (we use “LLC”)
- Set the subscriber's login
- Set its password
- We are setting up a connection with a dynamic IP, so we selected the “DHCP” option
- We need to make our connection the “default route”
- Finally, click “Add”
Actually, the Internet is now configured. After reboot everything will work. Just not on the first LAN port.
The LAN1 connector is initially connected to the “bridge” used for TV. You need to get rid of unnecessary settings, for which go to the “Advance” -> “Port Mapping” tab:
Making all local ports equal
Here we must set the selector to “Disable” and click “Apply”. To reboot the router, briefly press reset or go to: “Admin” -> “Commit/Reboot” -> “Reboot”.
Configuring Intecross ICxDSL 5633 E/UE/NE modems
With your browser open, enter in the address bar: “https://192.168.1.1.”
Press the Enter key, then the dialog box that I demonstrated above will appear.
and press the Enter key.
Before setting up the router, I recommend resetting all Intecross settings to factory settings; this can be done easily by pressing the “Reset” button on the modem case for 15-30, and then rebooting it.
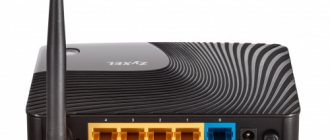
Appearance and firmware interface
Externally, the Intecross ICxDSL 5633 E/UE/NE models look like this:
Their interface may differ depending on the firmware:
Version 3.6.0;
Version 1.3.9;
Version 3.02L.09;
Connecting Intercross to the Internet
So, let's get down to business, the modem can be configured in two operating modes:
- “Bridge” mode - the Internet connection is configured on the computer; to access the Internet, you must start the connection manually each time.
Pros of this mode:
- The connection can be terminated at any time by simply pressing a button.
- You make the connection yourself when necessary.
- “Router” mode – automatically connects the router to the Internet.
Pros of this mode:
- You can distribute Wi-Fi.
- The connection is automatic.
- Ability to connect multiple devices to the Internet.
Configuring to “Router” mode
Intercross ICxDSL 5633 E (there are LAN, WAN tabs)
The appearance of the tabs on the bottom router looks like this:
Click the Wizard tab.
In the tab that opens, enter the parameters:
- VPI = 8; VCI= 35; — For Rostelecom subscribers.
- VPI = 0; VCI= 33; - For other providers.
Click the Next button.
Next, select the connection mode “PPP over Ethernet (PPPoE)” and click Next. Some providers may use a different type of connection, so if problems arise when connecting to the Internet, I recommend checking the connection type with those. provider support.
In the next step we enter the most important parameters:
- PPP Username - Your Internet login.
- PPP Password - Your login password.
If you do not have these details, then you need to check them in the contract or on the access card that was given to you upon connection. Be careful at this step; enter your username and password exactly as they were provided to you, respecting the case.
- "LAN IP" - 192.168.1.1;
- "LAN Netmask" - 255.255.255.0;
This completes the setup, check the parameters and click Finish.
Intercross ICxDSL 5633 E 2 (there is a Network tab)
If you couldn’t reset the router’s settings using the button, I recommend deleting them through the interface. The configuration of this firmware differs from the firmware above, because... There is a Network tab here, which stores the preliminary settings of the router.
First, let's go to this tab and delete all the preliminary settings. To do this, mark the existing row in the table and press the Delete button.
We repeat similarly for all records in the table.
Next, the “Channel Configuration” window will open with the parameters to be filled in:
- VPI = 8; (8-Rostelecom, for other providers 0).
- VCI = 35;
- Encapsulation - check LLC;
- Channel mode - select PPPoE;
- Enable NAPT - check the box;
- Login Name - your login;
- Password - your password;
Check and click the Add button, wait until the modem reboots.
After loading, a new line will appear in the Current ATM VC Table section, check it and click the Save button.
Select the “Admin” section, select “Save Current Configuration” from the drop-down list, click the Reboot button.
Setup in router mode is complete.
You can easily make similar adjustments to these parameters through the Wizard tab if something doesn’t work out for you. Setup via Wizard will be described below.
Setting to "Bridge" mode
Setting up in Bridge mode is the same for Intercross ICxDSL 5633 routers; first, delete the existing settings, as I recommended above.
We go to the Wizard tab, here you are prompted to enter a new password to log into the router, leave it blank or enter admin or your own option, click NEXT.
Skip the next step and click NEXT.
Next, you need to fill in the specified parameters according to the screenshots:
Next, select the “Admin” section, select “Save Current Configuration” in the drop-down list, click the Reboot button.
Setup in router mode is complete.
To set up a connection on a PC, use the instructions:
How to open the Intercross web interface
Before you connect your computer to a device called Intercross, you need to correctly configure the network card. Set static values: address 192.168.1.2, mask with leading zero, and default gateway address ending in 1.1. Below is an example:
Computer wired connection settings
You need to immediately configure not only the local settings (the “Use the following IP” block), but also the addresses of the DNS servers. The following values are suitable for Webstream: 217.70.96.34 and 217.70.106.5.
In theory, DNS addresses are specified in the contract. You must set them on all network cards of all computers connected to Webstream, even when using a router. And we continue to consider how to open the web interface of this router:
- Connect the LAN port to the port of the PC network card (use a patch cord);
- Connect the telephone cord plug to the corresponding connector (DSL);
- Apply power to the router;
- One minute after “step 3”, open your browser to navigate to the following address: 192.168.1.1.
You should see an authorization request. If all else fails, use another LAN port (one of the LAN ports may be disabled by software). Or, you can try to perform a hard reset.
The default login and password is the word admin.
How to enter the interface
And here’s how a hard reset is performed: turn on the device, wait a minute, press reset and hold for 12 seconds (until the lights blink). You can then turn off the device so you can start configuring it at any time.
Configuration in PPPoE mode
This mode automatically connects to the Internet and you can configure WiFi distribution.
To configure the Intercross ICxETH5670NE router in PPPoE mode, open any browser.
With your browser open, enter in the address bar: “https://192.168.1.1”
Press "Enter" key, then a dialog box will appear, enter:
- Username - “admin”;
- Password: “admin”;
Go to the Setup tab, WAN menu. Delete connection 1_INTERNET_R by clicking on the trash can icon.
Next, click on the Add button.
Pros and cons of the 5670 router
Two non-removable antennas are screwed to the back wall of the device we reviewed. The fact that they are not removable is bad. By installing a highly directional antenna, we could strengthen the signal at certain points in space. But here, it seems, nothing can be strengthened. Proof of this fact is in the film located at the end of the article.
Users consider the weak signal level to be the main disadvantage of the Intercross Wi-Fi router. You might think that it is stronger in ASUS devices from the RT-N line... If you need a good signal, buy D-Link, but then don’t complain about the quality of the “branded” firmware. As a rule, there are no complaints about the reliability and firmware of devices called “Intercross 5670”. Users are not satisfied with only a limited set of functions, although everything basic is in the firmware: IPTV works, the UPnP option is also present. One thing is not clear: where to get the proprietary software (firmware) files and who actually produces them.
Setting up in Bridge mode
This mode makes a manual connection to the Internet through settings on the computer.
To configure the Intercross ICxETH5670NE router in Bridge mode, open any browser.
When you log into the router, the following window will open:
Go to the top menu, click the Setup tab, and on the left side of the menu, click WAN.
We delete existing connections, I’ll show you using 1_INTERNET_R as an example, just click on the trash can icon.
Next, click the Add button.
- Connection Type - PPPoE.
It is better to check the connection type with your provider!
- Service Type - INTERNET.
- User name (Login) - Your login from the Internet.
- Password - Your login password.
We leave the remaining parameters as default.
At the bottom of the page, mark all ports (LAN Port) from “LAN1” to “LAN4”.
Click the Apply button.
This completes setting up the router in PPPoE mode.
Appearance and interface
After authorization in the Intercross router window, the user will be taken to the main page, where you can find out the following information: DSL connection status, current network connection speed, connection time. The router window will present the following sections, which will later be needed to configure the router:
- Status. The main page that opens immediately after logging in. All information about the connection is indicated here.
- Wizard. By opening this section, you can change the basic settings of the router.
- Lan. Information about the local area network is indicated here.
- Wan. A global computer network is configured here.
- Advance.DNS server parameters are set here.
- Admin. This section allows you to set a new password to log into the Intercross router setup system.
- Diagnostic. The last available section in which system diagnostics are performed.
Read more about corporate unlimited VIP from Megafon
How to connect unlimited Internet on Tele2 for a modem and phone without traffic limitation is written here
5 ways to set a location by phone number for free without the subscriber’s consent: https://teleconom.ru/advice/otsledit-mestopolozhenie-po-nomeru-telefona.html
Setting up a wireless WiFi access point
Enabling WiFi
And so your modem is configured in router mode, and all that remains is to configure the wireless access point.
Go to the Wireless tab and select the Basic menu item on the left menu.
Check the Enable Wireless box and click the Submit button.
Setting a password and name on WiFi
Go to the SSID tab (Left menu) and fill in the data:
- SSID (WiFi name) - any name.
- Authentification: “WPA-PSK/WPA2-PSK”.
- Pred Key (WiFi password) - come up with any password.
To save the setting, click Submit.
The wireless access point setup is complete.
Source
Equipment setup
I present to you a modem under the Russian brand, model 5633E, based on the Realtek chipset. (Modem description here). As a lyrical digression, I want to say that when I first encountered Intercross modems, I was slightly shocked, because... I thought that ADSL modems were not produced in Russia, and even under the Russian brand. While working with these modems, I was pleasantly surprised by the relatively good quality of their work. Moreover, the lines with which I have to work are old and often, with a line length of more than 2.5-3 kilometers, modems from such eminent manufacturers as D', Zyxel and Acorp sometimes refused to work. Intercross modems worked on such lines quite stably and without complaints.
Let's get started! We fill in the IP modem in the browser (by default, like most modems, it is 192.168.1.1)
Enter your login and password - they are also standard here - user: admin password: admin. Click OK and go to the web interface.
Now we are in the modem status window. Here we can see the status of the DSL us connection, the current speed of the modem (provided that there is a link of course =:)) Upstream Speed and Downstream Speed, the Signal/Noise parameters Upstream SNR and Downstream SNR, the time the DSL connection is active - Up.
Now let's carry out the basic setup of the PVC virtual channel.
In the top menu, click Wizard to open the wizard for setting up basic modem parameters.
We set the VPI/VCI parameters that the provider should provide to us. Click Next.
If we want to configure the modem in transparent bridge mode and raise a session from the computer, then select 1483 Bridged. I’ll make a reservation in advance that in 90% of cases this is the most convenient mode both in terms of operation and in terms of settings. Click Next.
At this step you can change the modem's IP address. In most cases, you can leave nothing changed and click Next. If you want to activate DHCP, then just check the Enable DHCP Server checkbox. Although in bridge mode this function is usually not needed.
Click Next. In principle, the setup is complete and we see a window to complete the connection wizard.
Now just click the Finish button to complete the wizard and reboot the modem with the current settings.
Our modem is ready to work - all that remains is to create a high-speed connection on the computer.
If we plan to connect several computers via a modem or simply want the session to go from the modem, then it makes sense to configure the modem in router mode. To do this, in the second step of the wizard, select PPP over Ethernet (PPPoE) instead of 1483 Bridged.
I’ll immediately make a reservation that some providers still use equipment that supports PPP over ATM (PPPoA), so I advise you to immediately find out the type of connection from the provider’s technical support. Click Next.
In most cases, the external IP address is assigned to the abbreviation dynamically, or even if the IP address is static, there is no need to register it anywhere, because it is assigned by the provider's access equipment. Therefore, select the Obtain an IP-address automatically option. We also immediately check the Enable NAT checkbox, because It is possible that in the future we may have to connect another computer or an entire local network to the modem to organize Internet access in it. Click Next.
In this window we need to enter the Username and Password for access to the network, which was given to us by the provider.
Here we can select the type of connection state - Continuous, Connect on Demand, or Manual connection.
I would recommend a permanent connection, because... in this case, the session will persist regardless of whether there is network activity or not. Click Next.
Configuring the modem's network parameters is similar to the bridge mode. At this step, I would recommend enabling DHCP to easily connect various network devices to the modem.
We go to the next window, where we complete the basic setup of our device.
The device is ready for use.
Now let's do some fine tuning. First, let's change the password for logging into the modem's web interface. In the menu at the top, select the Admin item, the Password subitem.
In the Old Password field, enter the old password (admin by default). In the New Password field - a new password, and repeat it in the Confirmed Password field.
Let's look at the DNS settings. Select the Advance menu item, DNS sub-item.
By default, the modem is set to Attain DNS Automatically.
If we want to register DNS server addresses manually, then select the Set DNS Manually option.
We enter addresses in the DNS1, DNS2 and DNS3 fields. Click Apply Changes.
If we need access to the modem from an external network, we will open the corresponding interface on the modem. Select the Admin menu item, Remote Access sub-item.
In the Interface drop-down we find our virtual channel and check the box for the protocol we need. Click Apply Settings.
Finally, do not forget to save your modem settings each time. select the Admin menu item, Commit/Reboot sub-item.
Check the box Commit current settings. And press the Reboot button.
If you did something wrong and cannot find the cause of the malfunction, or the modem is not working correctly, then it may make sense to reset the settings to factory settings.
Check the reset to default settings menu item and press the Reboot button.
After a reboot, the modem is completely “clean” - only factory presets.
If you cannot reset the modem programmatically, then this can be done using the hardware method. There is a small reset button on the back of the modem. You need to press it with something thin and long - for example, a pen refill or a pencil - and hold it pressed for about 10 seconds. The modem will blink its indicators and reboot.
Intercross ICxDSL 5633 E: setting up a modem for Rostelecom
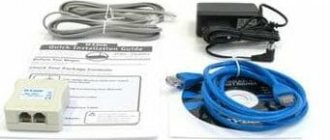
Connecting the device will not take much time, but for its successful implementation it is worth checking the equipment in advance. If one of the main elements is missing, the modem will not be able to work correctly. Regardless of the modification, the box with the devices comes with:
- power supply from 220V network;
- telephone cord (at least one);
- splitter;
- LAN cable.
Of course, the kit will also contain various documentation: warranty card, instructions for use, etc.
After checking that all the necessary elements are available, you can begin connecting the modem.
Important: Position the device in such a way that you have easy access to all connectors and also prevent overheating. This will prevent loss of contact where the cords are bent and extend the life of the modem.
First of all, we connect the power cable to the connector on the rear panel of the equipment, and the unit itself to a 220V AC outlet. If DSL modems have not been used before, most likely a splitter to separate telephone and Internet signals has not been installed. To do this, you will need to connect the telephone cable supplied to the apartment into the filter connector. There will be two interfaces on the opposite side of the splitter. One of them will be used to connect the modem, and the second for the telephone cord. You can find out the interface corresponding to each device using the captions on the filter.
Want to watch TV on your computer? Find out how to set up Diesel TV Player for Rostelecom.
You can find out how and where to pay for telecommunications services without fees and receipts here.
By connecting the modem and computer using a LAN cable, the equipment connection will be completed.
Setting up a connection to Intercross ICxDSL 5633 E
Setting up an Internet connection on the Intercross ICxDSL 5633 E is done in the device’s web interface. To enter the software parameters, enter the modem’s IP (default 192.168.1.1) into the address bar of the browser. After this, a window will open in front of us where we will need to specify the login and password (admin/admin). After providing the required information, the software home page will load. In the top horizontal menu, select Wizard. We set VPI to 8, and leave the VCI parameter at its default (35).
On the next page, select the PPPoE connection type. In the WAN IP setting window, check the Obtain an IP address automatically and Enable NAT checkboxes, and leave the address field empty. On the PPP Username and Password page, enter the login and password to connect to the Rostelecom Internet. They are indicated by the provider in the concluded contract. Now the system will offer to change the standard LAN IP and subnet mask.
You don’t have to change them, but immediately move on to the final step. On it, the software will present all the parameters selected during the setup process.
This is done so that the user can once again check and make sure that the entered data is correct. After pressing the Finish key, the system will save the settings and automatically reboot the modem to activate them.
Attention: Rostelecom users will not be able to configure the Intercross ICxDSL 5633 E modem in router mode, since the model has only one LAN port.
To connect more than one computer to the Internet, you will need to use additional routers or wireless routers, which will allow you to distribute the Internet to several devices.
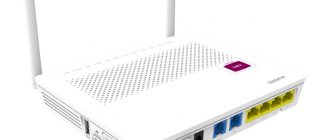
Xiaomi Mi Wi-Fi Router 3G review
It looks like a regular enlarged (due to non-removable antennas) packaging.
Xiaomi 3G router: it comes with a power adapter and instructions
The LAN and WAN interfaces are separated from each other by one of the antennas, as is the USB port from all Ethernet ports.
Ethernet/USB sockets are located between the router antennas
Like Xiaomi Router 3/Mini, Xiaomi Router 3G has only one blue LED.
One LED is a proprietary feature of the Xiaomi router display
Nothing superfluous: there are no buttons or switches on the side of the Xiaomi 3G router.
There are no physical controls on Router 3G
Taking a closer look: indication of Ethernet traffic exchange on site (a pair of LEDs). There is a reset button (small hole on the left).
The Ethernet indication is more varied than that of the Xiaomi Router 3
Ventilation in Xiaomi Router 3G, like its counterparts, is almost ideal: the lower surface of the case is a sieve with long holes.
The Xiaomi 3G router is well ventilated during operation
The adapter is standard - for American sockets. An adapter for European sockets is purchased separately.
Adapter for router plug is not included
Externally, Xiaomi 3 (G) routers are indistinguishable: they only show the number of Ethernet ports (Router 3 has two) and the color of the USB port.
The differences are only visible when viewed from behind.
General indication of the operation of Ethernet ports on the Xiaomi 3 and the presence of an indication of traffic exchange via Ethernet on the Xiaomi 3G.
The differences are also visible on the LAN/WAN display of both routers
Xiaomi Router 3G is slightly more compact than Router 3. It is also easy to hang on the wall by drilling a couple of elongated holes in order to install the case on pre-fixed screws (there is more than enough space inside). The printed circuit board with a radiator is located as compactly as possible, leaving room for cooling the device during operation.
The radiator is massive and dissipates heat well
Under the radiator there is a processor, RAM, a Wi-Fi radio subsystem (excluding output stages for amplifying the signal to the antenna) and flash memory. Ethernet chips do not require additional cooling. It is possible to install a pair of miniature fans from a non-working PC or laptop inside.
Leading Xiaomi 3G chips are hidden under the heatsink
The MediaTek-7621AT processor will “pull” up to 4 LAN ports - but this is already the prerogative of Xiaomi Router Pro (in the future - and higher models, when they are released).
Table: characteristics of the Xiaomi Router 3G router
| Parameter or characteristic | Value (tolerance) |
| CPU | SoC MediaTek MT7621AT (MIPS32 1004K, 2*880 MHz) |
| RAM | 256 MB (DDR-2) |
| Flash drive | 128 MB (SLC) |
| Standard, Wi-Fi range | 2.4 and 5 GHz, IEEE 802.11ac |
| Antenna parameters | 4, omnidirectional, non-removable |
| Number of LAN/WAN ports | 2 LAN ports, WAN port |
| File sharing speed on LAN between PC and gadgets | up to 1 Gbit/s |
| Local Wi-Fi speed | up to 1167 Mbit/s |
| Protocols for encrypted access to the Network via WAN/LAN | PPTP, PPPoE, L2TP, IPSec |
| USB ports | one, 3.0 |
| Local servers | DHCP |
| Encryption, Wi-Fi network protection | from Open to WPA-2 |
| Additional functionality | DMZ, NAT, firewall, SPI, Firewall |
| Device operating modes | access point, repeater mode |
Using third-party firmware (modified firmware from Asus, TP-Link, ZyXEL, free software OpenWRT/DD-WRT/Padavan), previously inaccessible functions are implemented, such as: repeater and (hybrid) bridge modes, WiFi2LAN client mode, additional guest networks and etc.