Rostelecom provides subscribers with high-quality equipment for connecting to the Internet. And if previously these were routers from third-party companies, today the provider’s logo increasingly appears on devices. This does not mean that the company produces routers independently. Famous Chinese manufacturers do this for her. There are several of them, and they produce different equipment. Therefore, the configuration of the Rostelecom router is different.
In this article we will look at the general principles of configuration. We will try to present the material in such a way that you can independently understand equipment from any manufacturer. Let's consider the most popular models as an example.
However, don't rely on step-by-step instructions. It’s better to understand the operating principle itself so that you can easily do everything yourself without pictures or screenshots.
What to do if the settings are lost
Electricity in our homes does not always work stably and flawlessly. Sometimes there are interruptions. Routers are usually equipped with a protection mechanism that allows them to remain operational when powered by an unstable network. But still sometimes the settings go wrong. This can also happen under the influence of a virus or due to other reasons.
Calling a technician every time your router settings are lost is not a good idea. It's expensive and time-consuming. Sometimes it's easier to figure things out on your own. Of course, calling support can help. But even in this case, it is much easier to follow the operator’s instructions if you yourself understand what you are doing.
This article will most likely be read by beginners. Therefore, we will focus on them. A professional will be able to independently detect and fix the problem without resetting the settings and our instructions.
But for a beginner it’s easier to reset all settings to factory settings and go through the setup procedure from start to finish. How to reset? For this purpose, each router has a special button. It is hidden from prying eyes in a shallow hole. This is good protection against accidental pressing and unplanned reset.
But since now you want to do this consciously, take a pin or needle in your hand and press this button. You need to hold it pressed for several seconds.
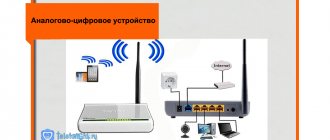
Adjusting a Rostelecom router with an ADSL modem
If the Internet is connected via a telephone cable, it is necessary to install a special device known as a splitter. Its operating principle boils down to cable branching. For the user, this means receiving a continuous Internet signal, even while talking on a landline telephone line.
Installing a splitter on a router:
- We connect the Internet cable to the splitter on one side,
- on the other - telephone line wire
- There is a telephone connection at the input, and a telephone cable and a modem at two outputs).
Now you need to fill in the settings of the Rostelecom router to specify the global network parameters.
- Open the “Connection” tab and fill in all the fields.
- WAN connection – PPPoE;
- activate WAN – confirm;
- activate NAT – confirm;
- activate UPnP – refuse;
- receive IP automatically - confirm;
- automatically connect to DNS – confirm;
- enter the name, login and key provided by the provider.
Settings are complete. The Internet connection appeared. Access to the global network is open - you can use its resources.
Login to the router
Now make sure that the router is connected to the computer. Check if the wires are plugged in well. If everything is in order, launch the browser and log into the device.
To do this you need to follow a few simple steps:
- Type the IP address of the router into your browser. Most likely it is 192.168.1.1 or 192.168.0.1.
- Enter login and password. Most likely their meanings are admin and admin. Sometimes a combination of numbers is suitable as a password: 1234.
- Click on the “Login” button. You are taken to the router interface.
Important! Your device may have different authorization information or address. You can recognize them on a special sticker that is attached to the case. If you still can’t log in, read our guide on how to log into a Rostelecom router.
Upon successful login, you will see the administration interface. This is where the fun begins. The fact is that different devices have different designs and even interface structures. It is impossible to describe in detail the work with each router separately within the framework of one article. Therefore, we will present the general principles so that you can independently apply them to your situation. We will briefly look at some of the features of the most common models that Rostelecom provides to its customers.
READ Smart home Rostelecom: control from a mobile application
Since the most popular models in our country are devices from TP-Link, we will consider the setup procedure using the example of an interface from this manufacturer.
About Rostelecom routers
The Russian telecommunications service provider Rostelecom works with high-quality equipment from its partner manufacturers of routers, modems, optical terminals, such as Sagemcom, ZTE, Huawei, QTech, D-Link and others. These are brands that have successfully proven themselves to have a high level of signal reception and transmission, which provides various user needs, depending on the chosen tariff plan. Based on the technical characteristics and durability of the equipment, the company chose the best brands and, as a sign of approval of quality, put its logo on them, thereby recommending that subscribers pay attention to certain copies.
Buying or renting a Rostelecom router is half the battle. The main thing is to configure it correctly so that the signal is as strong and continuous as possible. This is the only way to quickly open and download files of various sizes, watch videos online and work with images.
Setting up an Internet connection
Let's look at how to set up a router under Rostelecom. The main thing in this matter is to do everything right. If the router cannot connect to the network, all devices will show the connection as “No Internet Access”. Most often, it is this stage that causes the greatest difficulties for beginners.
It is important to understand the following here. There are a lot of settings in the router. It's easy to get lost among them. But this does not mean that all of them will be useful to you. Most of the available settings will never be useful to you. You don't even have to know about their existence. The default values will definitely work.
Your task is only to provide the following information:
- Internet connection type.
- Login.
- Password.
Most often, Rostelecom uses PPPoE connection technology. Therefore, you can safely set this value. If the Internet does not work, you can call the hotline to clarify this information.
The login and password are issued to the user when signing the contract and are indicated in the text. Perhaps in your case the provider will simply bind the device by MAC address. In this case, no access data is required.
Sometimes the “Dynamic IP” type is used to connect to the Internet. In short, it is written as DHCP. In this case, all settings work by default, and the Internet is available immediately after connecting to the network. If this happens in your case, then you won’t need to configure anything.
Now let's look at the setup process using the TP-Link interface as an example
(for ease of understanding, here are brief instructions in the screenshot)
- The interface can be in either Russian or English.
- In the left column, select “Network”.
- In the submenu that opens, click WAN.
- In the WAN Connection Type drop-down list, select PPPoE (or the connection that is used in your case).
- If fields for entering your login and password appear, enter them. They are indicated in the text of the contract that the provider gave you. Sometimes the password needs to be entered twice, as shown in the screenshot below. For some connection types, you do not need to specify a login and password.
- Leave the rest of the settings as they are.
- Click Connect.
- Click "Save".
If all settings are correct, you will see the status “Connected”.
Setting up the Rostelecom adsl modem is done in exactly the same way.
But you don’t need to configure the gpon router yourself. If you encounter any problems, call support. The company's specialists perform all work on setting up and maintaining such equipment remotely without your intervention.
Setting up a Wi-Fi connection on a Rostelecom router
If automatic configuration does not help to gain access to the Internet, the user will have to configure the Rostelecom router independently.
To configure the connection, follow these steps step by step:
- Enter the router setup address and log in.
- Log in.
- Open the manual settings tab. Basically this menu is called "Interface Setup" or "Wireless".
- You must provide all required data: AES, WPAPSK, access key.
- Save all changes made.
After the configuration has been completed, all that remains is to click “Continue” and use the wireless connection to the network.
Features of setting up some routers
Sagemon
In recent years, the company has increasingly provided subscribers with the opportunity to work with equipment that has an interface specially created for the company. We will describe the procedure for setting up Sagemon routers from Rostelecom.
In the main interface window you can select Russian language. This will greatly simplify the work.
The developers have provided the opportunity to carry out quick setup, which is completed in just a few steps. The main thing is to have a contract at hand, which contains all the necessary data.
READ Instructions for the capsule Marusya Inside
Open the “Wizard” tab of the settings and click on the section of the same name.
You will see input fields, as well as text guidance on how to fill them out correctly. Follow the instructions and save your changes. The Internet should work.
Another section is also available. It's called "Internet Connection". Here everything is set up even easier. By default, the most popular connection type PPPoE1 is selected. You just need to provide your login and password.
D-Link
It is possible to set the interface language to Russian, which makes working with it easier.
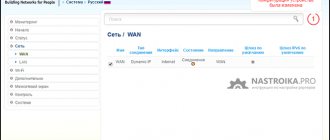
Internet settings are located in the “Network - WAN” menu. Here you need to delete old connections and add new ones.
A global settings window will open, which allows you to select the desired connection type, then allows you to insert your login and password.
The new interface looks different. To find the menu you need, click on "Advanced settings" in the lower right corner.
The procedure is described in more detail in the video tutorial.
And a couple more lessons on working with models from the manufacturer.
D Link Dir 300
D Link DSL 2640u, DSL 2500u
Asus RT N12
Setting up the Asus RT N12 router is easy. To do this, go to the “Network Map” category and specify the desired connection type.
A window will appear in which you need to enter all the necessary data. Instructions are provided that make it easy to figure everything out on your own.
Zyxel
Login information for the interface may differ on different models. Look for the data on the bottom of the case.
In the left column, select the “Internet” section and click on the “Authorization” link.
Select the desired connection type on the right side. Most often this is PPPoE.
We fill in the login and password that are indicated in your copy of the agreement with Rostelecom.
For different connection types, different parameters may appear to be filled in. All this information is indicated in the text of the contract. If you need help, you can always call the support operator and check the details with him.
After entering all the data, click the “Apply” button.
Huawei
In the main menu, select the “Basic” item and the “WAN” sub-item. Remove unnecessary connections. Now you will need to create a new one by clicking on the “NEW” button. You may decide to reconfigure your old connection. Then click on its name.
Check the "WAN Connection" box. The agreement from Rostelecom must indicate the values for the VPI and VCI fields. Fill out these fields with the required values.
Now select your internet connection type from the “Connection type” drop-down list. This is usually "PPPoE".
Now you need to enter your authorization details. This is your login and password. Their meanings are in a copy of the agreement with Rostelecom. After entering the data, click on “Submit”.
The Internet will be up and running within a minute.
QBR Qutech
How to connect the router correctly
- First you need to choose a convenient location for the router. A provider cable must be connected to the device, so the location of the device mainly depends on the length of the wire. It is best to install the router next to a desktop computer. Because many PCs do not have a connection to the Wi-Fi network and you will have to lay another cable from the router.
- Then you need to prepare the device itself. Pay attention to the appearance of the router.
- Antennas need to be straightened. However, this part of the device is not always part of the body; in some models these components must be screwed.
- After this, you should connect the power supply to the device and check its functionality. The device operation indicator on the router should light up.
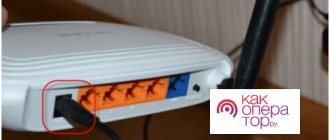
- Then you should directly connect to the Internet to set up the Wi-Fi signal. First, you need to connect the Internet cable - this is the wire that the technicians installed when connecting the Internet. It must be inserted into the router. To do this, you need to find a port on the device signed “WAN”. It is into this window that the cable must be inserted.
- Another panel on the router will light up, which is responsible for connecting to the network. From this point on, the connection to the router is complete.
However, before using it, you need to configure the signal the device receives. To do this, you need to connect your computer or laptop to the Internet. The name of the Wi-Fi network will correspond to the name of the router model. If the PC does not have the ability to connect to a wireless network, then it must be connected to the router using an additional cable. This wire comes with each router. It must be connected to any free port of the device and a personal computer. After connecting to the Internet, you can begin directly configuring the Rostelecom router.
What to do if the Internet still doesn't work?
It is possible that your DNS servers are configured incorrectly in your operating system. Follow these steps.
- Press Ctrl + R, enter the command ncpa.cpl and click OK.
- Right-click on the current connection and select “Properties”.
- Select IP version 4 (TCP/IPv4) and click the “Properties” button.
- Set automatic detection of DNS servers and click OK.
- Click Close and close the Network Connections window.
- If this does not help, you need to call the support service and ask for help.
Preparatory work
Regardless of the brand of the router, its installation follows the same rules - it is important to avoid the presence of electrical appliances working nearby, and also take into account that walls and partitions between rooms can cause an insufficiently high-quality signal from a wireless point.
Look at the back of the device. All available connectors are displayed on it, with the exception of USB 3.0, which is located on the side. The connection to the operator’s network occurs via the WAN port, and local equipment is connected via Ethernet 1-4. The reset and power buttons are also located here.
Check the IP and DNS protocols in your operating system before configuring your network equipment. The markers should be opposite the “Receive automatically” items. Read about how to check and change these parameters in our other material at the link below.
Read more: Windows Network Settings
Possible problems
Let's look at some of the problems encountered.
No required icon
Sometimes the icon you need is missing from the notification area. There may be two reasons for this:
- Drivers are not installed or updated. In such a situation, you need to go to the official website of the computer or laptop manufacturer, find the page with the software, download the necessary equipment and reboot.
- Wi-Fi adapter is not working. To do this, follow the following sequence of actions:
- Open "Control Panel".
- Find the “Network and Sharing Center” section. Most often it is part of another larger section, such as Network and Internet.
- Here you need to find “Change adapter settings” in the menu on the left.
- A new “Network Connections” window will immediately open.
- Double-right-click on the line “Wireless network connection”. The name may differ depending on the computer model, for example, the option “Wireless Network” is possible.
- The final touch is to enable this and confirm the action if necessary.
- You should also check whether the special mechanical switch of the Wi-Fi adapter works. It is usually located at the top of the keyboard among the F1–F12 buttons. The required button, most often F12, will have a Wi-Fi icon. You should press it while holding the combination with Fn. The switch may also be located on the device body.
The icon is marked in red
It is possible that the required icon is there, but it is marked in red. This means Wi-Fi is disabled. There are also two reasons for this:
- Wi-Fi is deactivated through Windows Mobility Center on the laptop. Then you need to find a label in the notification area indicating the charge level. Left-click on it and click “Windows Mobility Center.” In the “Wi-Fi” field, select “Enable wireless network”.
- Wi-Fi adapter is not working. The solution to this problem is presented above.
If the connection is still not established, then you can repeat all the steps from another gadget.
Checking the connection
Before you begin the router setup process, you need to double-check that it is connected correctly. Note that the connection to the router can be made either using a cable or via a Wi-Fi wireless network. In this case, it is better to reconfigure by connecting to the router via cable, following the following algorithm:
- Connect the router to the power supply network;
- Insert the cable leading to the Rostelecom network into the appropriate port of the router;
- Connect the computer to the router using the cable included with the router.
If the connection to the router is established via a wireless connection using a Wi-Fi network, you will need to enter a login and password to access this network. This default data can be found on the back of the router.