Smartphones are becoming more and more reliable in terms of storing important user information, and this is also positively influenced by a wide variety of backup methods. It's a pity, but there is always a chance that you will lose your mobile device, accidentally drop it into water, or simply smash it to pieces. It is in these cases that a backup of all the most important information will come to your aid - both documents related to professional activities and photographs of your still very young child, which will be great to show to everyone gathered for his 21st birthday.
The best Telegram channel about technology (possibly)
Google branded services will help you create a backup copy of your data, as well as numerous third-party solutions - you can also backup information to your computer. This article will tell you the key ways to lock all your files into a virtual safe where they won't go missing.
Disclaimer: when describing menu items in “Settings” and other applications on Android, purely conditional meanings are used. This is due to the fact that different manufacturers may call certain features completely differently. The purpose of the material is to provide direction for further action.
Introduction
Having received root on a smartphone, the average user begins to experiment with the device and install various interface modifications, themes, fonts, new kernels, firmware, radio and root applications. As a regular, long-time and active user of the 4PDA and XDA Developers forums, I can say that very often such experiments end in questions with the wording: “The phone won’t boot, what should I do?”
Even after reading the instructions very carefully, you can make a typo or press the wrong button, and then get a bootloop - an eternal boot of the phone with repeated bootanimation. In the worst case, you can get a “brick” - the phone will not turn on at all. This happens very rarely, and, frankly, you need to try very hard to, for example, kill flash memory. Usually, what users consider to be a “brick” can be successfully restored with the help of simple manipulations. And backup will help us a lot with this.
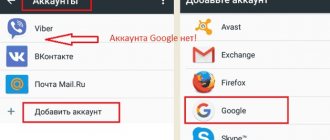
Basic backup functions that will satisfy most ordinary users are offered by Google itself. In your phone settings there is an “Accounts” tab where you can check the necessary boxes. After flashing or resetting the device to factory settings or activating a new phone, Android itself will restore contacts, history and tabs of the Chrome browser, Google Keep notes, photos, application data, calendar events, and so on. In the latest versions of Android, you can restore the desktop with all shortcuts and automatically install all previously installed applications.
However, Google can't backup everything. System and application settings will be reset, saved passwords (or rather, authentication tokens) will disappear, applications from third-party markets will not be installed again. Therefore, we need tools that can save everything. We'll talk about them.
WARNING
Most of the applications described in this article require root and BusyBox.
Conclusion
The article explains what a backup is, why it is needed and how it is done. Users who neglect to back up data in a timely manner complicate the process of recovering valuable information, and sometimes even the device itself, in the event of loss or damage. Back up your information in a timely manner, saving you time, money and effort.
Share the article via social media buttons to remind your contacts about timely backup. Also write in the comments how often you back up data, as well as your preferred method.
Backup of applications and their data.
I myself follow the “clean install” approach. When upgrading to new firmware, it’s easier for me to set up programs from scratch. And the appearance of bugs in this case is reduced to nothing, especially when moving to the next major version of the firmware. But many users find it more convenient to save application settings and restore them on new firmware. This is especially true for third-party programs that are not in the market. I will focus on the two most popular applications, with millions of downloads.
Titanium Backup
The most powerful tool for backing up, restoring, freezing and deleting applications along with their data (including system ones and those pre-installed by the manufacturer). Allows you to set up automatic backup on a schedule without closing applications, and transfer any application to an SD card. You can store different backups of one application, save SMS, MMS, call history, browser bookmarks, Wi-Fi access points in the form of an XML file. Can sync all backups to Dropbox, Box and Google Drive. Using this application, it is easy to make any user application a system application, add encryption, and link the application to the market after recovery (for further updates). A convenient feature is the creation of an update.zip archive based on a backup of applications and data, which can be flashed from the recovery console to restore applications and settings.
One of the most useful uses of Titanium Backup is to transfer applications and their settings between devices. As an example, I’ll show you how to make the popular WhatsApp messenger work on a tablet without a SIM card. When you search for a program in the market, the description page will indicate that this program is not supported on your device. Even if you download and install the APK, to activate the program you need to call the device, which a tablet without a SIM card (or LTE with a tariff without voice calls or a dialer cut out of the firmware) cannot do.
So, go to Titanium, look for the desired application, click on it and click “Save” in the pop-up menu. If you swipe left in the menu, you can call up additional functions. The same menu can be called up with a long tap on the application in the list. After running the script, a new entry about the creation of a successful backup will appear in the notification panel. For ease of use, I advise you to configure the program to upload backups to the cloud. Synchronization can be configured on the third tab - “Schedules”. Click “Start” on the “Synchronization with Google Drive” item, and a notification in the curtain will indicate successful completion.
On the tablet we launch Titanium and synchronize backups with the cloud. At the same time, the newly made backup from the phone is downloaded. WhatsApp will be at the very end of the list of programs. A crossed out name means that the program is not installed on the tablet. Click on the program and select “Restore” from the pop-up menu. All. You can launch WhatsApp.
Titanium Backup: backup and restore on another device
Other articles in the issue:
Hacker #195. Attacks on Oracle DB
- Contents of the issue
- Subscription to "Hacker"
Helium - App Sync and Backup
The main difference of the program is the ability to work without superuser rights (the application uses the standard backup manager, available in any Android starting from version 4.0. - Ed.). At the same time, some of the functions are reduced and a companion application is required on the computer. The program will allow you to backup your user dictionary, messages and call logs, and Wi-Fi access points. System applications cannot be backed up, even if you are rooted. Also, reservation may be prohibited by the developers of some programs. They will be at the bottom of the list. For example, WhatsApp cannot be backed up.
Helium remembers all the devices on which it was launched and allows you to restore backups separately on different devices. Backups can be stored on a memory card or in the cloud (Google Drive, Box, Dropbox), and can also be made on a schedule. Another feature of the application is that it is easy to transfer data between devices, for example, having started a game on one device, you can continue it on another.
IMEI
There are often cases when, after updating the firmware, cellular communications and the Internet stop working.
This is a sure sign that the IMEI (International Mobile Equipment Identity) has failed. This number is unique for each device and serves to identify the device on the network. If there is a failure, it may be reset to zero, and the device will no longer see the network. To avoid such cases, I advise you to make a backup of the EFS partition containing the IMEI in advance: using programs from the market, manually through the console (adb shell) or on the device through a terminal emulator. It is worth noting that for different devices the partition table may differ radically depending on the chips used. In the case of Nexus 4, you need to enter the following commands in the terminal:
Backup IMEI:
su dd if=/dev/block/mmcblk0p8 of=/sdcard/m9kefs1.img dd if=/dev/block/mmcblk0p9 of=/sdcard/m9kefs2.img
Repair IMEI:
su dd if=/sdcard/m9kefs1.img of=/dev/block/mmcblk0p8 dd if=/sdcard/m9kefs2.img of=/dev/block/mmcblk0p9
The Nexus 5 does not have a dedicated EFS partition. Therefore, you need to backup sections 12 and 13, which contain not only IMEI, but also other data:
su dd if=/dev/block/mmcblk0p12 of=/sdcard/modemst1.img dd if=/dev/block/mmcblk0p13 of=/sdcard/modemst2.img
Restoration is carried out by a similar command.
Photos and videos
After unsuccessful firmware update or, for example, damage or theft of the phone, the most unpleasant sensation is caused by the loss of captured videos and photos. After all, applications can be reinstalled, passwords can be restored if necessary, and photos, if you don’t protect yourself in advance, will be lost forever. And in the market there are programs for every taste for saving your photos and videos. Let's look at a few of them.
Google+
A standard program from the “good corporation”, pre-installed on all stock firmware. I’ve been using it for a long time and on all devices (currently the albums contain more than 10 thousand photos). Automatically syncs all captured photos with closed Picassa albums (soon the same feature will appear in Google Drive). Photos will be available on all devices logged into the same account. If you have Internet access, all photos can be viewed even on a new device by logging into your Google account. A nice bonus is auto-correction of some photos, creation of collages from similar photos and GIF animations from series of photos. “Auto-creatives” also automatically appear - a compilation of many photos and videos taken on the same day to music. When you change the location where you take photos and videos, “Stories” and “Travel” usually appear.
Other options
- MEGA - provides 50 GB of storage by default, has flexible settings, a synchronization client for the computer and an extension for the Chrome browser. Different viewing modes, the ability to open folders for other users.
- Mail.ru cloud - 100 GB for new users. It has a nice interface and a client for the computer.
- Dropbox is interesting because it has a companion application, Carousel, which can not only automatically upload photos, but also clean your smartphone of those that have already been downloaded.
Autoload settings Google+, Mega, Cloud Mail.ru
INFO
It is better to store important backups in the cloud or on your computer so that they can be used even after a complete wipe of the device.
Where is the data copied?
If you decide to make a backup of Android, then you need to decide where exactly to copy all the information. Often, special applications offer the following options:
- A microSD memory card is a very convenient way if you have the appropriate slot, but this is not the best option for ensuring the safety of data if you are afraid of losing your smartphone;
- A computer is a slightly more complicated method, since it requires a connection via a USB cable, but it is the most reliable;
- “Cloud” - contacts and other information are copied to the application developer’s server, or to Dropbox or some other similar service.
Backup of arbitrary files
There are also various programs for backing up files on an SD card. In general, they have similar features and differ in interface or supported cloud services.
Foldersync
Material Design, support for Amazon Cloud Drive, Box, Dropbox, FTP, Google Drive, Mega, OneDrive, SMB/CIFS, WebDav, Yandex Disk. It has a built-in file manager, many settings, filters, and convenient planning. Ability to configure two-way synchronization, transfer hidden files, configure transfer via Wi-Fi / mobile Internet, Tasker support, PIN code protection, ability to synchronize subfolders.
DataSync
Ability to synchronize between devices via Bluetooth, schedule, application data, files and folders. Automatic two-way data synchronization will allow you to save game progress and automatically download it to all connected devices when data changes on one of them.
Dropsync
Advanced synchronization client with Dropbox. Uploading photos and videos, monitoring battery level, Wi-Fi/3G/4G/WiMax connections and adaptation according to user preferences, customizable auto-sync interval, plug-in for Tasker, ability to select synchronization mode: download only, download and delete, only downloading, mirror downloading and more.
Essentially, this is an analogue of the Dropbox desktop client with on-the-fly synchronization (as in the Linux version of the client, file changes are tracked using the inotify mechanism, so everything is synchronized at once, and not at certain time intervals).
Foldersync, DataSync, Dropsync settings
INFO
For Linux/UNIX users, rsync backup for Android is suitable, which will allow you to send and receive files from a remote server via SSH. Has Tasker support.
Full device backup
Nandroid backup (from NAND - the type of memory used in modern smartphones) is a complete backup of the entire firmware along with applications, data and settings. The function is supported by TWRP or CWM. In addition, you can make a backup directly from Android using the Online nandroid backup program. The already discussed Titanium, as well as Nandroid manager, will help you recover individual data. First, let's see how to make a backup from the recovery console.
CWM
To create a backup, select Backup and Restore, and then Backup to /sdcard. Before clicking, you can select the backup format or free up unused data. To restore, select Backup and Restore and then Restore from /sdcard. If you select Advanced restore from /sdcard, you can specify the boot, system, data, cache, sd-ext partitions for recovery separately.
For greater safety, the resulting backup can be transferred to a computer. But there's a catch. The fact is that if the device has an “external” (real) memory card, CWM will place the backup in it and it will be available for saving on the computer using standard means (directory clockworkmod/backup/date-and-time-of-backup on the memory card ). Everything is fine here.
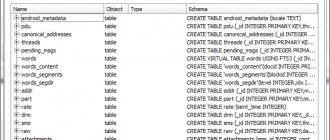
A lyrical digression, or a declaration of love for Nexus devices. If you look at the partition structure of Nexus devices using the adb shell busybox fdisk /dev/block/mmcblk0 command (you need root and installed from the BusyBox market), you can see the following picture (see screenshot "Partition structure on Nexus 5 and Nexus 4").
The aboot partition is the primary bootloader. It can be damaged if, for example, you flash the kernel or bootloader from another device or pull out the cord from the phone during the flashing process. In this case, the partition table crashes and the phone stops loading into the bootloader and recovery, and also stops responding to fastboot and adb commands.
An ordinary user thinks that it is a “brick” and takes the phone to a service center, where he pays more than a hundred dollars for a new one to replace the allegedly burnt board. In fact, in section 15 for Nexus 4 and section 11 for Nexus 5 there is a backup copy of the bootloader - abootb. This is one of the reasons why it is almost impossible to kill the Nexus, because the backup bootloader can be restored without any problems.
Turn off the smartphone and turn it on while simultaneously pressing the keys. Then simultaneously press and hold the button combinations (will only work if the main bootloader is killed). After that, connect the device to the computer (now it will be detected and ADB will work) and copy the backup bootloader to the main partition using the commands
$ adb shell su
The partition table will be restored, and if necessary, you can then flash the desired bootloader.
However, in smartphones without a memory card slot or in the absence of one, the backup will be invisible to the user. This is because Android's internal memory mount points have changed since version 4.2 to support multi-user operation. The virtual (internal) memory card itself is mounted in /data/media, and the CWM backup is also located there. But the main user's data is in /data/media/0, and it is this directory that is then mounted as /sdcard. Therefore, the backup will remain unavailable using standard means and without root rights.
You can get a backup from /data/media using a file manager with superuser rights or by connecting your smartphone to your computer in recovery mode. Next, enter the command adb shell, and then ls /sdcard/clockworkmod/backup/ to search for the directory with the latest backup. We transfer the backup with something like this:
$ adb pull /sdcard/clockworkmod/backup/2015-04-20.15.46.18 \ "D:\Nexus5\Backup\Nandroid\2015-04-20.15.46.18"
where the numbers are the previously found backup, corresponding to the date and time of its appearance, and at the end - the path on the computer to store the backup, which can be arbitrary.
TWRP
To create a backup, click the Backup button and mark the required sections with crosses (not sure - select all). Additionally, you can remove encryption, enable compression, skip creating an MD5 hash, and select saving to a USB - OTG flash drive. As a result, the backup will be in the /sdcard/twrp/backups/backup-date-and-time directory. Unlike CWM, it will be available regardless of the presence of a memory card. To restore, click Restore and select the one you need.
INFO
The market has a large number of programs for separate backup and recovery of SMS, calls, contacts, kernels, recovery, and so on.
Nandroid Manager
It is a one-stop tool to manage all your Nandroid backups. Using Nandroid Manager, you can recover applications and data, SMS, call log, Wi-Fi hotspots, saved paired Bluetooth devices, and user dictionary from Nandroid. The application sees backups created in both custom recoveries, and allows you to rename them and search for information in separate databases within the backup.
Nandroid Manager Features
Online nandroid backup
Allows you to make a backup on a device operating in normal mode, without rebooting into recovery. In the settings you can select the following options:
- Backup name - manually each time / by UTC time zone / by phone time zone / based on the firmware version number, including creation time.
- Backup type - CWM/TWRP with or without compression.
- Mode - normal (full) / selection of partitions for copying. When you select the latter, a list with choices opens.
- Where to save the backup.
- The number of backups for storage is from “all” to 10 (if full, the older ones are deleted).
- Saving Yaffs2 sections as Tar files.
- Excluding Dalvik Cache from backup.
- Excluding Google Music files from backup.
The program supports uploading backup files to the cloud, FTP or Google Drive. A customizable schedule for automatic backups is available, from “every day” to “every 30 days” with the option “only when the device is charging.” Additionally, Tasker actions are supported using the plugin.
Backup Types
Conventionally, backup is divided into two types - full and partial.
Full backup involves saving the entire firmware or individual parts - partitions: bootloader, recovery, etc. Such a backup is suitable for restoration only to the device from which the copy was made. Pouring an image into another device will result in a brick.
With a partial backup, a certain type of data is saved: photos, music, applications, notes, call history, etc. The received information is suitable for copying/moving to another device.
Backup using ADB
The method, so to speak, is for geeks. We connect the smartphone to the computer, enable USB debugging. Next, we use the adb backup command, which has the following keys:
- -f FILE — location and name of the file to be created for the backup on the computer. If this parameter is not present, the backup will be created in the current folder called backup.ab. On Windows, paths with spaces and special characters should be enclosed in quotes.
- -apk | -noapk — whether or not to save the APK application in the backup. The default is do not save.
- -system | -nosystem — whether to save system applications in backup. The default is to save. Selecting -nosystem will prevent system applications from being saved when -all is specified.
- -all — save all installed applications, including system ones, in backup.
- -shared | -noshared — whether to include application data and the contents of the memory card in the backup. The default is do not save.
- — here you can write a list of applications that will be backed up. Ignores -nosystem.
Accordingly, to perform a full backup, use the following command:
$ adb backup -f "D:\Backup\ADB-2015-04-20.ab" -apk -shared -all -system
After this, Now unlock your device and confirm the backup operation will appear in the console, and a notification will appear on the phone asking you to confirm the operation and set an optional password for the backup. The process of creating a backup copy can last more than forty minutes, so there is no need to be nervous. To restore, use the command “adb restore path-to-file”, for the example above it would be:
$ adb restore "D:\Backup\ADB-2015-04-20.ab"
We confirm the request on the phone, enter the password (if you set it during the backup) and wait for the recovery, which may take even longer than creating the backup itself.
INFO
You can find out the IMEI numbers of all your devices linked to Google (including old ones) on the page google.com/settings/dashboard by opening the Android list.